The term Installed Base refers to the information maintained by Juniper as part of its product support offerings about the Juniper products your company has purchased.
The installed base view contains device-specific details (known to Juniper through the sale and maintenance of the device) along with the status information collected from the installed devices.
To access the Installed Base view, you must first link your Juniper account to Mist organization on the Organization > Settings page.
Once you link the account, you can view the Installed Base information on the Organization > Inventory > Installed Base page.
Link Juniper Accounts to Mist Organization
You can view the Installed Base information for only those devices that are associated with the Juniper account linked to your Mist Organization. See also: “View Installed Base” below.
Note: To link your Juniper account to your Mist Organization, you must be able to access the Organization > Settings page. For that, you must be assigned with the Mist Super User role.
To link your Juniper account to an Organization in Mist:
- On the left panel, click Organization > Settings and then locate the Juniper Account Integration tile.
Figure1: The Juniper Account Integration Section on the Settings Page
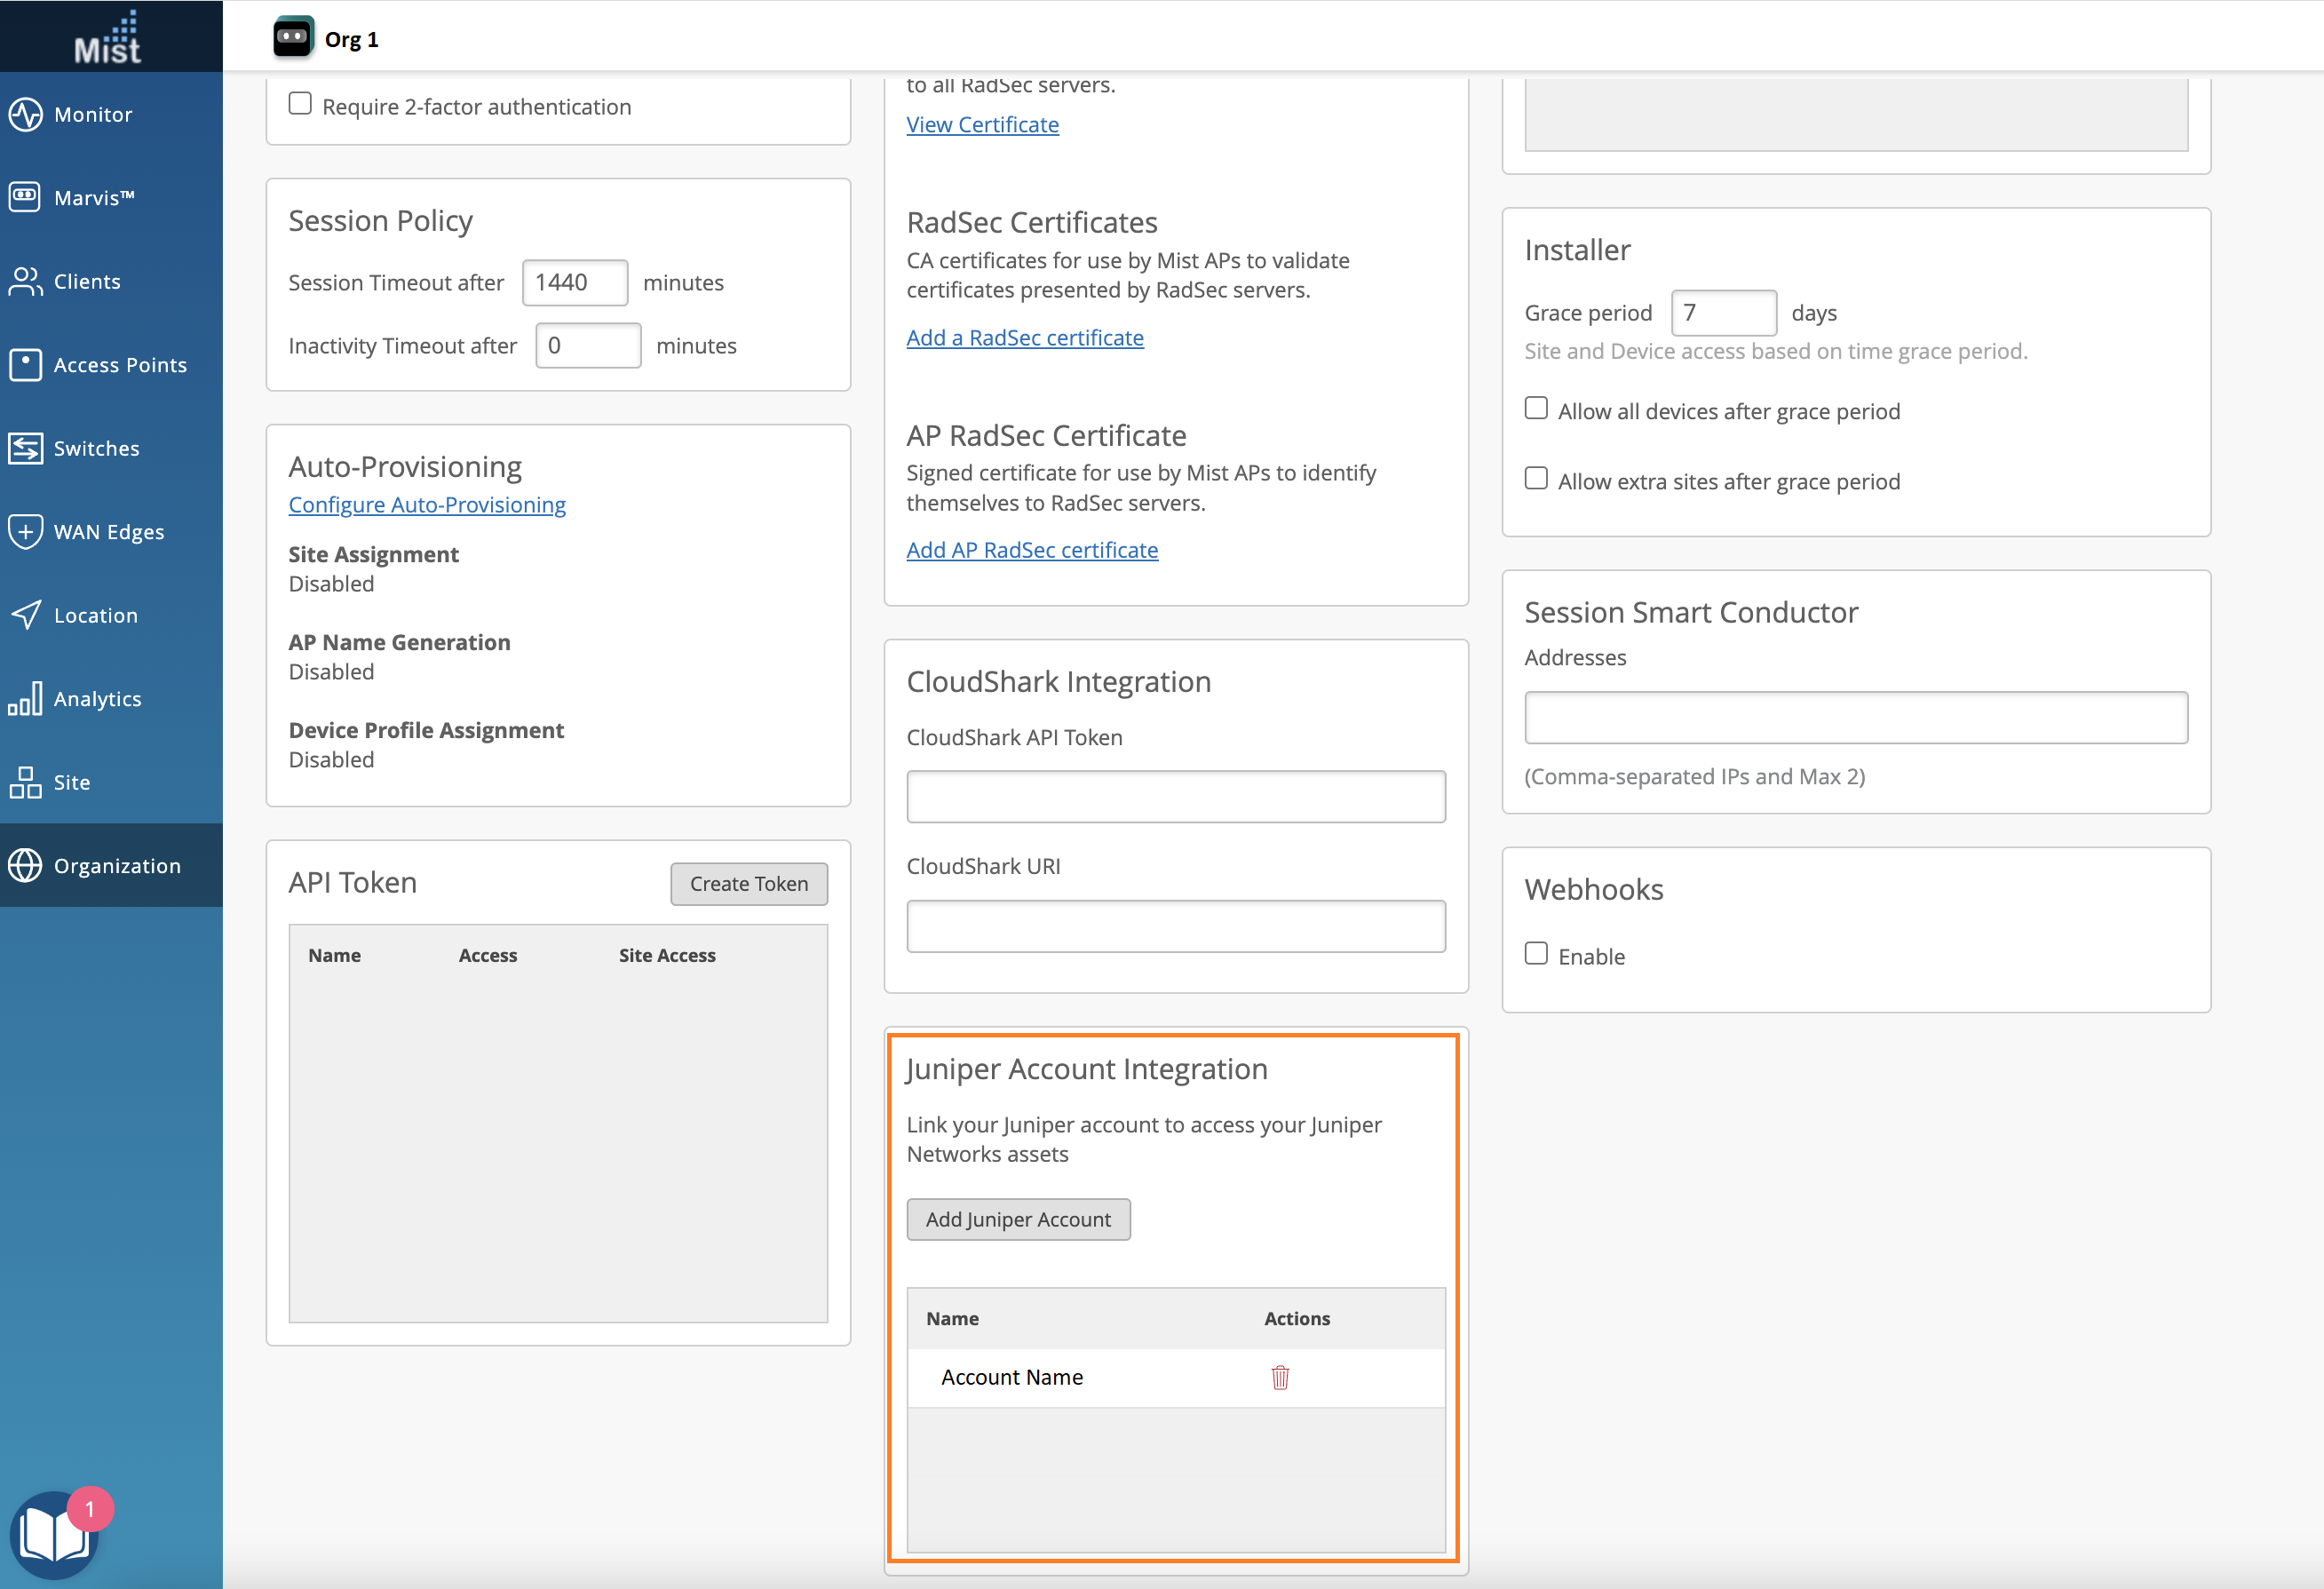
- On the Juniper Account Integration tile, click Add Juniper Account. The Add Juniper Account window is displayed.
Figure2: Add Juniper Account Window
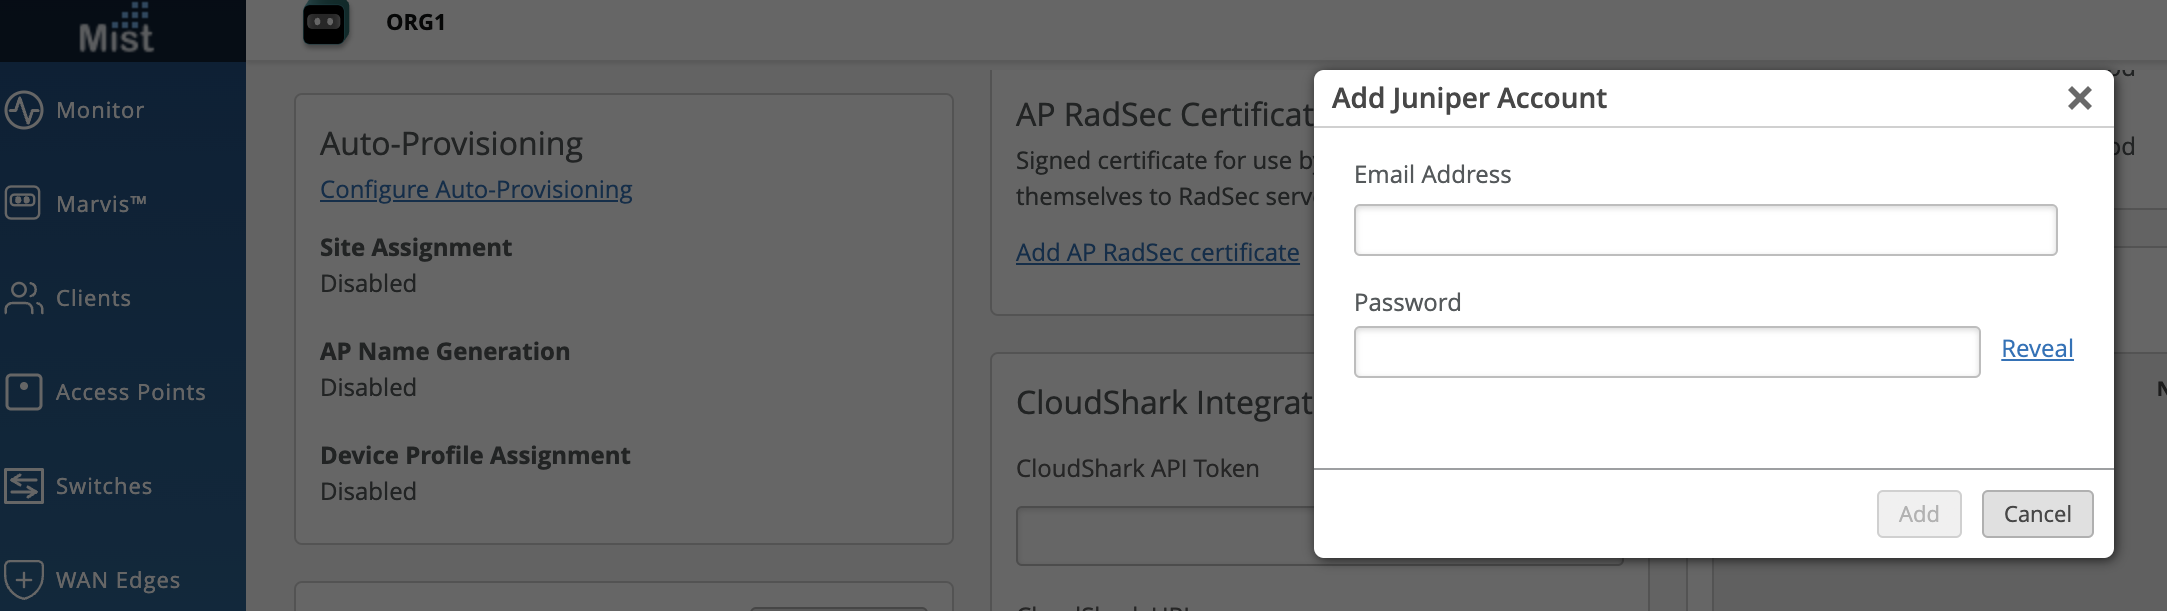
- Enter the access credentials (e-mail address and password) of the Juniper account to be linked, and then click Add. Mist validates the Juniper account, links the user’s primary Juniper account to Mist Organization, and populates the Organization > Inventory > Installed Base page with the devices assigned to the user’s primary Juniper account. The Juniper Account Integration section displays the linked primary account name.
To unlink an already linked account, click the delete icon against the account name.
When you unlink a user account, the associated devices are removed from the Installed Base page.
View Installed Base
To access the Installed Base view of your Juniper devices, you must link your Juniper account to your Mist Organization.
You can use the Installed Base information to onboard the devices to Mist cloud.
The Installed Base view provides device-specific details and status information about the Juniper devices that are:
- Assigned to the Juniper account mapped to your Mist Organization through the Juniper Account Integration tile on the Organization > Settings page.
- Maintained by Juniper Networks through an active support contract.
- Compatible with Mist Assurance.
To view the Installed Base information:
Click Organization > Inventory > Installed Base. The Installed Base tab is displayed.
Figure: The Installed Base Tab
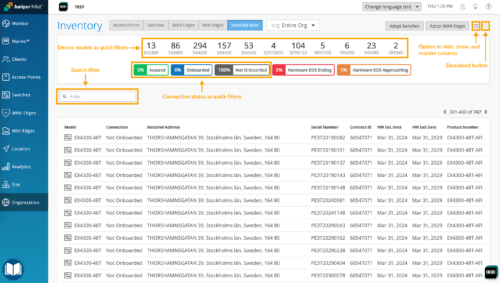
The banner at the top of the Installed Base tab provides the following quick summary information of the installed devices:
- Device model
- Connection status
- Assured—Percentage of devices onboarded to Mist to the Wired or WAN Assurance experience.
- Onboarded—Percentage of devices onboarded to Mist to the Juniper Support Insights experience.
- Not onboarded—Percentage of devices currently not onboarded to Mist.
- Hardware EOS status
- Hardware EOS Ending—Percentage of devices whose hardware EOS dates are in the immediate future (in less than 3 months).
- Hardware EOS Approaching—Percentage of devices that are approaching their hardware EOS dates (in 3 to 6 months).
You can click the device model or connection status information on the banner to quickly filter the device list by the selected criteria.
The Installed Base tab displays information on the following fields:
Note: The Installed Base view doesn’t list all the below fields by default. You can use the hamburger menu on the top right of the page to show, hide, and reorder the fields.
- Connection—The device status:
- Assured—Indicates that the device has been onboarded to Mist to the Wired or WAN Assurance experience.
- Onboarded—Indicates that the device has been onboarded to Mist to the Juniper Support Insights experience.
- Not Onboarded—Indicates that the device is currently not onboarded to Mist.
- Model—The device model. Example: EX2300-24P.
- Installed Address—Device location address, as maintained by Juniper support services.
- Serial Number—The device serial number, which is a unique ID mapped to the device.
- Contract ID—The service contract document number associated with the device.
- HW EoL Date—The date on which the device reaches end of life.
- HW EoS Date—The date on which the device reaches end of support.
- Customer PO—The purchase order number associated with the device. Multiple devices can have the same purchase order number.
- Sales Order—The sales order number associated with the device. Multiple devices can have the same sales order number.
- Product Number—The part number (stock keeping unit) associated with the device.
- Contract Type—The type of active support coverage provided for the device. Example: Maintenance.
- Contract SKU—The stock keeping unit (SKU) assigned to the active support coverage associated with the device.
- Contract Start—The date on which the support contract begins.
- Contract End— The date on which the support contract ends.
- Ship Date— Date on which the device was shipped to your company’s site.
- Reseller—Name of the reseller through which your company acquired the device.
- Distributor—Name of the distributor through which your company acquired the device.
- Warranty Type—The warranty type associated with the device. Example: Standard Hardware Warranty.
- Warranty Start Date—The date on which the device warranty becomes active.
- Warranty End Date—The date on which the device warranty expires.
On this page, you can;
- Filter the device list by using the filter button on the quick summary on the page banner. You can click each device model (for example, EX4300, SRX300) to quickly filter the device list by that model, or the device status (for example, Assured) to filter the device by its connection status.
- To clear an active filter, click it again.
- Filter the device list by using the filter box provided on the upper left. Use the column names as search filters.
- Hide, show, and reorder the columns by using the hamburger menu on the top right of the page to open the Table Settings You cannot hide or reorder the Model and Connection fields.
- Download the Installed Base data in CSV format by clicking the download link on the top right of the page. The downloaded file has an additional column named Type to indicate whether the device is a switch or WAN edge.
- Access Juniper Support Portal (JSP) from the help (?) menu.
Note: If you open the downloaded CSV file with Excel on a Mac computer, any non-English characters in the file might appear as special characters. To avoid this issue, follow the steps below:
- Open a new Excel file and then select File > Import > CSV file > Import.
- Select the file to be opened and then click Get Data. The Text Import Wizard window appears.
- Select Unicode (UTF-8) as File Origin.
- Click Finish.
View Your Device Details
You can use the device Details page to access additional support information about your Juniper devices listed in the Installed Base tab.
To view the device details page, select a device from the Installed Base tab. The Overview tab in the device details page is displayed.
Figure: The device Details page (Overview tab)
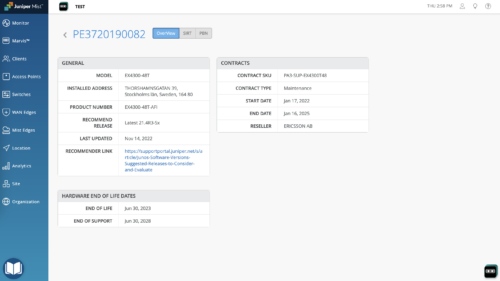
Overview Tab
The overview tab displays device information on the following fields:
- General
- Model—The device model. Example: EX2300-24P.
- Installed Address—Device location address, as maintained by Juniper support services.
- Product Number—The part number (stock keeping unit) associated with the device.
- Recommended Release—The recommended Junos OS software version for the device.
- Last updated—The date on which the recommended Junos OS software was last updated.
- Recommender Link—Link to a Juniper Support Portal (JSP) Knowledge Base (KB) article with a list of recommended Junos OS version for each Juniper platform.
- Contracts
- Contract SKU—The stock keeping unit (SKU) assigned to the active support coverage associated with the device.
- Contract Type—The type of active support coverage provided for the device. Example: Maintenance.
- Start Date—The date on which the support contract begins.
- Reseller— Name of the reseller through which your company acquired the device.
- Hardware End of Life Dates
- End of Life—The date on which the device reaches EOL.
- End of Support—The date on which the device reaches EOS.
SIRT Tab
To view the security incident response team (SIRT) tab, select the SIRT tab in the device details page. The SIRT tab is displayed.
Figure: The device Details page (SIRT tab)
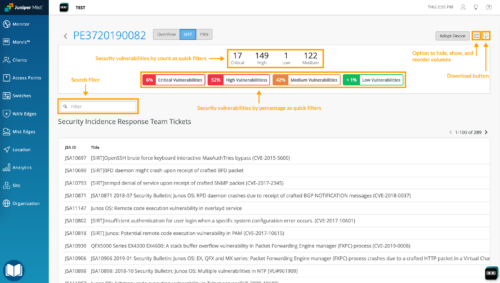
The SIRT tab displays information on the following fields:
- JSA ID—The Unique value that identifies the security advisory on Juniper Networks Support Portal.
- Title—A synopsis of the security advisory.
- Severity—Severity rating of the security advisory. The values are critical, high, medium, and low.
- Affected Models—The device models affected by the security advisory.
- OS Versions Affected—The Junos or Junos Evo software versions affected by the security advisory.
- Release Date—The date on which the security advisory was first published.
- JSA Updated Date—The date on which the security advisory was last updated.
- Problem—A description of the security advisory.
- Solution—The solution for the security vulnerability described in the advisory.
- Workaround—Detailed instructions on how to temporarily circumvent the problem.
- Affected Series—Identifies one or more product series affected by the security advisory.
- Release Notes—Short description of the security advisory.
On the SIRT tab, you can:
- Filter the tickets by security vulnerability using the filter button on the quick summary (For example, High Vulnerabilities) on the page banner.
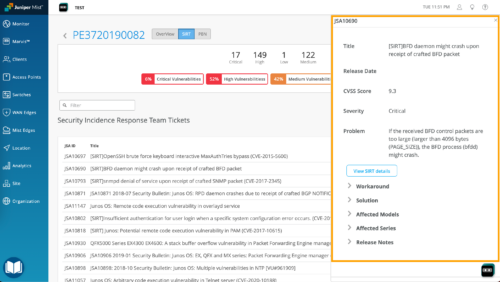
- Open a Quick View panel to view more information about the SIRT ticket. Click on any of the SIRT tickets to view the Quick View panel for the SIRT ticket.
Figure: SIRT Quick View Panel
PBN Tab
To view the proactive bug notification (PBN) tab, select the PBN tab in the device details page. The PBN tab is displayed.
Figure: The device Details page (PBN tab)
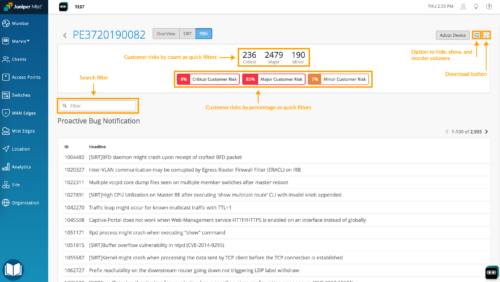
The PBN tab displays information on the following fields:
- ID—The unique value that identifies the bug.
- Headline—The synopsis of the problem.
- Bug Type—Indicates the phase or activity during which the problem was discovered. For example, Day-1.
- Trigger—Describes the events that happened before or at the time the problem occurred, or the event that caused the problem.
- Introduced In—The Junos or Junos Evo software release where the problem was first found and reported.
- Fixed In—The Junos or Junos Evo software release in which the problem was resolved.
- Release Notes—A short description of the problem.
- Restoration—Indicates how the service can be restored when the problem occurs. Values include:
- Self-recovery—Service, traffic, or operation disruptions are automatically restored without any user intervention.
- Not-possible—It is not possible to restore the service or traffic.
- Manual—User intervention is required to restore the service, traffic, or operation disruption.
- Restoration Steps—Steps to restore the service when the problem occurs.
- Workaround—Detailed explanation of how to temporarily circumvent the problem until a permanent resolution is available.
- Workaround Provided—Indicates whether a workaround for the problem is provided or not. Values include:
- Yes—Workaround is available and is described in the Workaround field.
- Not-possible—There are no workarounds to the problem.
- Product Family—Identifies one or more products affected by the problem.
On the PBN tab, you can:
- Filter the tickets by risk level using the filter button on the quick summary (For example, Major Customer Risk) on the page banner.
- Open a Quick View panel to view more information about the PBN ticket. Click on any of the PBN tickets to view the Quick View panel for the PBN ticket.
Figure: PBN Quick View Panel
Adopt a Device
Before adopting a device, ensure that the device meets the prerequisites. For more information, see Troubleshooting Switches and Troubleshooting Gateways (SRX).
To adopt a device to the Juniper Mist cloud, use the Adopt Switches and WAN Edges buttons on the upper right of the page. For more information, see Adopting a Juniper EX Switch – Video, Adding an EX Series Switch to the Juniper Mist Cloud, and SRX Adoption.
When you successfully adopt a device, it becomes cloud-connected. The cloud-connected devices are listed on the Switches or WAN Edges tab (depending on the device type) with the status Connected, in addition to being listed on the Installed Base tab.