Introduction
Welcome to the Mist vBLE Deployment Guide. In this guide we learn about how Mist location works, go over basic understandings of the Mist vBLE array, best practices for deploying location, use cases, asset visibility and the four steps for location. This guide will also reference certain sections back to the Mist support pages for easy access to additional information related to the section.
Mist is the first company to introduce an enterprise-grade platform forindoor BLE location services with groundbreaking features including a dynamic BLE 16 antenna array integrated into Mist’s Access Points, machine learning in the Mist cloud eliminating the need for expensive site surveys, and patented virtual beacon (vBLE) technology. The Mist architecture is also unique in its ability to both send and receive BLE signals, which makes it ideal for the following BLE services (offered by Mist):
- Contextual engagement services, such as wayfinding, alerts, and proximity
messaging via BLE - Operational efficiency applications, like asset & people visibility leveraging
3rd party BLE (Bluetooth Low Energy).
How the Mist Location Works for Engagement
Mist works off this idea of “Probability Surfaces” instead of triangulation. Where the more beams your client hears from the Mist APs the more RSSI (Received Signal Strength Indicator) data there is for location engine to work with in creating a sum of probability surfaces, which provides the best possible location accuracy in real time with sub second latency.
Essentially your mobile device, with the Mist SDK, listens to the BLE coming from the beams from the Mist AP, once the Mist SDK receives the beams the SDK will then send the mobile information to the cloud where location engine will calculate and respond back with an x,y coordinate to your mobile device.
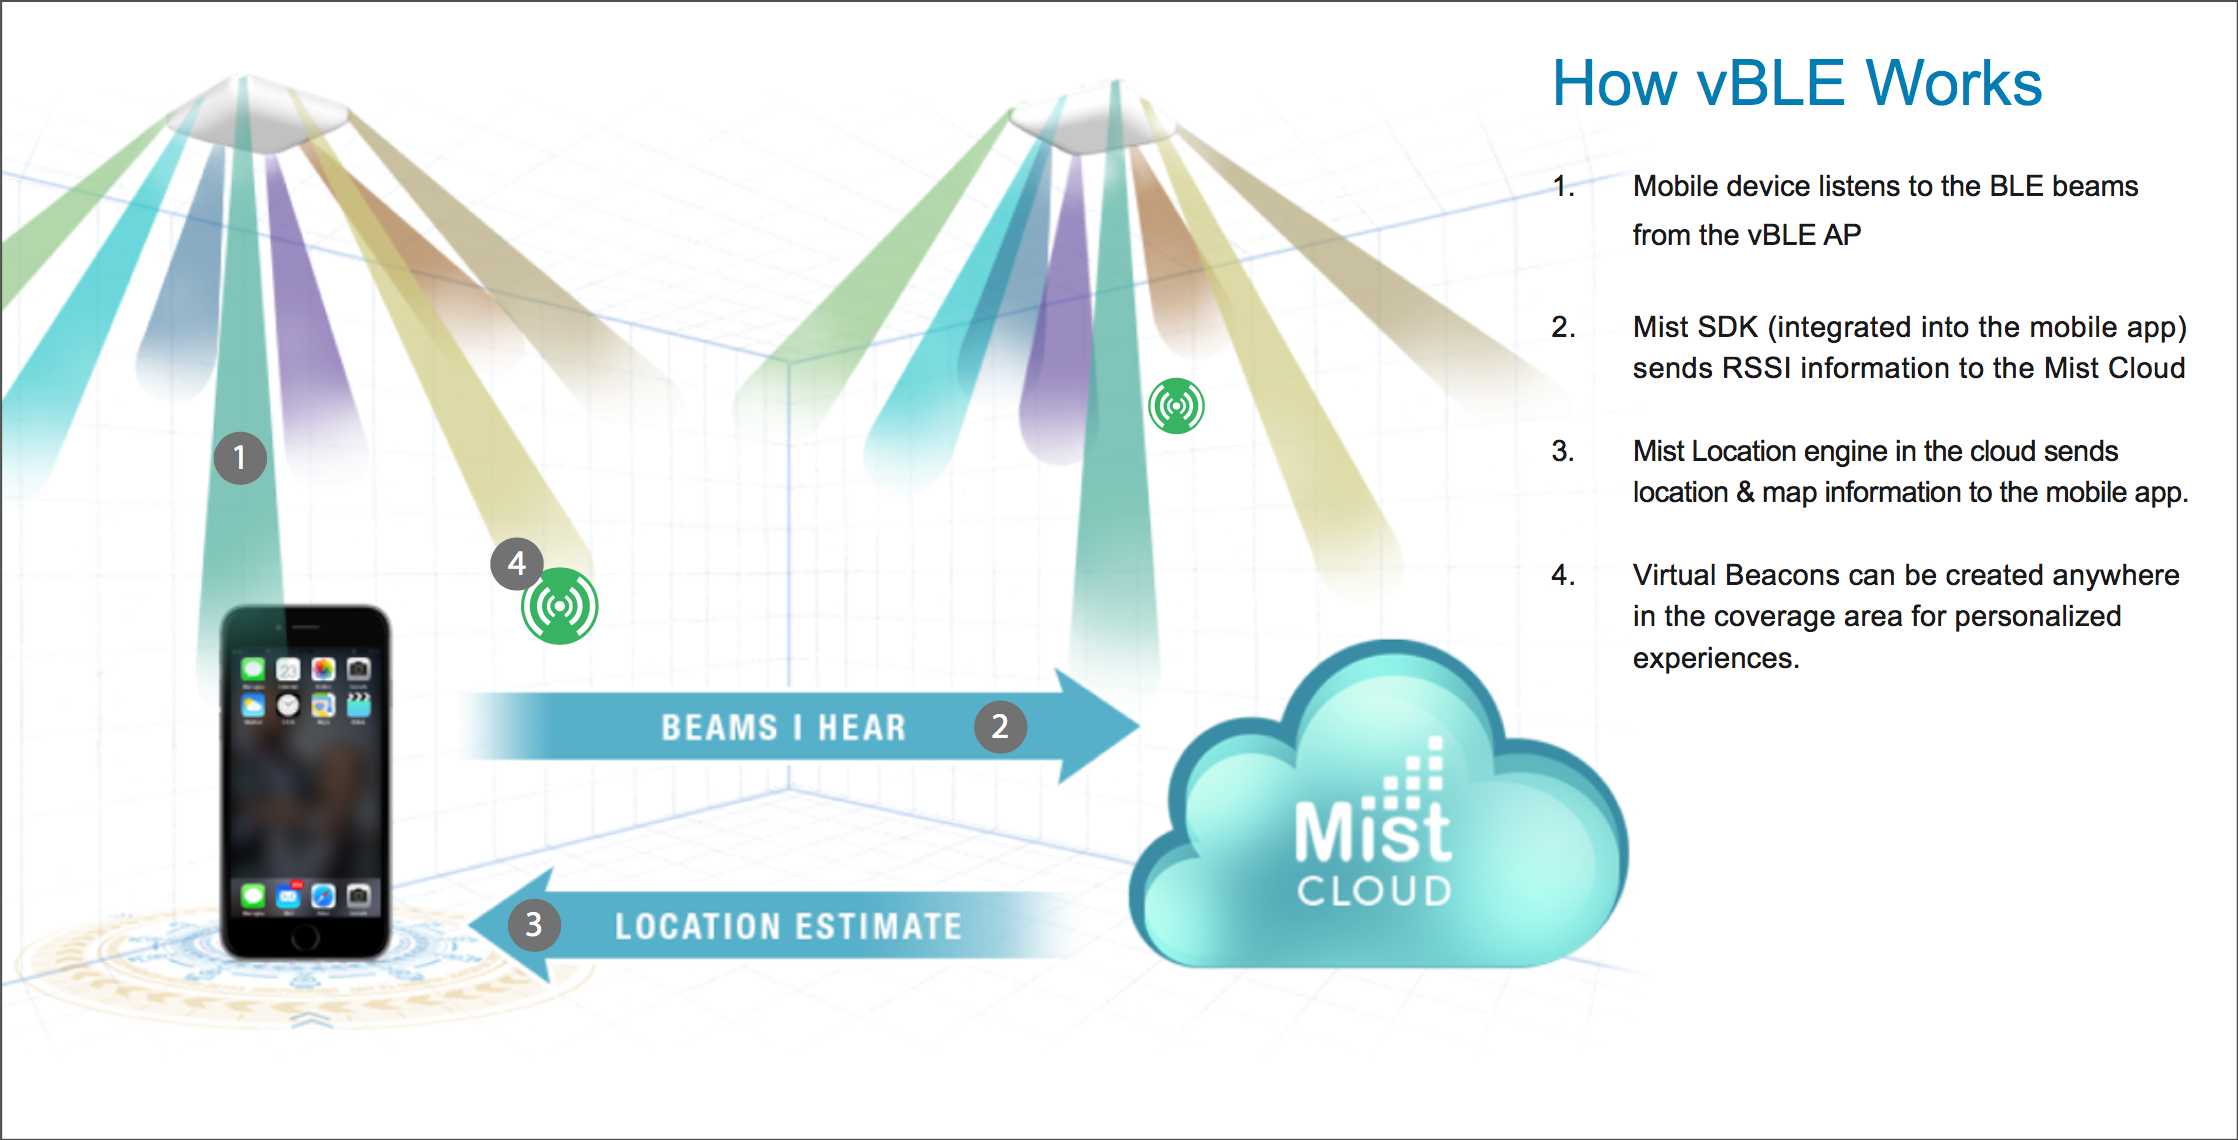
So the more beams your client sees from neighboring APs the more accurate your location will be as these probability surfaces builds up. This leads into the machine learning aspect where machine learning is taking in this RSSI data and changing the Path Loss Formula (PLF) constantly, eliminating the need for site surveys.
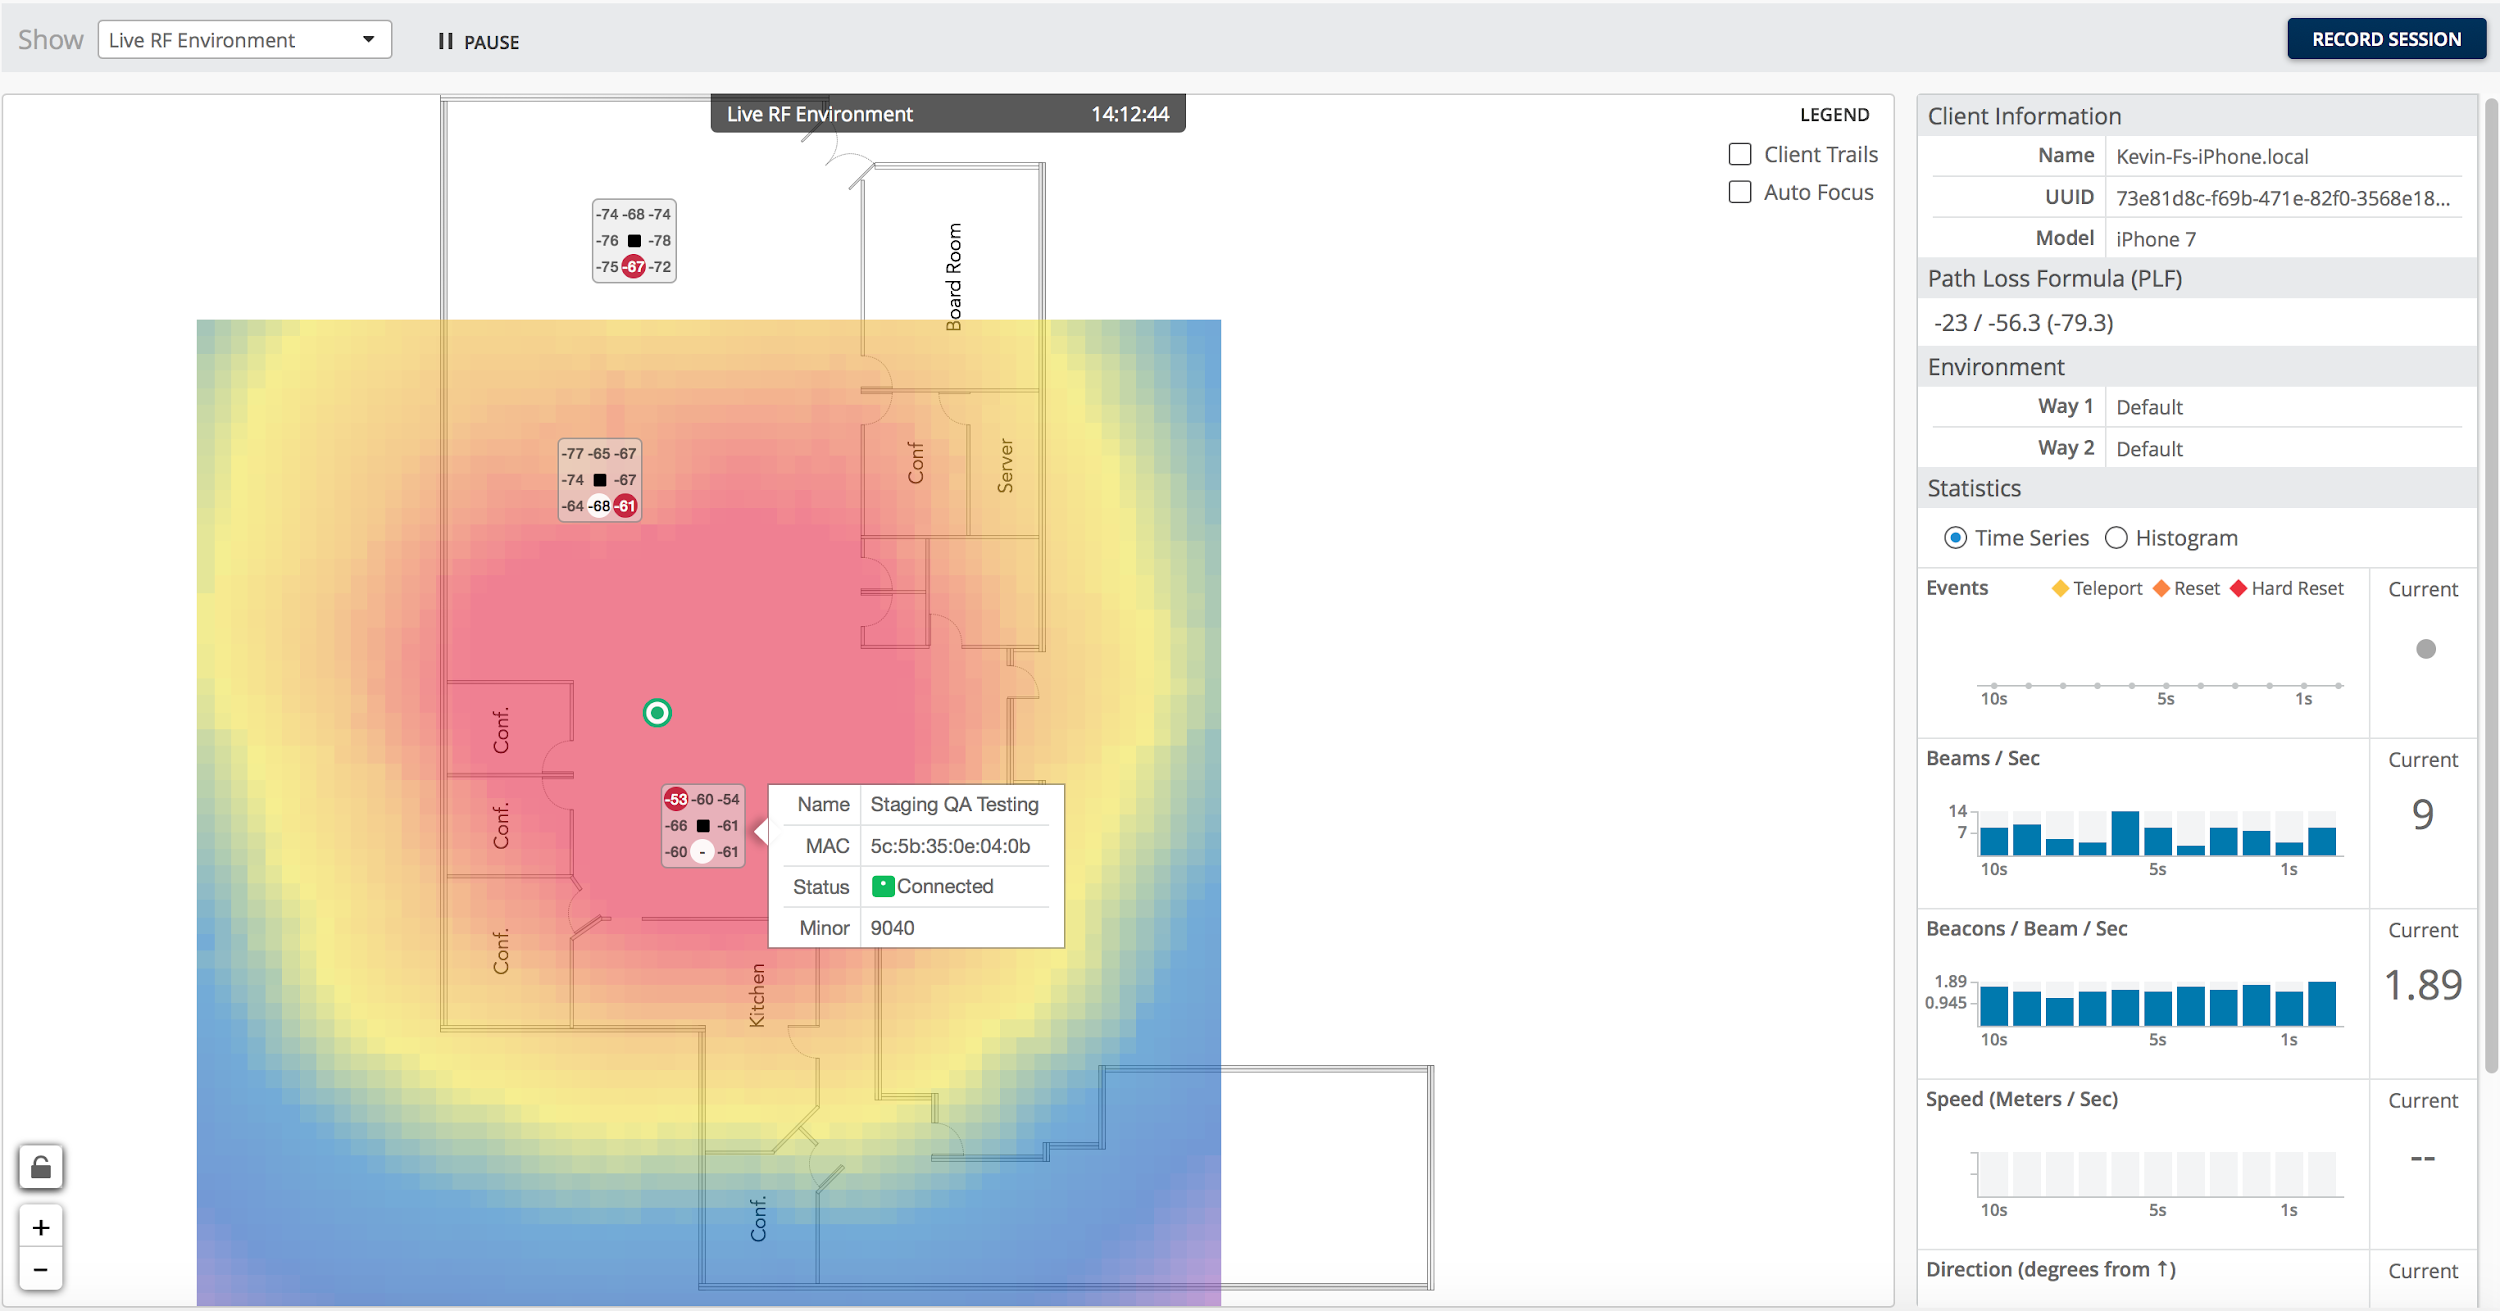
Below is an example of the probability surface where the center of the red blob is the peak of the surface and the highest probability of where you are and the blue is the least probability where you can be.
Link to mist video https://www.mist.com/documentation/location-how-it-works/
When deploying for location you would want to follow the Best Practices and AP Design section and make sure that your deployed APs are deployed in a way that encompasses the user in the areas of interest for location. This is known as the Rubber Band Model, where the idea is you want to be inside the “Perimeter” of your deployed APs for the best location accuracy possible.
 |
 |
 |
You want your Client (SDK/Asset) to be enclosed inside the Rubber Band Model of the deployed APs for the best location accuracy possible. Going outside the Band will decrease in accuracy the further you go away.Note: Assets are the opposite when comparing to an SDK client. Instead of the SDK client listing and receiving RSSI information from the beams of the Mist vBLE array assets instead beacon out and the APs receive RSSI information from the when the assets beacon based on how many beams were heard from the asset at the time. Please see “Asset Visibility” section for more in depth details.Location Use CasesThere are primarily three uses cases when it comes to deploying for location, which are Way-finding, Proximity Messaging with Virtual beacons and Asset Visibility.Wayfinding is the most common use case revolves around having a location estimate stick to a way-finding path as the user walks towards a destination. This is very similar to google maps but for indoor solutions. Blue Dot & virtual beacons for proximity messaging is all about an accurate location estimate in an open xy space. The blue dot is your SDK client where the location engine is essentially voting on your location from neighboring Mist APs and building up a probability surface of where you are at a given location. This in turn gives the user free motion to move around and can be able to trigger a push notification when approaching a virtual beacon.
 Asset Visibility is a location feature where the Mist AP can operate in either a concurrent transmit / receive mode or a dedicated receive only mode, listening to any device transmitting within the vicinity of the deployed Mist APs such as smart watches, fitbits, headsets as well as off the shelf 3rd party BLE asset tags. The basic principle applies for “assets” as they do for SDK clients, where the more RSSI information is sent to location engine in the Mist cloud the more accurate the location estimate.
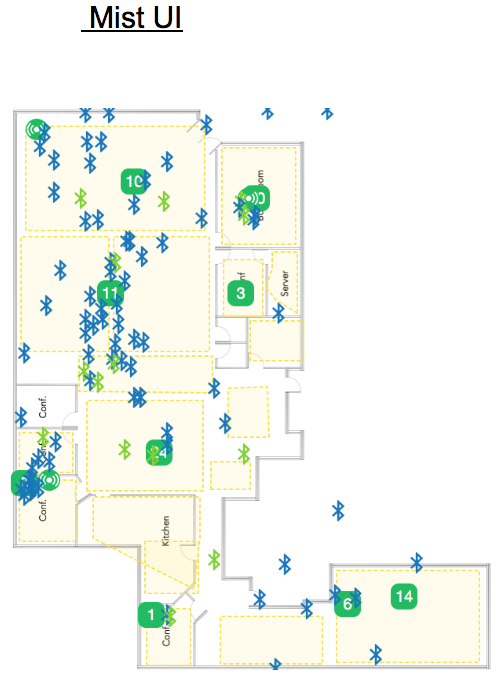 Best Practices
- Mounting the AP
- The Mist APs must be mounted on the ceiling with the LED facing toward the ground. Link to Hardware Installation Guide for all AP Models
- https://www.mist.com/hardware-installation-guides/
- AP Height
- Placing APs between 9 to 15 feet (2.75 to 4.5 meters) high.
- AP Distance from other APs
- Deploy APs between 33 to 50 feet (10 to 15 meters) from neighboring APs for optimal coverage in a spread out offset fashion.
- APs down in hallways can be spaced out every 20 meters.
- Keeping each AP within line-of-site of the other neighboring APs is highly recommended.
- Keep in mind, all you are doing is blanketing an area with BLE energy. Don’t spread the APs too far apart, as the location error on the edges of the coverage range degrades quickly.
- If APs are too far from each other, then we call the non-coverage area in between the APs “no man’s land” — meaning there is no optimal coverage. Location accuracy will suffer if a device is in “no man’s land.”
- Line of Sight
- Line of sight from your device to at least 2 APs is highly recommended.
- It is best to place the AP at junction points whenever possible. This will help maximize both coverage and line of sight for corners.
- AP Coverage Range
- The APs have an optimal BLE coverage range of around 2,500 square feet (15 meters).
- Keep in mind that the further away you are from an AP, the lower the RSSIs are from the device the less accurate your location will be. This is why having APs within line of sight of neighboring APs — and spreading them out to create an overlap of BLE coverage — helps improve accuracy; when a client moves further away from one AP, in turn, it moves closer to another.
- APs must be on floor plan:
- An AP must be placed on the map for location to happen. APs that are powered up but not placed on a map will be ignored for location.
- APs in rooms
- For any location accuracy to be guaranteed in room an AP must be placed in the middle of the room.
vBLE Details
- Mist vBLE Array
- The Mist AP has a vBLE array, which consists of a 16 Directional Antennae Bluetooth Array. Eight unique antennas are reflectors to help with directing the BLE energy outward away from the AP, and the other eight unique antennas are directional antennas that point in eight different directions, transmitting BLE energy in a flashlight-like fashion.
- To better visualize this, imagine a flashlight shining narrow beams in eight different directions.
- AP Directional Beam Angle
- The best directionality comes from about a 45 degree angle, with the AP’s LED facing down towards the ground. Anything below 45 degrees acts more like a null radius, since you are directly under the AP at 0 degrees.
- This is why the higher an AP is placed, the null radius under the AP increases and the RSSI from the client decreases.
- AP Beams
- Each AP is transmitting on eight unique directional beams.
- The Mist SDK on the device hears these beacons from the beams, and sends the RSSI and device sensor information back to the Mist cloud. Through either wifi or cellular.
- The more beams your device or asset tag hears the more accurate your location will be, as there is more data for the location engine to make a better location estimate.
Enabling Engagement How to enable engagement for location services for SDK clients and turning the vBLE arrays for all Mist APs on a site level.Please Note: This feature is only available if you purchased the location license. If you didn’t purchase the license then Engagement will be disabled until a license is purchased.
- Go to Organization
- Select Site Configuration
- Select the site of interest
- Select Engagement under Bluetooth based Location Services
- Save
This will enable the vBLE array on ALL Mist APs for the selected site Asset VisibilityHere we will go through how to set up for “Asset Visibility” and understand some basic principles of “BLE clients” aka asset tags / beacons as well as tag vendors and configurations.Figure 1 shows the difference between and SDK and BLE client in how RSSI information is collected, same idea as SDK clients, the more beams heard the more RSSI information is used to give the best location accuracy.Please Note: This feature is only available if you purchased the asset license. If you didn’t purchase the license then Asset Visibility will be disabled until a license for assets is purchased.
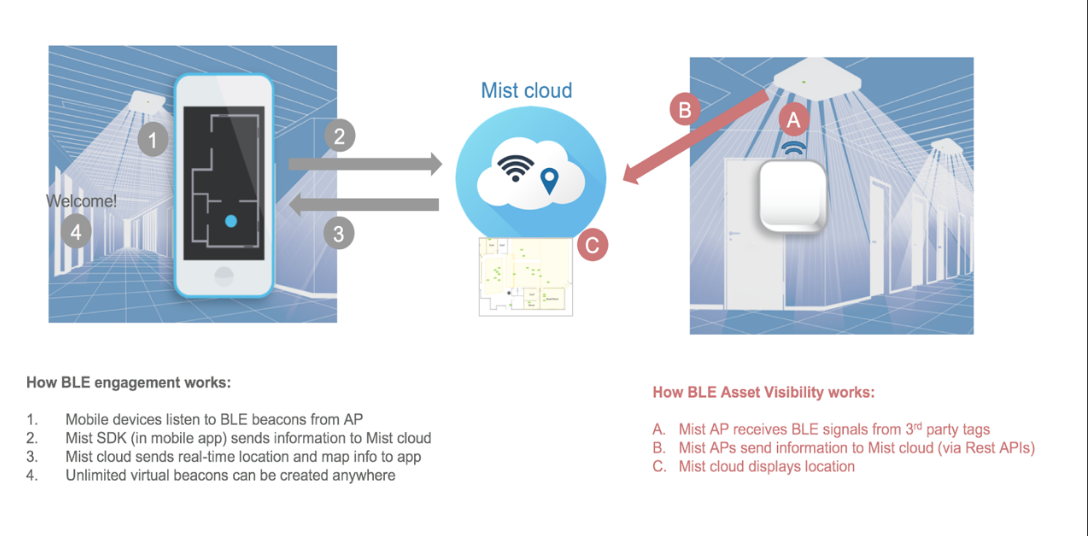 Enabling Asset Visibility
- Go to Organization
- Select Site Configuration
- Select the site of interest
- Select Asset Visibility under Bluetooth based Location Services
- Save
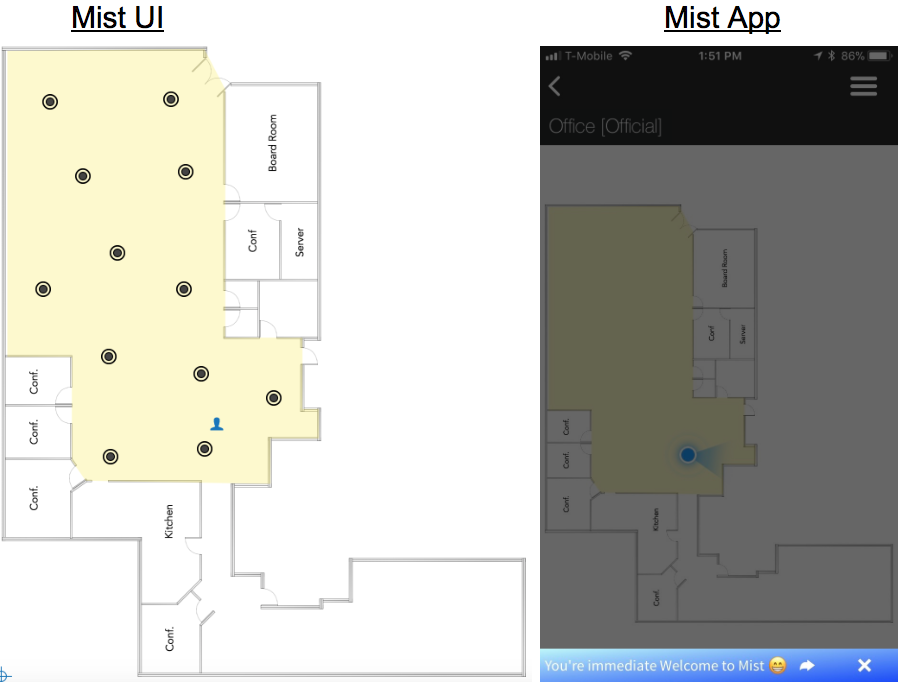
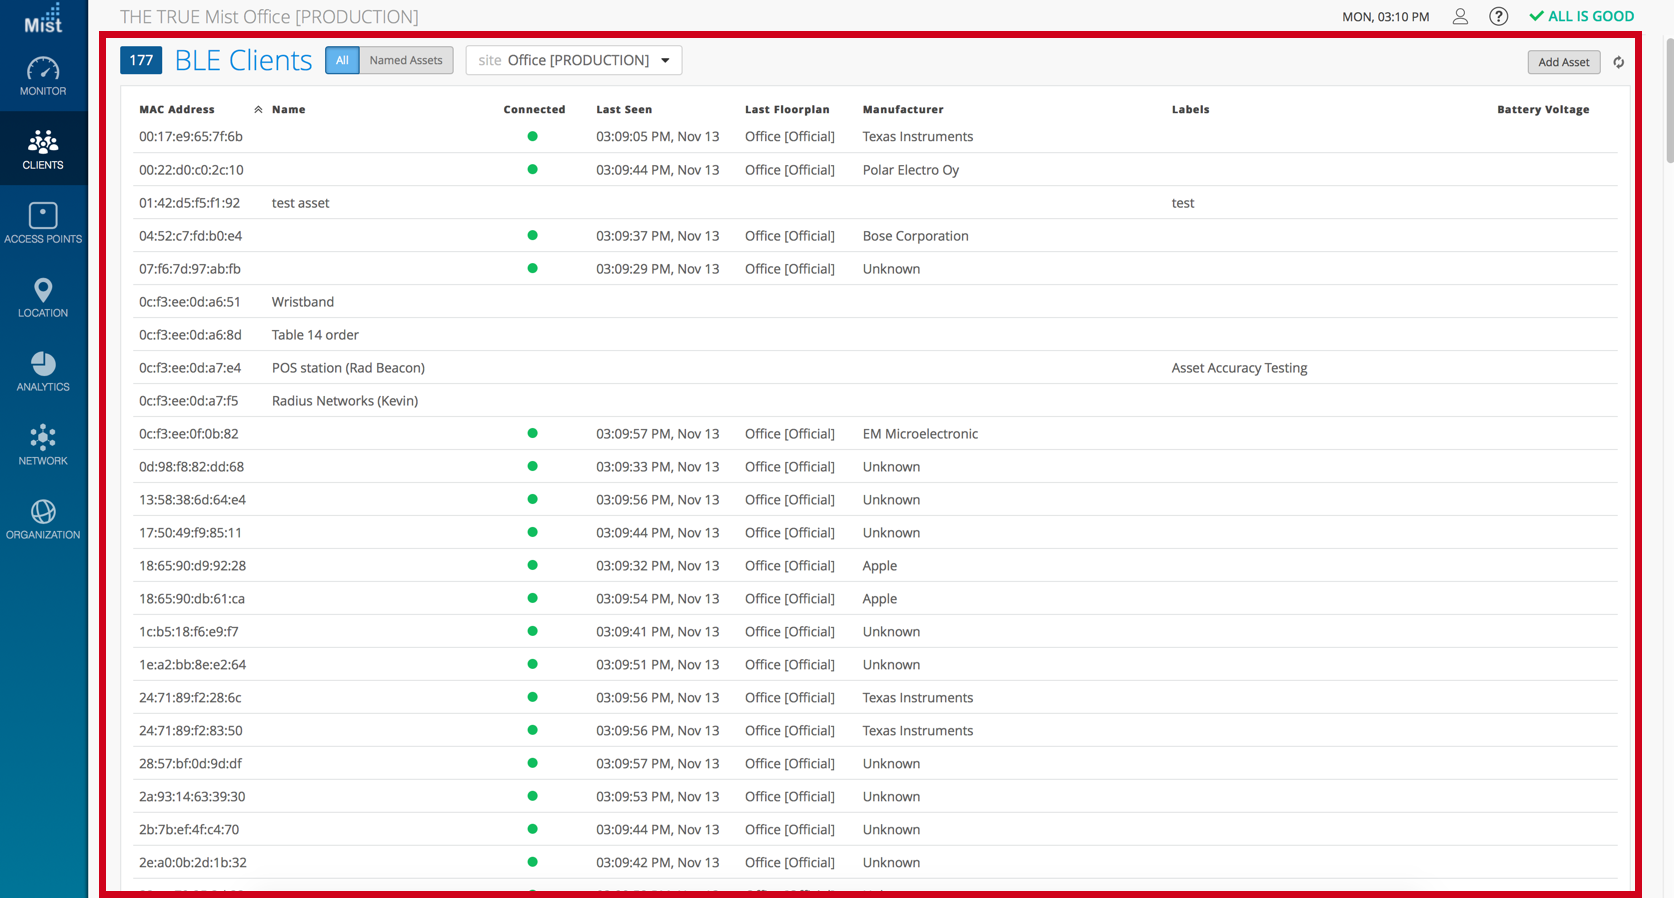
This will enable the BLE receive functionality array on ALL Mist APs for the selected site.Once saved you will be able to see “Newly Discovered Assets” in BLUE and “Name Assets” in GREEN on the “location live view” of your selected floor plan. You can also view all the BLE devices the APs are picking up around them by:
- Select Clients tab
- Select BLE Clients
 Tag Vendors / Configuration:
- Tag Vendors:
- Any tag vendor will work with Mist as long as the APs are able to detect the tags. Tag vendors we’ve worked with the most:
- Blue vision, kontakt.io and Radius Networks.
- Tag / Beacon Configuration:
- For configuration for both tags and beacons we recommend setting tags to anywhere between 100ms – 1000ms interval rates and 0 dBm for power.
- Any tag vendor will work with Mist as long as the APs are able to detect the tags. Tag vendors we’ve worked with the most:
Notes:
- APs transmitting / Receiving: Please be aware that when both “Engagement” (aka APs transmitting) and “Asset Visibility” (aka APs receiving) in the “Bluetooth based Location Services” under “Site Configuration” are enabled the AP is in a coextensive state of transmitting / receiving, meaning you are able to do both “SDK clients” and “Assets” simultaneously.
- For more optimal performances for “Assets” disable “Engagement”. This will put the AP into a pure receive mode, which means the APs have more time to scan the room.
- Bluetooth on Phones/Devices acting as a beacon: Please note that when a phone’s Bluetooth is enabled that does “NOT” mean the phone is advertising itself as a beacon. Phones do not typically transmit at the same rate as a beacon does, and only really receive unless explicitly told to do so. Hence the need many, if not all, of the times to have a 3rd party application on the phone to be able to perform that intended function of turning a phone into a beacon.
- Link to Bluetooth LE Resource Center https://www.mist.com/bluetooth-le-resources/
- Granular accuracy: If you need more granular accraucy for assets (1 – 3 meters) follow the instructions for Best Practices with the exception of the AP deployment being more densely deployed::
- AP Height
- Placing APs between 8 to 10 feet (2.5 to 3 meters) high.
- Line of Sight
- Tag must have line of sight to at least 4 APs.
- AP Distance from other APs
- Deploy APs between 25 to 32 feet (8 to 10 meters) from neighboring APs for optimal coverage in a spread out offset fashion.
- Rubber Band Model: Make sure to follow the rubber band mode in that your tags are within you AP deployment.
- AP Height
Deployment Validation (The Four Steps)For any location deployment, these four steps shown below should be verified before proceeding with using location. After correctly performing these four steps, the system is then ready for machine learning to find an PLF (path loss model) for the area that the Mist AP is deployed and different client device models. The four steps are as follows:Scale Floor Plan
- To scale the floorplan,
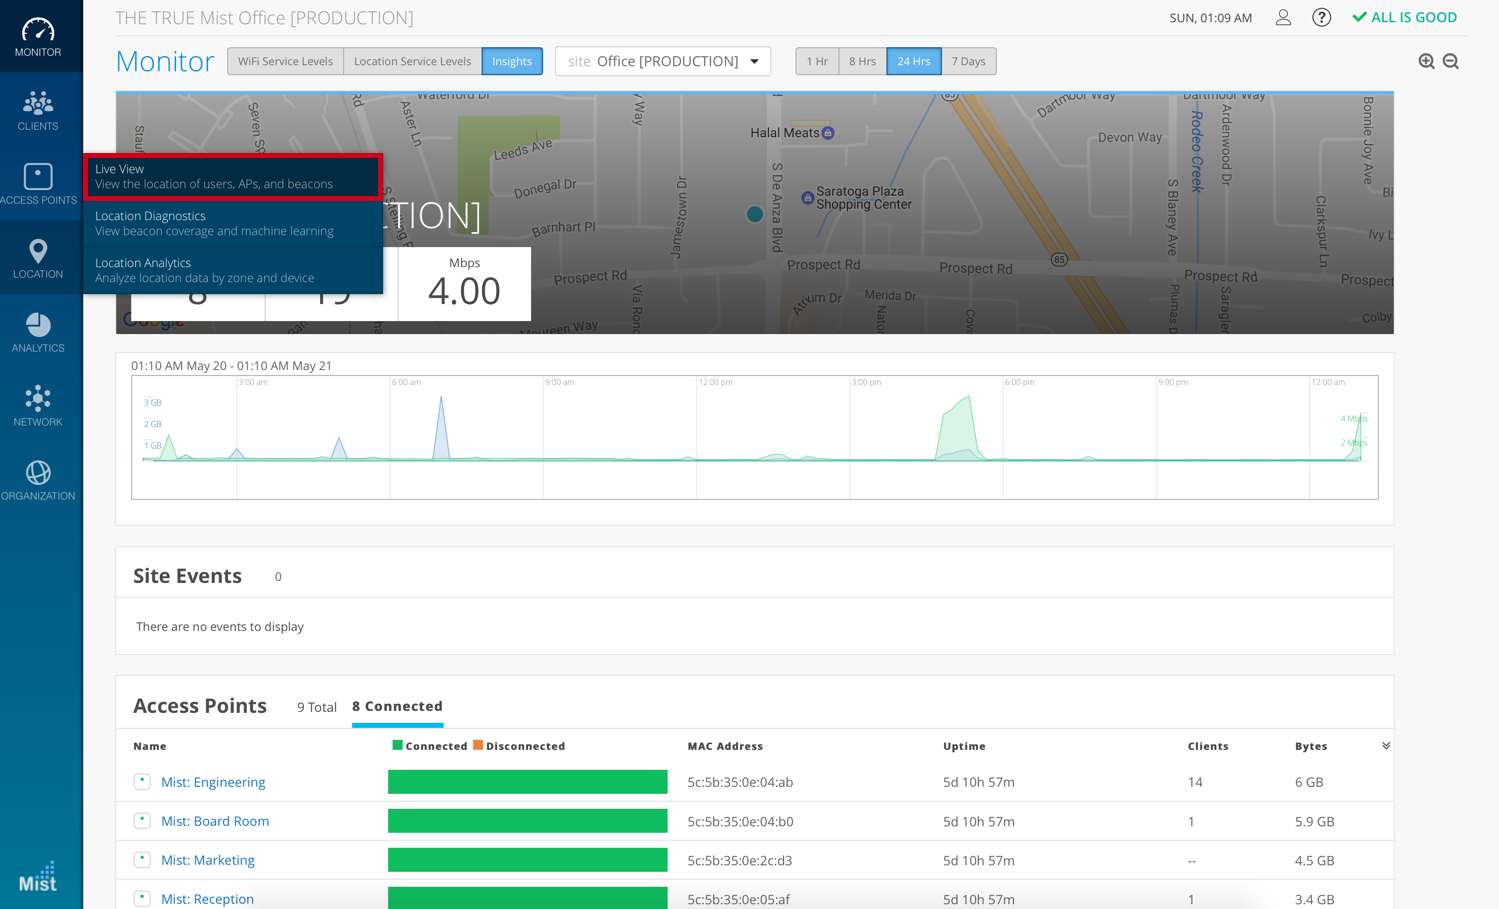
- Select “Live View” from the “Location” side navigation menu
-
- Select the site and floor plan you want to scale

- Click on “Setup floor plan”
 Select the “Set Scale” option
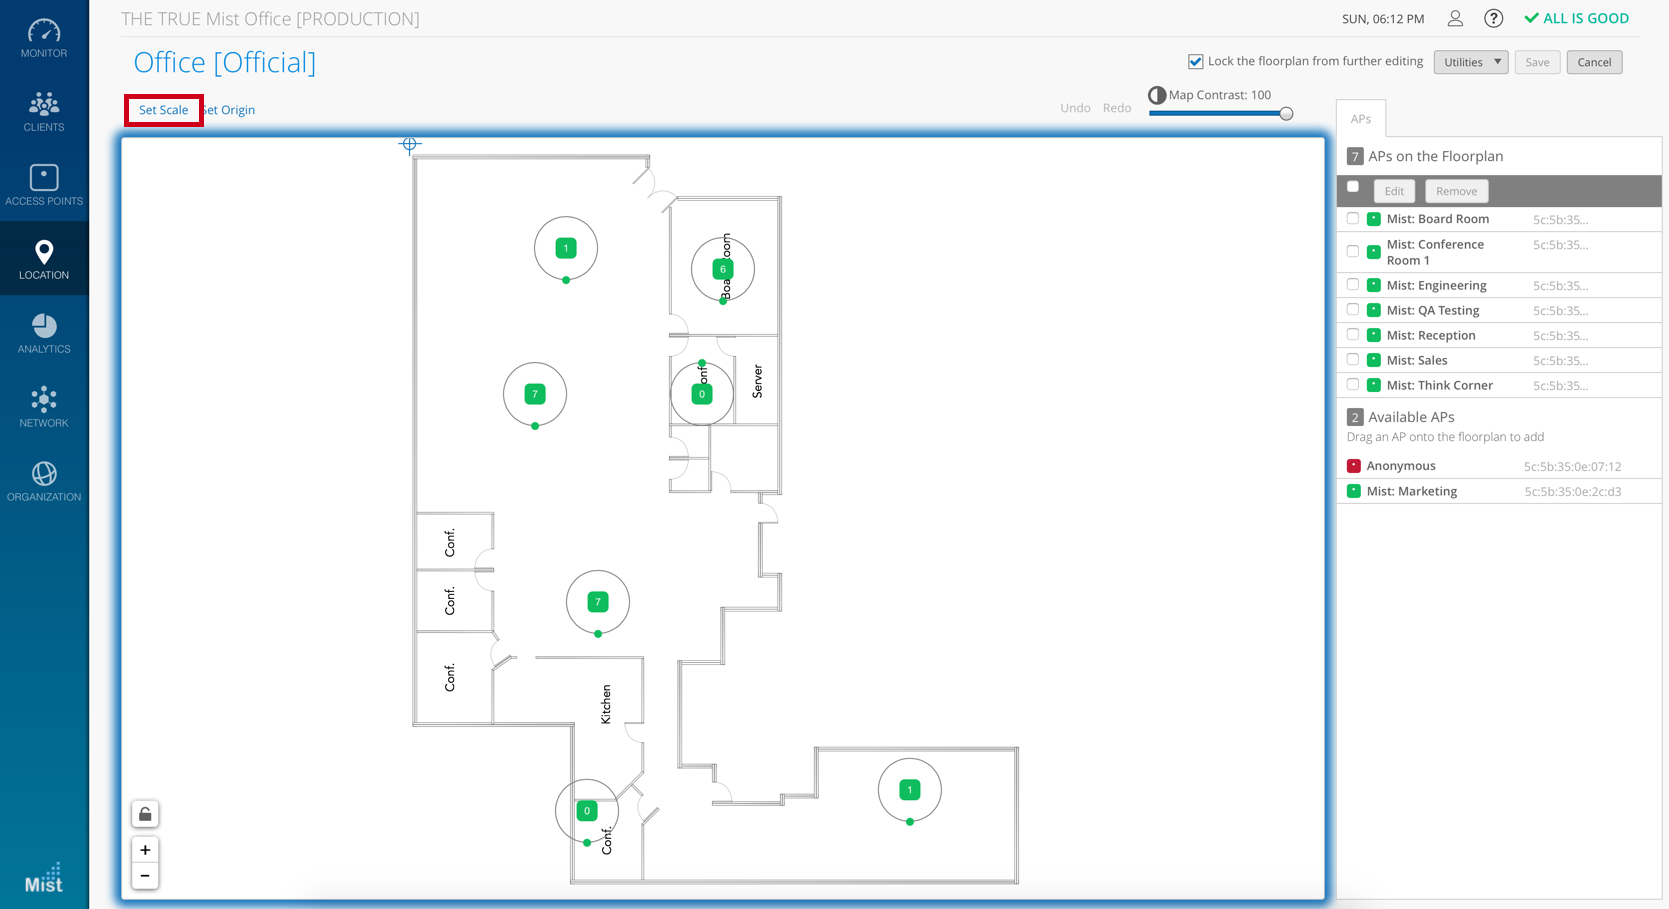 Scale the floor plan and push done
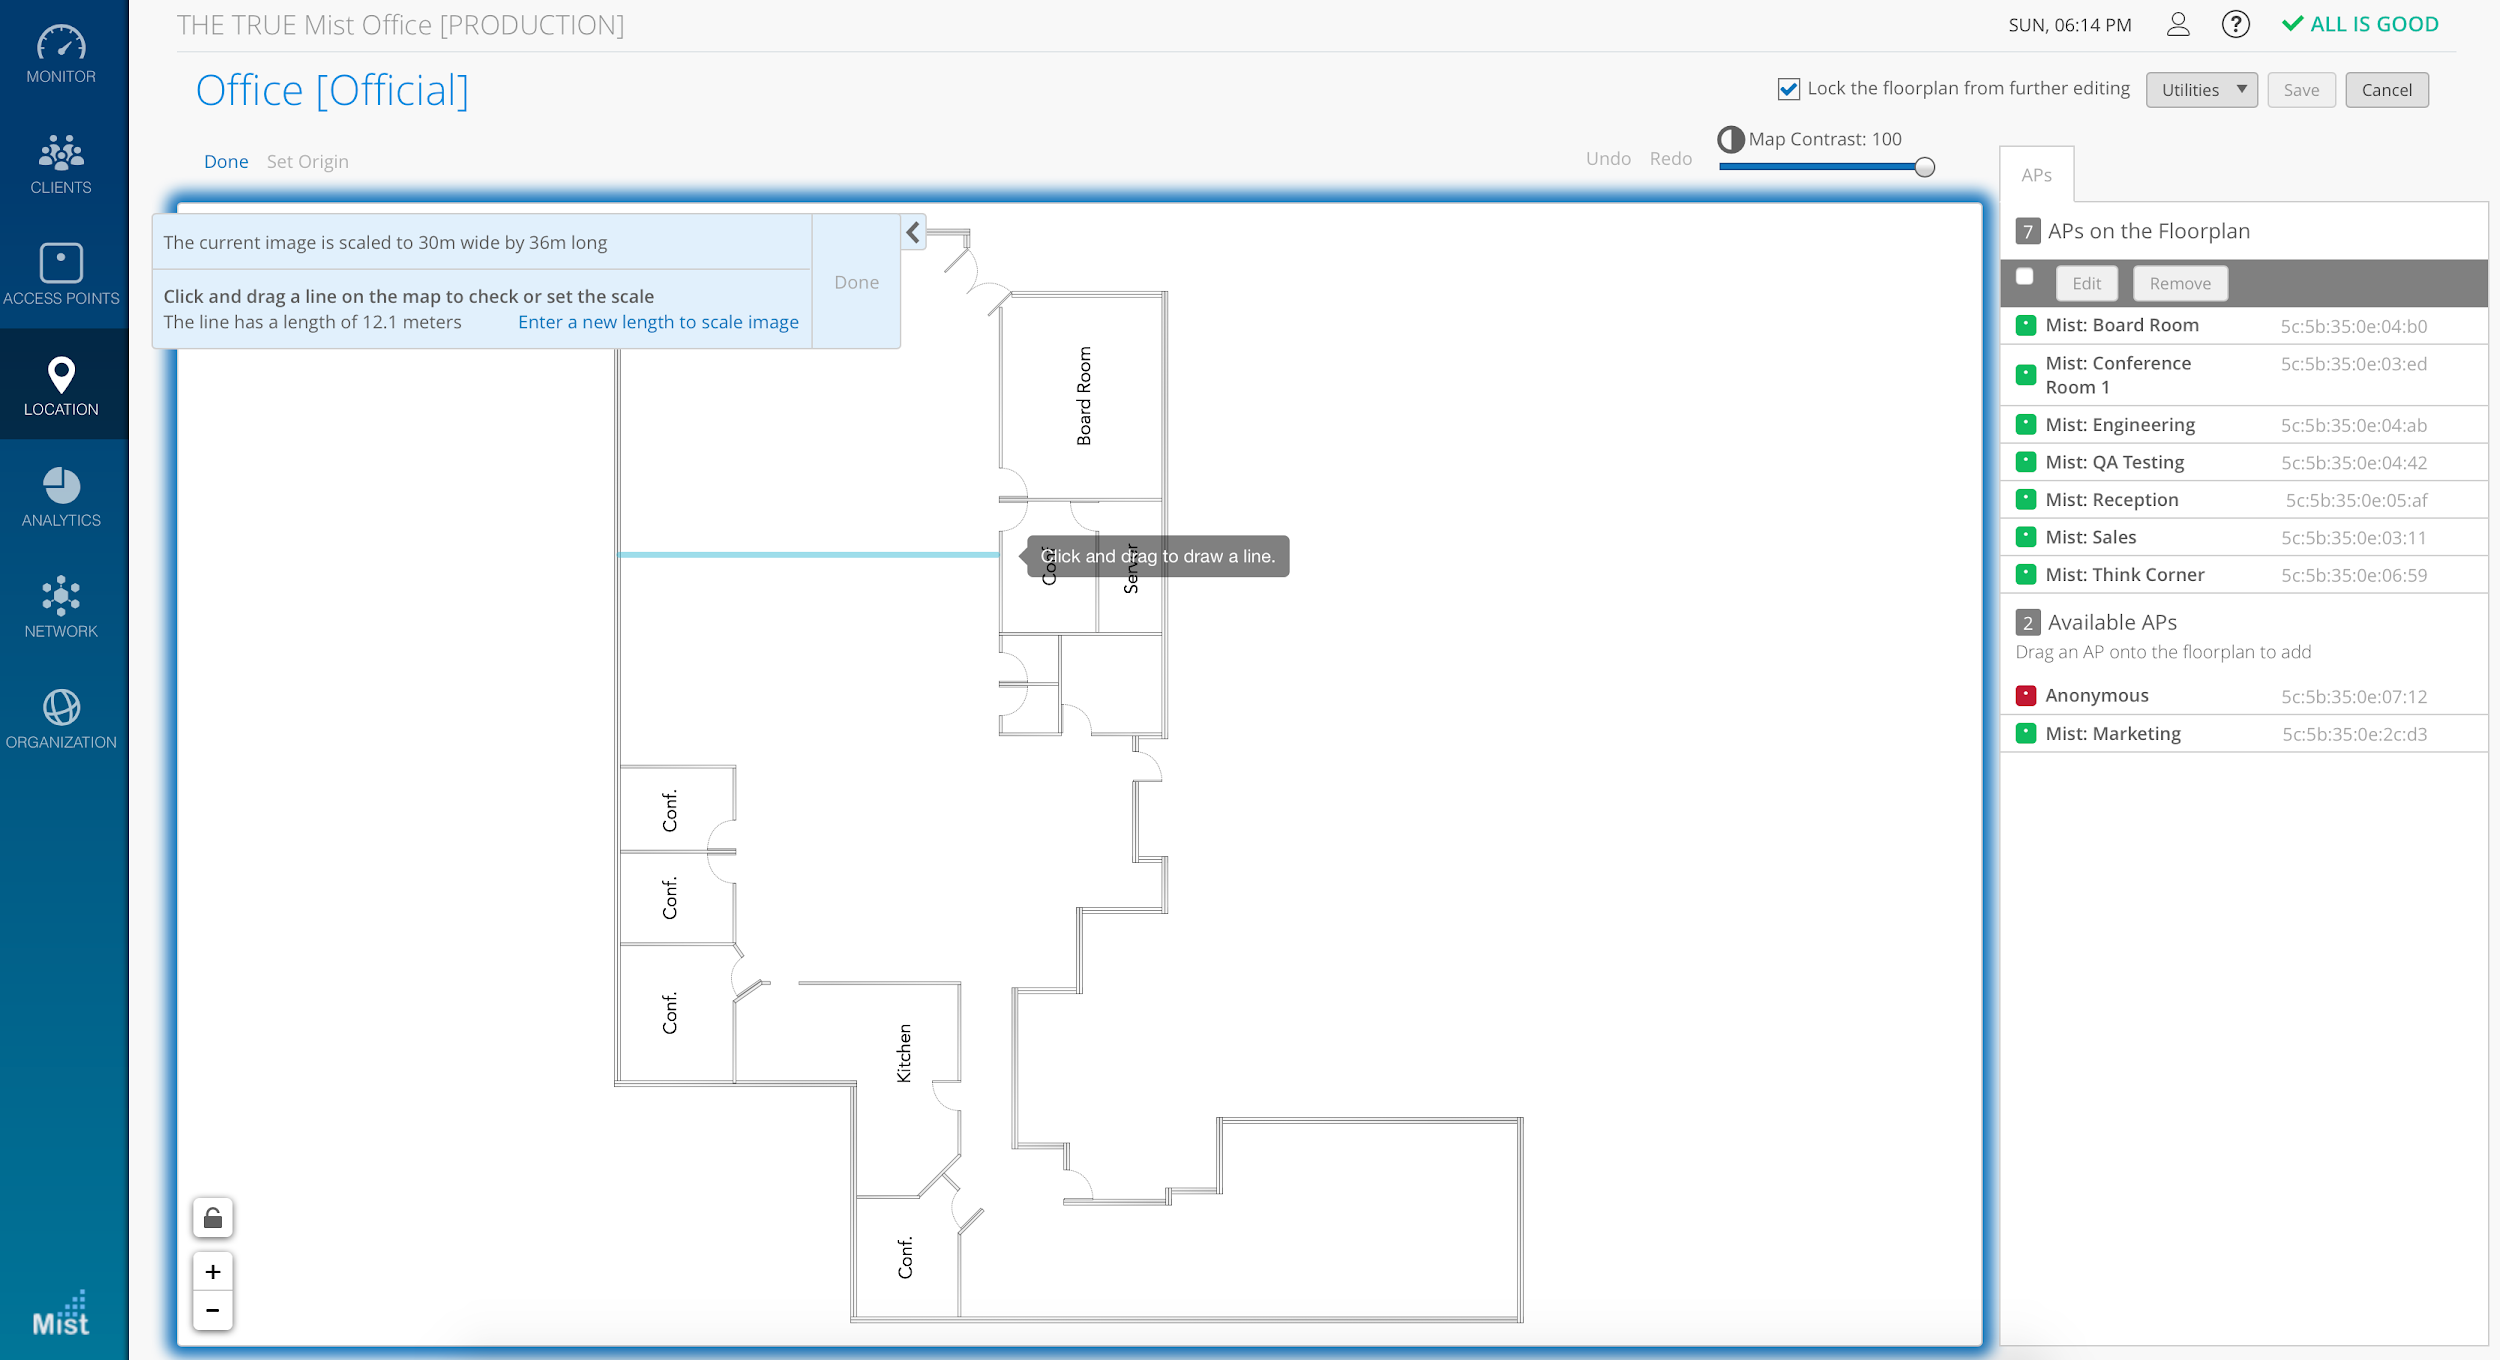
- Scale can be thought of as the foundation for your location accuracy. If, for example, a room is 10 meters long but you scale the room to be 1000 meters long in the system, then when you physically walk 5 meters, the system UI would only reflect you as moving one inch. This gives the false impression that location is broken, but location has actually placed you correctly based on the provided scale. Thus, it is crucial that your floorplan is scaled properly.
- One trick if you don’t know the scale of a floor plan is to look for a standard door and scale that door to be 0.91 meters (3 feet). This should scale the floor plan appropriately.
Set AP Placement
- To place an AP on the floor plan
- Select “Live View” from the “Location” side navigation menu

-
- Select the site and floor plan you want to scale
- Unlock the floorplan for editing
- Select the AP from the “Available APs” option
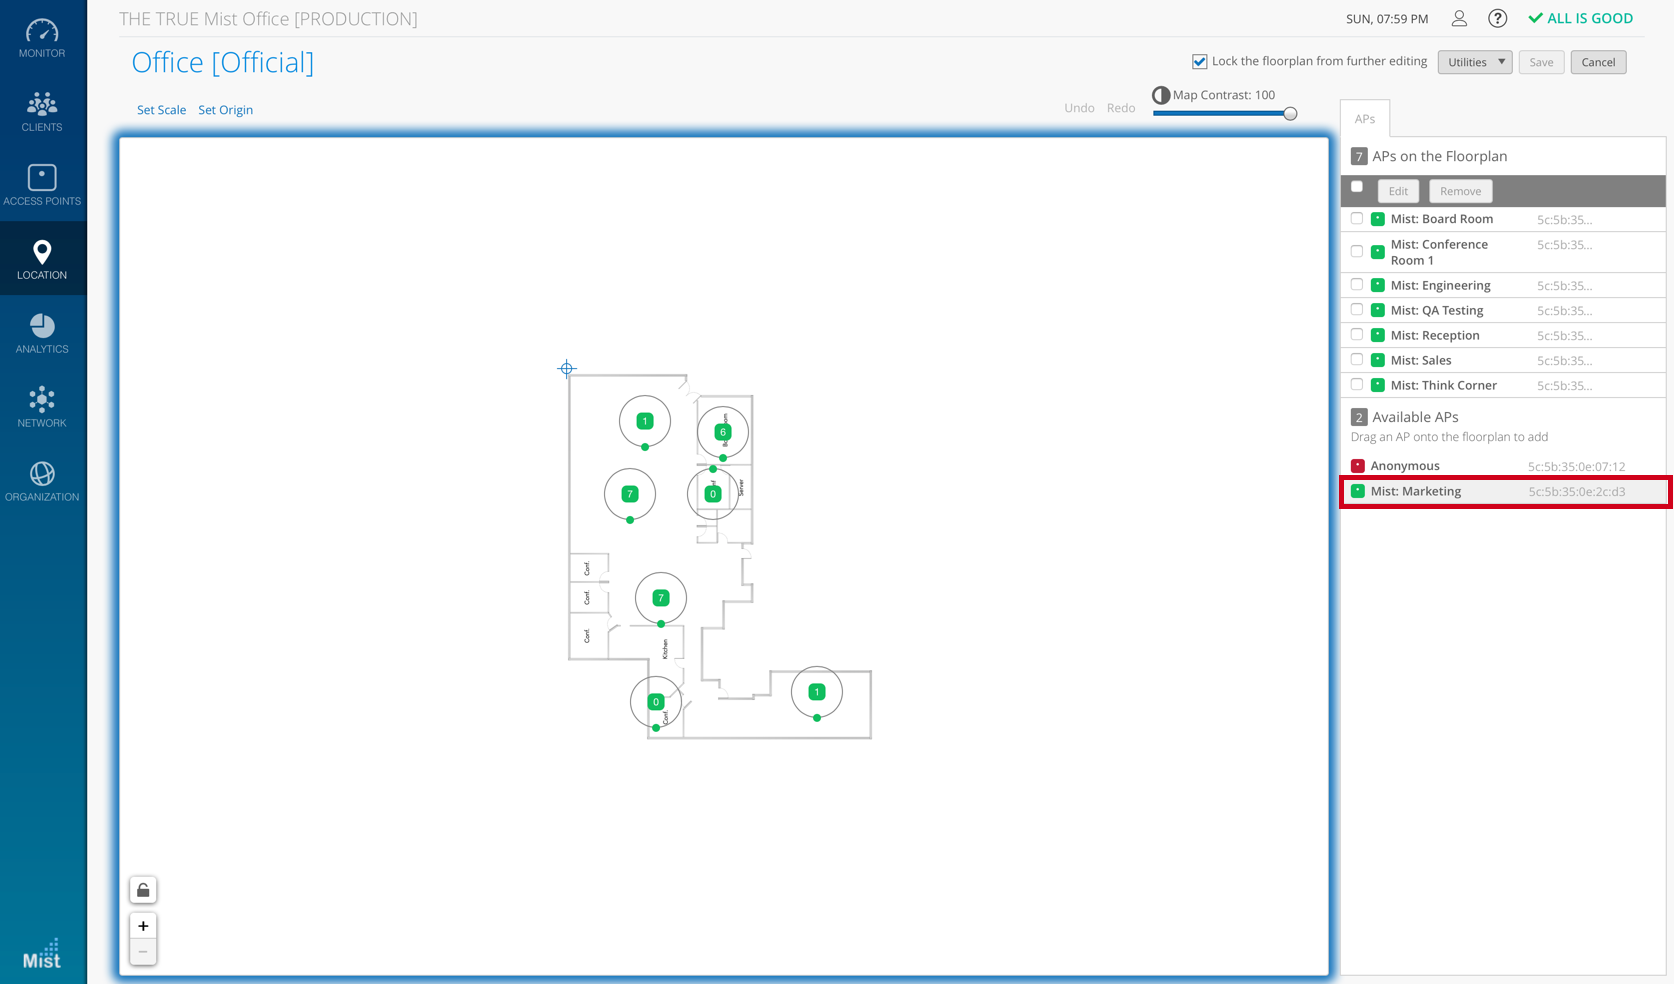
- Drag and drop the AP on the floor plan

- AP placement is simple yet important. In the UI, just drag and drop the AP onto the floor plan where the AP is deployed in the real world. For example, let’s say you have a 10 x 10 meter room and physically deploy the AP in the center of the room. You would do the same in the system by placing the AP on the middle of the floorplan in the UI. If you physically move that AP to the upper-right corner of the room, then you would also need to update the system by moving that AP to the upper-right corner of the floorplan.
- It is important to ensure that the MAC address of the AP placed in the system matches that of the AP in the physical deployment. If the APs and their placements do not match, this will give the false impression that location is broken; the system will show your location in a different area on the floor plan.
Set AP Orientation
- Setting the AP orientation (rotation)
- Select “Live View” from the “Location” side navigation menu
-
- Select the site and floor plan you want to scale
- Click “unlock for editing”, select the AP you want to set the orientation, and rotate the small green dot on the outer ring of the selected AP. You can also select all APs and set all selected APs orientation in the “edit” section for a quick mass orientation edit.
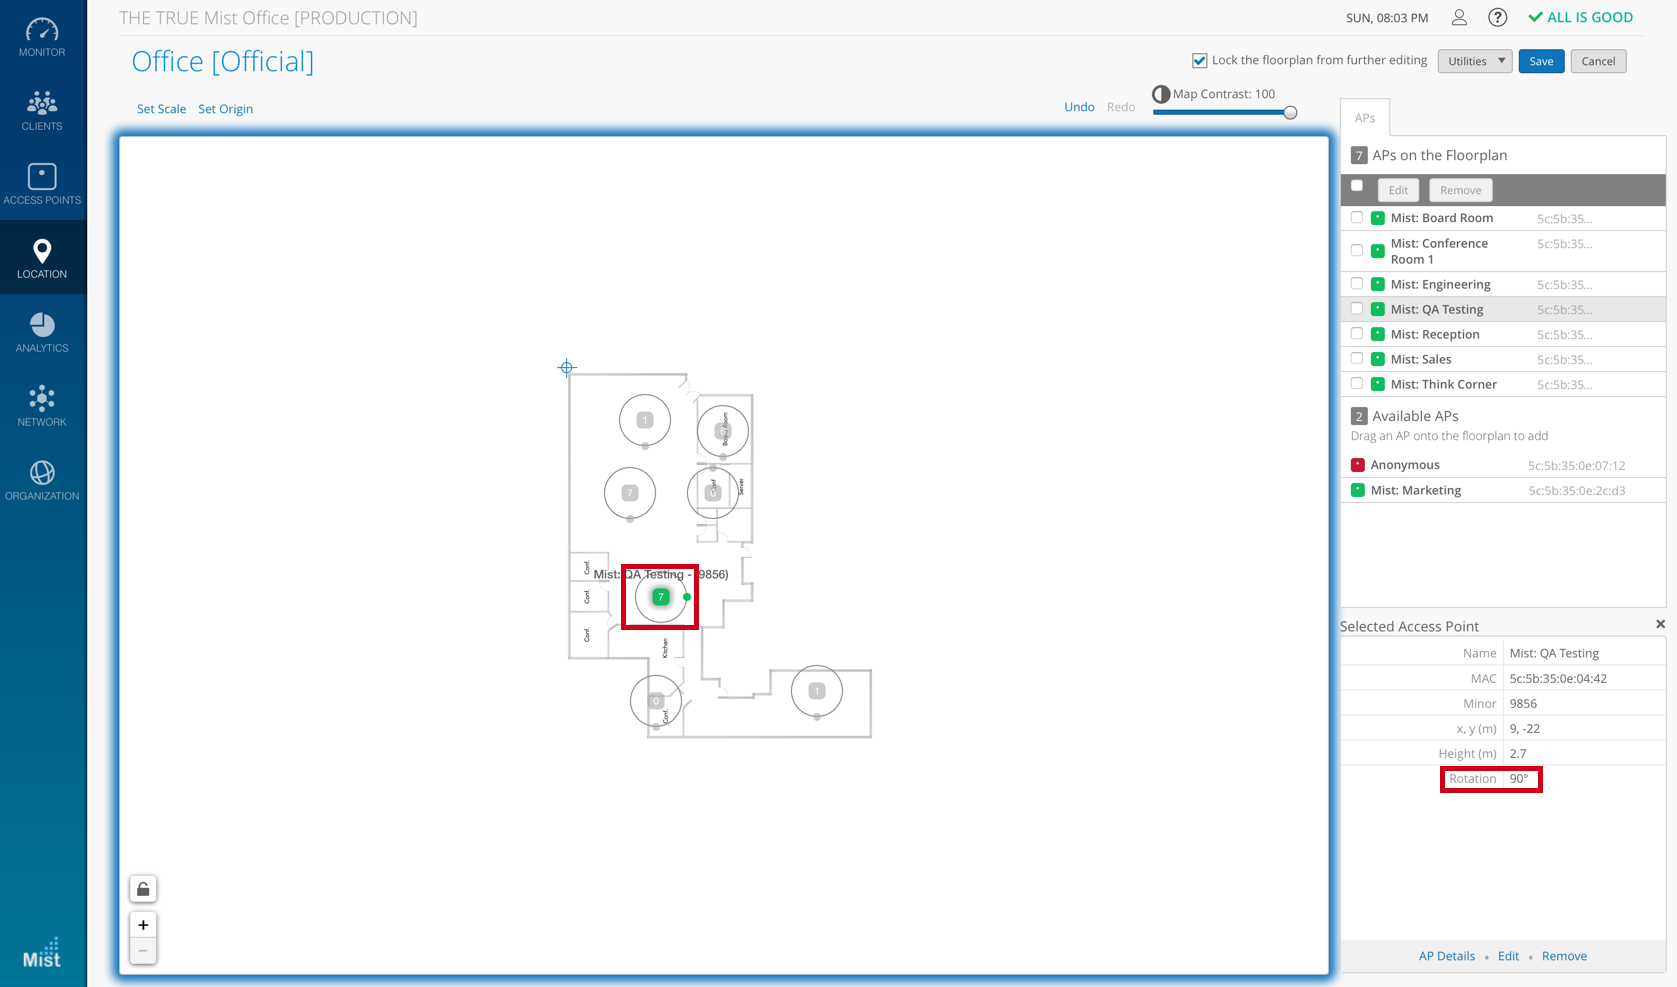
- AP orientation is a crucial part of location accuracy. Wherever the AP’s LED is pointing in relation to the map’s perspective, that AP’s orientation (or rotation) in the UI must match its orientation in the real world. If done incorrectly, the location engine will place your client’s location somewhere else.
- Please note your map does not have to face true north. The easiest way to determine the AP’s orientation is to find a reference point on the floorplan when comparing the UI with the real world.
- When setting the orientation in the UI, make sure the small green dot points in the same direction as the AP’s LED. A good tip is to orient all of the AP’s in a common space in the same direction, as this makes it easier to spot problems down the road.
- Imagine drawing a line from the Mist logo towards the LED and continuing drawing that line past the LED. This is your imaginary line of where the LED is facing.
Set AP Height
- Setting the AP Height
- Select “Live View” from the “Location” side navigation menu.
-
- Select the site and floor plan you want to scale.
- Select the AP you want to set the height and click “Quick Edit”
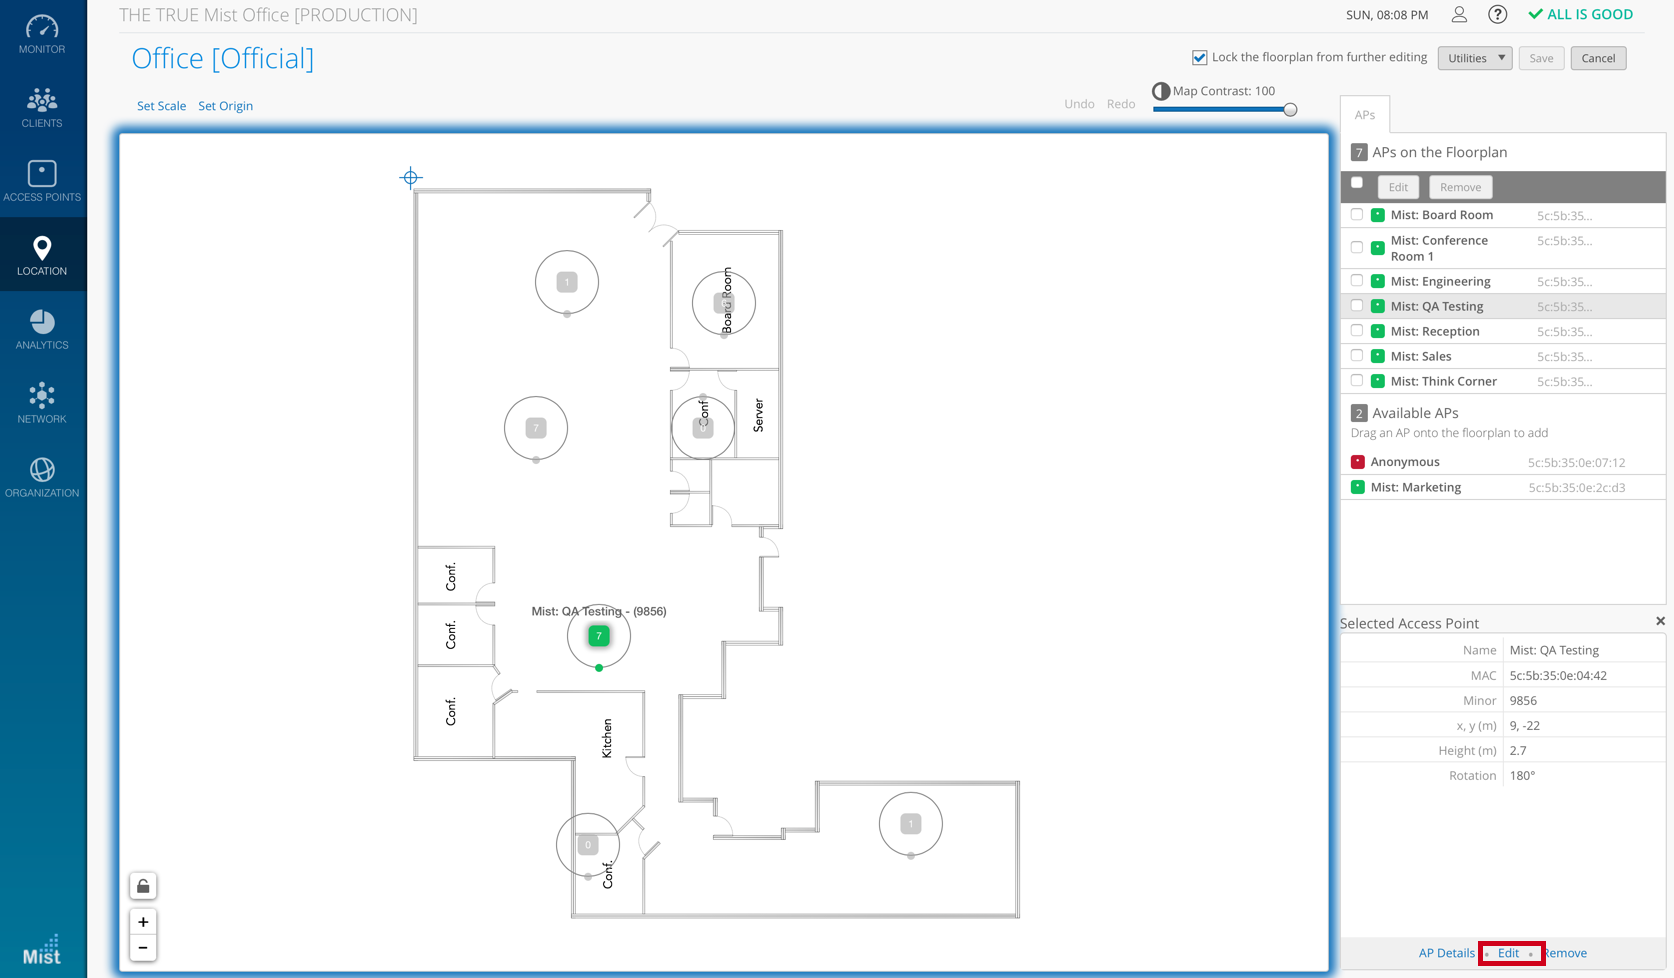
- You can now change the height of the AP
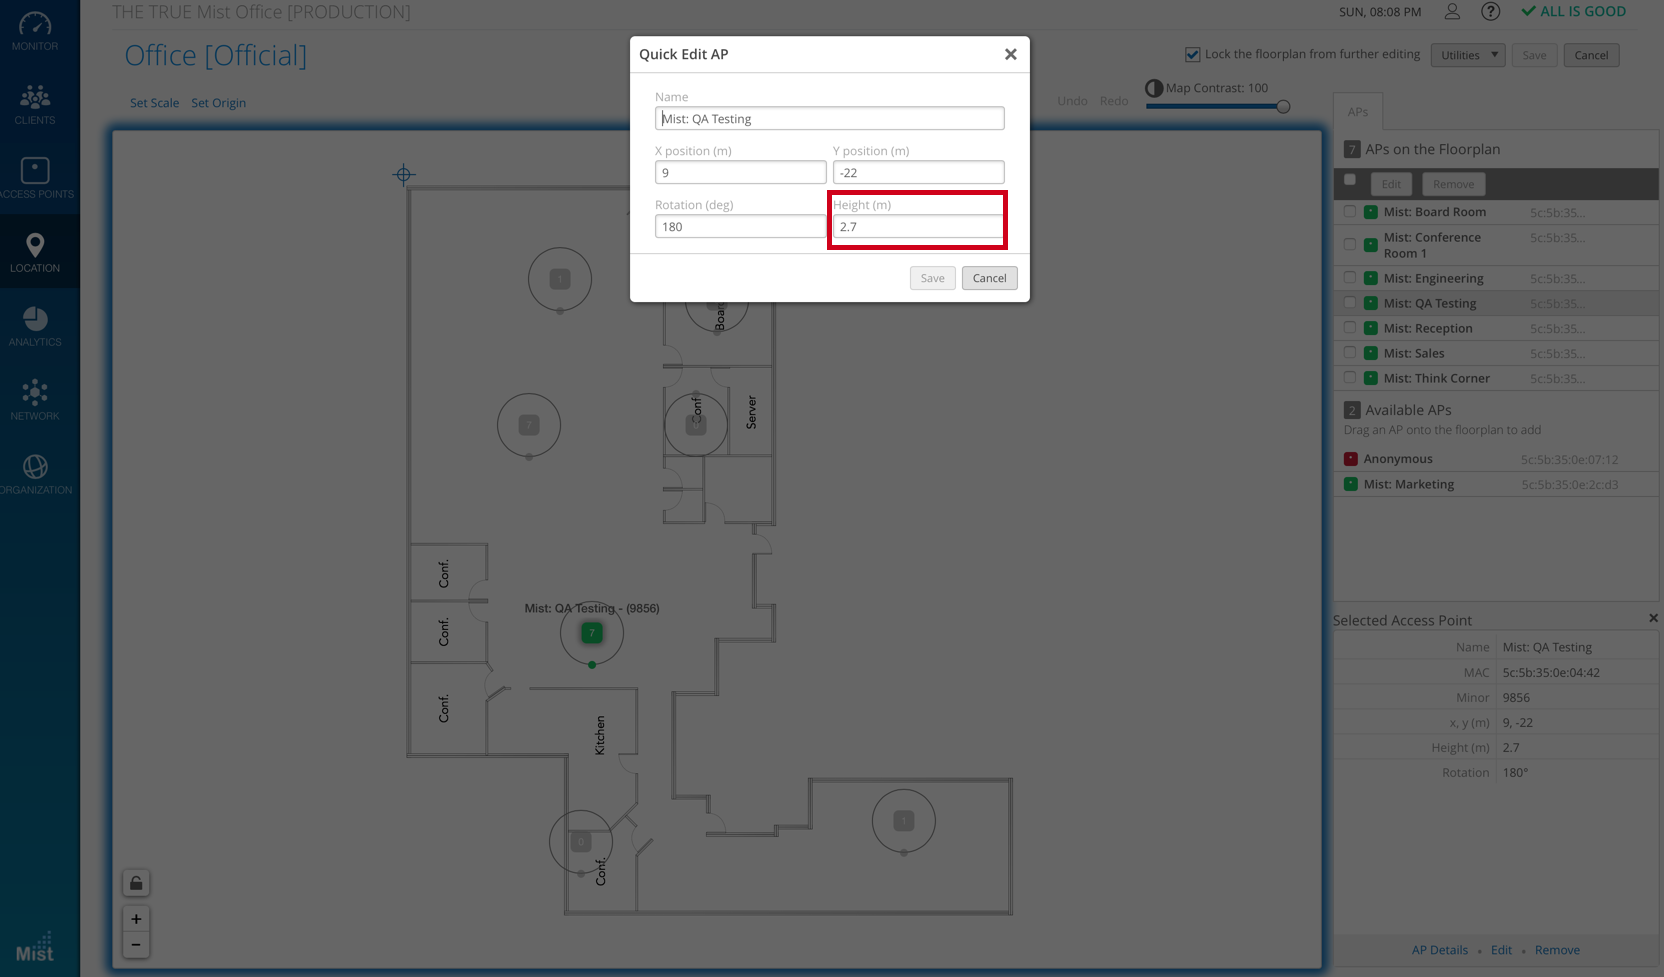
- AP height is the last step in the initial deployment process and is important since the location engine takes this into account for machine learning.
- By default, we set all APs to 2.75 meters (9.02231 feet). Make sure to set the AP’s height appropriately in the “Quick Edit” section of the Live View.
All in all, the message is simple; the system and real world deployments must match as closely as possible. They do not necessarily have to be perfect, but the closer the UI deployment reflects reality, the better location accuracy will be. After this, machine learning will continuously adjust and find a more optimal path loss formula (PLF) that works for your deployment. If you find your location experience is not ideal revisit these four steps. The majority of location issues comes from an incorrect AP setup. Below is a link to a video on how to do the setup for these four steps.Location Deployment Mistakes
- DO NOT install APs on the ground or on any object with the AP facing up or down.
- DO NOT install APs on the walls with the AP vertical to the wall.
- You can install APs horizontally on walls as long as the LED is still facing down.
- DO NOT install two or more APs 1 meters from each other.
- This is just poor use of coverage.
- DO NOT install APs near or up against metal, glass or concrete.
- DO NOT install APs more than 15 feet high.
- If you do need to install APs more than 15 feet high please contact Mist ( support@mist.com) to have a Mist SE help advise as certain uses cases may require more dense AP deployment for higher ceiling deployments.
- DO NOT install APs above the ceiling.
- Only certain use cases call for this, which would require advice from a Mist SE (support@mist.com) on how to best deploy for such a use cases.
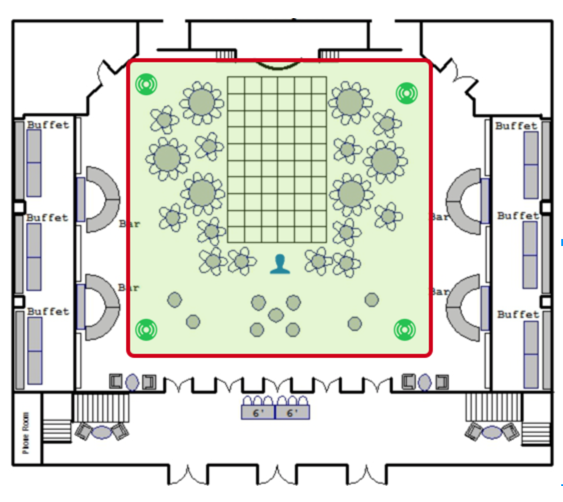
Location Deployment ExampleEngagement (SDK)Lets take an example of a Engagement use case where we are deploying Mist APs in an air port for customers to wayfinding their way using an app. Below is sample deployment following best practices.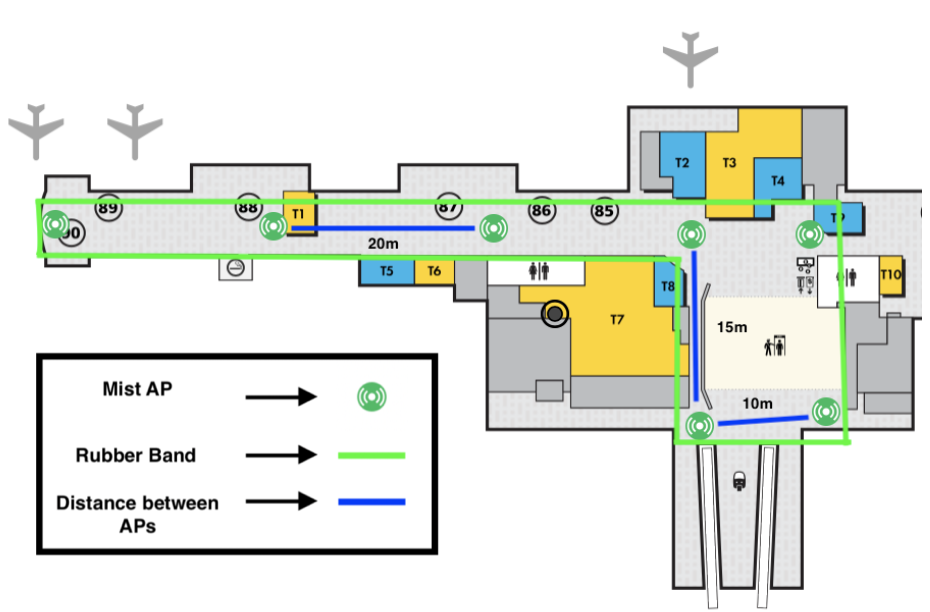
- Mist APs are placed within the area we want to do location. Remember accuracy is best within the rubber band.
- Open areas, like to the right, are in a rectangle-like formation with a distance between APs are 10 – 15 meters.
- Hallways / corridors, like the left side, are in a straight line with a distance between APs of 20 meters.
Asset VisibilitySupportIf you have any questions that were not answered in this guide or you have a very specific question that this guide did not cover you can go to our support page and email to submit a ticket. Below are two ways you can submit a ticket.
- You can email your questions at support@mist.com
- You can go to https://support-portal.mist.com/hc/en-us/requests/new