WAN Assurance
Cradlepoint NetCloud Integration with Mist cloud
You can now integrate your Cradlepoint NetCloud Manager account with the Mist cloud. The integration enables you to onboard Cradlepoint devices (5G WAN adapters) to the Mist portal, assign the devices to a Mist site, view inventory details, and get insights into the Cradlepoint device events.
The integration also enhances Juniper Mist’s client-to-cloud user experience by additionally providing insights into the branch WAN adapters, helping the network admins reduce Mean Time to Identify (MTTI).
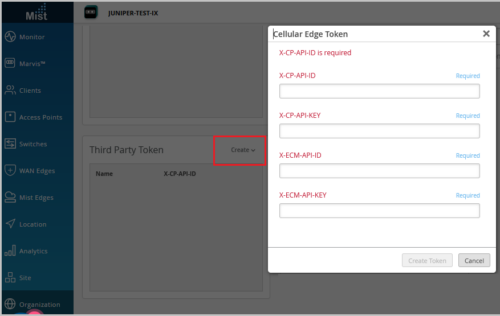
To integrate your NetCloud Manager account with the Mist cloud, you need to obtain the required API keys (X-CP-API-ID, X-CP-API-KEY, X-ECM-API-ID, and X-ECM-API-KEY) from NetCloud (see Obtaining API Keys) and add them to your Mist organization as a Cellular Edge token. On adding the Cellular Edge token to your organization, the supported Cradlepoint devices are automatically onboarded to the Mist portal.
Note: You require an active Marvis subscription to integrate your NetCloud account with the Mist cloud.
You can add Cellular Edge tokens from the Organization > Settings > Third Party Token tile.
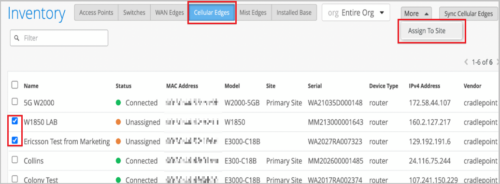
To view the inventory details of the Cradlepoint devices onboarded to the Mist portal, click Organization > Inventory > Cellular Edges. The Mist portal supports the following Cradlepoint devices: W1850, W2005, W2000, W4005, E300, and E3000. If the Cellular Edge page doesn’t display any data, click Sync Cellular Edges on the Inventory page. You can also assign Cradlepoint devices to a site by clicking More > Assign to Site. You must have at least one Mist device deployed in the site to which you want to add Cradlepoint devices.
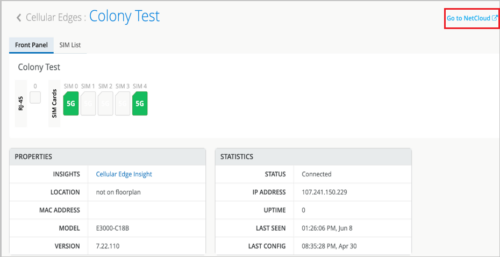
To access the Cradlepoint device details page, click WAN Edges > Cellular, and then select a device from the list. The device details page lists device-specific information along with an option to navigate to the NetCloud dashboard.
Support for replacing WAN Edges (SSR and SRX)
You can now replace an existing WAN Edge with a new one.
Note that replacing a node in a cluster will cause minimal impact on network services. Therefore, we recommend that you plan for a maintenance window to do this. Also, ensure that the Junos version on the new node being added is the same as that on the current running node in the cluster.
To replace a WAN Edge, navigate to the WAN Edge dashboard (WAN Edges > WAN Edges > List > WAN Edge name) and select Replace WAN Edge from the Utilities menu. The image below shows the Mist page from where you can replace a WAN Edge.
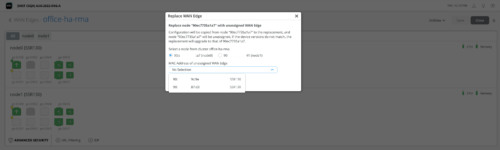
Note: A device can be replaced only with another device of the same model. For example, you can replace an SSR120 only with another SSR120.
Simplified Operations
Enhancements to the Alerts page
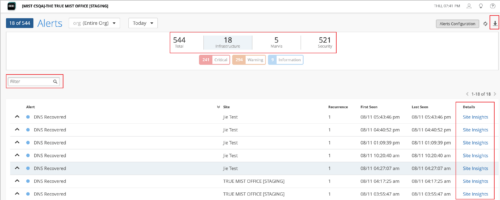
We have added the following new features to the Alerts page (Monitor > Alerts) with a view to making your interactions with the page easier:
- Group-wise stats—Filter and view alerts related to Infrastructure, Marvis, or Security groups. You can also view the total number of alerts. To filter the alerts, just click the group button at the top, on the dashboard banner.
- Download icon—Click the Download icon on the top right of the page to download the alert details for the selected scope in a CSV file.
- Search filter—Filter and view alerts based on keywords.
- Links to related pages—Use the hyperlinks in the new Details column to access the related Mist portal pages quickly. The Details column provides links to:
- The Marvis Actions page when Marvis alerts are present.
- The relevant insights pages when infrastructure alerts are present. Links to site insights are displayed when the Alerts page generates the same alert for more than one device in a site. Links to the AP, switch, or WAN Edge insights page are displayed when the alerts are present on one device.
- The network security page (Site > Security) when a security alert is present.
New auth policy labels under Mist Access Assurance
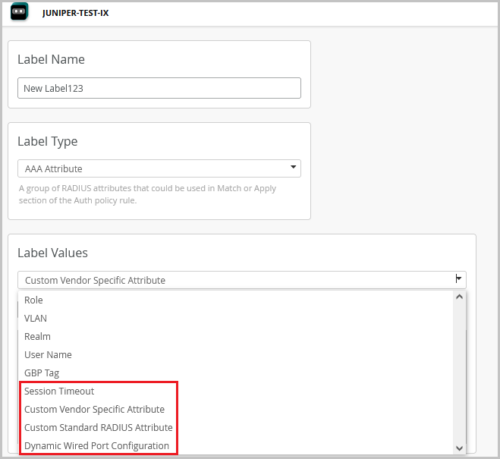
You can now configure the following new authentication policy labels under Juniper Mist Access Assurance:
- Custom Vendor Specific Attribute—Configure vendor-specific attributes to be returned in the Access-Accept message. Example: PaloAlto-Admin-Role=superuser. After selecting this label, click Add Attributes to add one or more attributes.
- Custom Standard RADIUS Attribute—Configure standard IETF RADIUS attributes. Example: Idle-Timeout=600 or Termination-Action=RADIUS-Request. After selecting this label, click Add Attribute to add one or more attributes.
- Dynamic Wired Port Configuration—Configure the VLAN names that Access Assurance returns as Egress-VLAN-Name RADIUS attributes in Access-Accept message. This feature allows for easy dynamic port configuration based on connected device identity. In particular, it is useful for dynamically configuring trunk ports for connected APs. Add the number ‘1’ in front of VLAN name to set the VLAN as tagged, and 2 to set the VLAN as untagged. For example, the VLAN name ‘1corp-vlan’ indicates that corp-vlan is a tagged VLAN. After selecting the Dynamic Wired Port Configuration label, click Add VLAN Name to add one or more VLAN names.
- Session Timeout—Configure Maximum duration (in seconds) for which the user session should remain connected before a re-connection or re-authentication is required. Range: 3600 through 604800.
Policy labels enable you to define and save a match criteria set that can be used in Auth Policies. To configure the labels, navigate to Organization > Auth Policy Labels.
We have also added a default label, Admin Auth, to the Auth Policy creation page. You can use this label as a match criteria set for authenticating a management user into a network device (example: a user-login into the CLI of a Juniper switch).
Note: Availability of Access Assurance is limited. Please contact your Juniper Mist representative if you would like to try this feature.
For more information about Mist Access Assurance, see Mist Access Assurance documentation.
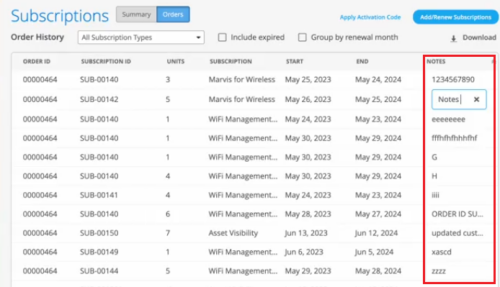
Customer-specific notes in subscriptions
You can now add notes to your subscription orders on the Organization > Subscription > Orders page. This feature helps you track subscriptions based on custom requirements. For example, if the subscription budget is tied to a site or department, you can use the notes to track the same. To add a note, click inside the NOTES column against a subscription order, and type the notes.
Operating mode status for APs
For APs that operate in a reduced functionality mode, the Access Point page provides a warning icon along with a tooltip displaying the AP operating mode details such as the configured radio bands and the supported antenna chains in each band. To view the operating mode information of an AP that is in a reduced functionality mode, hover over the warning icon displayed alongside the AP status.
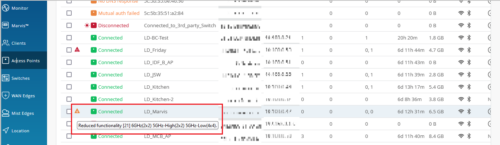
Only AP43 and AP45 support the reduced functionality mode, when specific configurations are applied. An AP45 requires the 802.3bt standard for a 4×4 antenna chain support in all the radio bands configured. However, if you enable this AP with the 802.3at standard, it operates with a fewer number of chains. The AP43 operates in the reduced functionality mode when USB peripherals are activated.
Wired Assurance
Support for auto configuring router IDs and loopback interfaces per VRF
You can configure the following topology settings in the Campus Fabric Configuration page (Organization > Campus Fabric > Create Campus Fabric).
- Auto Router ID Subnet—This subnet is used for automatically assigning a router-id to each device in the fabric (including access devices irrespective of whether they are configured with EVPN or not). Router IDs are loopback interfaces (lo0.0) used for overlay peering between devices. For new topologies, this field auto-populates a default subnet value (172.16.254.0/23), which can be modified. When you edit an existing topology, this field doesn’t populate any default value.
- Loopback per-VRF subnet—This subnet is used for automatically configuring loopback interfaces (lo0.x) per VRF used for services such as DHCP relay. For new topologies, this field auto-populates a default subnet value (172.16.192.0/19), which can be modified. When you edit an existing topology, this field doesn’t populate any default value.
Note: You must configure separate subnets for underlay, Auto Router ID, and Loopback per-VRF. The subnets should not overlap with each other.

Port stats now available inside campus fabric ports panel
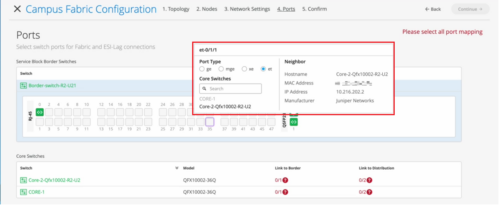
On the Ports tab of the Campus Fabric Configuration page (Organization > Campus Fabric), you can now view the port stats by hovering the mouse over the port icon. This view is similar to the port stats view on the front panel of a switch dashboard. You can also select a port to get a detailed view that includes neighbor information such as hostname, MAC address, IP address, and manufacturer.
OSPF configuration and monitoring
You can now configure the following additional OSPF settings for your switches.
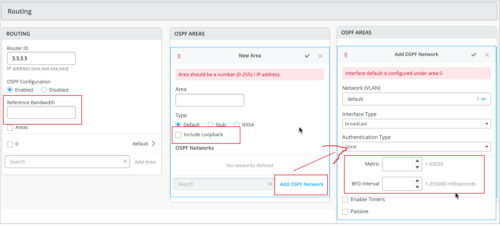
- Include Loopback—Enable this feature to include loopback interface addresses in an OSPF area. Loopback interfaces (lo0.0) are the router IDs (usually the IP address of the device) used by OSPF to identify the routing device from which a packet originated. You can configure this setting in the OSPF AREAS tile in the switch configuration template at the organization level (Settings > Switch Templates), at the site level (Sites > Switch Configuration), or at the device level (Switches).
- OSPF Metric—Configure OSPF metric. Routes with lower metrics or cost are preferred to those with higher path metrics. You can configure this setting in the Add OSPF Network window in the OSPF AREAS tile in the switch configuration template. Range: 1 through 65535.
- BFD Interval—Specify the interval at which the device exchanges BFD packets or hello packets with its peer. You can configure this setting in the Add OSPF Network window in the OSPF AREAS tile in the switch configuration template. Range: 1 through 255000 (in milliseconds).
- OSPF Reference Bandwidth—Set the reference bandwidth used for calculating the default interface cost. You can configure this setting in the Routing tile in the switch dashboard.
The following image shows the new OSPF settings:
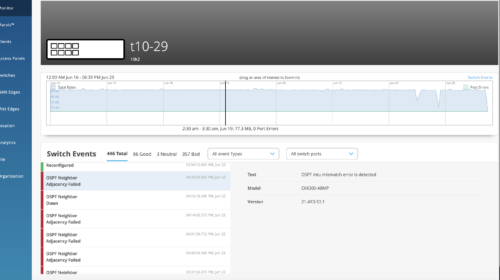
We have also enhanced the Switch Insights page (Switches > switch name > Switch Insights) to display OSPF errors such as MTU mismatch, duplicate router ID, area # mismatch, netmask mismatch, area type mismatch, OSPF Interface type mismatch.
Security Alerts
End of support for cipher suites using the CBC mode
On July 19th, 2023, at 9am PST, Juniper Mist will end support for cipher suites using the Cipher Block Chaining (CBC) mode of operation on our cloud endpoints. These cipher suites are known to be susceptible to attacks such as padding oracle attack, which can lead to data leaks and other security issues.
We will hold a test deprecation on July 6th, 2023, at 10:00am PST to disable the CBC ciphers. This test will be in effect for 24 hours, so that you can test your systems for impact. For more information, refer to End of support for cipher suites using the CBC mode.