Juniper Mist on US GovCloud addresses specific regulatory and compliance requirements of US government agencies at the federal, state, and local level; contractors; educational institutions; and other US customers that run sensitive workloads in the cloud. This environment currently is “In-process” on the FedRAMP marketplace for Impact level “Moderate”.
This page lists the Juniper Mist updates released on US GovCloud on December 15, 2023 across Wireless Assurance, Wired Assurance, WAN Assurance, Marvis, Location Services, and Analytics.
Wireless Assurance
Update to the VLAN type names in the dynamic VLAN configuration
In the dynamic VLANs configuration on the WLAN page (Site > WLANs > WLAN Name), we have renamed the VLAN type ‘Airespace (airespace-interface-name)’ as ‘Named’, and ‘Standard (Tunnel-Private-Group-ID)’ as ‘VLAN ID’. We have also updated the labels ‘Static VLAN ID’ and ‘Dynamic VLAN ID’ to ‘Static VLAN ID(s)’ and ‘Dynamic VLAN ID(s)’, respectively.
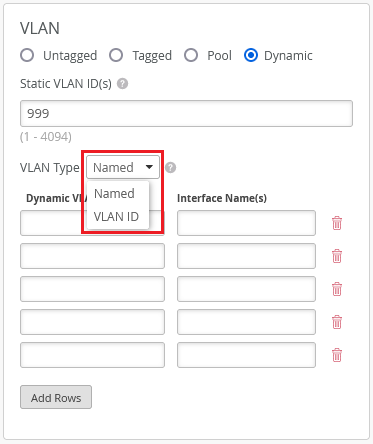
A Named VLAN supports Airespace-Interface-Name or Tunnel-Private-Group-ID RADIUS attributes and can be specified as a single VLAN, a pool of VLANs, or as variables. A VLAN ID supports Tunnel-Private-Group-ID RADIUS Attributes and can be specified as a single VLAN, VLAN range, or as variables.
Email notification to guest users when sponsors act on their access request
You can configure the Mist portal to send an email notification to the guest portal users with Sponsored Guest Access as their authorization method, when the sponsors act on their access requests. To configure this, navigate to the Authorization tab of the guest portal configuration page (accessed from Site > WLANs), and select the Email guest when approved/denied check box. This check box is disabled by default. The notification contains the request approval status, the time at which the request was approved, and the duration for which the authorization will be in effect.
Mist Edge
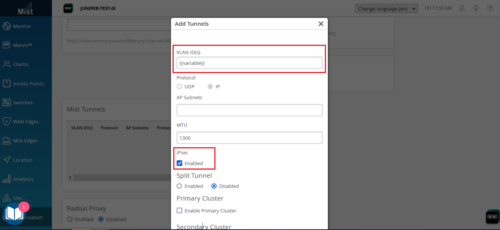
Enhancements to Mist Tunnels
We have made the following changes to the site-level Mist Tunnels (Organization > Site Configuration > site name > Mist Tunnels):
-
Support for configuring VLAN IDs through site variables. Site variables provide a way to use tags (example: “VLAN_VAR”) to represent real values (example: 11) so that the value can vary according to the context where you use the variable. This means the same variable can configure different VLAN IDs in different sites.
-
IPsec support for site-level Mist Tunnels. This feature enables you to use IPsec protocols for the tunnels from APs to site-level Mist Edges.
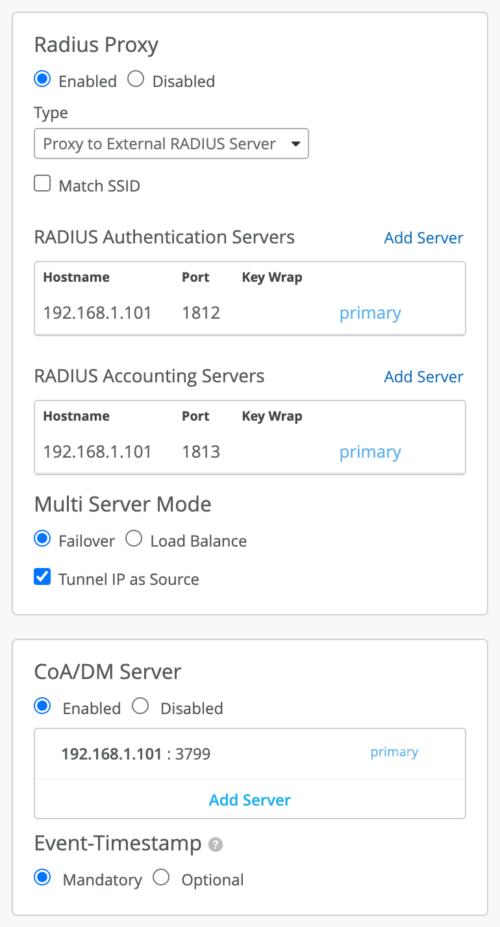
Mist Edge Support for Change of Authorization
The Mist Edge Radius Proxy service now supports Change of Authorization (CoA) operation. CoA is a mechanism that supports changing the authorization of a user or device dynamically after they were authenticated.
For this feature to work, you need the AP firmware version 0.14.29091 or higher.
The configuration involves the following steps:
-
On the Mist Edge,
-
Enable RADIUS Proxy. You must select Proxy to External RADIUS server as the RADIUS Proxy type. In the RADIUS Proxy section, select the Tunnel as Source option if you want the requests to come from the Tunterm IP. If this option is not selected, the request comes from the out of band management (OOBM) interface.
-
Configure the CoA/DM server on the Mist Edge to receive the CoA Request packets or Disconnect Request packets from a specified set of Dynamic Authorization Clients (DACs). The CoA/DM server configuration includes a server IP and a shared secret. You can also set the inclusion of an event timestamp to be mandatory or optional. This configuration enables the Mist Edge to listen in on the CoA port (UDP 3799) for any incoming CoA Request or Disconnect Request packets from the RADIUS server.
-
To configure these settings on an organization-level Mist Edge, navigate to Mist Edges > Mist Edge Name > Mist Edge Cluster. To configure this for a site-level Mist Edge, go to the Organization > Site Configuration > Site Name page.
-
On the WLAN page,
-
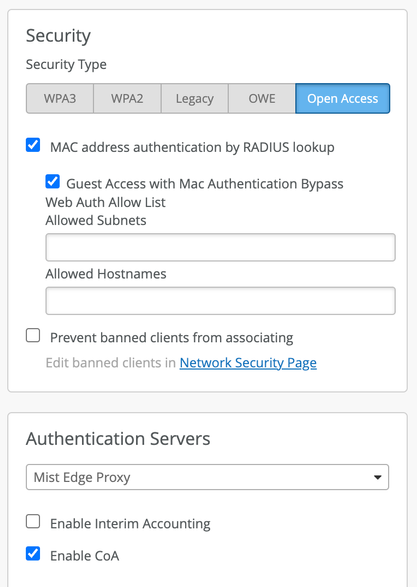
Select a supported security type. The following security types are supported: Enterprise (802.1X), Personal (SAE/PSK) + MAC Address Authentication by RADIUS lookup, OWE + MAC Address Authentication by RADIUS lookup, Open Access + MAC Address Authentication by RADIUS lookup.
- Set the Authentication Servers to Mist Edge Proxy and enable CoA.
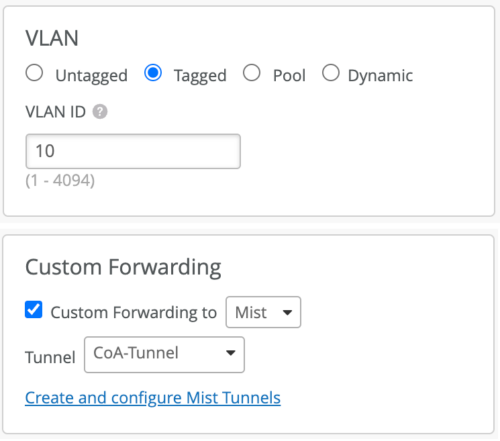
- Enable VLAN Tagging and set Custom Forwarding to Mist Tunnel (for an organization-level Mist Edge) or to Site Edge (for a site-level Mist Edge).
-
Marvis
Troubleshoot with Marvis on the support ticket creation page
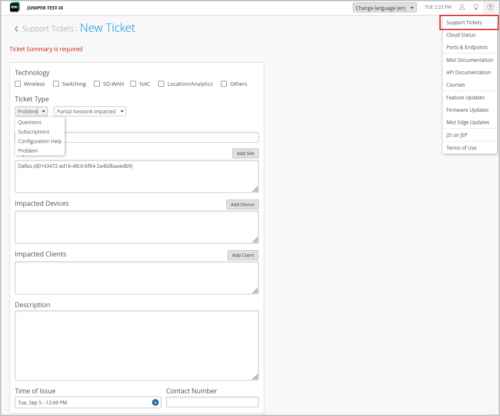
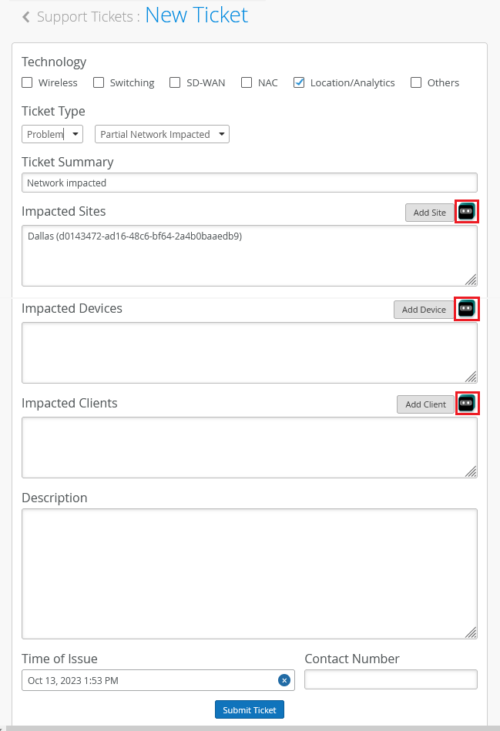
Before you submit a support ticket against a site, device, or client, you have an option to perform a quick troubleshooting from the ticket creation screen itself. The support ticket creation page, accessed from the help (?) menu, has a Marvis launch button against each of the following fields: Impacted Sites, Impacted Devices, and Impacted Clients. To initiate a troubleshooting operation, click the Marvis button and then select the item (site, device, or client) that you want to troubleshoot. You need a Marvis subscription to be able to use this feature.
Wired Assurance
Support for auto configuring router IDs and loopback interfaces per VRF
You can configure the following topology settings in the Campus Fabric Configuration page (Organization > Campus Fabric > Create Campus Fabric).
- Auto Router ID Subnet—This subnet is used for automatically assigning a router-id to each device in the fabric (including access devices irrespective of whether they are configured with EVPN or not). Router IDs are loopback interfaces (lo0.0) used for overlay peering between devices. For new topologies, this field auto-populates a default subnet value (172.16.254.0/23), which can be modified. When you edit an existing topology, this field doesn’t populate any default value.
- Loopback per-VRF subnet—This subnet is used for automatically configuring loopback interfaces (lo0.x) per VRF used for services such as DHCP relay. For new topologies, this field auto-populates a default subnet value (172.16.192.0/19), which can be modified. When you edit an existing topology, this field doesn’t populate any default value.
Note: You must configure separate subnets for underlay, Auto Router ID, and Loopback per-VRF. The subnets should not overlap with each other.

Port stats now available inside campus fabric ports panel
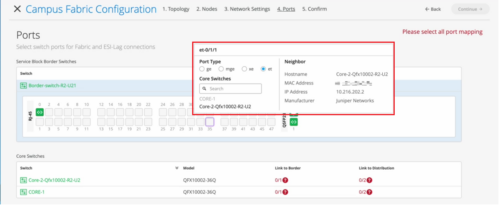
On the Ports tab of the Campus Fabric Configuration page (Organization > Campus Fabric), you can now view the port stats by hovering the mouse over the port icon. This view is similar to the port stats view on the front panel of a switch dashboard. You can also select a port to get a detailed view that includes neighbor information such as hostname, MAC address, IP address, and manufacturer.
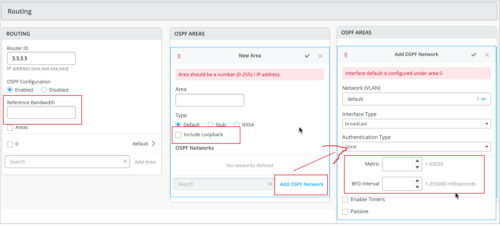
OSPF configuration and monitoring
You can now configure the following additional OSPF settings for your switches.
- Include Loopback—Enable this feature to include loopback interface addresses in an OSPF area. Loopback interfaces (lo0.0) are the router IDs (usually the IP address of the device) used by OSPF to identify the routing device from which a packet originated. You can configure this setting in the OSPF AREAS tile in the switch configuration template at the organization level (Settings > Switch Templates), at the site level (Sites > Switch Configuration), or at the device level (Switches).
- OSPF Metric—Configure OSPF metric. Routes with lower metrics or cost are preferred to those with higher path metrics. You can configure this setting in the Add OSPF Network window in the OSPF AREAS tile in the switch configuration template. Range: 1 through 65535.
- BFD Interval—Specify the interval at which the device exchanges BFD packets or hello packets with its peer. You can configure this setting in the Add OSPF Network window in the OSPF AREAS tile in the switch configuration template. Range: 1 through 255000 (in milliseconds).
- OSPF Reference Bandwidth—Set the reference bandwidth used for calculating the default interface cost. You can configure this setting in the Routing tile in the switch dashboard.
The following image shows the new OSPF settings:
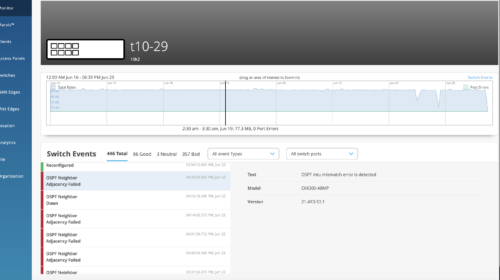
We have also enhanced the Switch Insights page (Switches > switch name > Switch Insights) to display OSPF errors such as MTU mismatch, duplicate router ID, area # mismatch, netmask mismatch, area type mismatch, OSPF Interface type mismatch.
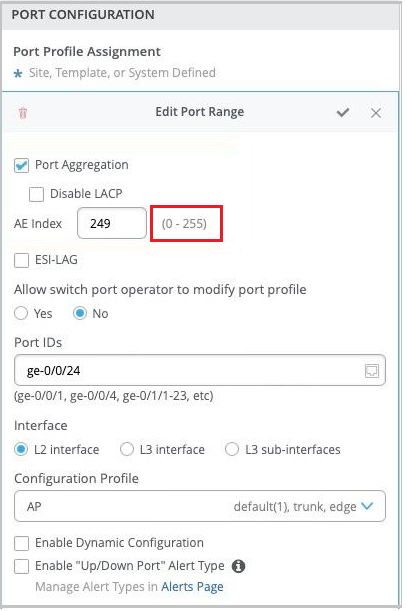
Support for AE interface index range from 0 to 255
We have increased the supported range of aggregated Ethernet (AE) interface index (aex) from 0-127 to 0-255. You can configure the AE index on the Ports tab of your campus fabric page (Organization > Campus Fabric > Ports) and through the switch configuration templates (Organization > Switch Templates). In the switch configuration template, the AE index configuration is available on the Port Config tab in the Select Switches Configuration section, as shown below.
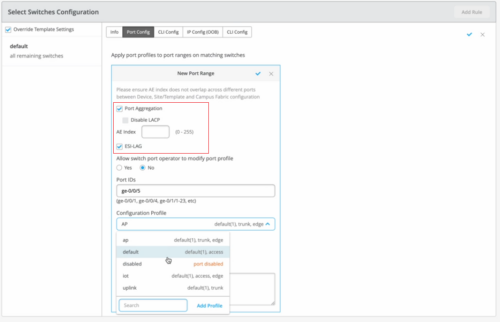
ESI-LAG option now available on switch templates
You can configure ESI Link Aggregation Groups (ESI-LAGs) on the aggregated Ethernet (AE) interfaces on a switch participating in Campus Fabric (EVPN/VXLAN). This functionality is an extension of ESI-LAG option available on the switch detail page (switch dashboard) to the site and organization level now.
Mist supports ESI-LAG only on the AE ports that are configured with Link Aggregation Control Protocol (LACP). You can now configure ESI-LAG at the device, site template, and organization template levels, using the options on the following pages:
-
Device Level: On the Port Configuration tile on the Switches > switch name page.
-
Site level: On the Port Config tab in the Select Switches Configuration section on the Site > Switch Configuration > switch configuration name page.
-
Organization level: On the Port Config tab in the Select Switches Configuration section on the Organization > Switch Templates > template name page.
ESI link aggregation groups (ESI-LAGs) enable one or more client devices to form a logical link aggregation group (LAG) interface with the peers.
Note: To be able to apply the ESI-LAG configuration, you need to have the switch included in a campus fabric configuration.
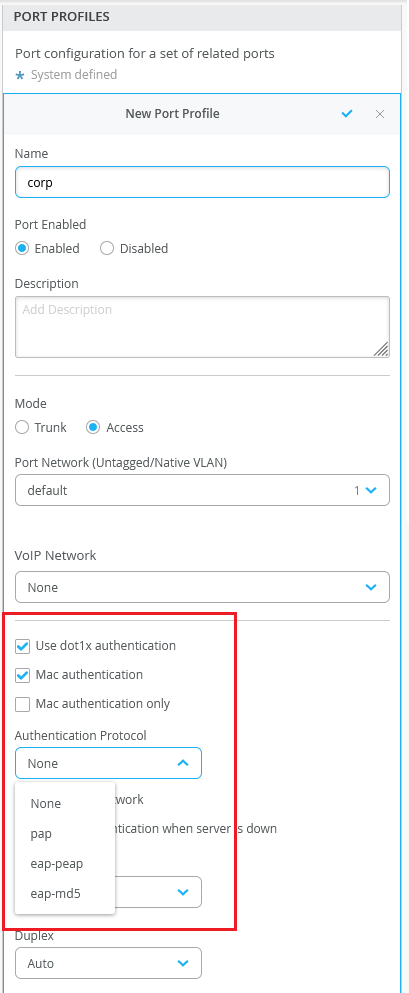
Authentication protocols on port profiles
You can configure authentication protocols on the port profiles that use dot1x authentication with the MAC authentication option. Junos supports the following protocols: Protected Extensible Authentication Protocol (eap-peap), Password Authentication Protocol (pap), and eap-md5. These protocols are used by a supplicant to provide authentication credentials for MAC RADIUS authentication. You can configure these protocols from the Port Profiles tile on the switch dashboard (Switches > switch name), site template (Sites > Switch Configuration > switch configuration name), and organization template (Organization > Switch Templates > template name) pages.
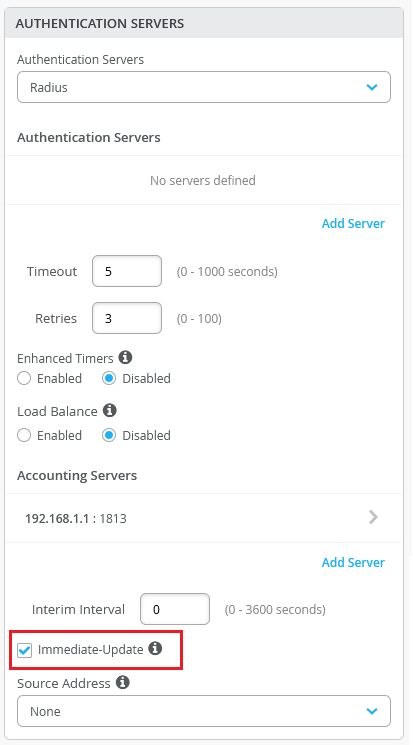
Support for sending immediate updates to the RADIUS accounting server
You can configure your switch to send an Acct-Update message to the RADIUS accounting server immediately following a change of authorization (CoA) operation, IPv4 address allocation, or de-allocation. To do this, select the Immediate-Update check box on the Authentication Servers tile on the switch configuration page (organization template, site template, or the switch dashboard). This option is available only if you have configured a RADIUS accounting server.
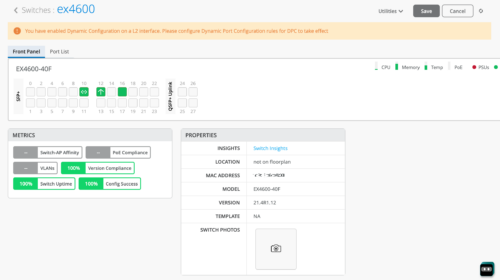
Notification about incomplete dynamic port configuration
Dynamic Port Configuration mainly involves two steps – defining dynamic port profile assignment rules (or dynamic port configuration) and then enabling the rules on the ports to be set as dynamic ports. If you do not enable any port to function as a dynamic port after defining a dynamic port configuration set, the switch dashboard displays a message suggesting that you set a port to function as a dynamic port.

Similarly, if you enable a port to function as dynamic port but forgot to define the dynamic port profile assignment rules, the switch dashboard displays a message suggesting that you define the dynamic port configuration.
You can create dynamic port configuration from the switch template or from the switch detail page (switch dashboard).
Table Capacity insights (MAC address, ARP, and route tables)
The Switch Insights page now provides the following indicators in the new Table Capacity section:
-
MAC Address Table: Displays the percentage of the MAC address table capacity used. The MAC address table contains MAC Address-interface bindings associated with each VLAN.
-
ARP Table: Displays the percentage of Address Resolution Protocol (ARP) table capacity used. The ARP table contains the learned MAC Address-IP bindings of the devices connected to the network.
-
Route Summary: Displays the percentage of routing table capacity used.
You can hover over each of these indicators to view the number of entries in each table.

The color of these indicators changes depending on the percentage of the table capacity used, as shown below.
|
Color of the indicator |
Percentage of the table capacity used |
|---|---|
|
Green |
0 to 80 |
|
Orange |
81 to 90 |
|
Red |
91 to 100 |
LACP status for AE ports
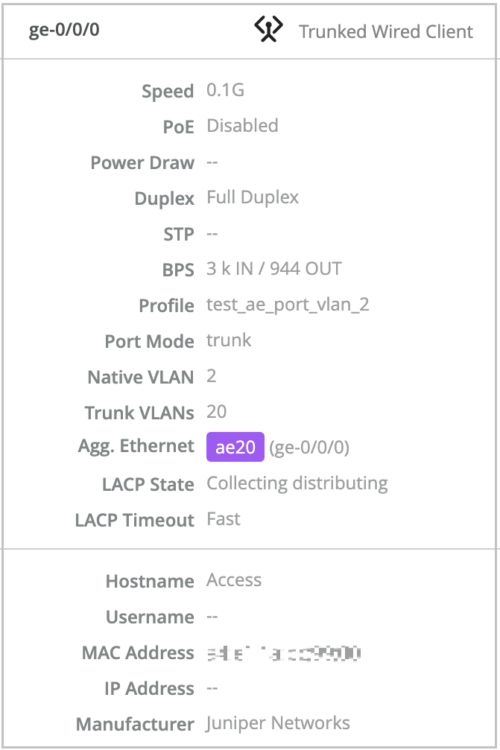
You can now view the Link Aggregation Control Protocol (LACP) states (or Mux states) of the aggregated Ethernet (AE) interfaces on your switch. The following LACP states are supported: Attached, Detached, and Collecting distributing. You can also see the LACP timeout information. The timeout values supported are fast and slow. If a port doesn’t have the aggregated Ethernet configuration, the LACP status is not available for that port.
To view the LACP status of a port, navigate to the switch dashboard (Switches > switch name) and hover over the port on the Front Panel tab. You can also click the port to view this information.
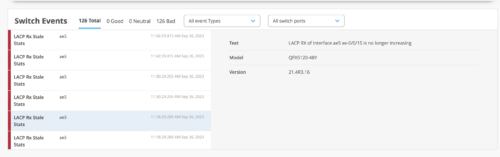
Switch event displayed when an AE interface doesn’t receive LACP stats
The Switch Events section on the Switch Insights page displays an event when an aggregated Ethernet interface included in a Link Aggregation Control Protocol (LACP) bundle does not receive the LACP stats despite the bundle being up.
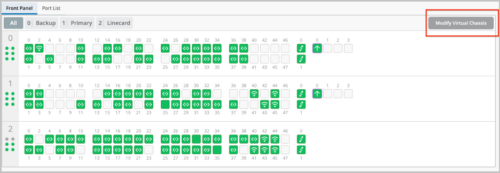
Virtual Chassis Enhancements
You can now add new members to a Virtual Chassis, or renumber or replace the existing members in a Virtual Chassis, by using the Modify Virtual Chassis option on the switch details page. This option replaces the Edit Virtual Chassis option on the Utilities menu on the switch list (the Switches page).
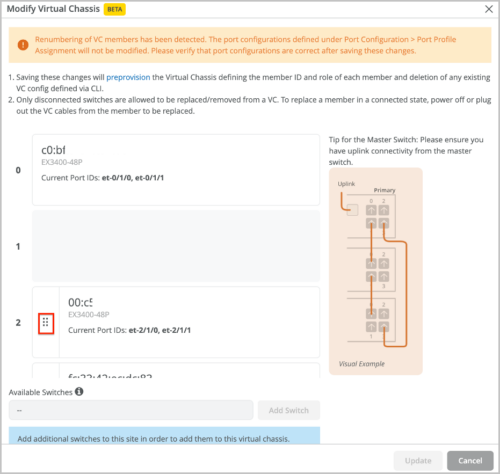
The Modify Virtual Chassis option is available for a switch only if its configuration is managed by Mist. This workflow leverages the Junos preprovisioning method which specifies the role and serial number of all members in a Virtual Chassis. To learn more about preprovisioning, see Example: Configuring an EX4200 Virtual Chassis Using a Preprovisioned Configuration File.
The Virtual Chassis formation workflow
This workflow remains the same. However, the Virtual Chassis is preprovisioned for all new Virtual Chassis formed via the cloud. The Virtual Chassis formation on the Mist cloud using the Form Virtual Chassis option on the switch list page is applicable only to the following three platforms: EX2300, EX4650, and QFX5120. All other EX Series and QFX Series platforms form a Virtual Chassis automatically when the dedicated VC ports are connected between two or more members.
The Modify Virtual Chassis workflow:
This workflow applies to all the EX Series and QFX Series platforms that support Virtual Chassis. Here are the enhancements to this workflow:
-
Renumber members within a Virtual Chassis: You can move around the port panel of a switch to change the order of the member. The order is incremental. The first entry is member 0, the second is member 1, and so on. You are required to specify the FPC0.
-
Changing the role of a member: You can change the role of a member to a primary or backup routing engine. All other members will assume the role of a linecard member.
-
Deleting a primary, backup, or linecard member: You can delete the members that are disconnected from the Virtual Chassis. To delete, click the trash icon.
-
Replacing a member: You can replace a disconnected Virtual Chassis member with another, by deleting the old member and adding a new switch.
-
Adding a member: You can add new member switches to the Virtual Chassis by clicking the Add Switch button.
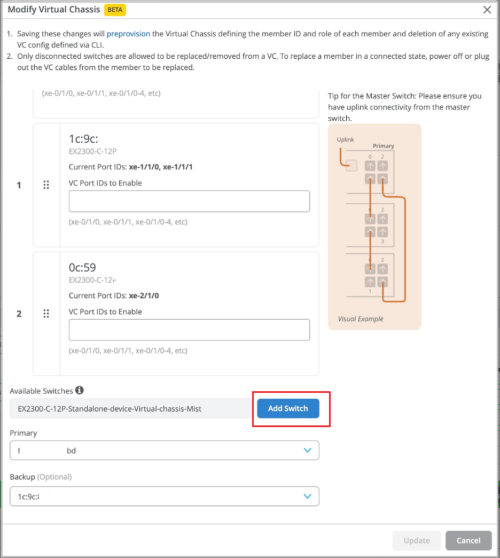
For the Add Switch feature to work, you must ensure the following:
-
The new switch is of the same model as the other members in the Virtual Chassis.
-
The new switch runs the same Junos version as the other members.
-
The new switch is connected to the network.
-
The new switch is assigned to the same site.
-
-
Within a Virtual Chassis, you cannot renumber, move around, or delete FPC0 unless it is disconnected. It is the device identifier for connectivity to the Mist cloud.
-
When you delete an FPC0, replace it with an existing member in the Virtual Chassis. You cannot add a new member during the deletion of the FPC0.
-
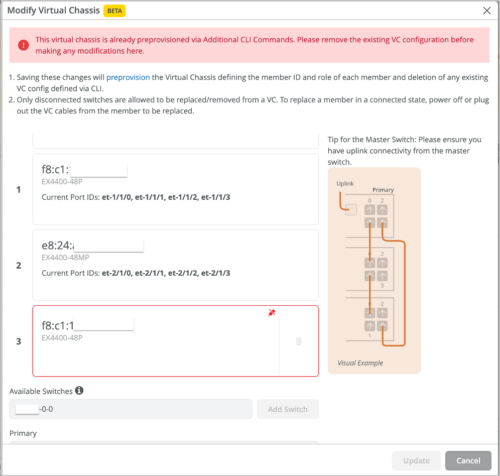
Prior to modifying a Virtual Chassis, you must delete any additional CLI commands related to the Virtual Chassis because those CLI commands take precedence over everything else.
-
The Add Switch dropdown will only show switches that meet the following criteria:
-
The switch should be a part of the same site. The switch models with dedicated Virtual Chassis ports can be in connected or disconnected state. However, for modifying an EX2300, EX4650, or QFX5120 Virtual Chassis, the members should be in connected state.
-
The switch is of the same model family.
-
The switch configuration is managed by Mist.
-
The switch is not currently part of the same or another Virtual Chassis.
-
The switch runs the same major firmware version as the existing members.
-
-
The Modify Virtual Chassis button is disabled when Configuration Management is disabled.
-
The Modify Virtual Chassis button is available and visible only to Super Users and Network Admins.
Bulk upload of switch configuration
Though the switch templates provide scalability, you had to still configure some device-specific fields such as IP addresses, Router-ID, Name individually on each device. You no longer need to manually configure these settings. Instead, you can import the following switch-specific configurations to Mist via a CSV file: MAC address, serial number, switch name, switch role, router-ID, IP configuration (OOB), Primary IP (In-Band), and Default Gateway (In-Band). The option to import the settings is available on the switch list page. To import the settings, select the switches that need to be configured and then click the Bulk Upload Configuration button.
The Bulk Upload Configurations window provides the required guidelines for you to perform the import. You can download a sample CSV file from the Bulk Upload Configurations window, update it with the required information in accordance with the guidelines provided, and then upload the file back.
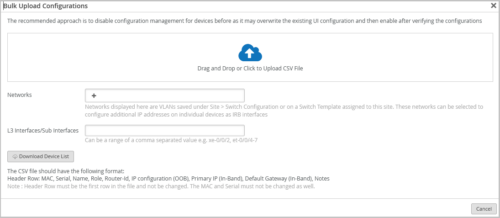
If you specify any networks or L3 interfaces on the Bulk Upload Configurations window, you can configure settings for the specified networks and interfaces. Networks are specified if you want to configure additional IP addresses on individual devices as IRB interfaces.
You must not modify the header fields, MAC addresses, and the serial numbers in the CSV file.
Support for port mirroring
You can configure port mirroring on switches at the organization level (Organization > Switch Templates), site level (Site > Switch Configuration) and device level. Port mirroring is the ability of a device to send a copy of a packet to an external host address or a packet analyzer for analysis. In the port mirroring configuration, you can specify the following:
-
Input: The source (an interface or network) of the traffic to be monitored. Along with the input, you can specify whether you want Mist to monitor the ingress traffic or the egress traffic for an interface. If you want both ingress and egress traffic to be monitored, add two input entries for the same interface – one with the ingress flag and the other with the egress flag.
-
Output: The destination interface to which you want to mirror the traffic. You cannot specify the same interface or network in both the input and output fields.

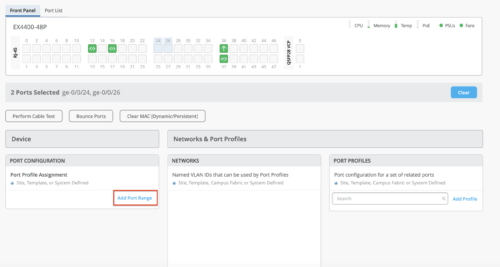
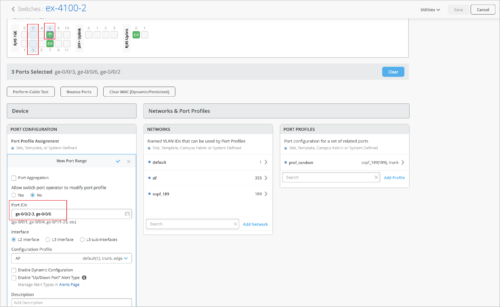
Enhancements to the port selection page
On the Switch Detail page, we have made the following enhancements to the bulk port action functionality:
-
On the port selection view, the Edit Port Configuration port action has been replaced with Add Port Range under Port Configuration. This new implementation is consistent with the original Add Port Range on Switch Detail page.
-
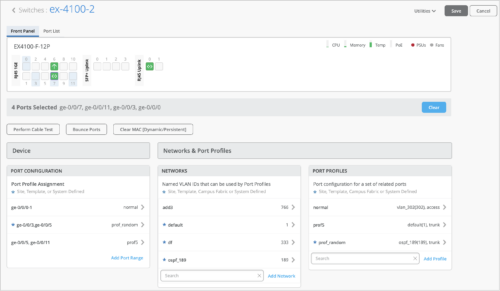
When you select multiple ports from the front panel view, the configuration page filters the Port Configuration, Networks, and Port Profiles settings applicable to the selected ports. If the selected ports do not have any configuration, the Port Configuration, Networks, and Port Profiles tiles are displayed without any data.
-
When you select a single port from the front panel view, the configuration page filters port Statistics and Wired Client insights in addition to the Port Configuration, Networks, and Port Profiles settings.
-
When you add a port range by using the Add Port Range option in the Port Configuration tile, the New Port Range window prepopulates the Port IDs field with the ports you selected on the Front Panel view.
Support for configuring DNS, NTP, and RADIUS as site variables
Different sites may have unique DNS or RADIUS configurations. Mist now supports these use cases by providing an option to configure DNS Settings (Servers and DNS Suffix), NTP, and RADIUS servers as site variables at the switch template level. Site variables provide a way to use tags to represent real values so that the value can vary according to the context where you use the variable. This means the same variable can configure different values in different sites. You can configure DNS, NTP, and RADIUS as site variables on the organization-level switch templates:
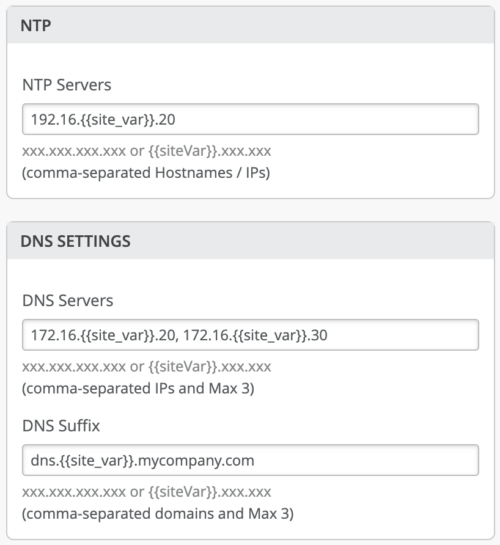
As each site has a corresponding value, the site variables are resolved on each device as shown below:

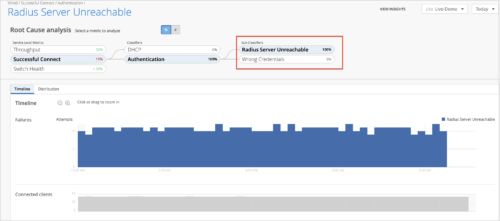
New Sub-Classifiers under Successful Connect SLE
We have added two new Sub-Classifiers to the Successful Connect metric in the Wired SLE framework. The Successful Connect metric tracks the percentage of successful authentication and DHCP requests initiated when a client initially connects to a wired port.
The following are the new Sub-Classifiers added:
- Radius Server Unreachable – If the RADIUS server configured to process authentication requests for wired ports is unresponsive from the switch (NAS), the SLE counts bad user minutes for the impact seen by users because of the authentication request failure. This sub-classifier will also display the switch that’s reporting the RADIUS server unreachability.
- Wrong Credentials -If wired clients’ attempts to connect to the network fail because of incorrect credentials (username or password), the SLE framework determines the issue from the data collected by the switch from the RADIUS server.
WAN Assurance
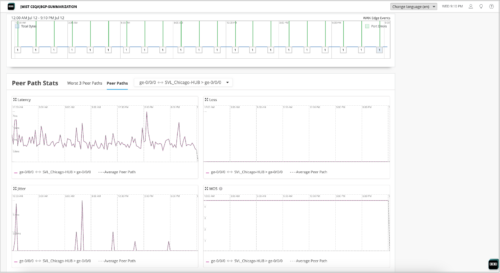
Jitter, loss, and latency views for overlay links (SRX Series)
The WAN Edge Insights page for the SRX Series devices now shows jitter, loss, and latency data for overlay links. These network performance metrics provide insights into the quality of your network connection. These features are already available for SSR.
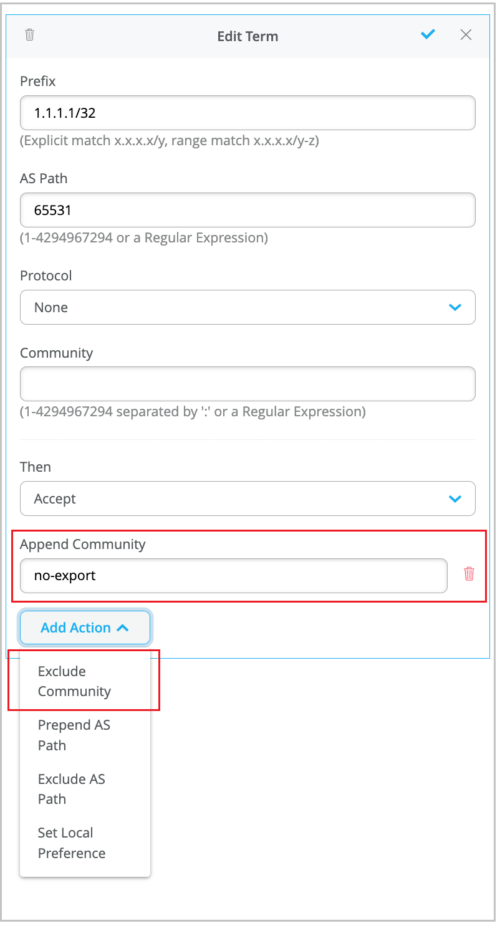
Support for appending and excluding communities in BGP routing policies
You can configure the BGP routing policies on your WAN Edges to append a new community value to the existing community values. Previously, the only option available in the BGP policy was to completely replace any community values existing in the prefix received, using the Set Community action.
The BGP routing policy now supports the following new actions:
-
Append Community: Appends the specified community value to the existing communities. The Append Community and Set Community actions are mutually exclusive.
-
Exclude Community: Excludes the specified community. The Exclude Community and Set Community actions are mutually exclusive.
If you specify both Append and Exclude actions for the same community value, the Append action takes priority.
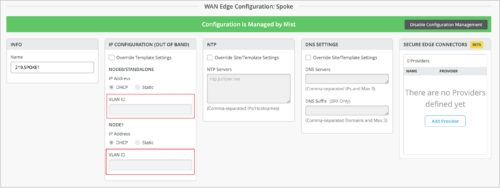
VLAN support for IP configuration (out of band)
The WAN Edges now support VLAN configuration for out of band management interfaces that use DHCP. You can configure a VLAN for the out of band management interface from the IP CONFIGURATION (OUT OF BAND) tile on the WAN Edge configuration page (WAN Edges > WAN Edges > device name). This option allows you to perform out of band management using a separate management network. Mist also places the out of band management traffic into a dedicated management virtual routing and forwarding (VRF) instance.
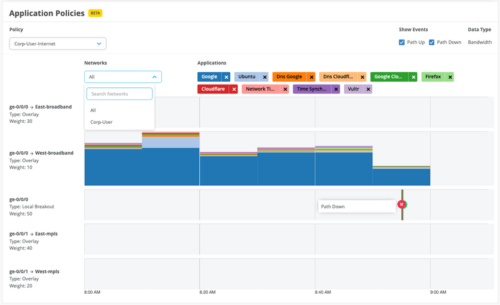
Application path insights
We have added an Application Policies dashboard to the WAN Edge Insights page. This dashboard shows the paths the application traffic takes to traverse through the network. The information displayed also includes the WAN links and the details of any events that impacted those paths. You can view this information for each policy. If your policy contains a lot of source networks and users, you can apply filters to view the source network or users that you are interested in.
Enhanced WAN Edge port insights
We have enhanced the WAN Edge Port insights section with an Application TX+ RX Bytes dashboard. The dashboard provides a default view of the top 10 applications on the WAN links of a given WAN Edge device based on traffic. You can choose to view the data per interface or for all interfaces together.

New critical IDP profile for SRX
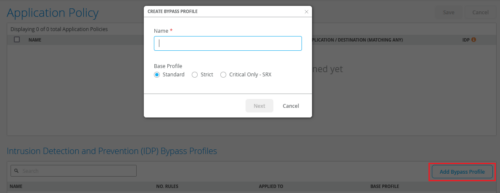
We have added a new Intrusion Detection and Prevention (IDP) profile to the application policy configuration for SRX devices. The new profile, called Critical Only – SRX, detects critical attack signatures and takes the recommended action. You can select the new profile from the IDP drop down menu on the application policy configuration page (Organization > Application Policy).

The IDP policies enable you to selectively enforce various attack detection and prevention techniques on the network traffic passing through an IDP-enabled device. The SSR support will be available in 2024.
Client telemetry based on DHCP events
The WAN Edge Insights page now displays some additional client details based on DHCP events. The details displayed include hostnames of some clients which were previously listed as anonymous devices. This information is displayed on the clients list launched from the Number of clients column in the Applications section on the WAN Edge Insights page.
IDP bypass profiles
You can add exceptions to your Intrusion Detection and Prevention (IDP) Profiles by configuring them with bypass profiles. An IDP profile can have multiple bypass profiles, each with multiple bypass rules. The option to add bypass profiles is available only for the IDP profiles of the following types:
-
Standard – The Standard profile is the default profile and represents the set of IDP signatures and rules that Juniper Networks recommends. Each attack type and severity has a Juniper-defined, non-configurable action that the IDP engine enforces when it detects an attack. The possible actions are as follows:
-
Close the client and server TCP connection.
-
Drop the current packet and all subsequent packets
-
Send an alert only (no additional action).
-
-
Strict – The Strict profile contains a similar set of IDP signatures and rules as the standard profile. However, when the system detects an attack, this profile actively blocks any malicious traffic or other attacks detected on the network.
-
Critical – Only SRX – (Applicable only to the SRX Series devices) This profile detects critical attack signatures and takes the recommended action. Note that Mist recommends the ‘Critical – Only SRX’ profile for SRX300 line of firewalls.
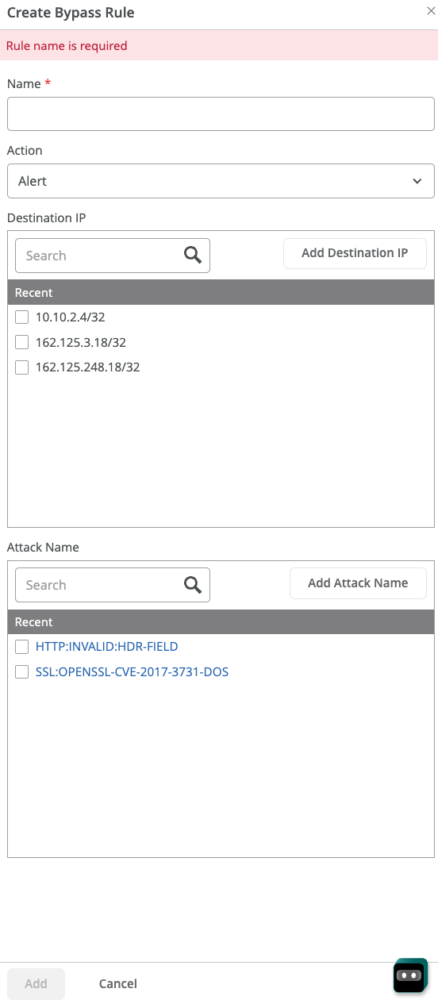
To know about these profile, see IDP-based threat detection (SRX) and IDP-based threat detection (SSR). You can create IDP bypass profiles from the Organization > Application Policy page.
You can create bypass rules against specific destination IP addresses, attack names, and severity.
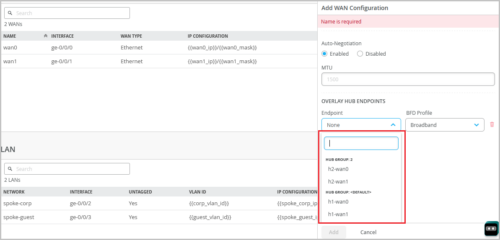
Hub group configuration in hub profile
To help you scale your hub architecture horizontally, we have introduced hub groups. Each hub group can support up to 31 hub endpoints, helping you overcome the previous limit of 31 hub endpoints per overlay. With this change, you can use hub groups to increase the number of overlay paths.
The configuration workflow involves the following:
-
Configuring the hub group on the hub profile. Supported values range from 2 to 128. If you want to add multiple hubs to the same hub group, configure the same hub group value on all the hub profiles involved. The value 1 represents the default hub group.

-
Selecting overlay paths to hubs (OVERLAY HUB ENDPOINTS) on a spoke device. The endpoints are filtered under each hub group configured. You can do this from the WAN configuration section on a spoke device details page (WAN Edges > WAN Edges > WAN Edge name) or in a spoke template (Organization > WAN Edge Template > WAN Edge template name).
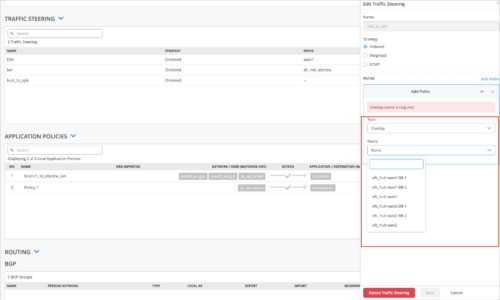
Hub-to-spoke traffic steering
The hub profiles let you control the selection of path for the traffic going from hub to spoke. To do this, follow the steps below:
-
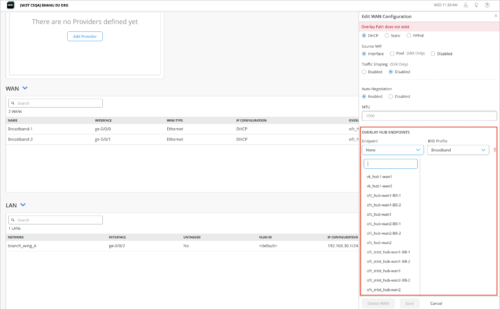
(Applies only to the SSR devices. For SRX Series devices, a default endpoint is used.) Configure hub-to-spoke overlay endpoints in the HUB TO SPOKE ENDPOINTS section on the hub profile. Starting in this release, Mist lets you specify hub-to-hub and hub-to-spoke endpoints separately. The hub-to-spoke configuration field consists of two parts – a read-only part that shows the hub profile name and an editable part in which you configure an endpoint name. Note that we have replaced the field label Overlay Hub Endpoint with Default Endpoint and moved it to the HUB TO SPOKE ENDPOINTS section.

-
Specify the hub endpoint (configured in the previous step) on the spoke device details page (WAN Edges > WAN Edges > WAN Edge Name) or spoke template (Organization > WAN Edge Template > WAN Edge Template Name). You can select the hub endpoint on the spoke from the OVERLAY HUB ENDPOINTS field in the WAN configuration section. These endpoints are listed per hub group.
-
After configuring the endpoints, use them in the traffic steering configuration on the hub (on the Organization >Hub Profiles > Hub Profile Name page) to steer the traffic going from hub to spoke. You can choose from the following three strategies: ordered , weighted, and ECMP. Based on this selection, traffic will be steered through the corresponding paths from hub to spoke.
New BGP options on Mist Networks
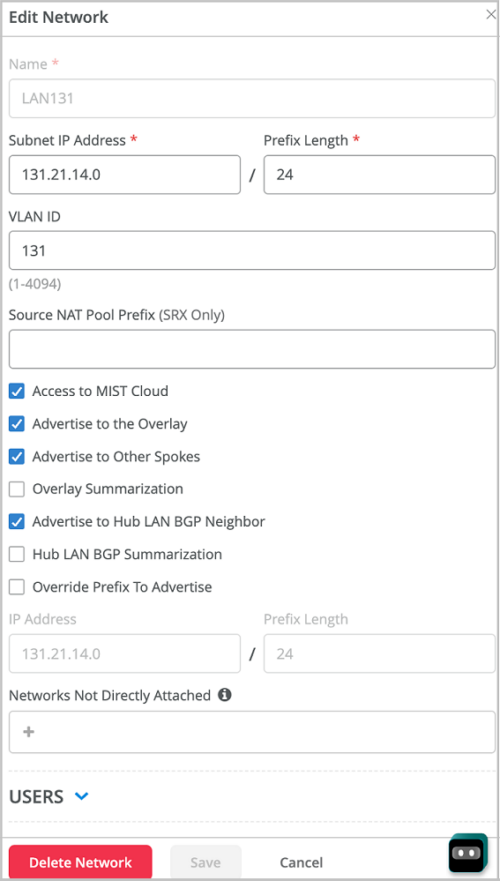
We have introduced the following options on the Networks page (Organization > Networks):
-
Advertise to Other Spokes: Enable this network to advertise the network prefix to other spokes. This option is enabled by default. If you want the network to advertise this prefix only to the hubs, but not to other spokes, disable this option.
-
Advertise to Hub LAN BGP Neighbor: By default, this network prefix is advertised to any LAN BGP neighbor at the hub. If you do not want the network to advertise this prefix to the hub LAN BGP neighbors, disable this option.
-
Overlay Summarization: Enable this network to summarize the network prefix advertised to the overlay. For instance, Mist can summarize 192.168.1.0/24 to 192.168.0.0/16. This feature limits the number of BGP updates received by a hub from each spoke and sent by the hub back to all the other spokes.
-
LAN BGP Summarization: Enable this network to summarize the network prefix advertised to the LAN BGP neighbor. For instance, Mist can summarize 192.168.1.0/24 to 192.168.0.0/16.
- Advertise to the Overlay: Enable this feature on the BGP LAN or WAN section in the WAN template to advertise the BGP prefixes from LAN BGP to the overlay.
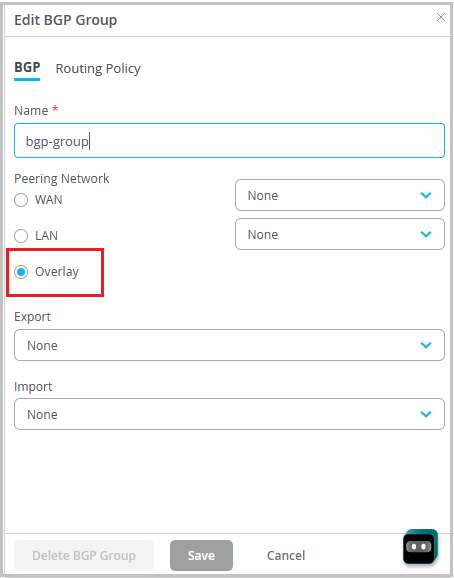
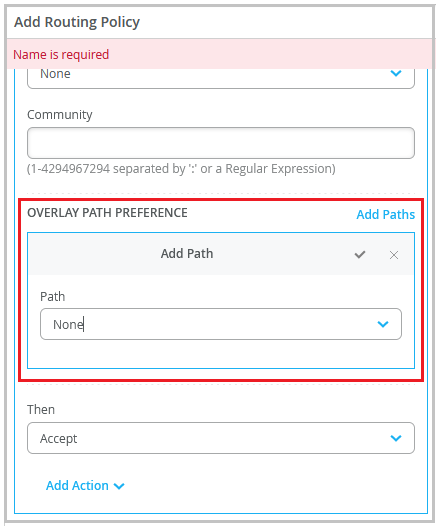
Overlay traffic steering for BGP-learned prefixes
You can specify a preferred path for the traffic going from a spoke device to the BGP-learned prefixes, by configuring overlay path preferences in the routing policies on the spoke devices. This feature allows you to determine which hub the traffic should pass through. You can do this by performing the following steps in the BGP section on the spoke device details page (WAN Edges > WAN Edges > WAN Edge Name) or in the spoke device template (Organization > WAN Edge Templates):
-
Configure a BGP group with Overlay selected as the peering network.
-
Configure a routing policy with the intended overlay path preferences in the policy term. The OVERLAY PATH PREFERENCE field populates the overlay endpoints defined in the WAN configuration section of the spoke device.
-
Select this policy as the Export policy on the Edit BGP Group window.
Support for blocking traffic at the URL subcategory level
You can now configure WAN Edge devices to block traffic at URL subcategory level. This feature provides you with more granular control in blocking traffic as it allows you to define application policies for a subset of URLs. You can select URL subcategories from the application creation screen (Organization > Applications > Add Applications).
Previously, Mist supported configuration of application policies for URLs at the category level, which would mean applying the same policy to multiple URL subcategories.
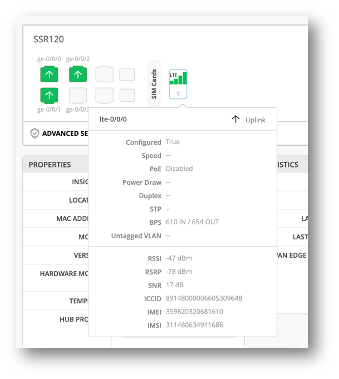
LTE interfaces on front panel
The WAN Edge front panel now displays LTE interface-specific information for compatible SSR and SRX devices. The front panel has a port icon to represent LTE interfaces. You can hover over the port icon to view the following LTE-specific information along with interface status details: Received Signal Strength Indicator (RSSI), Reference Signal Received Power (RSRP), Signal-to-Noise Ratio (SNR), Integrated Circuit Card ID (ICCID), International Mobile Equipment Identity (IMEI), and International Mobile Subscriber Identity (IMSI).
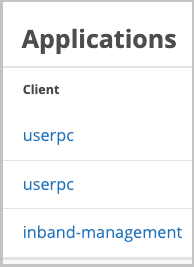
Support for viewing additional DHCP client information
SRX devices with a DHCP server configured send the following additional DHCP client information to the Mist cloud: Client, MAC Address, and Device Type. You can view these details along with the number of applications, TX bytes, RX bytes, and total bytes in the Applications section of the WAN Insights page.

Platform Updates
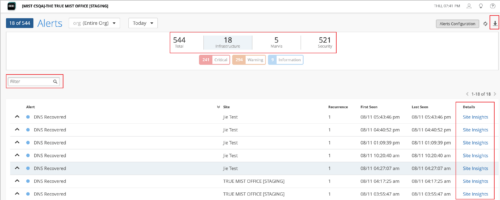
Enhancements to the Alerts page
We have added the following new features to the Alerts page (Monitor > Alerts) with a view to making your interactions with the page easier:
- Group-wise stats—Filter and view alerts related to Infrastructure, Marvis, or Security groups. You can also view the total number of alerts. To filter the alerts, just click the group button at the top, on the dashboard banner.
- Download icon—Click the Download icon on the top right of the page to download the alert details for the selected scope in a CSV file.
- Search filter—Filter and view alerts based on keywords.
- Links to related pages—Use the hyperlinks in the new Details column to access the related Mist portal pages quickly. The Details column provides links to:
- The Marvis Actions page when Marvis alerts are present.
- The relevant insights pages when infrastructure alerts are present. Links to site insights are displayed when the Alerts page generates the same alert for more than one device in a site. Links to the AP, switch, or WAN Edge insights page are displayed when the alerts are present on one device.
- The network security page (Site > Security) when a security alert is present.
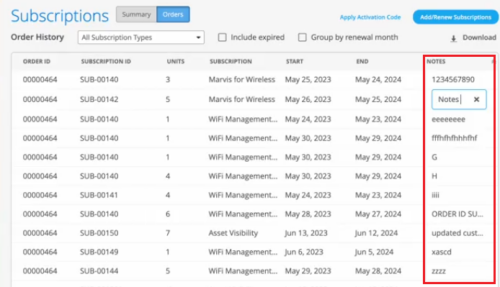
Customer-specific notes in subscriptions
You can now add notes to your subscription orders on the Organization > Subscription > Orders page. This feature helps you track subscriptions based on custom requirements. For example, if the subscription budget is tied to a site or department, you can use the notes to track the same. To add a note, click inside the NOTES column against a subscription order, and type the notes.
Operating mode status for APs
For each AP that operates in a reduced functionality mode, the Access Point page provides a warning icon along with a tooltip displaying the AP’s operating mode details such as the configured radio bands and the supported antenna chains in each band. To view the operating mode information of an AP that is in a reduced functionality mode, hover over the warning icon displayed alongside the AP status.
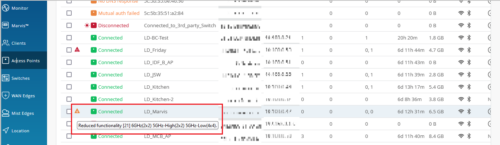
Only AP43 and AP45 support the reduced functionality mode, when specific configurations are applied. An AP45 requires the 802.3bt standard for a 4×4 antenna chain support in all the radio bands configured. However, if you enable this AP with the 802.3at standard, it operates with a fewer number of chains. The AP43 operates in the reduced functionality mode when USB peripherals are activated.
Enhancements to Client movements on Live View
The Live View page (Location > Live View) for client locations has been updated with enhancements for seamless client movement rendering for all client types. The change applies to:
- SDK Clients
- Named Assets
- Discovered Assets
- Connected Wi-Fi Clients
- Unconnected Wi-Fi Clients
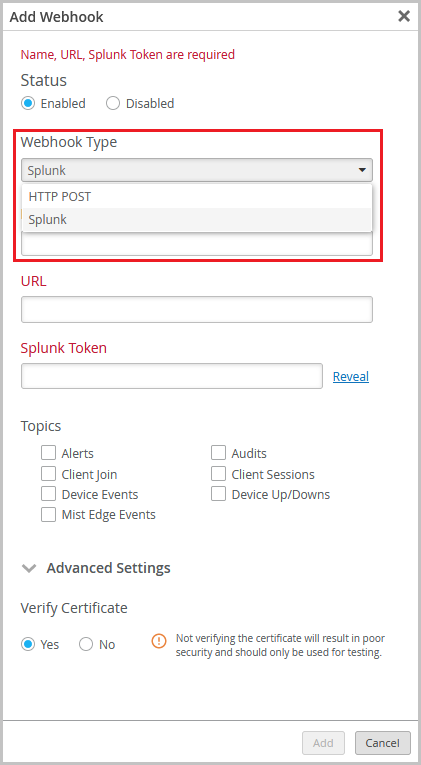
Webhook configuration redesign
The webhook configuration in the organization and site settings has received a facelift. Webhooks enable you to receive real-time updates from Mist on a variety of topics that include alerts, device up and down information, and audit logs. You can now configure multiple webhooks with different topics or destinations. You also have an option to configure the Splunk webhook format. Splunk is a platform used for collecting, indexing, and analyzing data. You can configure the Splunk webhook by selecting Splunk from the Webhook Type drop-down list on the Webhooks tile on the Organization > Settings or Organization > Site Configuration > site name page. The Splunk webhook type does not support custom headers. The default webhook type in Mist is ‘HTTP POST’.
Support for importing site variables
You can now import site variables to Mist in a CSV file. You can import the site variables from the Site Variables tile on the site configuration page (Organizations > Site Configuration > site name).
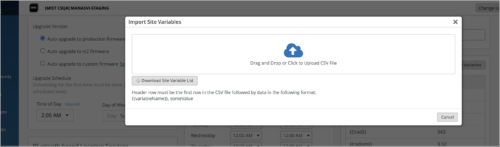
If any variables in the CSV file conflict with the existing site variables during the upload operation, Mist discards them. Only new variables are uploaded.
You can use one of the following methods to upload the site variables:
-
Download the current site variable list in a CSV file from the Import Site Variables window, append new variables to the list and upload it.
-
Upload a completely new CSV file without the existing variables.
The CSV file must have a header row that contains the fields Variable,Value. The header row must be followed by the variable names and the values in this format:{{variableName}},someValue. See the following sample:
Variable,Value

{{ssid}},Mist Guest

{{guest_vlan}},957
Support for 24-hour clock
The Mist portal now supports the 24-hour clock. By default, Mist maintains a 12-hour clock. If you want to switch to a 24-hour clock, select the 24-Hour Time check box from the My Account page (as shown below). The default date format is MM-DD-YYYY.

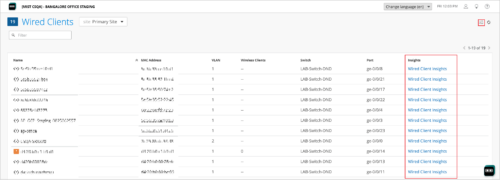
Quick access to insights from list pages
You can now access the insights view of your sites, devices, and clients from their list pages. This option is helpful for Mist admins who need to frequently access the insights data for troubleshooting purposes. Previously, for device and site insights, you had to navigate to the device and site details pages.
The following are the list pages that now provide the option to access the insights view: Access Points, Switches, WAN Edges, Cellular Edges, Mist Edges, Wired Clients, Wi-Fi Clients, and Sites (Organization > Site Configurations). These pages display hyperlinks to access the insights view, in the Insights column.
Support Tickets UI redesign
To streamline our customer support process, we have revamped the Support Tickets creation UI on the Mist portal. The new UI lets you submit issues or questions with more specific details, helping you reach the right support team quicker. You can group your issues under specific technology types that include Wireless, Switching, SD-WAN, NAC, Location/Analytics, and Others. The new UI supports the following ticket types:
-
Questions: Submit your questions.
-
Subscriptions: Request support for a subscription order. You need to provide a ticket summary along with the subscription order ID.
-
Configuration Help: Request support for your configuration.
-
Problem: Submit a problem. You can specify whether the problem impacts the network fully or partially, or it affects only specific devices or sites. You can also raise RMA requests from here.