The Mist Experience application demonstrates the use cases that are enabled by the location services using Mist SDK and Mist API delivered by Mist Systems leveraging directional vBLE arrays and Unsupervised machine learning.
Mist Experience app is available for App Store and Play Store. This App is compatible with the following device:
- iPhone, iPod, and iPad with OS version 10 or later.
- Android phone and tablet with OS version 6.0 or later.
Features
Application Wake-up
- Send a notification for application wake-up to the user when he/she is in or near an organization’s location when the app is not running in the foreground or background. The app does need to register once prior to that location.
Location-based Notifications
- Send notification based on a specific location or area in an organization’s facility, leveraging Mist’s patented virtual beacons
Wayfinding with location Blue Dot
- Shows a map of where the user is and a blue dot that pinpoints his/her specific location. Mist SDK makes the location based real time blue dot experience come to life. For turn by turn navigation and underlying path routing logic for wayfinding, we work with 3rd party mapping systems, and have an ecosystem as well: https://www.mist.com/
ecosystem#
Select Profile
- Selecting a profile simulates a logged-in user’s name and image for a clearer demo.
Request for help
- Two different modes that enable a customer to request help and an associate to respond to this request. Achieved through a workflow that also shares location information.
Named/Discovered Assets:
- By enabling this feature, all named or discovered assets will display on the floor map.
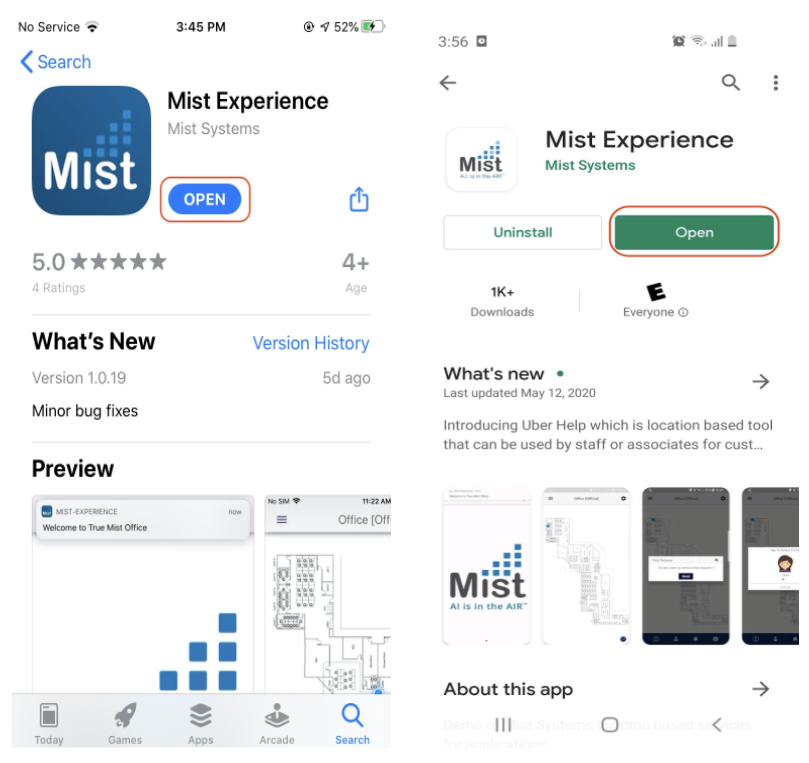
Download and Install App
- Go to App Store or Play Store and search for “Mist Experience”
- You can download and install the App from here.
- Click on open.
Search on App Store and Play Store, download, and install the Mobile App.
- Open the Mobile App, click “Allow while using App” to access location services and “Allow” to enable notification.
- Initially, the Organization list is empty.
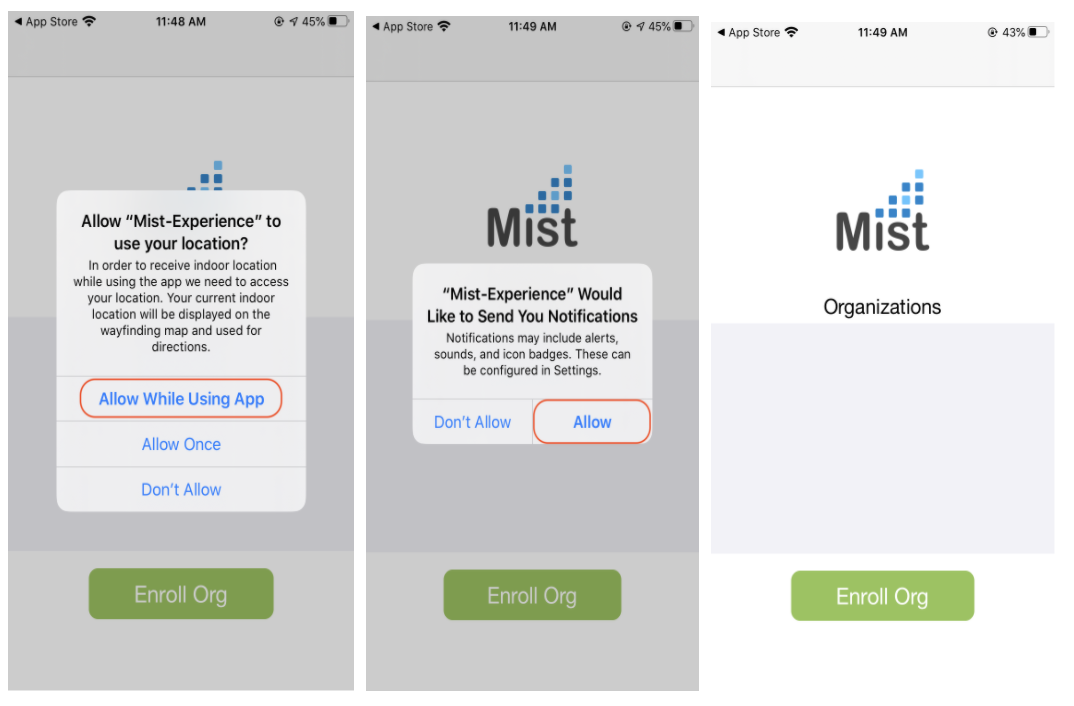
Grant permission to access location and notification service
Getting Started with Mobile SDK
Mist Experience app demonstrates all the features of the Mist location services using Mist SDK. This app showcases all use cases that can be achieved by implementing Mist SDK into the customer app.
To get started with this App, you need to create a Mobile SDK invite from the Mist Dashboard.
- Log in to the Mist Dashboard
- Go to Organization → Mobile SDK
- Select “Create Invitation” located to the upper right-hand-side corner of the page.
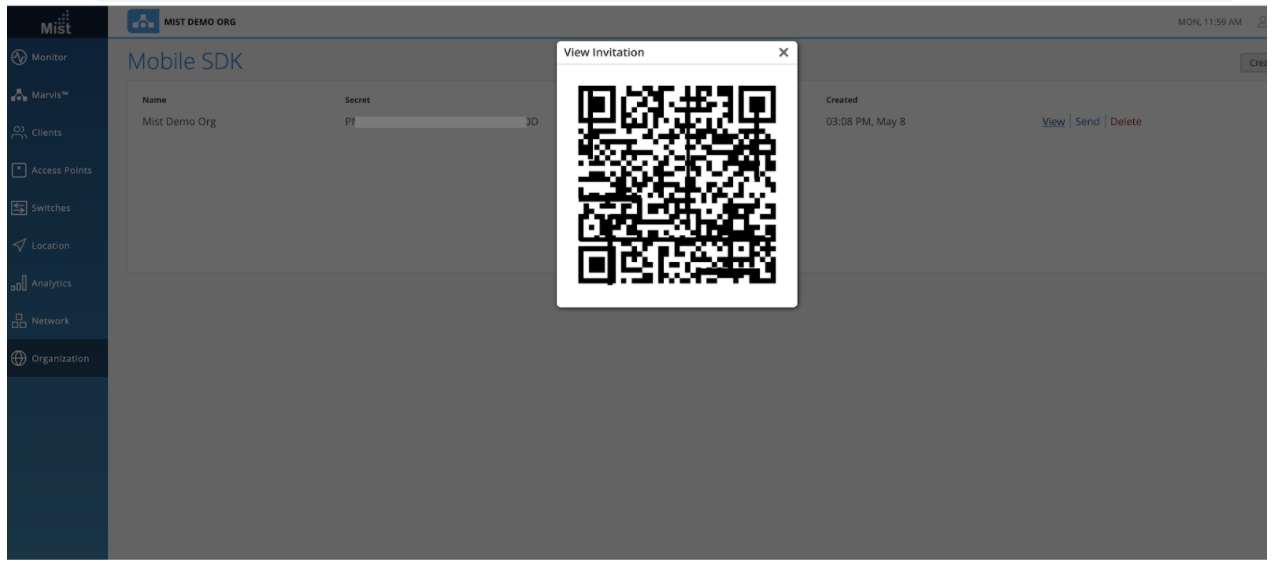
- Click on “View” and you can see the QR code to Enroll the device with Org using Mist Experience App.

Create Mobile SDK Invitation
Scan the QR code to Enroll Org
Organization List:
After installing the Mist Experience app on your device and creating a Mobile SDK invitation from Mist Dashboard, you are good to start.
To register your device to the Organization, you need to scan the Mobile SDK QR code using Mist Experience App. Once done, you can see the Mobile SDK invite name in the Organization list in App.
Follow the steps below:
- Log in to the Mist Portal
- Go to Organization → Mobile SDK
- Click on “View” on any of the invites on the list. This will display the QR code that is needed.
- On the app side, tap on “Enroll Org”. It will then prompt an alert asking to grant permission to access the device camera.
- Once you click on “OK”, this will bring up the QR scan camera
- Scan the QR code from the Mist dashboard.
- This will add the organization in the list. Select your org to proceed.

Scan QR code in iOS Mobile App
For Instance: Here, “Mist Demo Org” is the Mobile SDK invite name which will appear in the Organizations list after enrolling Org by scanning QR code.

Scan QR code in Android Mobile App
Mobile Engagement:
Mobile engagement provides features such as wayfinding, customer-associate flow, app settings and request for help. Once you select this option, you will land on the Persona page – Customer and Associate.
- Select the intended role (Customer or Associate) and you will navigate to the Home page with Mist Logo.
- From the Home page, tap on the menu on the top left-hand-side corner of the screen to reveal the feature set offered.
- From the side menu, select “Wayfinding” that will load the floor map and blue dot showing the current location on the floor plan.
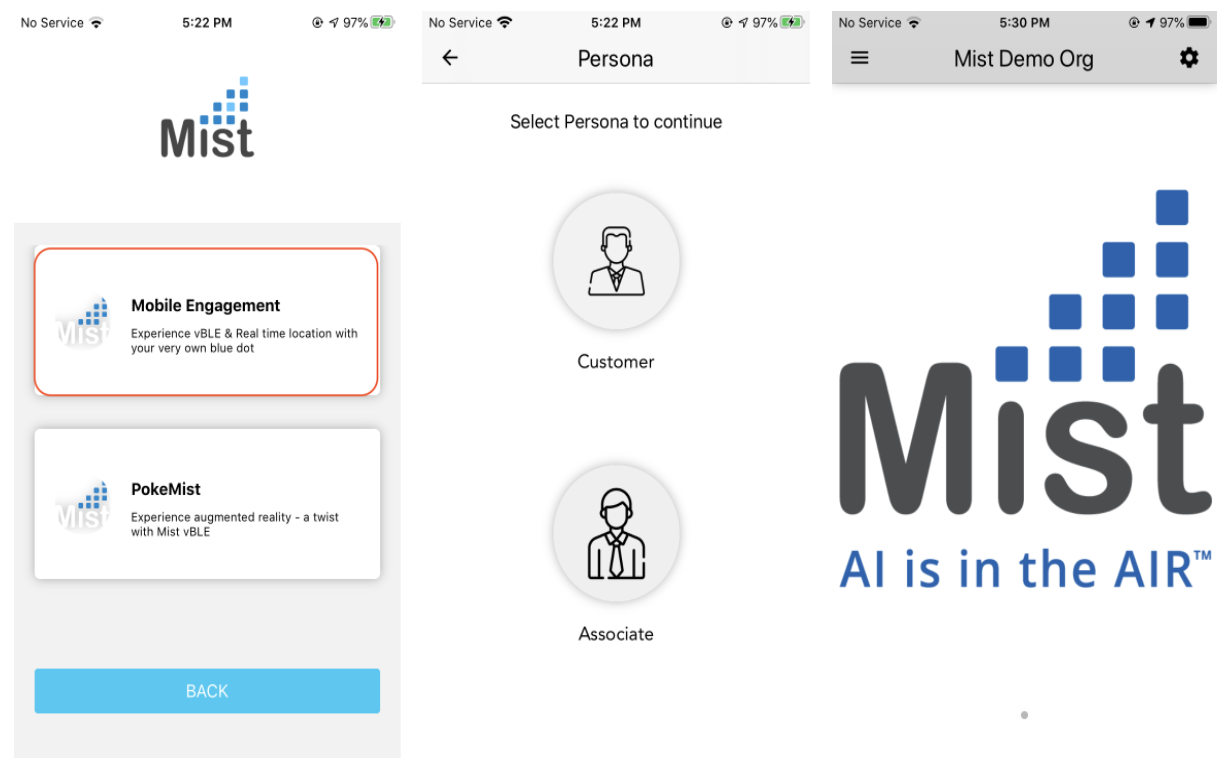
Mobile Engagement, Persona selection, and home page
App Menu
After persona selection, you land on the Home page. To the upper left corner of the screen, you can select Hamburger Menu. The menu consist of the following options:
- Home: This option navigates to the home page with the Mist logo.
- Wayfinding: shows a map of the current location that the user is in. A blue dot displays the user location in the map.
- Settings: opens the Setting from the right side – sliding menu. You can also swipe left from the right edge of the home screen to view this.
- Profile: shows profiles for demo purposes of the “request for help” feature. Selecting a profile shows the associate the profiles icon and name the customer has selected
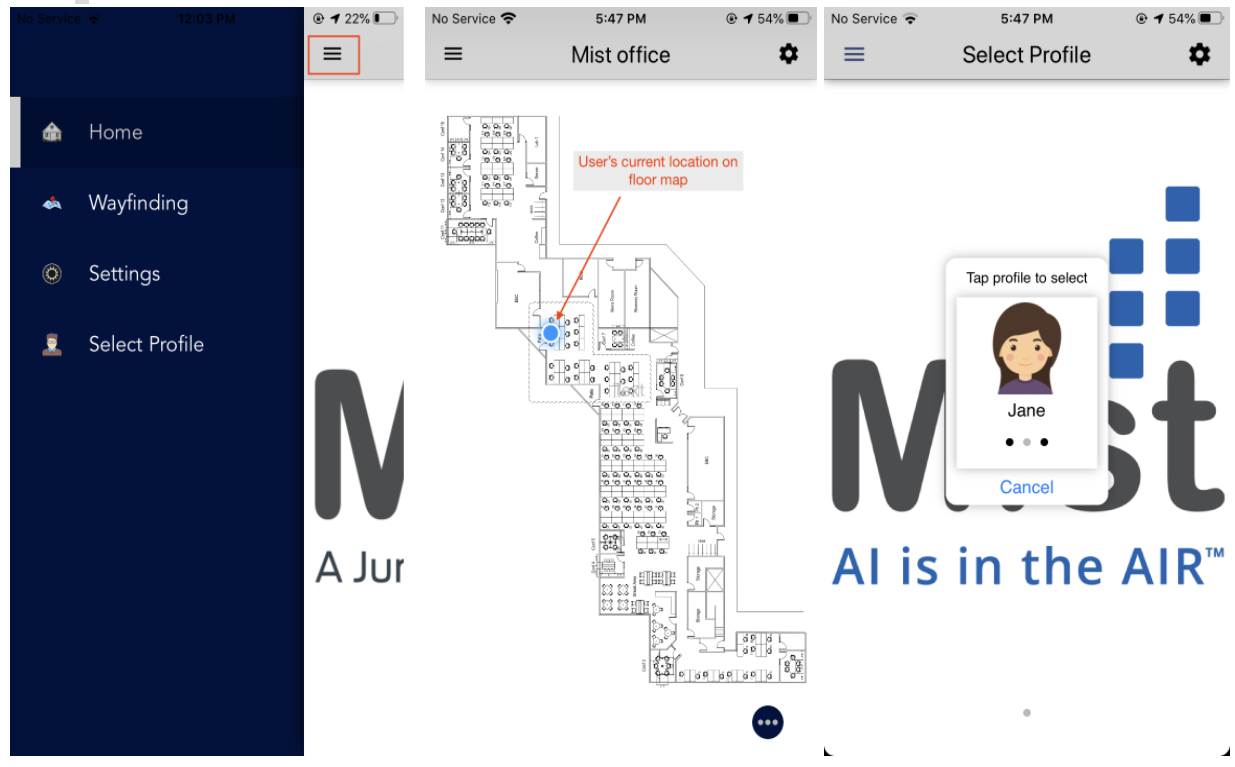
App Menu, Wayfinding and select profile
Customer
Customers are the users who can request for help/service from the App.
- After selecting the Customer from the persona screen and Wayfinding from the home page side menu, you can see the floor plan and blue dot showing your current location.
- Click on the expand button to the bottom right-hand-side corner to view the tab bar options.
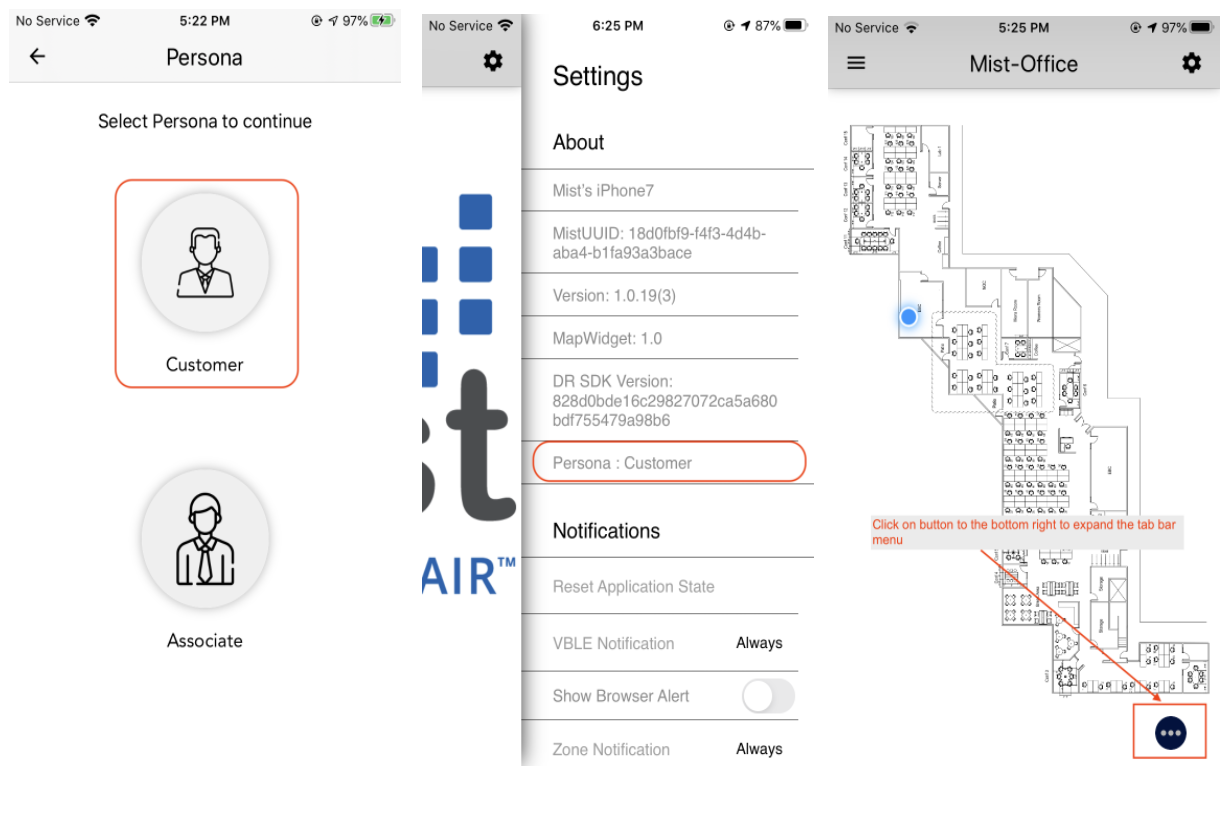
Select Customer role
- Select the “Request for Help” to the bottom of the screen which is used to send a help request.
- An Associate will be notified about the request and he/she will reach out to your current location shown on the floormap.

Send a request for help
Associate:
An associate is a user who helps customers to resolve the request. Users with an associate role should select “Associate” from the Persona menu. They will get a notification whenever the customer requests for help.
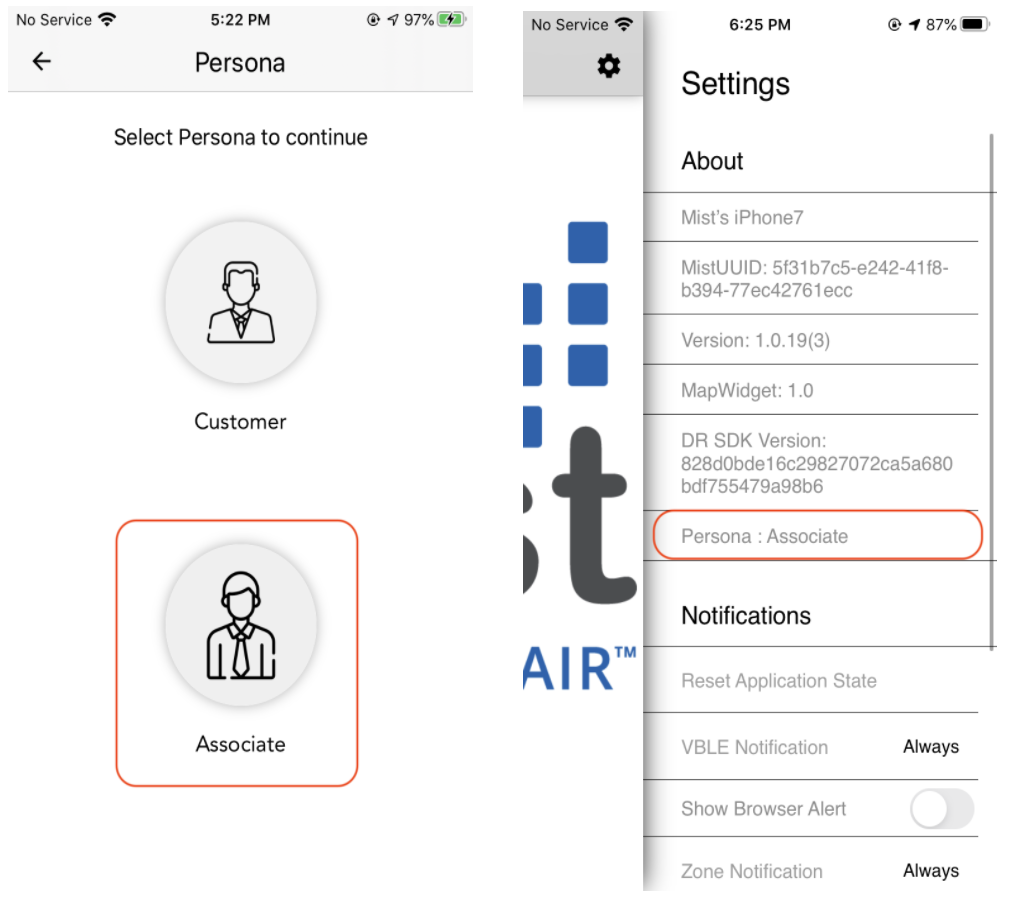
Select Associate role
- When the request is sent by the Customer, the Associate will receive the Help Alert notification.
- In the Wayfinding screen, the Associate can accept the request and walk towards the customer’s current location which is shown on the floor plan.
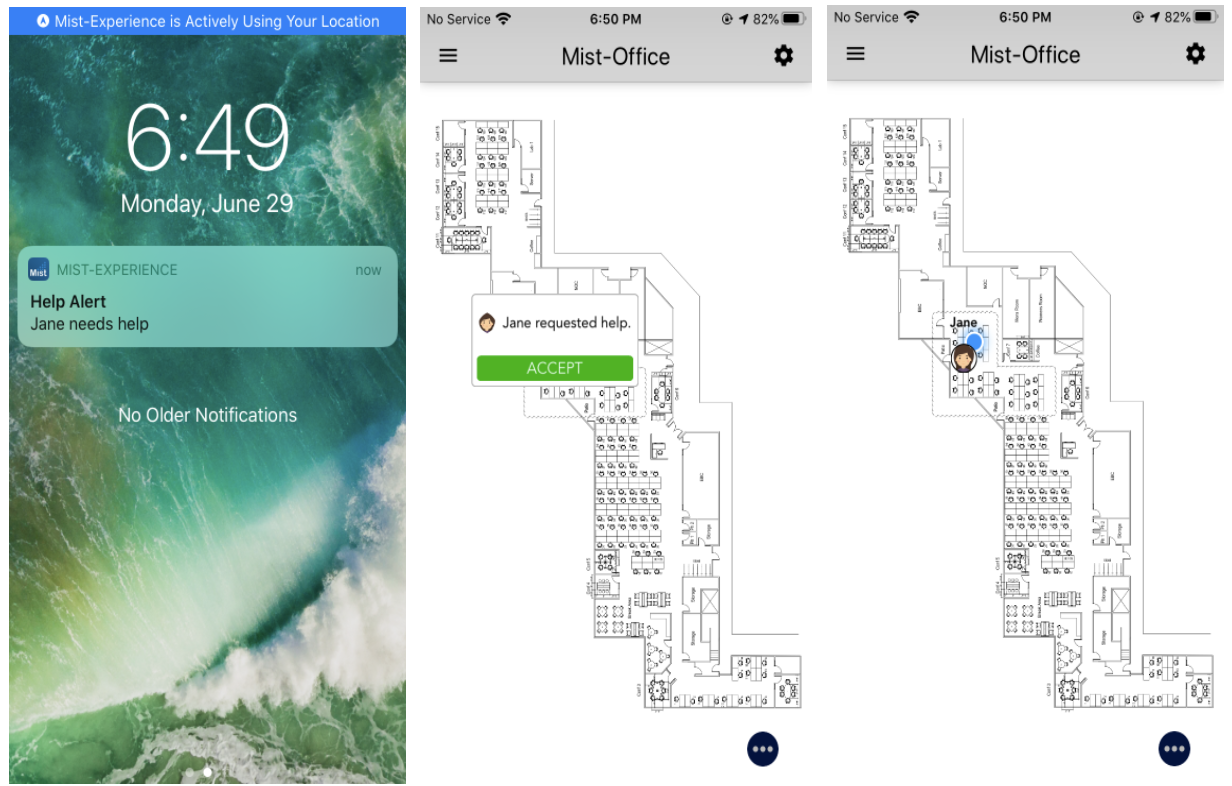
Associate resolving customers help request
Wayfinding
Way-finding is all about getting people to places. It refers to guiding people through a physical environment and enhancing their understanding and experience of the space. Indoor wayfinding is particularly important in complex built environments such as Educational Campus, Healthcare, Airports, Museums, Shopping malls, and many more.
To enable Wayfinding in Mist, you need to enable it from the Mist Dashboard by adding wayfinding paths. Wayfinding paths are the equivalent of Google Maps and Roads.
Mist has also partnered with map vendors such as Jibestream and Micello to enhance the wayfinding experience. To enable this feature, you need to configure a third party map on the Mist Dashboard.
- Once Third-party maps (Micello or Jibestream) are imported and set up on the Mist Dashboard, you can do wayfinding using this app.
- Wayfinding widget on the left side will help navigate to the desired destination.
- By clicking Navigate, you can see a routing path to the destination and you can start walking on this path.
- Once you reach the location, you can click on End Route and the path is removed from the map.
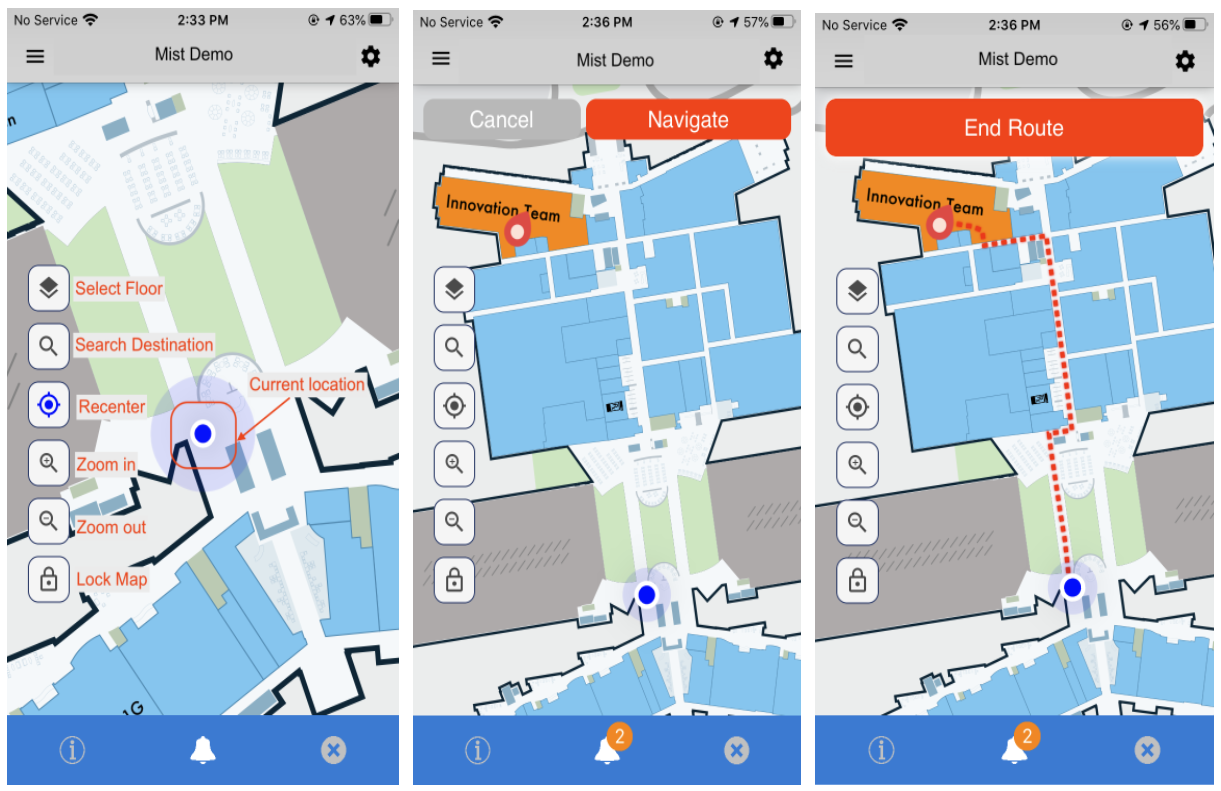
Wayfinding using Jibestream map in Mist Experience
Mist SDK makes the location based real time blue dot experience come to life. For turn by turn navigation and underlying path routing logic for wayfinding, we work with 3rd party mapping systems, and have an ecosystem as well: https://www.mist.com/
PokeMist
PokeMist is a fun interpretation of PokemonGo. To make this feature work, please make sure you have the vBeacon setup done in Mist Dashboard.
- Add vBeacons on your floor map in Mist Dashboard ➡️ Live Location view.
- Make sure vBeacon has title and message. Without title or message, PokeMist will not be shown on the Mobile app.
- Once the setup is done, in the Mist Experience app, select PokeMist from the Engagement menu. The app will start downloading the content required to get started.
- Select Play once the app is done loading.
- Point your device camera to vBeacon created on the map to view PokeMist popup. Tap on any PokeMist icon or message bubble to pop and win.
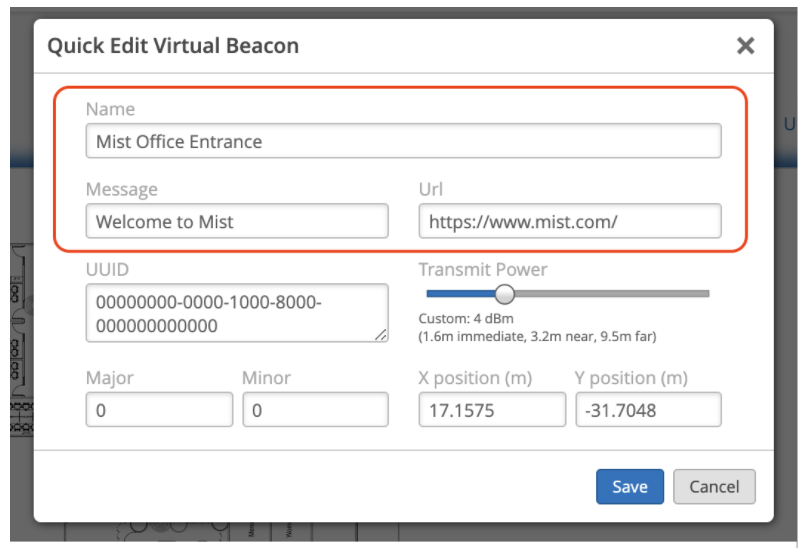
Set up Virtual Beacon Title and Message
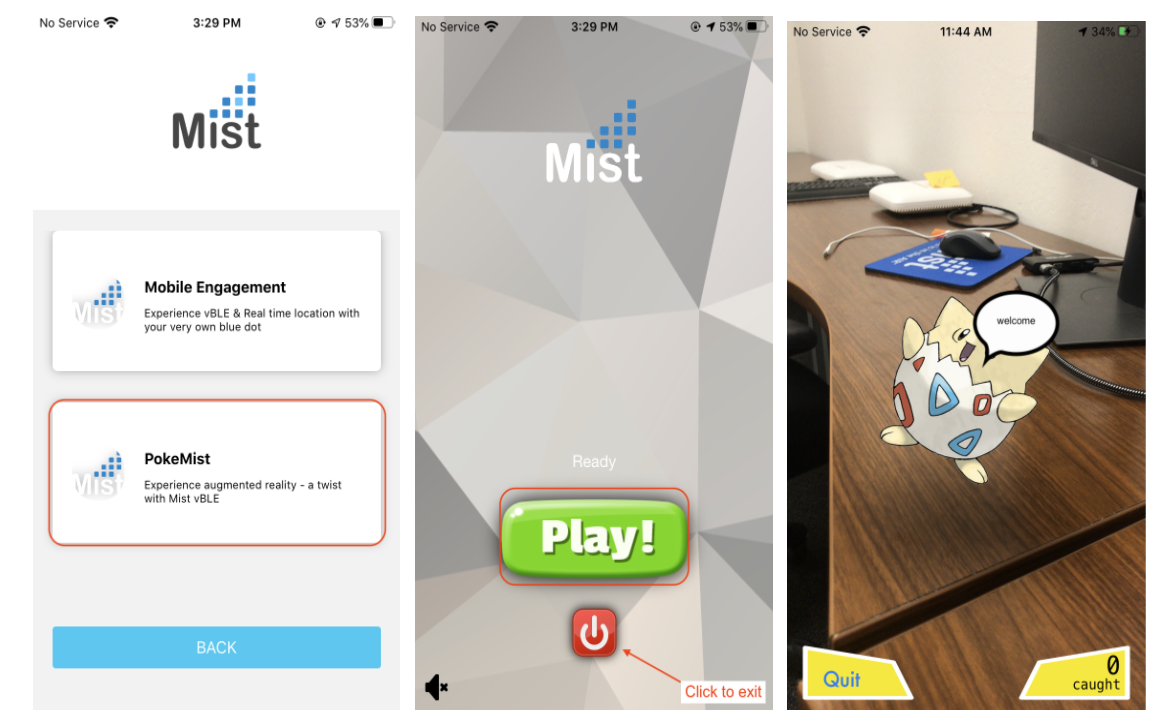
Play PokeMist and see how many points you can rack up!
Zone Notification
- Zones are named areas that can be added on a map of an organization’s site.
- Before you enable this feature, add zones on the floor map via Mist Dashboard.
- Zone notifications can be turned on in the App from “Settings.”
- When a user goes into the defined zone, notification is sent to the application informing the user that he/she is in that zone.
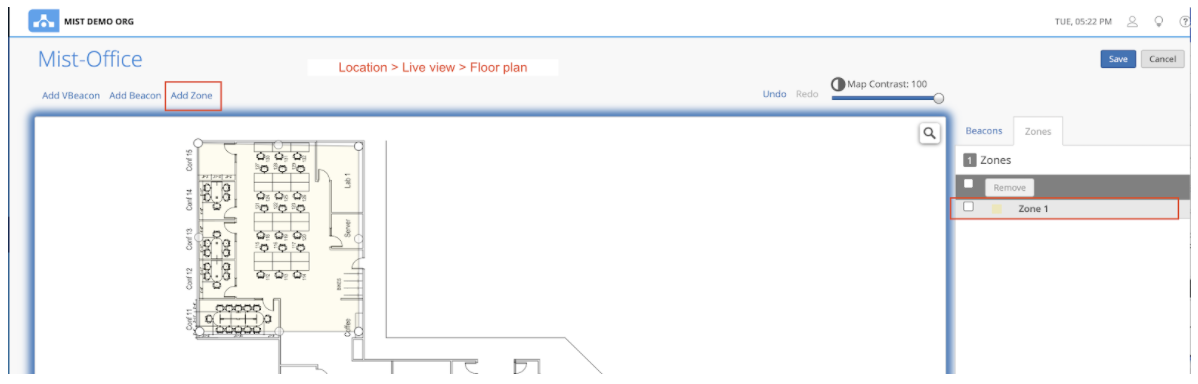
Add Zone from Mist Dashboard
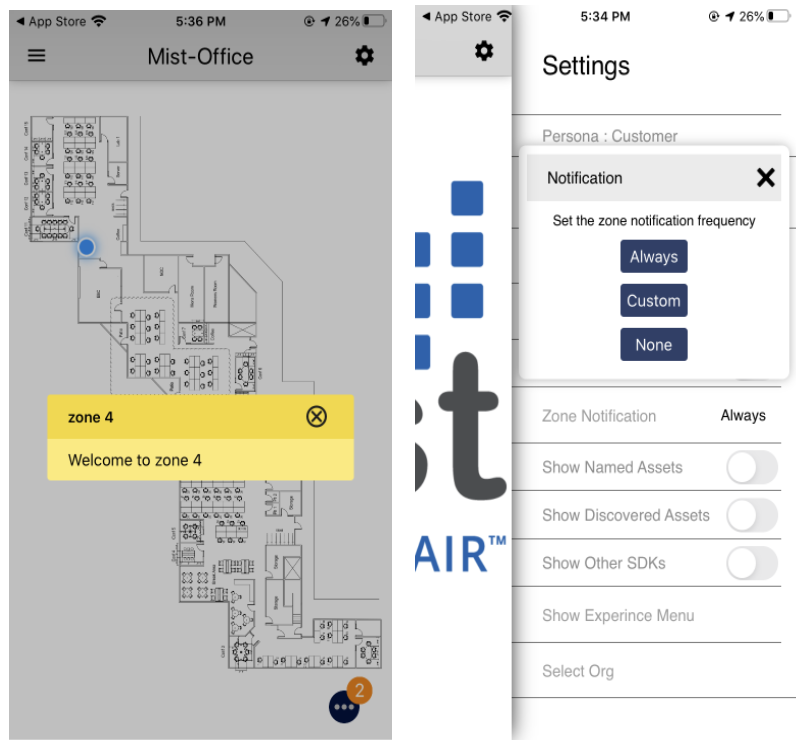
Enable Zone Notification from settings and receive a notification when you enter the zone
Virtual Beacon Notification
- Virtual beacons can be added on a map on an organization’s site and are configured with a message in the Mist portal.
- Virtual beacon notifications can be turned on in the App from “Settings.”
- When a user goes near the location of the virtual beacon, a notification is sent to the application with the configured message.
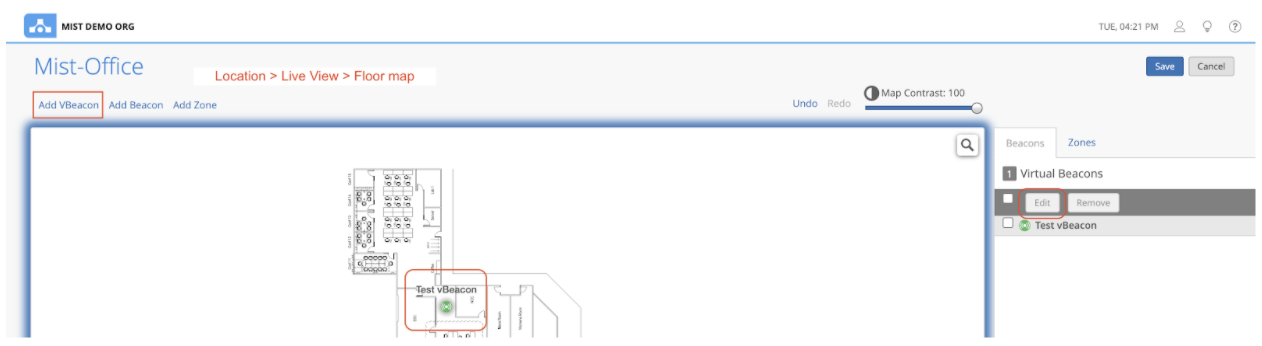
Add vBeacon from Mist Dashboard
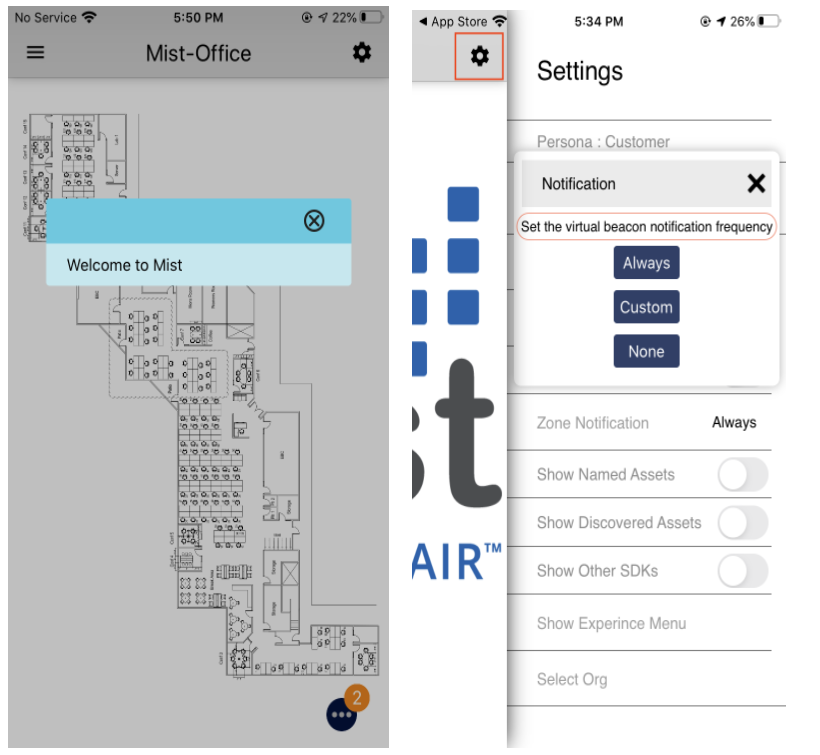
Received a notification when you are near the Virtual Beacon proximity
Application Wake-up
This feature provides the ability to send a notification to a customer when a user is in or near an organization’s location. When a notification is received the user can single tap on it to launch the application and show the application’s “Home Screen”.

Wake up notification received when user is in or near org
App Settings
To enable features in the Mist Experience app, you can use App settings. To access settings, tap on “Settings” in the menu, tap on the settings icon on the upper right, or swipe left from the right edge of the screen.
About
- Device – shows the current device name.
- MistUUID – shows the unique identifier of the device in Mist Universe.
- App version – shows current App version.
- DR Version– shows current Dead Reckoning(DR) version.
- Persona – shows selected Persona (Customer or Associate).
Notification
- Reset Application State – Reset the App state to receive wake up notification.
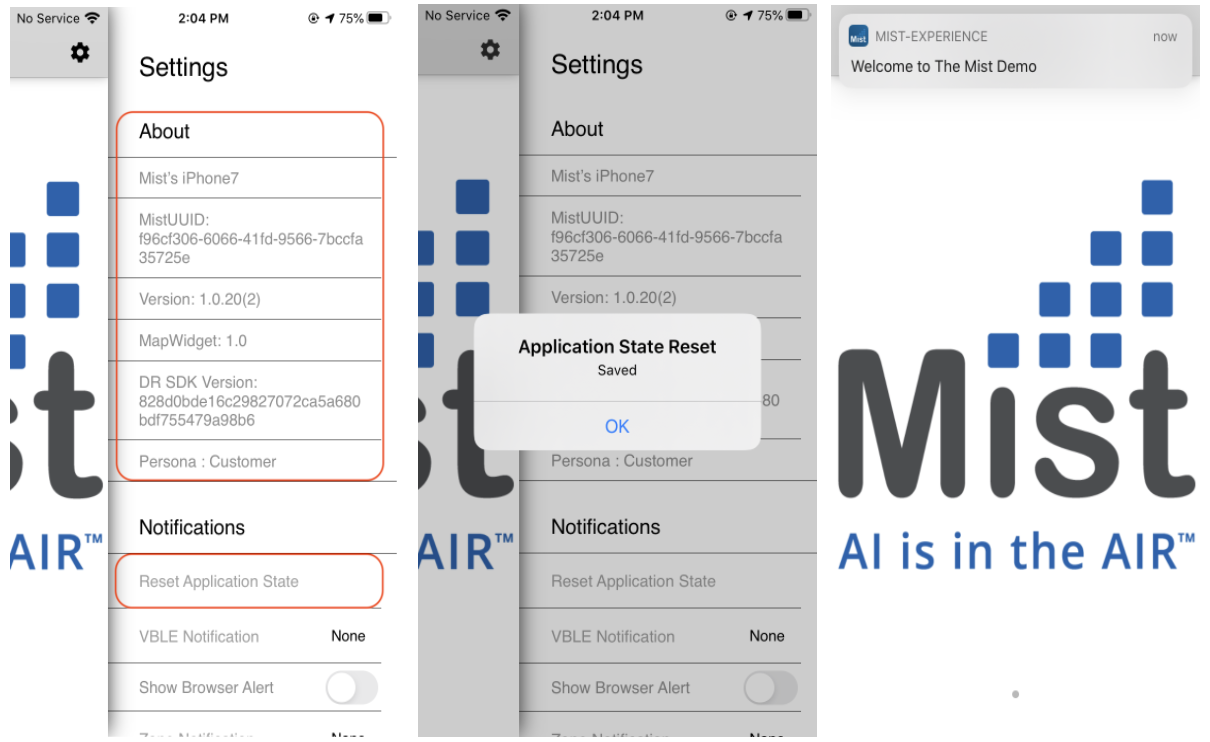
About section shows App details and Reset the Application State to receive wake up notification in a few seconds
- VBLE and Zone notification –
- By enabling this feature, the App will receive vBeacon and Zone notification.
- You can also select any notification timer. When you tap on Zone/vBLE Notification you will see the dialog box appearing on the screen showing option Always, Custom and None.
- Show browser alert
- If a vBLE notification has a URL configured, this feature will pop up a browser in response to vBLE notification event.
- This feature is available for both customer and associate persona. Users can disable this feature from app settings.
- Show Experience Menu – To get back to the experience menu, tap on ‘Show Experience Menu’
- Select Org – This will allow you to go back to the launch page of the application to select from the list of Orgs, you already have enrolled.
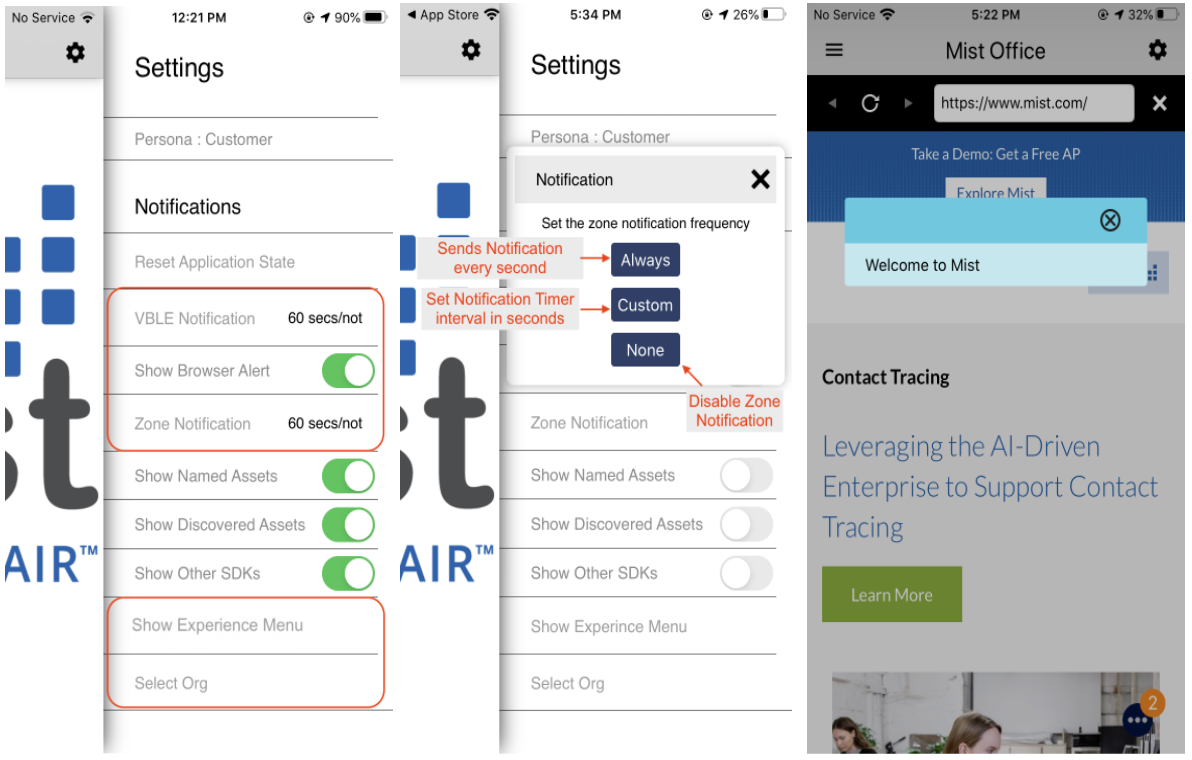
VBLE and Zone Notification settings, Show Browser Alerts and navigate to Org List / Experience Menu
- Show Named Assets: By enabling this feature, you can view Named assets on floor plan. ‘Show Named asset’ is disabled by default in App Settings.
- Discovered assets: By enabling this, the app will display all BLE clients being advertised/heard from a Mist AP. ‘Show Discovered assets’ is disabled by default in App Settings.
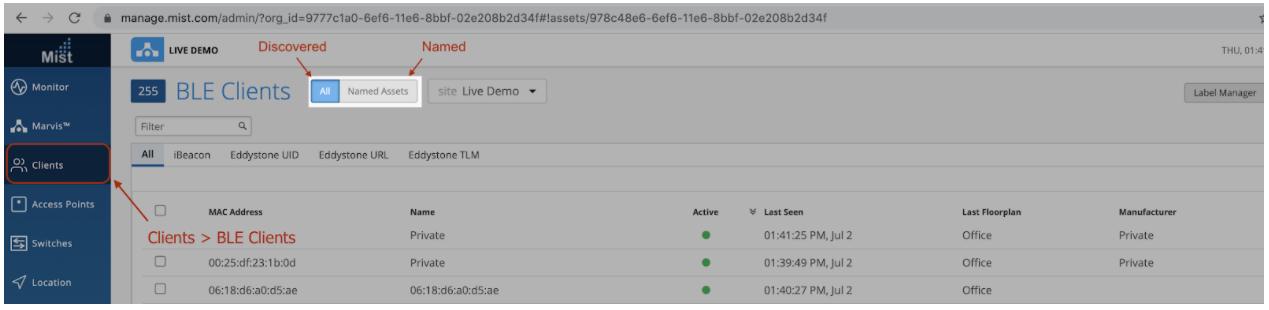
View all Discovered and Named BLE Clients in Mist Dashboard
- Show Other SDKs: ‘Show Other SDK’ clients are by default disabled. By enabling this feature, you can view other SDK clients nearby on the floor plan.
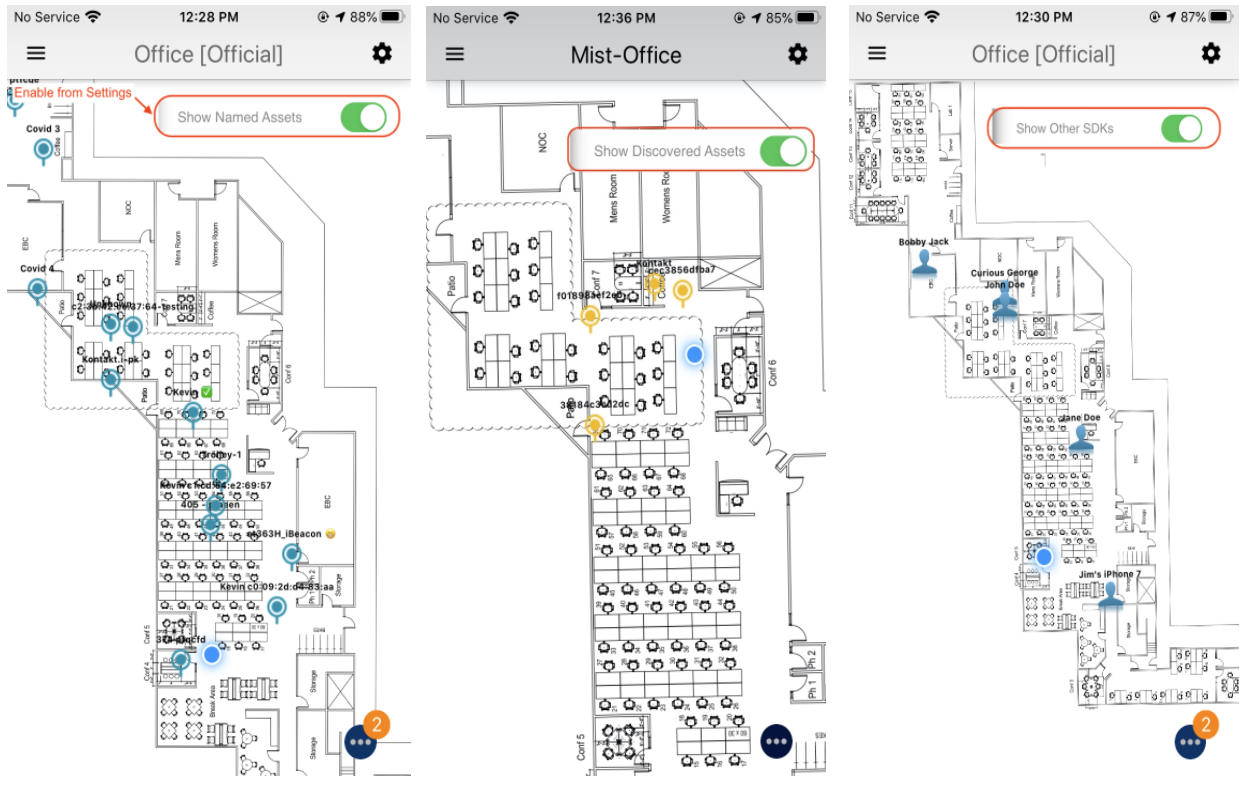
Enable Show Named, Discovered assets and Other SDKs from Settings
Uber help
The Uber Help feature is a location based tool that helps associates or staff respond to customer requests for assistance. This feature is similar to “Request for Help” for Associate and Customer using Mist Map. User Help uses Jibestream-map and provides additional options such as select floor, search and select destination(POI), and request for assistance. It enables a request workflow that is aided by location.
Uber Help has two persona:
- Customer
- Associate
After the Org is enrolled for the first time, or in subsequent use, after selecting the Org from the list, you can see the following:
- The persona selection page will be displayed.
- When the persona is selected (and only the first time), you will be prompted to provide some information. Fill in the details such as first name, last name, phone number and tap login.
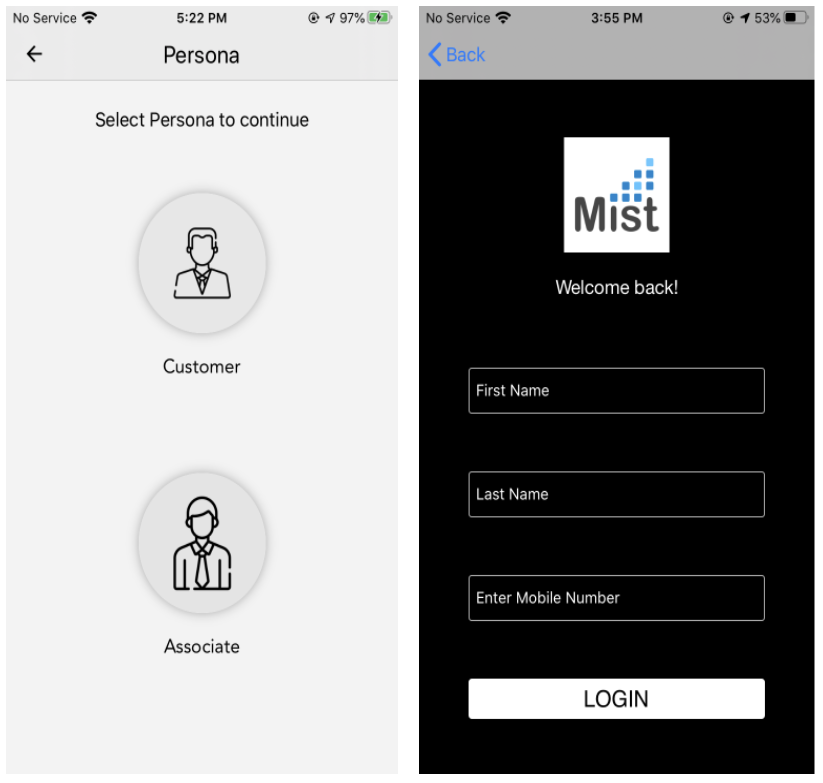
Select Persona role and login
Customer Persona (Request for help)
- Tap on the “REQUEST FOR HELP” button.
- Select the type of request you are making. Wheelchair / Assistance. It defaults to Wheelchair.
- Provide special instructions if needed and tap “SEND”
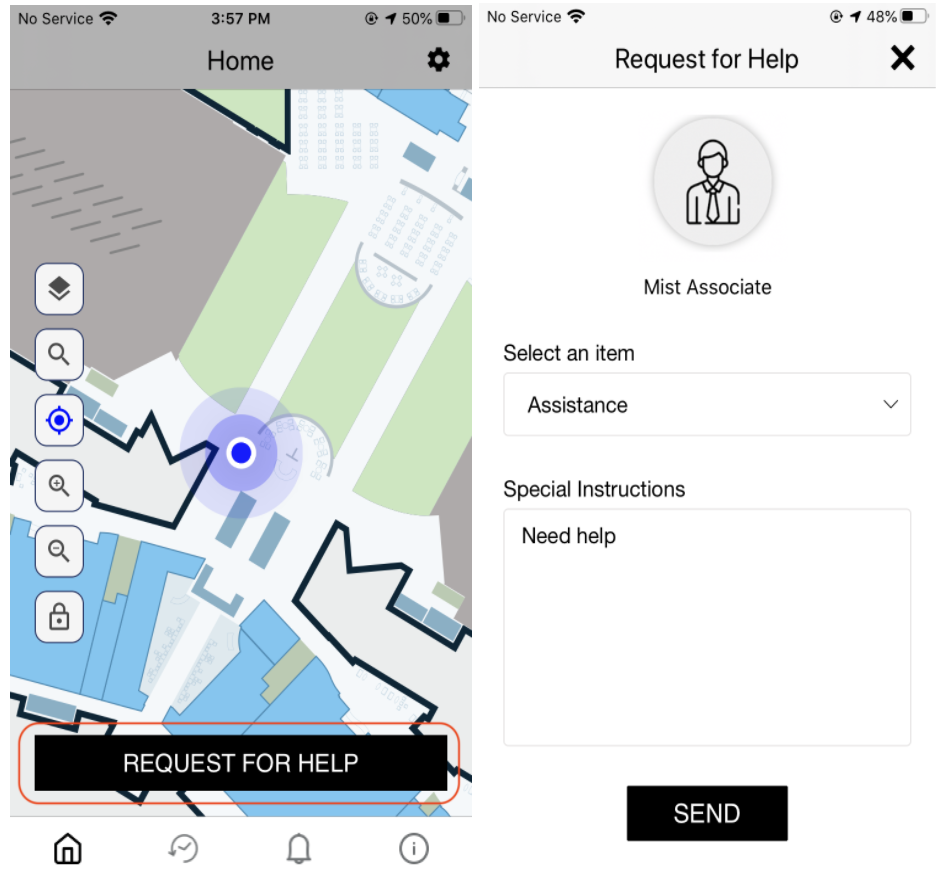
Customer’s home screen and send request for help
- This will notify available Staff (Associate) that a request is pending. Your screen will show “Connecting you to an associate . . .”
- You can also cancel the request by tapping on “Cancel Request”.
- Once a Staff accepts the request, the following things will be displayed:
- Associates Name
- Floor
- Estimated time to reach you
- Wayfinding path from the associates location to you.
- You can also contact the associate by clicking the “Contact” button or cancel the help request by selecting “Cancel Request”.
- At this point, Associate staff is actively working on your request and when the staff reaches the customer’s location the status changes from “Accepted your request” to “Associate has arrived”.
- Once the requested task is complete, the Associate can resolve the request on their end. This should send an alert on the Customer’s device as “Associate has resolved your request”.
- After this, the request screen is dismissed and App navigates back to the home screen.
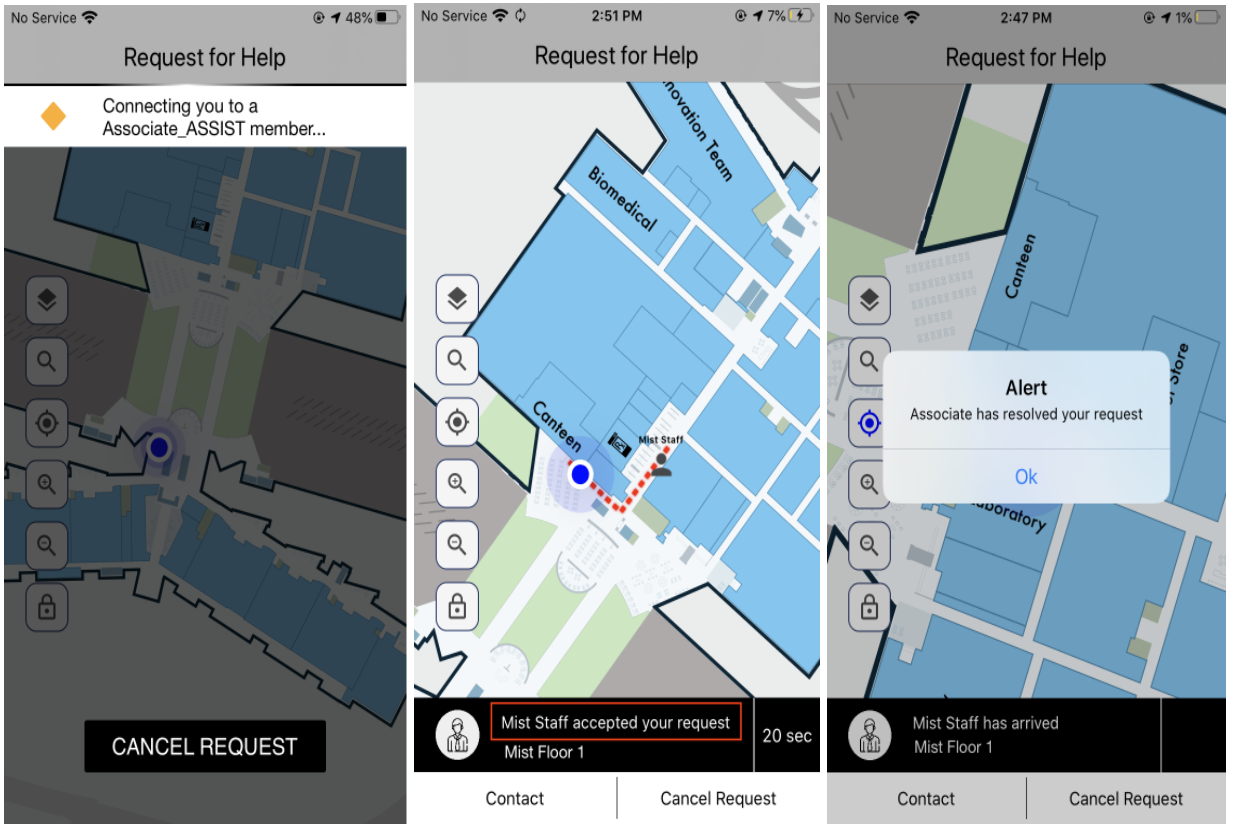
Help request sent, Associate accepts the request and resolves it once task is finished
Associate Persona (Responding to the request)
- Associate staff gets notified regarding the customer’s request.
- Staff can also see the numeric badge on the bottom indicating the number requests received.
- Users can tap on the icon “❓” to view the list of requests.
- Associate accepts the request and starts working on it.
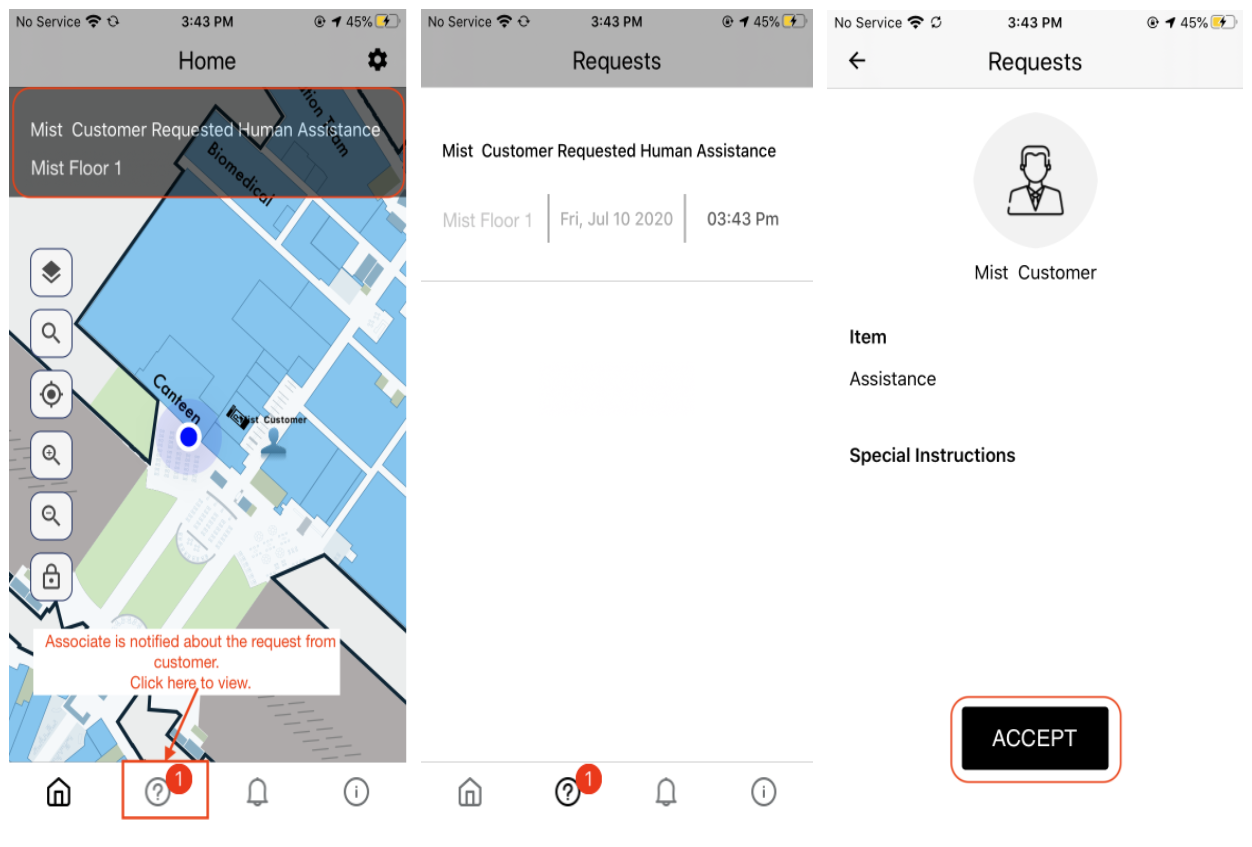
Associate received help notification from the customer and accepts the request
- Once the associate finishes the request, he/she can navigate to the customer’s location by clicking on the location pin.
- Associate and customer both can see the ETA in mins/sec depending upon the distance.
- They can communicate with each other by tapping “Contact” which starts a phone call.
- Once an associate reaches the customer’s location and the requested task is complete, they can mark the request as resolved by tapping “Resolve Request”.
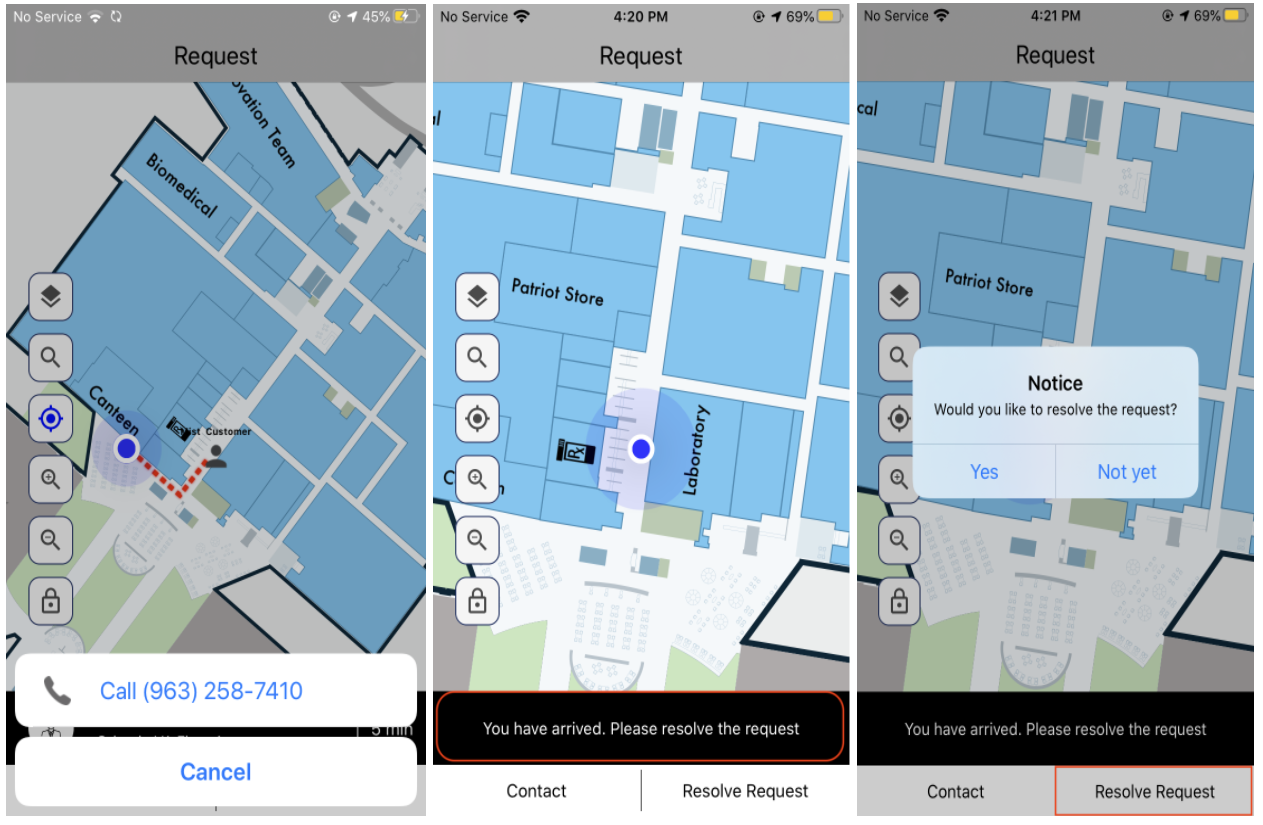
Contact via phone call, associate has arrived near customer location and request is marked as resolved