Solution Overview
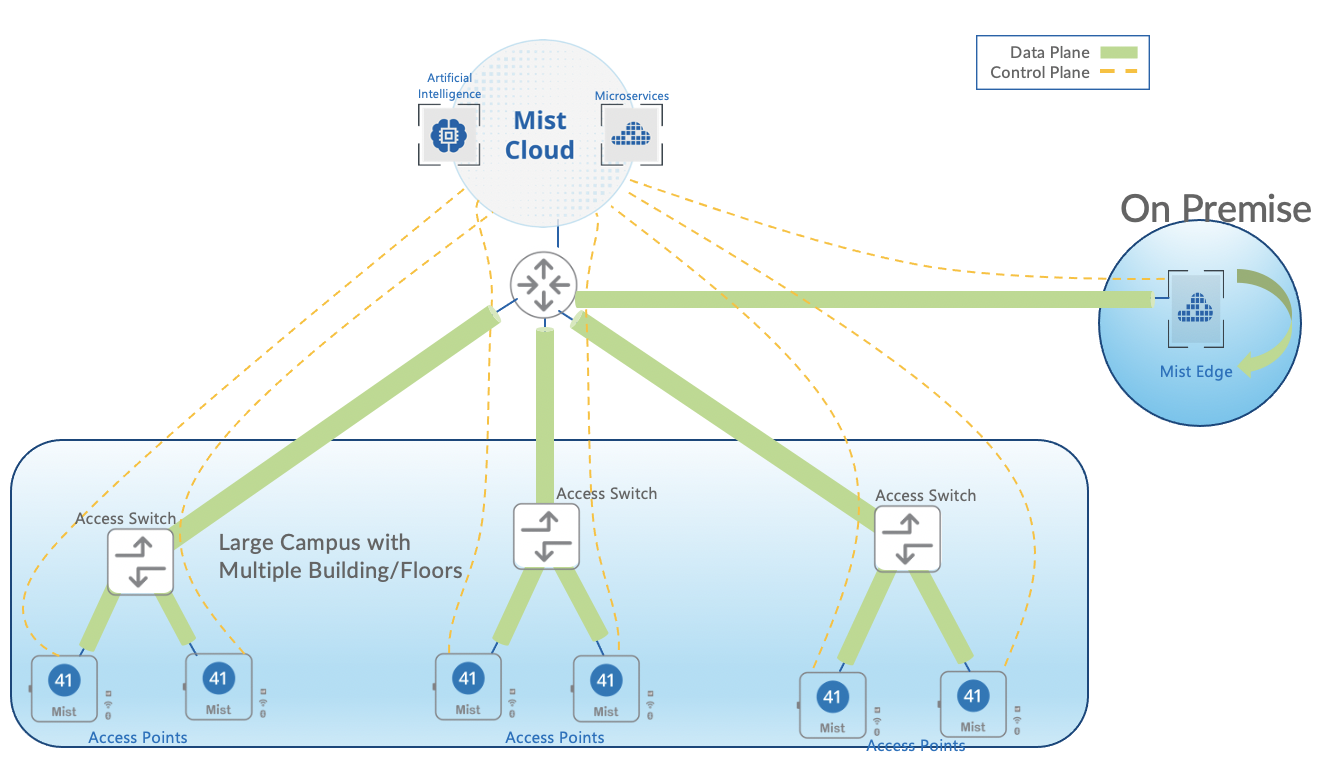
Mist solution leverages Mist Edge for cases that need to retain the Centralized Datapath Architecture for Campus/Branch deployments. Providing the same level of redundancy and access to corporate resources, while extending visibility into user network experience and streamlining IT operations.
Mist AP can form L2TPv3 Tunnel to extend one or more VLANs from one or multiple Mist Edge located in Campus, DC, or DMZ simultaneously. AP can support both local and Centralized Datapath together.
Remote Teleworker

How it works
This solution leverages Mist Edge for extending centralized corporate/production/guest network VLANs to APs using L2TPv3 tunnel. Mist Cloud orchestrates the Mist Tunnel, the Datapath is maintained in the event the Mist Edge’s or AP’s cloud connectivity to Mist Cloud is lost.
- Mist Edge is based on multi-service architecture, so individual services can be upgraded as and when required with a 3 second downtime, without the need of a reboot.
- AP firmware and Mist Edge service version are decoupled, upgrading a Mist Edge does not warrant an AP firmware upgrade.
- APs can form multiple Mist Tunnels to different Mist Edge Clusters on Site, DMZ and datacenter, user traffic can be mapped to be tunneled or local bridged based on radius attributes returned for 802.1x authenticated wireless LANs.
- APs can support tunneled and local bridged Wireless LANs together and are not mutually exclusive.
Mist cloud-driven AI provides unprecedented user experience visibility via the Service Level Expectations (SLE) framework and the AI-driven Marvis Engine with natural language processing for troubleshooting and root cause analysis and Marvis actions. IT can leverage this for remote troubleshooting of user issues without spending any additional resources.
Mist Edge Onboarding
Mist Edge onboarding is very straightforward, without the need for pre-staging and they can be shipped directly to the branch or Campus and brought up online.
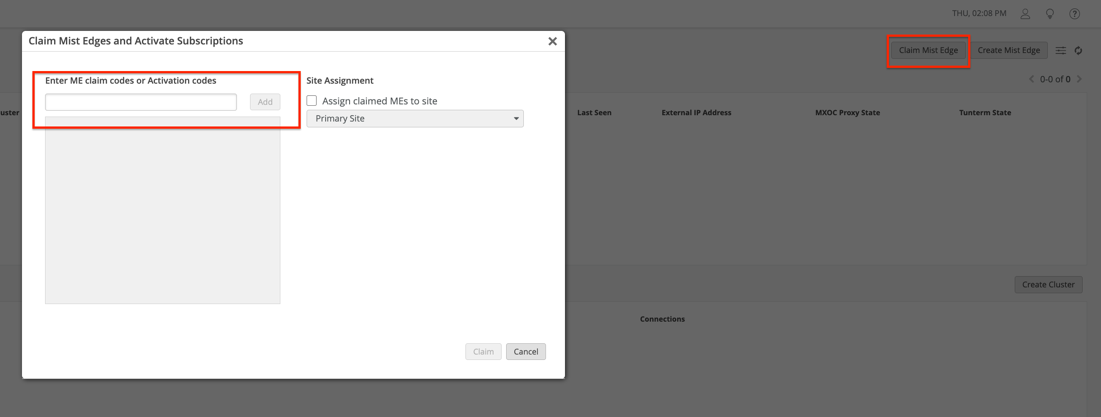
Claim on the Mist Dashboard
Go to Mist Edges > Mist Edges Inventory > Click on claim
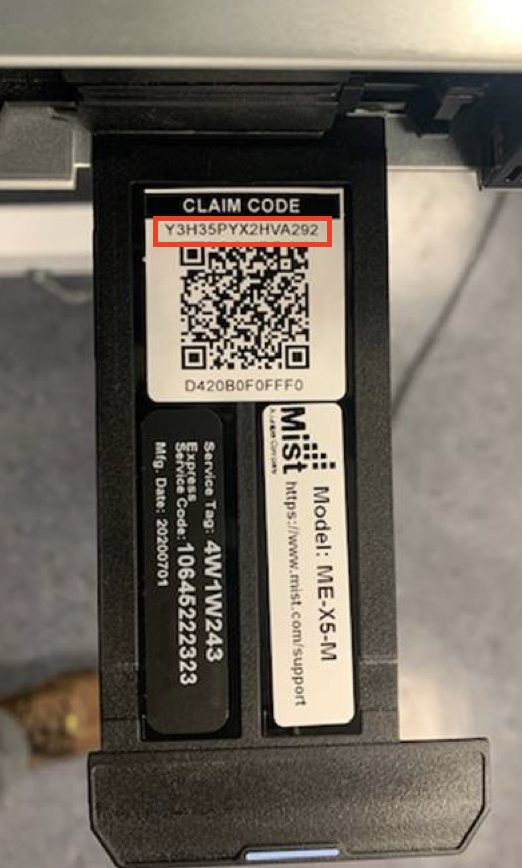
Enter the claim code, which will be given in the purchase order or can be seen in the appliance pull-out tag. Alternatively, one can scan the QR code using the Mist AI app.
Ensure Mist Edge is powered on and the power button shows green.

After the Mist Edge is claimed it will show up as Disconnected and Registered,
Verify Mist Edge Subscription
If you activated a trial period or purchased a Mist Edge subscription license, verify its status by going to: Organization > Subscriptions > Summary
![]()
please contact your local Juniper Mist partner or representative who can help by getting a quote for adding the Mist Edge subscription or raising a request for trial subscription.
Note: Mist Edge subscription is entitled on per AP basis, each AP tunneling requires a Mist Edge subscription.
Setup Mist Edge
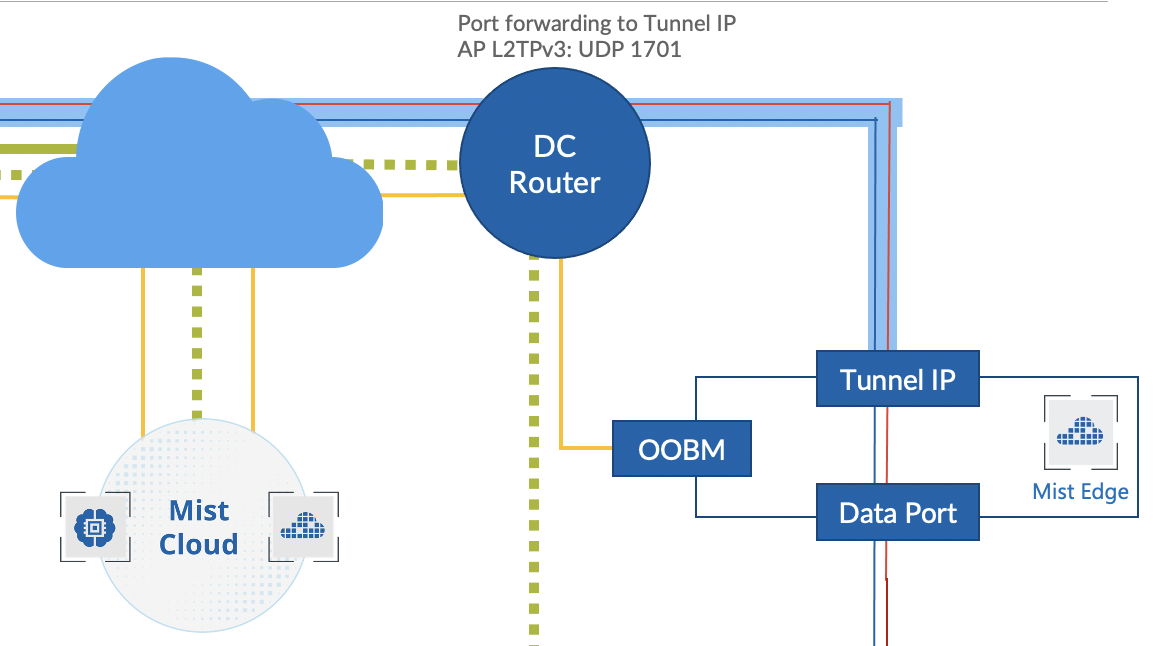
Mist Edge typically resides in the DMZ/DC/Campus with one arm connected to the Internet and another arm going into a trusted corporate network. First, it is necessary to understand physical port connections before proceeding to the actual configuration.
Physical port connections overview
The following snippet outlines Mist Edge port configuration requirements:
Note: It is highly recommended to ensure the OOBM and the Tunnel Termination IPs are on different subnets.
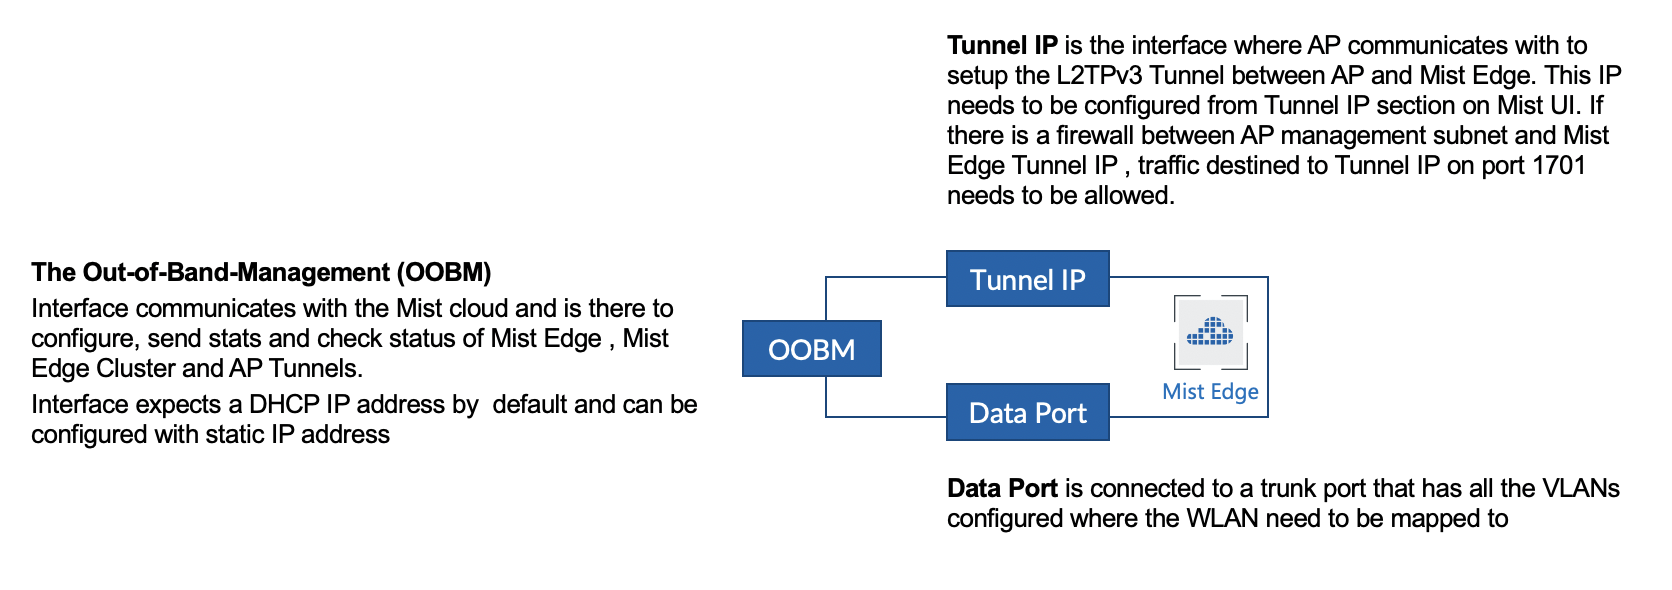
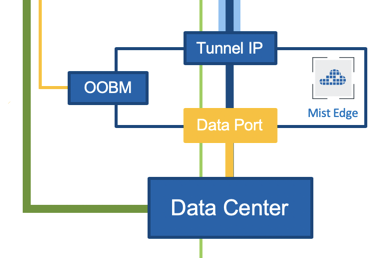
Configure OOBM
Connect the Out-Of-Band-Management (OOBM) Port of the Mist Edge to an access-mode interface of your switch. The OOBM port is used by Mist Edge to communicate to the Mist Cloud for configuration, telemetry, and lifecycle management.
The following figure shows OOBM port on a X1 Mist Edge appliance:
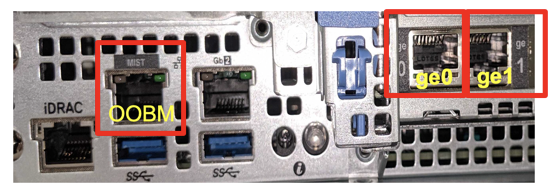
Note: OOBM port on the Mist Edge appliance is marked as “MIST.” By default, OOBM port is configured for DHCP. There are two ways to configure static IP depending on your network.
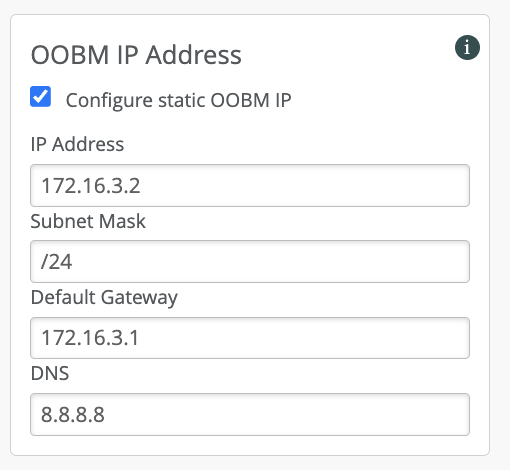
To configure static IP, one can configure this from the Mist Dashboard or from the CLI, depending on your circumstances.
If your network has DHCP, it is recommended to first connect using DHCP to the cloud and then use the Dashboard to configure the static IP:
If your network does not have DHCP, it is recommended to use CLI.
On the Mist Edge, there is an additional management port labeled as IDRAC. This is used to access the BIOS, system status and Mist Edge CLI.
IDRAC will use DHCP when connected to a network and IP address can be viewed from the front panel via View-> IPv4 -> IDRAC IP. The IDRAC GUI will be accessible from the HTTPs website, e.g., https://<IDRAC IP>.
The default IDRAC user is root and password will be available on the Mist Edge appliance pull-out tag, on reverse sides of the tag.
Log into the CLI, the default username and password for Mist Edge CLI is mist /<Claim-code>, default root password is <Claim-code>.
Make sure you drop into root (su -) and use the below command to specify the OOBM parameters:
mxagent oob-ip static --address [IP address] --gateway [Gateway IP] --netmask [Netmask] --name-servers [Name Servers]
e.g: mxagent oob-ip static –address 172.16.3.2 –gateway 172.16.3.1 –netmask 255.255.255.0 –name-servers 8.8.8.8
OOBM Interface ID may be different for each Mist Edge model, default as follows:
| Mist Edge Appliance Model | Interface Id |
| X1 | eno1 |
| X1-M | eno8303 |
| X5 | eno3 |
| X5-M / X10 | ens1f0 |
For Mist Edge to communicate to the Mist Cloud the following FQDNs and ports must be allowed for the OOBM interface.
Refer to this link for most up to date information – https://www.mist.com/documentation/ports-enable-firewall/
Once the OOBM is configured and firewall rules are in place, Mist Edge should show connected with Amber dot as below:

In case of Mist Edge not showing connected even after 5 minutes, one can SSH to the Mist Edge appliance using the Out-Of-Band management IP address that we have configured in the previous step.
The default username and password for Mist Edge appliance is mist /<Claim-code>, default root password is <Claim-code>.
Make sure you drop into root (su -) to issue following debug commands to check connectivity to Mist Cloud:
- Issue ‘mxagent info,’ which will show output like below:
- # mxagent info
- Status: Registered
- IP: 10.2.10.224
- Mist Reachable: Yes
- Org ID: <Current-Org-Id to which it is Registered>
- # ping ep-terminator.mistsys.net
If ping is successful, request to ensure 443 outbound to ep-terminator.mistsys.net is allowed in the firewall, which should ensure Mist Edge shows up connected.
Note: Above URL will be based on your regional cloud instance on which your org exist, refer to this link for more details on cloud instances – https://www.mist.com/documentation/ports-enable-firewall/
Configure Tunnel Termination Services
The Tunnel Termination Service is a service listening for APs to request L2TPv3 tunnel connection. The service will be automatically installed once Mist Edge is fully configured.
Note: Request to keep the Switch ports connected to Mist Edge Data ports ME-X1 (ge0, ge1) , ME-X1M(ge0,ge1,ge2,ge3), ME-X5 (xe0,xe1), ME-X5M/ME-X10(xe0,xe1,xe2,xe3) shut down on switch until a Tunnel IP is pushed to Mist Edge and Mist Tunnel is configured.
Note: Tunnel IP is not reachable until this service is instantiated on Mist Edge
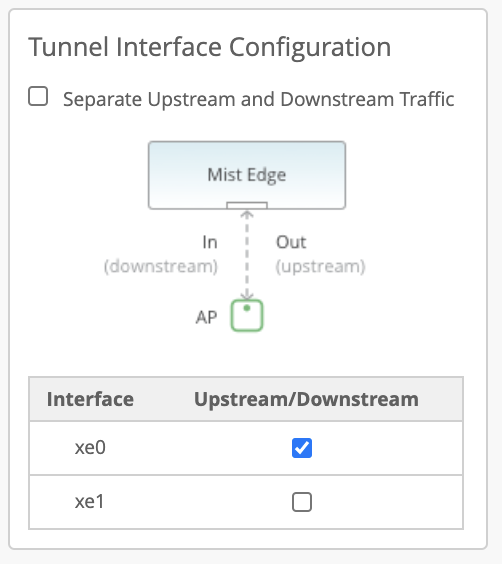
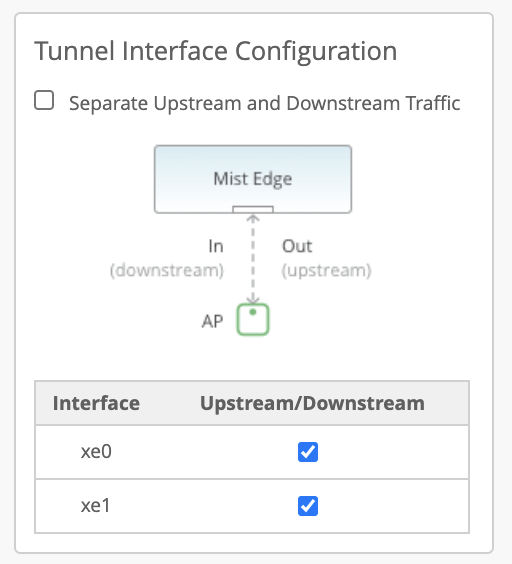
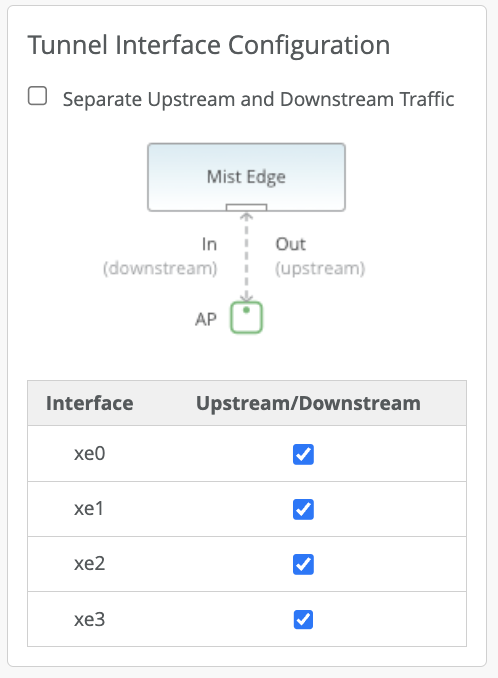
Dual arm or Single arm
Mist Edge has multiple Tunnel (Data) ports, which can be configured as single arm or dual arm (downstream and upstream).
In the Mist Edge setting page if you select “Separate Upstream and Downstream Traffic.” This will be a dual-arm configuration. Assign the interfaces as needed. In the below example we are using Mist Edge X5-M/X10 on left and X1 on right, where ge0 (or xe0 and xe1) interface is connected to the public untrusted side and ge1 (or xe2 and xe3) interface is connected to the corporate network with all the user VLANs tagged:
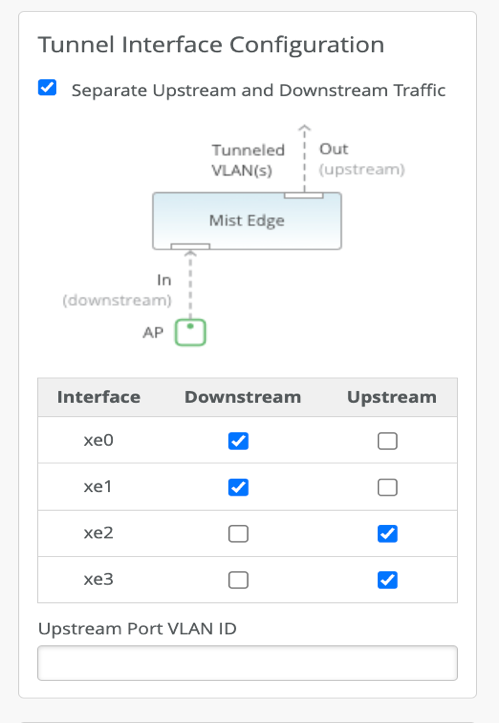
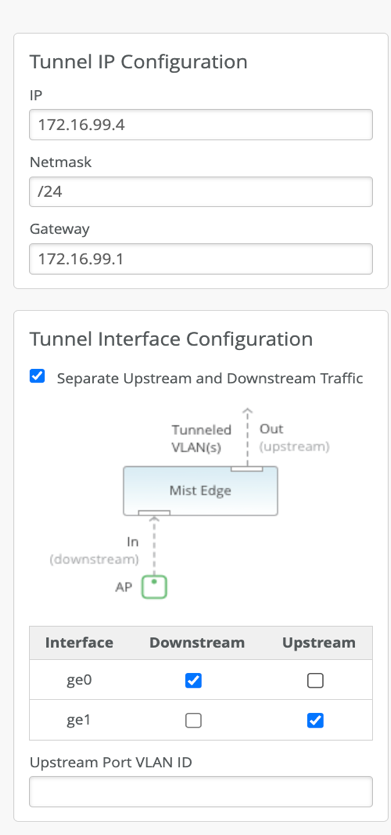
Note: a. Upstream Port VLAN ID is optional and should only be used whenever the upstream switchport is configured as an access port with a single VLAN untagged.
The ‘OOBM IP’ received through DHCP or assigned static while bringing up the Mist Edge is different from ‘Tunnel IP’ that is entered in the Mist Edge details on Mist Dashboard (Mist UI).
Tunnel IP and downstream ports:
Connect your downstream port to the untrusted side of your network that typically goes to your firewall. The Downstream port must be connected to the untagged interface.
Onsite deployment (Campus/Branch); The AP should be able to route to the Tunnel IP.
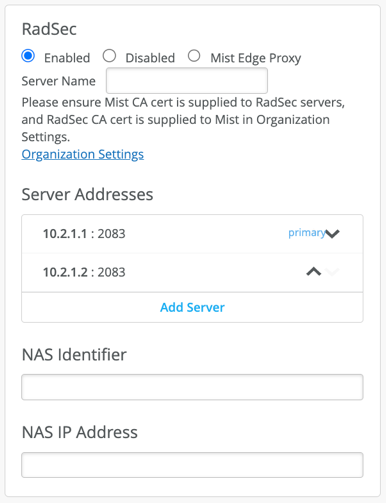
Note: Tunnel IP SVI on Mist Edge is a protected interface, so even if it is not connected to a firewall, it is only open for ports UDP: 1701 (L2TPv3), 500 and 4500 (IPsec) and TCP port 2083 for RADSEC.
Note: For remote worker use case alone Mist Edge will be using UDP port 500,4500 and TCP port 2083, all other Campus and Branch use cases it will just use UDP port 1701.
Upstream Data Port:
Connect your upstream port to the trusted side of the network. This interface would typically connect to your core/aggregate switch trunked with all the necessary user VLANs allowed. Mist Edge will flow L2 tagged traffic from the tunnels to here.
| X1 | 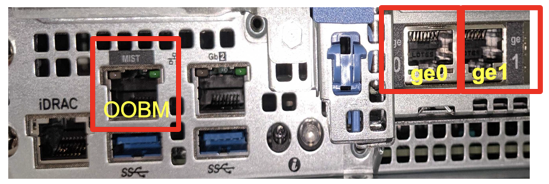 |
| X5 | 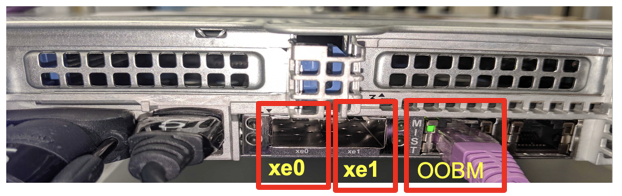 |
| X5-M and X10 | 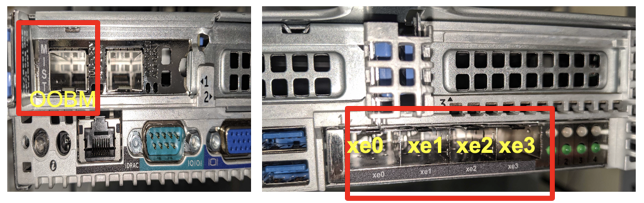 |
Instead of a dual-arm configuration, one can also use single-arm, where either one port or multiple ports are configured in the port channel. In single arm the corresponding port on upstream switch needs to be configured as trunk with Tunnel IP being native/untagged, rest of the client VLANs are tagged. Like how upstream is configured in a dual-arm configuration.
If multiple ports are used, they will be part of the port channel, listed below are those settings.
Note: Mist Edge auto detects port-channel when multiple ports are selected and there is no configuration required.
Single-arm, single port used:
Single-arm, multiple ports in port channel:
For a ME-X5-M and ME-X10, in single arm configuration, we can select one or more ports in a port channel or can have all ports in a LACP.
For fiber ports on ME-X5, ME-X5-M and ME-X10:
Recommendation is to use SFP Cable OM3 50/125μm / OM4.
If the OS2 version is used, frequent LACP flap, packet errors, port not coming up will be observed.
If for ME-X5-M and ME-X10, copper ports are required for OOBM (management port labelled as mist), a Juniper Fiber to converter can be requested.
Mist Edge Deployment types:
Depending on your networking needs, you may want to use an org-level Mist Edge or a site-level Mist Edge.
- Org-level: All APs with an SSID configured for tunneling to Mist Edge will be able to form a L2TP tunnel to this Mist Edge, irrespective of the AP’s site. You will need to configure a Mist Cluster and a Mist Tunnel
- Site-level: Only APs with an SSID configured for tunneling to site, will be able to form tunnels to MEs in the same site. You will configure a Site Mist Tunnel under site configuration.
(Org-Level) Mist Edge: Create a Mist Edge Cluster:
Now that all the interface configuration have been done, we can create a Mist Edge Cluster and add Mist Edge in there:
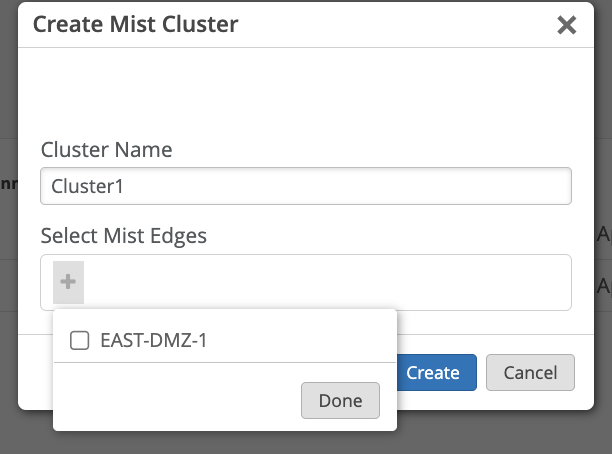
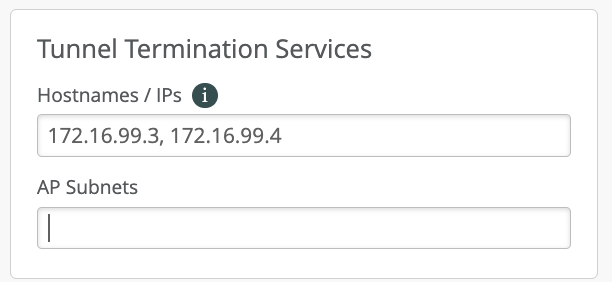
Under Mist Edge Cluster configuration, we will need to specify the Hostname/IP address under Tunnel termination services, IP/Hostname specified under this section would be the same as Tunnel IP configured on Mist Edge.
In case multiple Mist Edges are part of the cluster, their respective IP addresses should be listed there, comma separated:
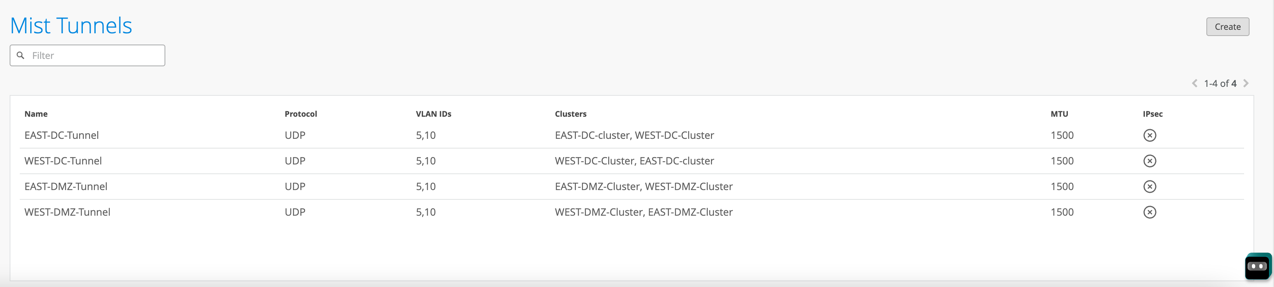
“If you add multiple Mist Edges to a single Cluster, this will form an Active-Active setup for all the MEs in the same cluster. This will best-effort load balance the APs between them. In the event one of them is down, the APs will failover to the other MEs in the same cluster.”
“If you require an Active-Standby setup, create a second cluster for the ME you want to be on standby. In the event the Primary Cluster MEs are down, the AP will fail over to the Secondary Cluster MEs. The notion of primary and secondary cluster is specified in Mist Tunnels.”
(Org-level) Setup the Mist Tunnel
Navigate to Mist Edges and below Mist Edge Cluster, create a new Mist Tunnel.
Once you create a Mist Tunnel, this is where you will specify all user VLANs required to be tunneled back, assign the tunnel to the Mist Edge Cluster (s) we have created earlier as Primary/Secondary here, leave the rest of the setting as it is.

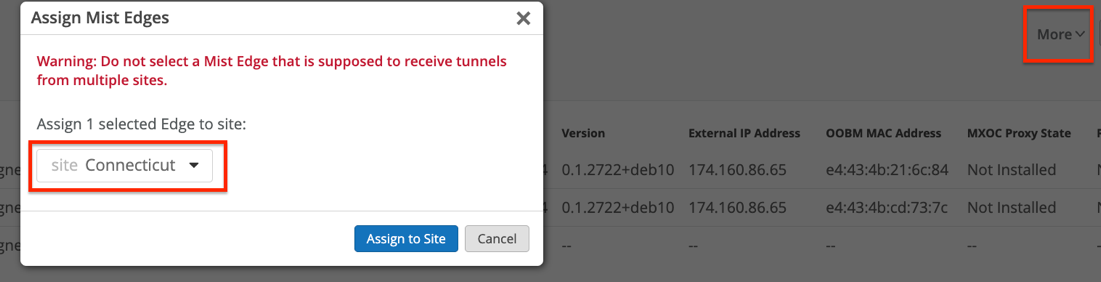
(Site Level) Assign Mist Edge to Site
After claiming and configuring your Mist Edge, select the Mist Edge and assign it to the desired site.
(Site Level) Create Site Tunnels
Navigate to Organization -> Site Configuration for your desired site.
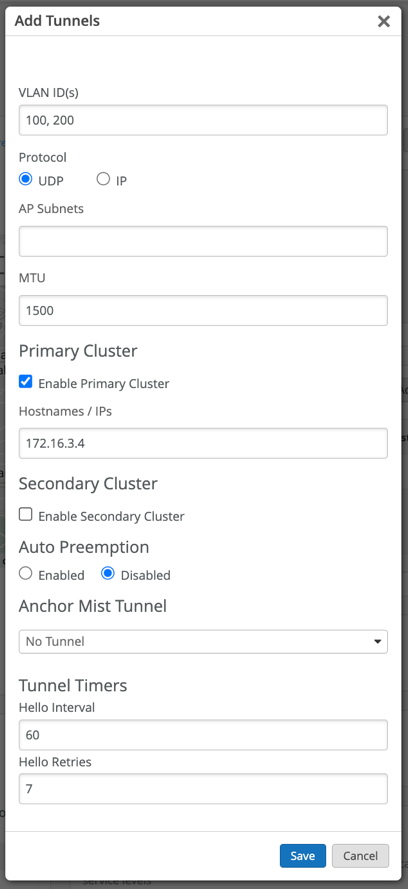
Click on Add Tunnel to define the tunnel profile for this site.
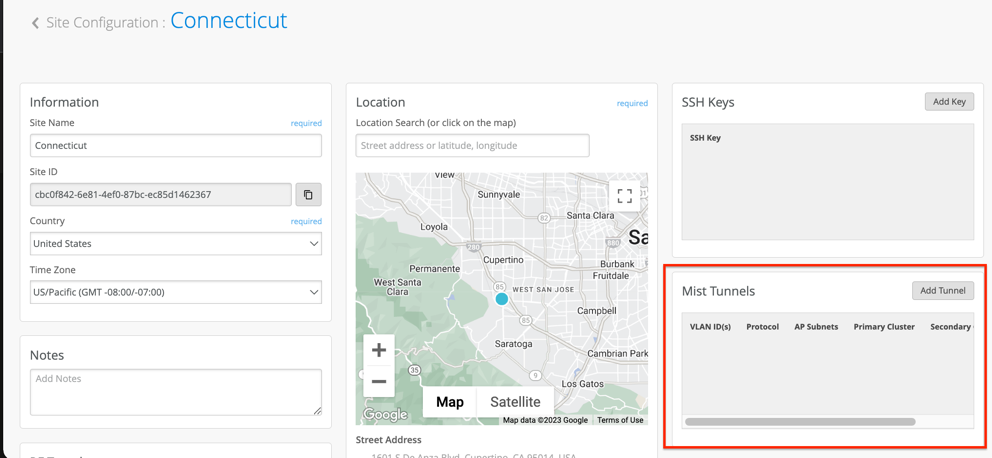
This is where you would list all your user VLANs (Client VLANs) that you would like to extend from your corporate network to the APs. The VLAN list should be comma separated.
Enable Primary Cluster. we will need to set our Cluster IP address(es) or FQDNs for the APs to communicate with.
IP specified on the Mist Edge cluster will be the same as Tunnel IP configured on Mist Edge.
The active-active or active-standby Mist Edge cluster concept and configuration is same as org-level Mist Edges.
Configure and prepare the SSID
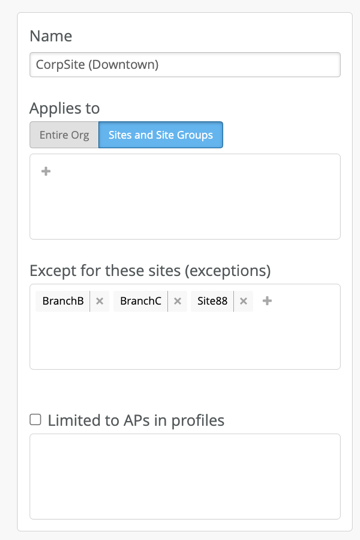
The best way to provision your corporate SSID to extend VLANs is to leverage WLAN Configuration Templates.
Navigate to Organization → Wireless → WLAN Templates.
Create WLAN Template and use template assignment for either specific Sites or Site-Group, where individual sites will be mapped into a Site Group or the entire Org with actual office Sites added as exceptions. For example, the following template will be assigned to all Sites, except Sites “Site88” “BranchA,” and “BranchC”
WLAN Template assigned to Site/Site group
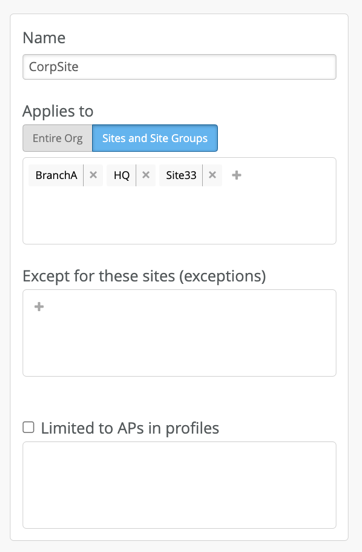
Entire Org with some site exclusion.
SSID security settings depend on customer requirements, but below are the most important parts regarding VLAN data tunneling back to the corporate network.
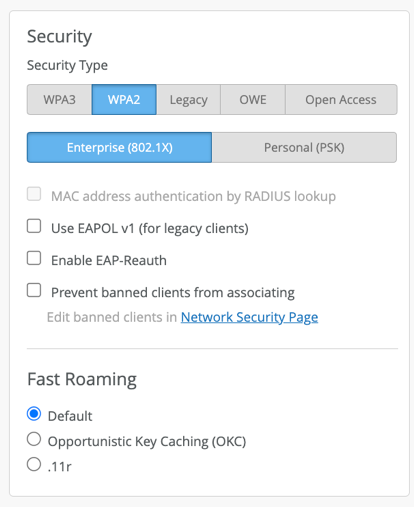
Specify the desired VLAN, these will be the VLAN that will be tunneled through the Mist Edge:
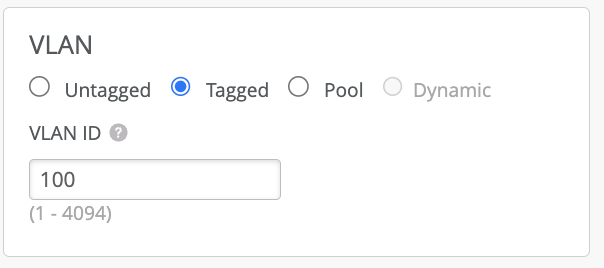
Note: Mist AP will not tunnel any wlan configured with untagged vlan
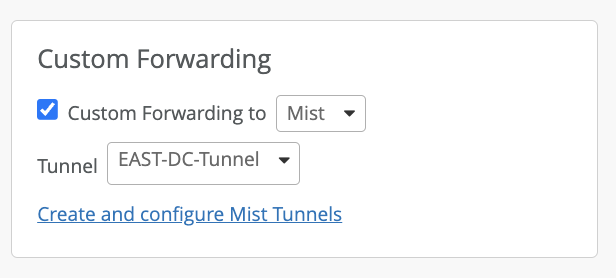
Depending on your deployment type, you will choose how the APs will be tunneled.
For Org-Level: specify Custom Forwarding to Mist then choose the tunnel profile from dropdown. The Mist Tunnel must also specify the same VLANs you wish to tunnel.
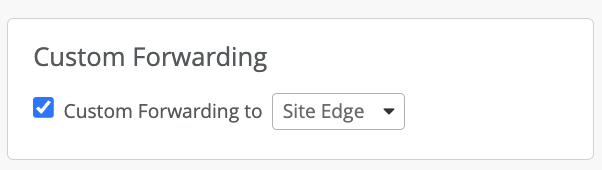
For Site Level: Specify Custom Forwarding to Site Edge. The Site tunnels must also specify the same VLANs you wish to tunnel.
Create a Site for Campus, Branches
Sites can be created using UI under Organization → Site Configuration
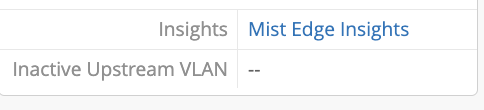
APs mapped to Tunneled Wireless LAN will form L2TPv3 tunnel and status can be confirmed on AP table and Mist Edge Inventory.
![]()
![]()
Mist Edge Insights
One can launch Mist Edge Insights from Mist Edge details.
Mist Edge Insights provide Insights into Tunnel trend, Mist Edge Events (service restarts, config changes, upgrade, Mist Edge reboots).
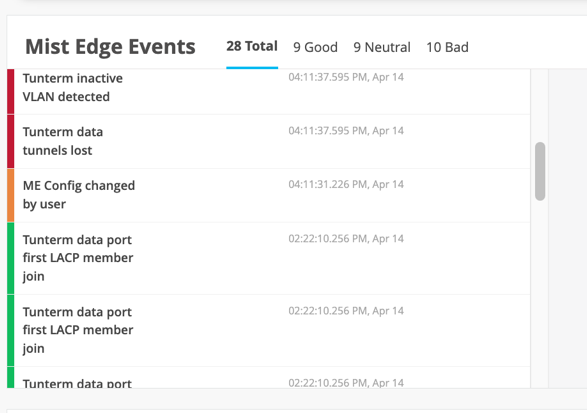
It also shows the Time series and list view of Data ports.

Provides LACP status and LLDP neighbor info, makes it easier to verify the upstream switch port connections.
