About:
The Mist AI app is designed to help in installing Juniper Switch(es), Wan edge routers, Mist edge and Mist Access Point(s) for easy on-boarding.
Mist AI app support following user roles:
Installer role
- Installer role has a minimum level of access to the org, sites, and AP’s.
- Can do the initial installation such as claim AP to Org, assign/unassign AP, or place on the map, etc.
- Cannot unclaim or remove the AP from the Org.
- Site and AP access is allowed based on timed grace period and/or explicit site access. Timed grace period from the last modified time – default 7 days (refer to API documentation)
- Grace period value can be set between a minimum of 1 to a maximum of 365 days. Or can be disabled in the installer configuration in Organization -> Settings
- Generally, installers work on recent deployments – bringing up new sites, add newly claimed devices to new/existing sites.
- Uses API and Mist AI App, no access to native Admin UI.
Admin role:
- Users with admin role have access to all the app features.
- Easy and secure login based on SSO and biometric authentication.
Installing the App:
Mist AI app is available for download on Play Store and App Store. This app is compatible with the following device:
- iPhone, iPod, and iPad with OS version 10 or later.
- Android phone and tablet with OS version 6.0 or later.
To download the app, navigate to the App store or Play store on the device, and search for “MistAI”. After download and install, click on the open or MistAI icon to start using the Mobile app.

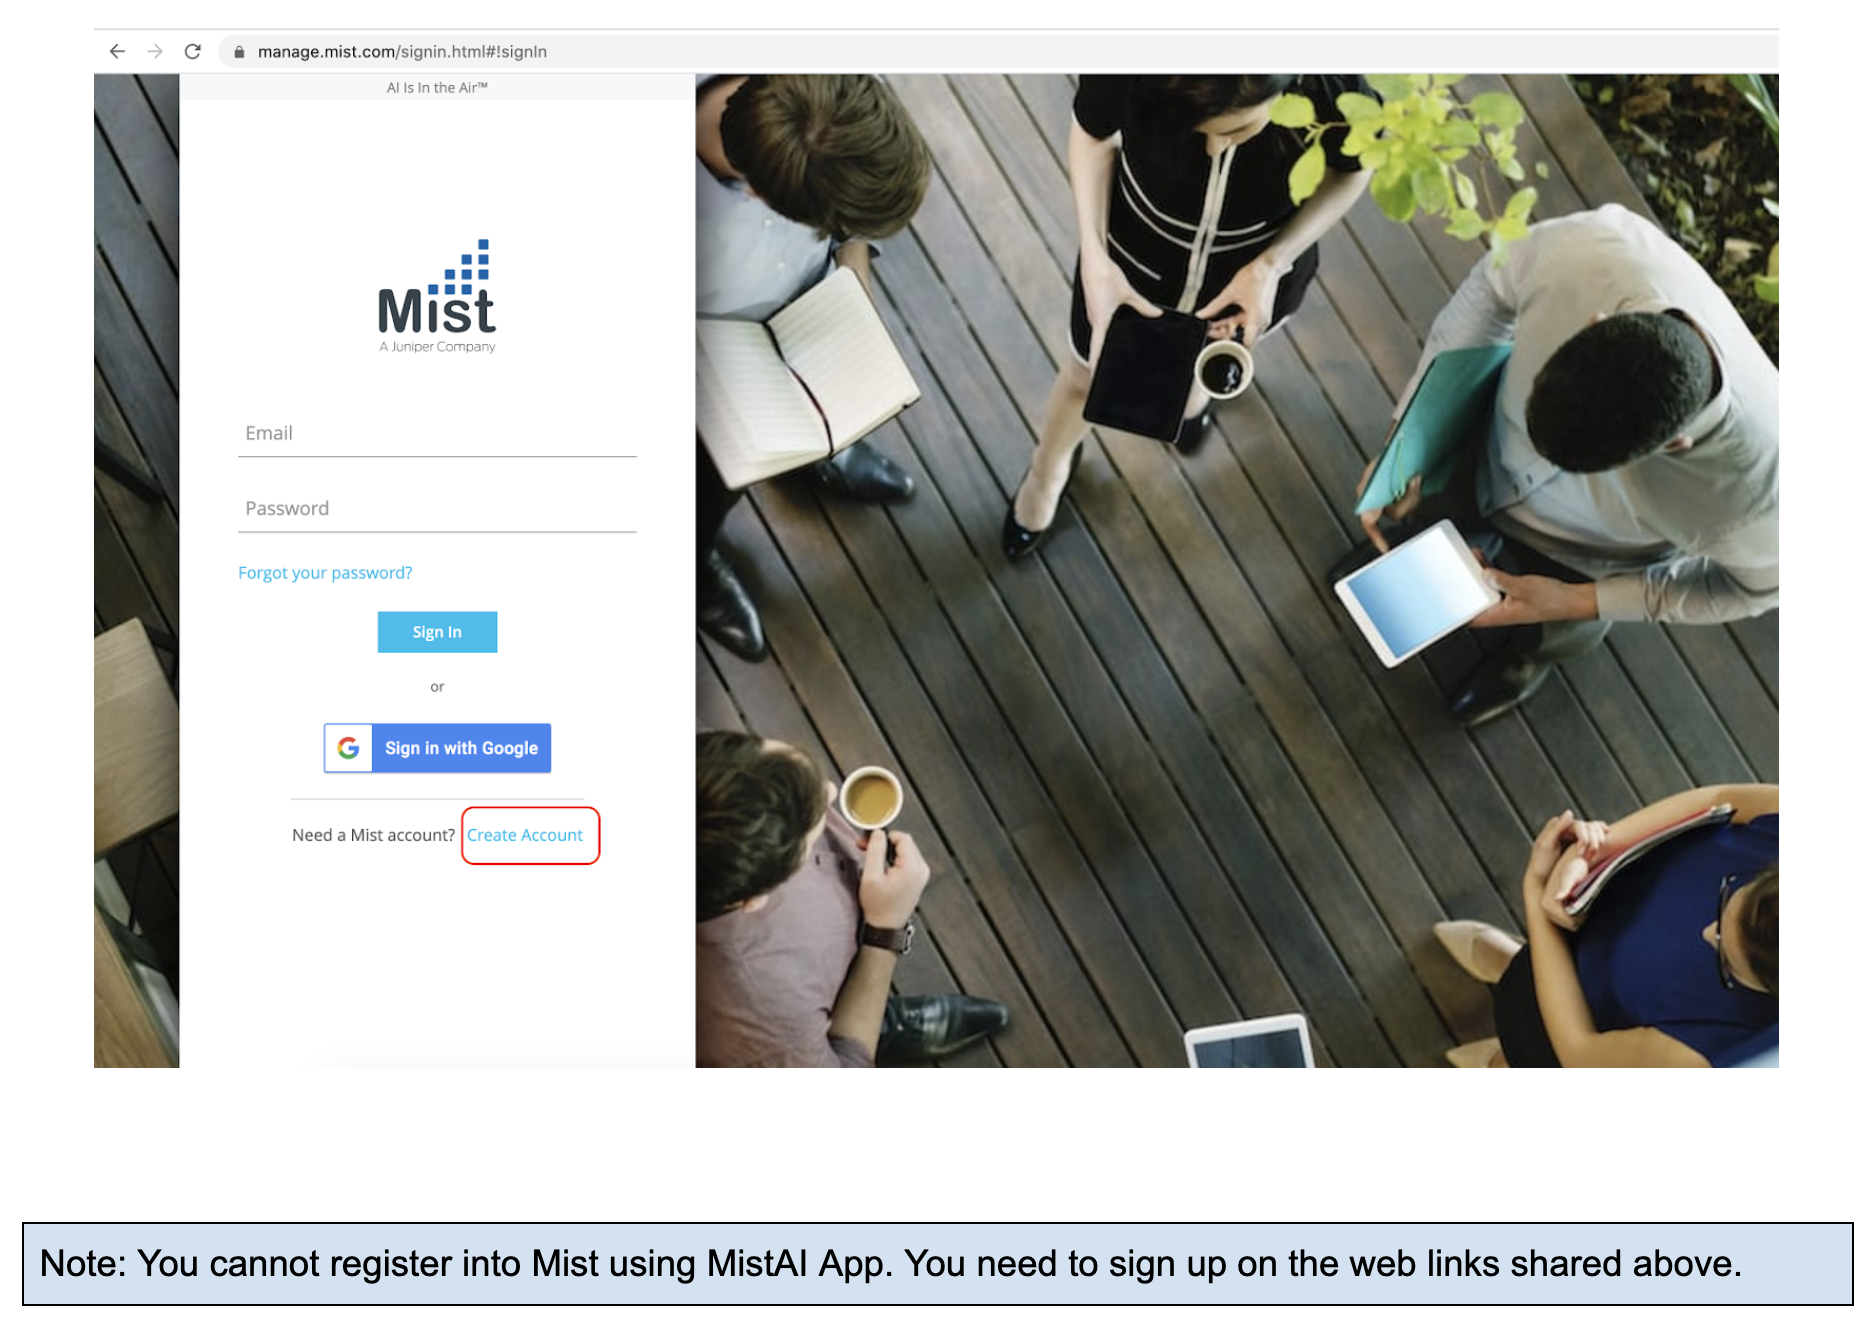
Getting started with Mist
- To start using the App, you need to create an account from the Mist UI portal. You can select the link depending on the deploying Organization(Org) environment.
- A verification email will be sent to the email address provided in the “Create Your Mist Account” form. Verify your account by following the link in the email sent to you.
Please contact the Mist support at support@mist.com to know the deployment org environment if unsure.
Global 1 – Production-AWS: https://manage.mist.com/signin.html#!signIn
Global 2 – Production-GCP: https://manage.gc1.mist.com/signin.html#!signIn
Global 3 – AWS-EAST: https://manage.ac2.mist.com/signin.html#!signIn
Global 4 – Production-GCP-Cannada: https://manage.gc2.mist.com/signin.html#!signIn
Europe 1 – EU: https://manage.eu.mist.com/signin.html#!signIn
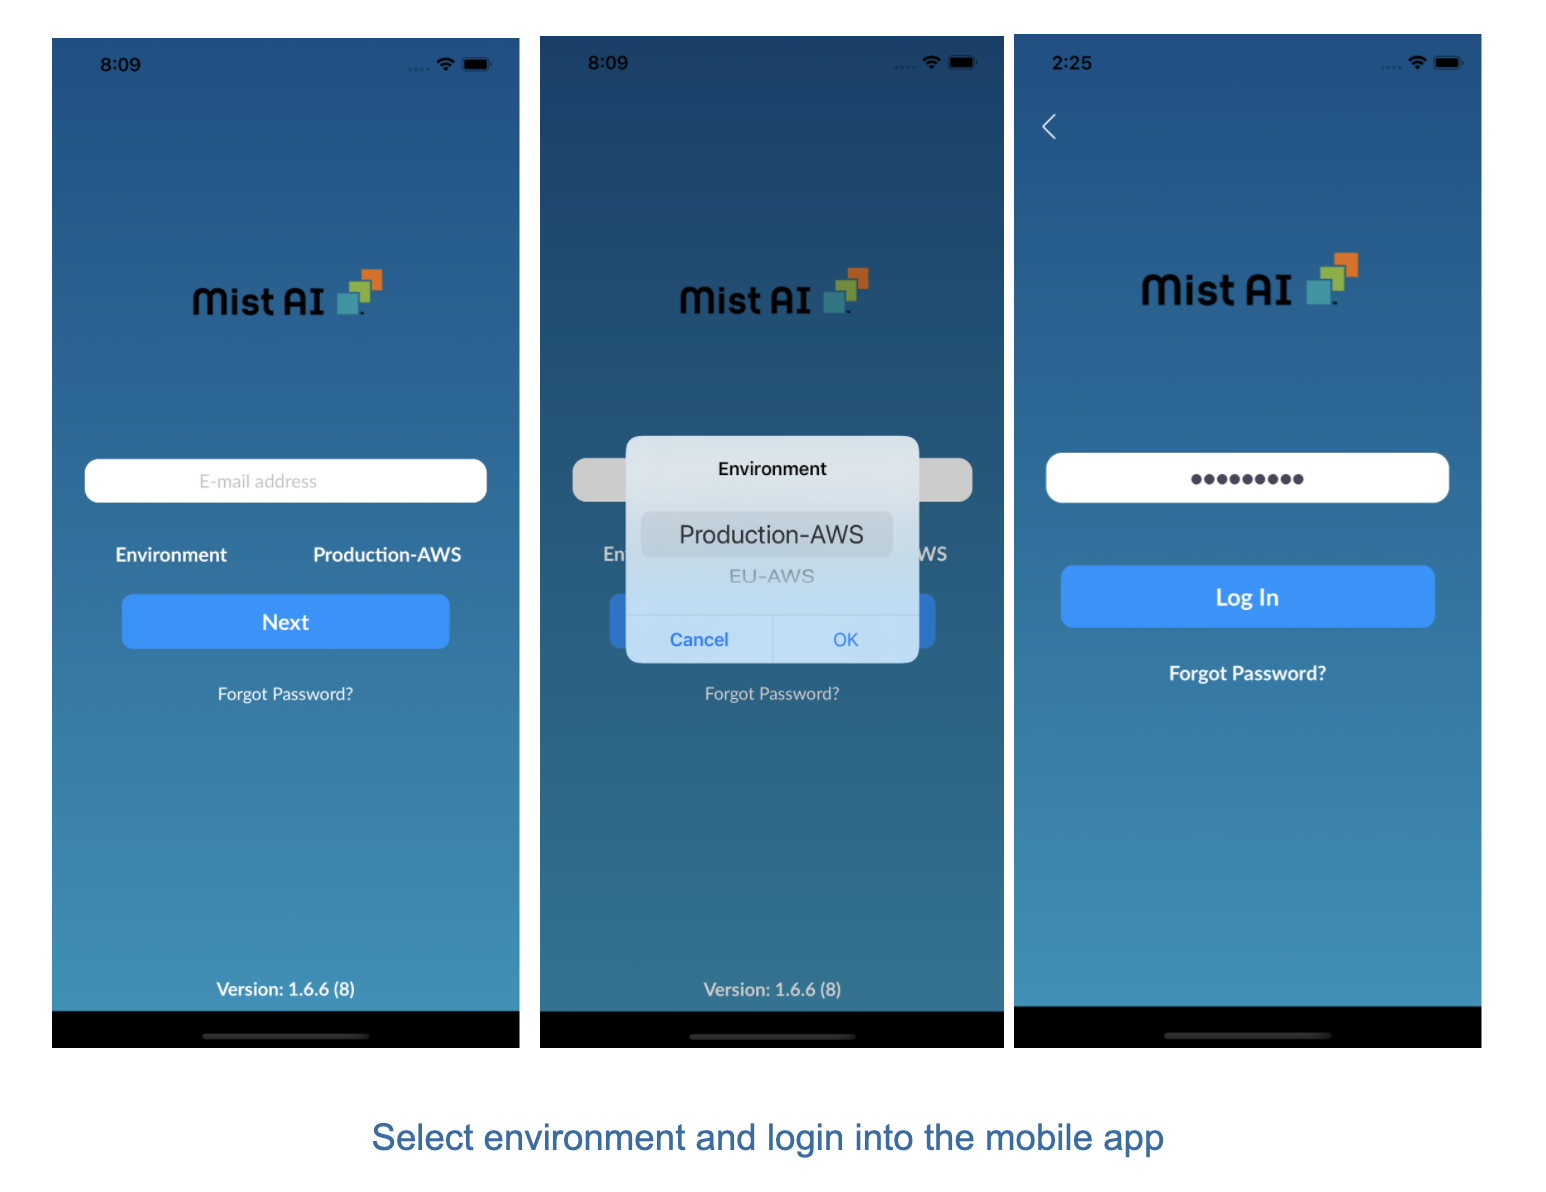
User Login
To login to the MistAI app, you should be registered on the Mist account. To begin using the mobile app, you need to
- Select environment (Production-AWS/ Production-GCP/ EU)
- Enter the registered email and password for the first time.
- If 2FA is enabled, please use your authenticator app to verify the user device.
- You will be logged in successfully.
- Next time, on login, you can use Touch ID/Face ID/passcode to log in directly into the App.

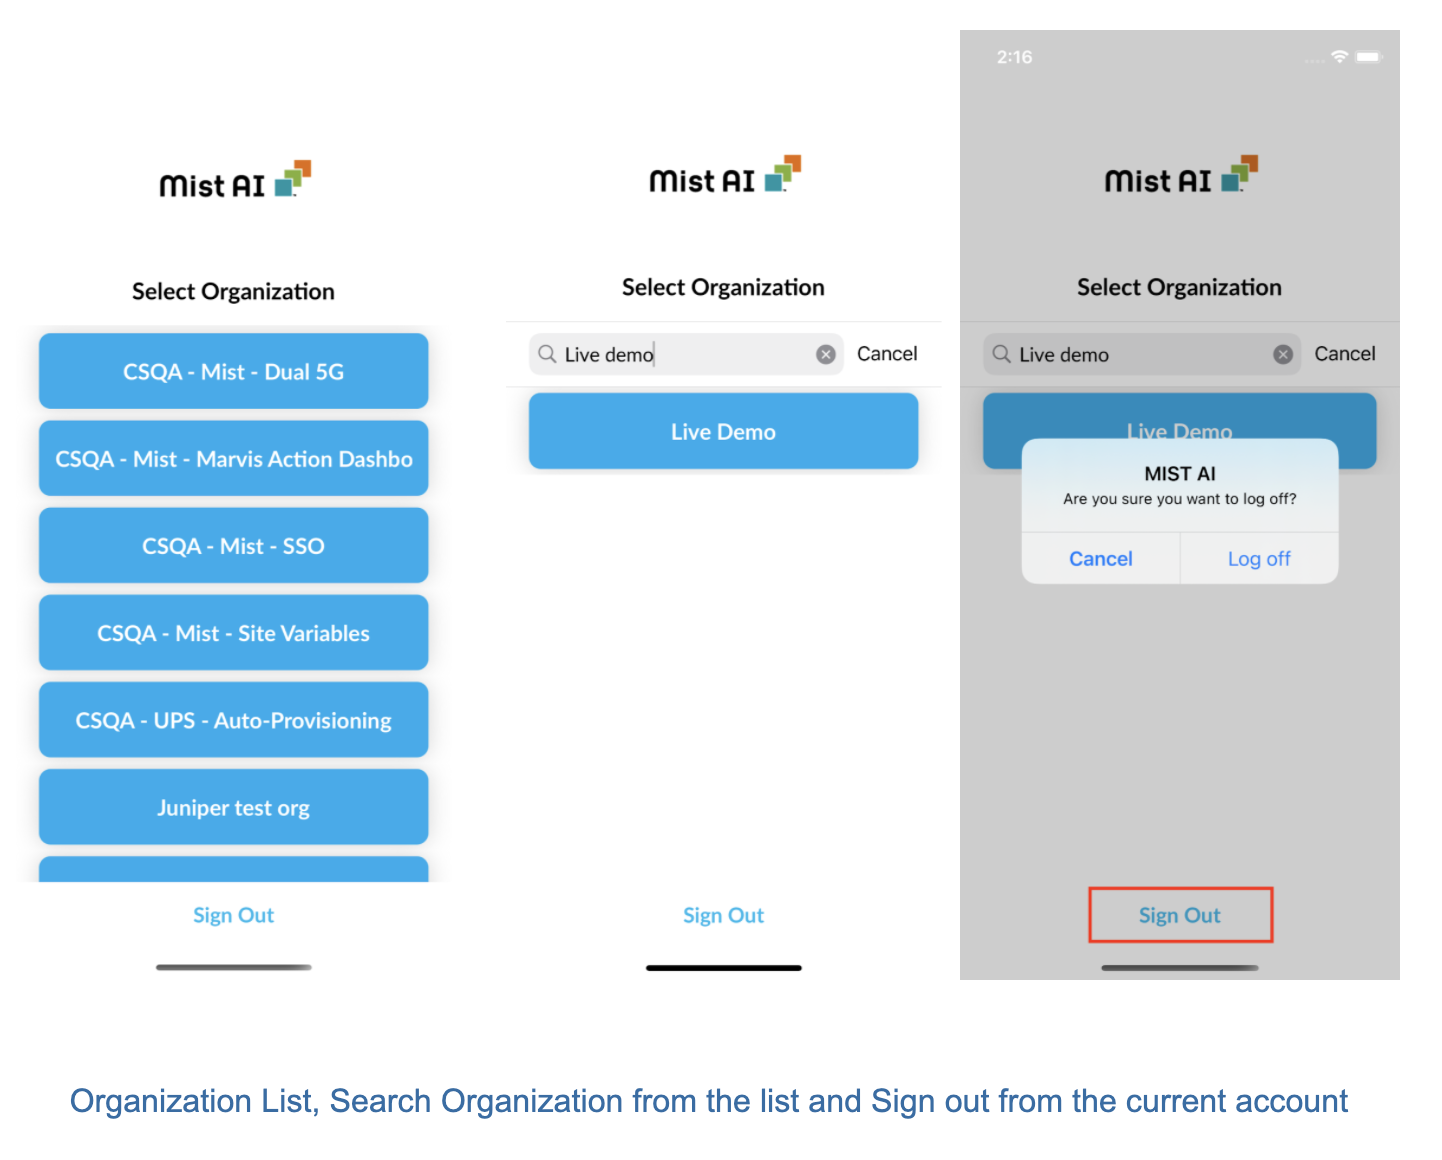
Org List
- Display a list of all the Orgs you have access to.
- Search for the Org you want to open. All orgs on your account will be in alphabetical order.
- Choose the org and you will be prompted at the home screen of the selected org.
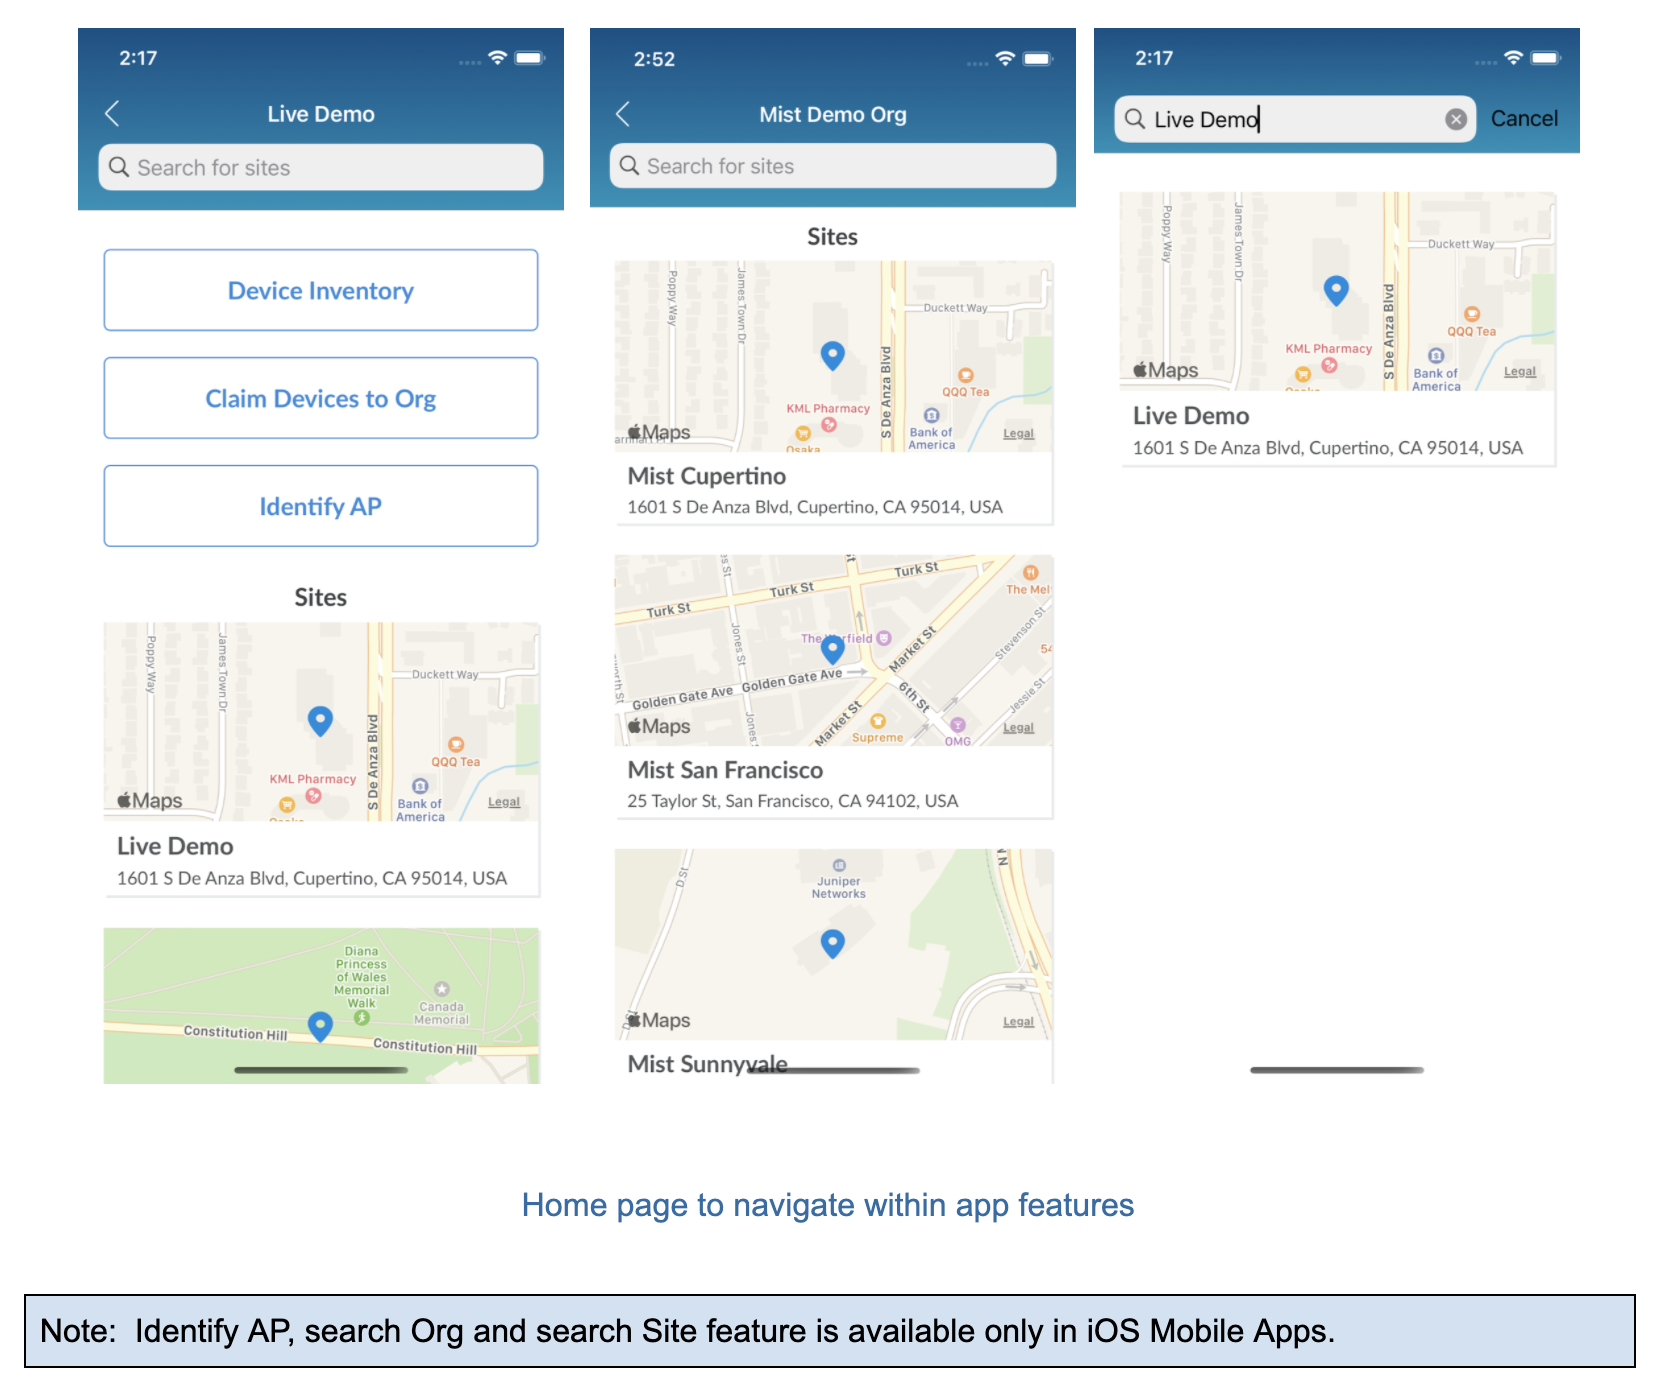
Home screen
- After selecting the org you will be prompted at the home screen of the selected org. From here you can either go to AP inventory, Claim AP to Org, Identify AP, and select Sites.
- You can also search sites from the home screen.
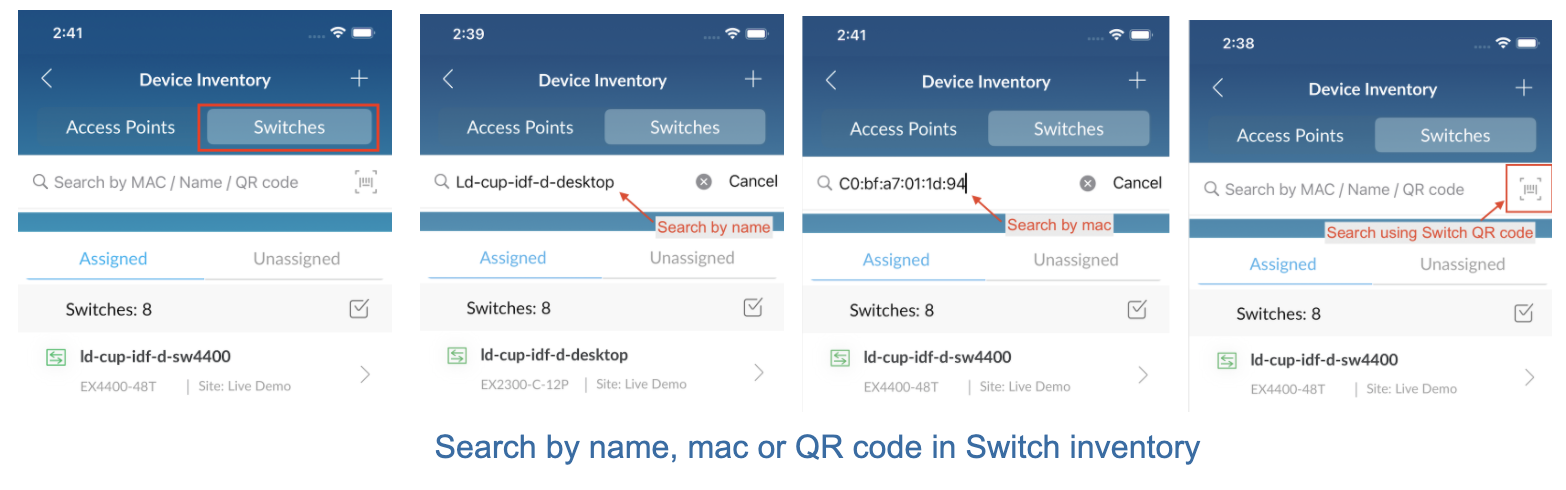
Device Inventory
This is where you can see all “Assigned” and “Unassigned” devices on your org. Note this is currently from an org level, showing all Access Points and Switches from all sites under your org. You can search for devices by name, mac or QR code.
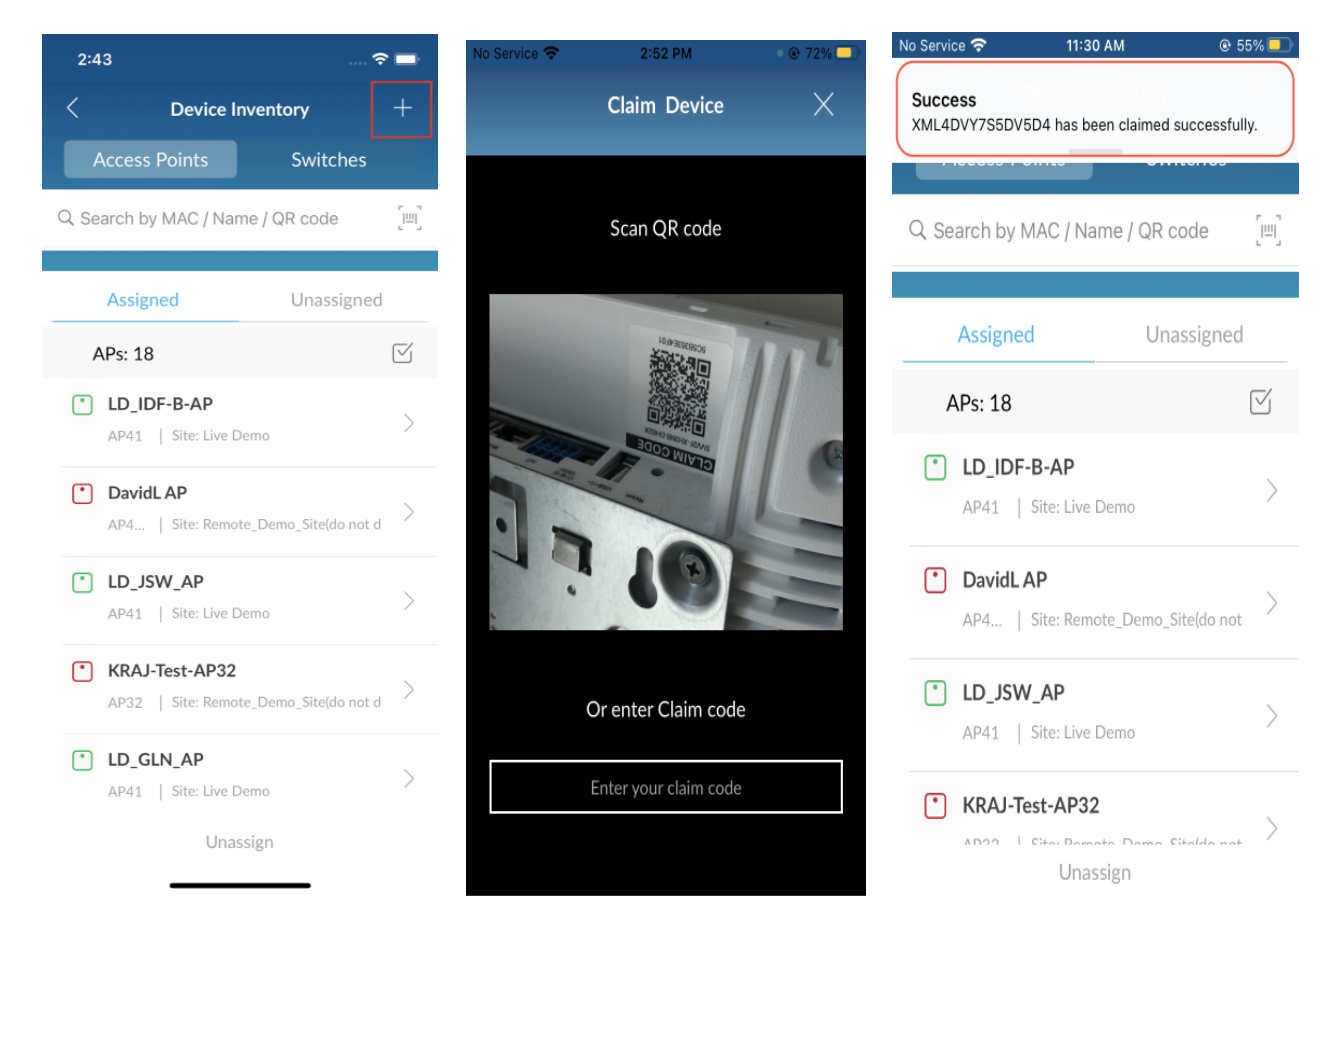
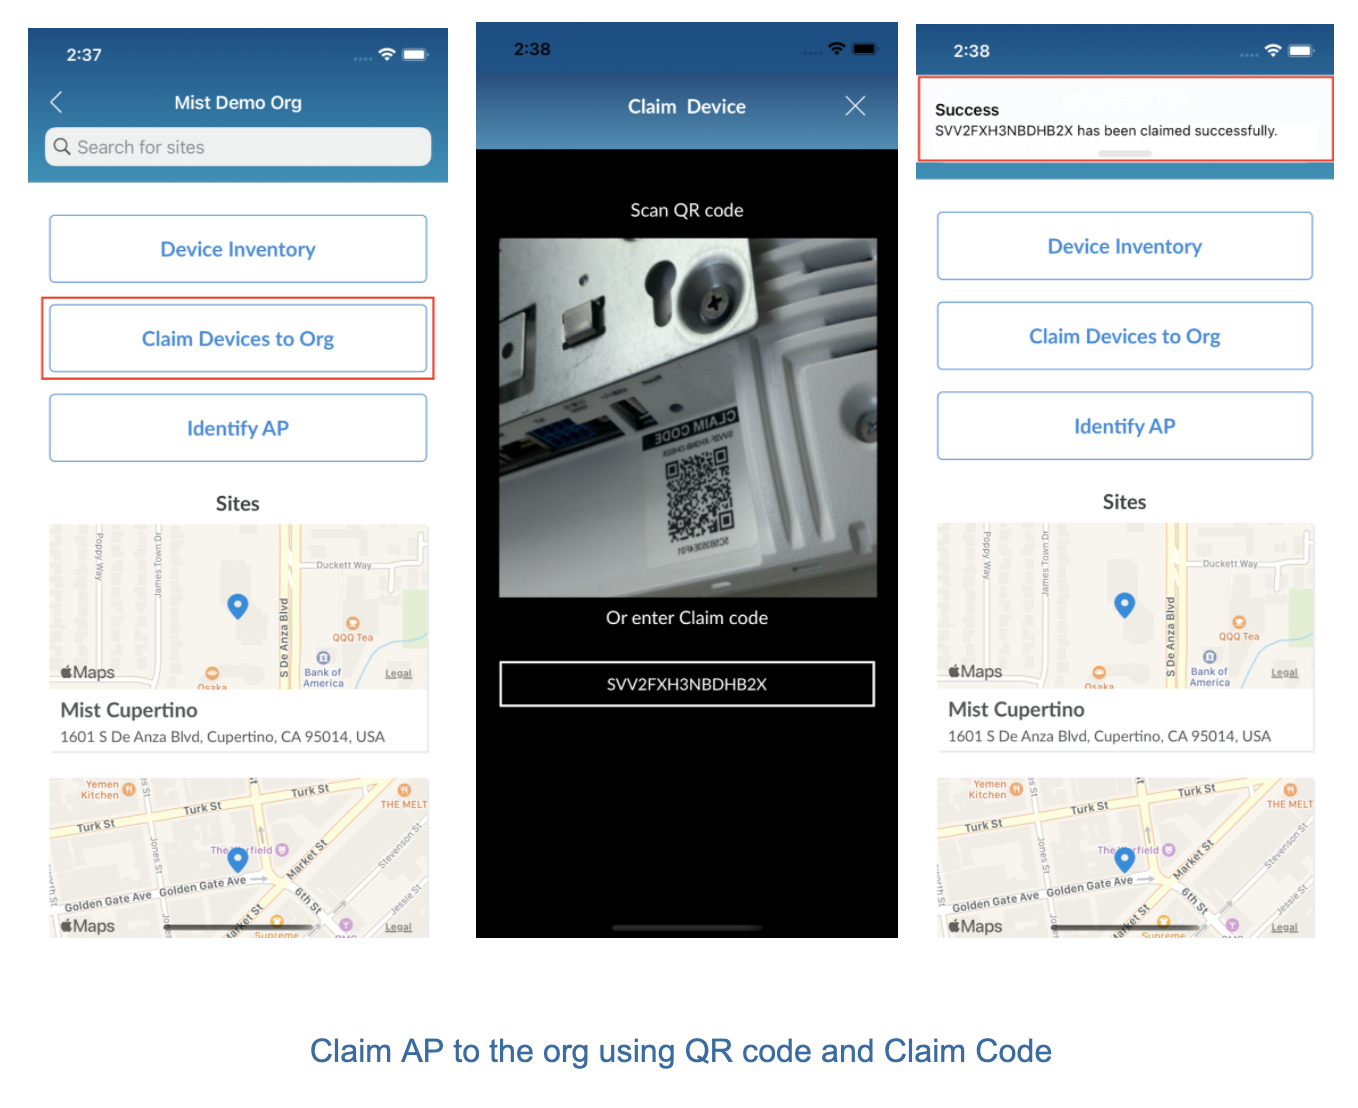
Claim Device
You can claim a device to the Org using the QR code or Claim code if the device is not already claimed using activation code.
- Tap on the ‘+’ icon to start the camera to scan the QR code.
- You can use the QR code or enter the claim code directly.
- You will see a notification alert on successful claim.
- If the device is already claimed or the claim code is invalid, you will get the notification alert respectively.
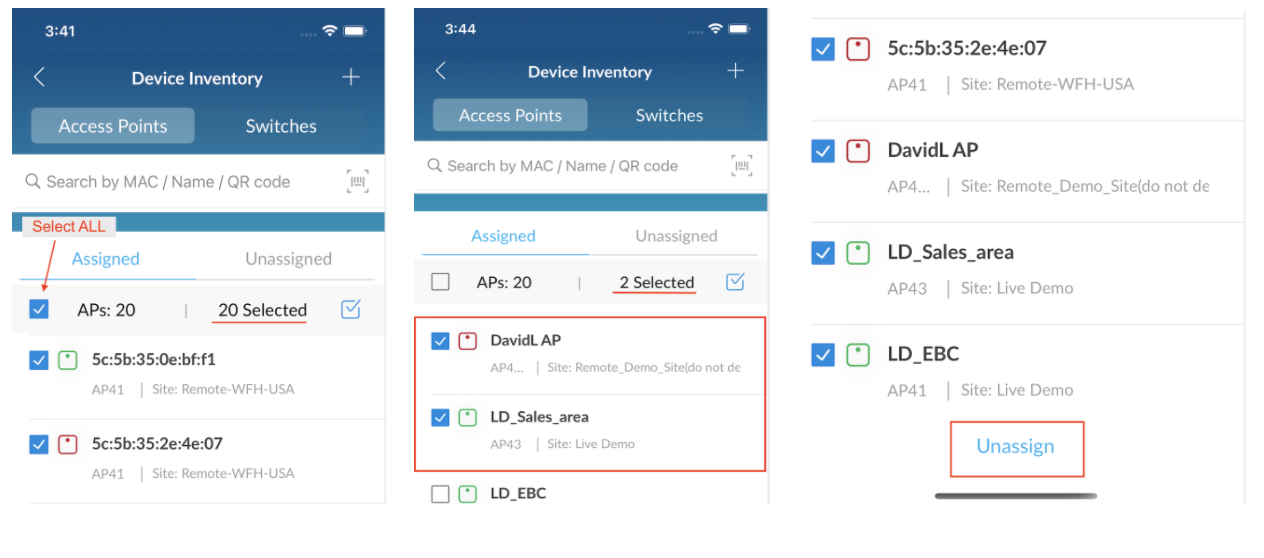
Access Points
Assigned APs: The assigned AP list has all the APs which are already or recently added to the respective sites.
1. You can search for the Access Points Name, MAC, and also scan QR code location to the right of the search bar.

2. You can edit the assigned list to unassign the APs from the site.
- Enable Multi-select option.
- Select the APs you want to unassign from the Site.
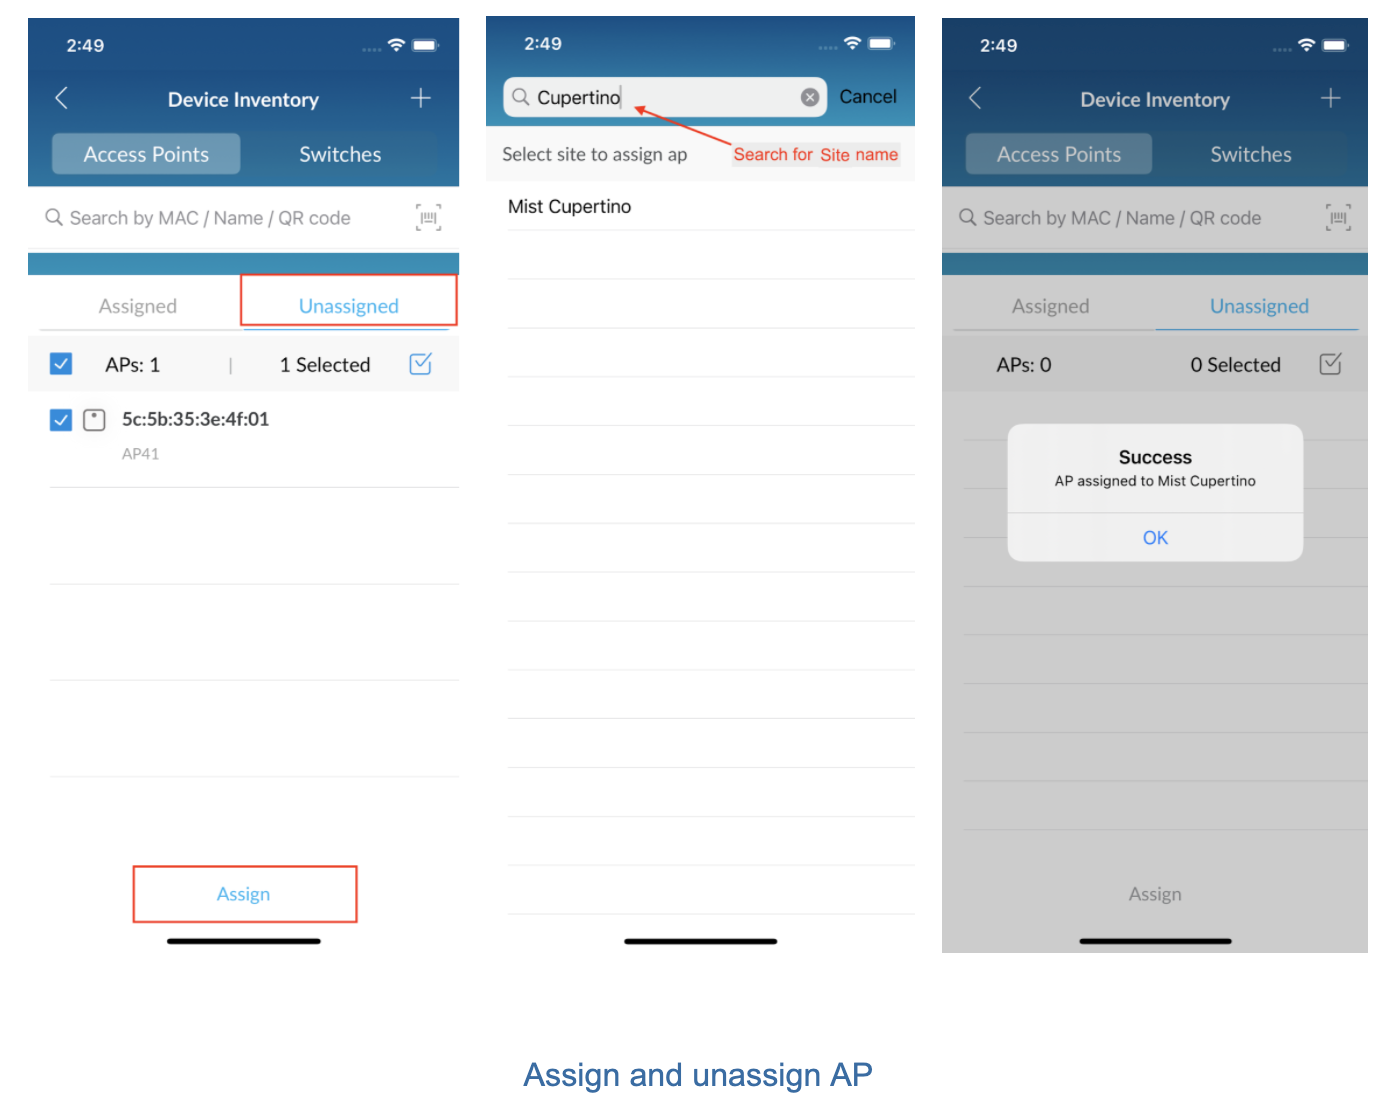
Unassigned APs: The unassigned AP list has all APs claimed to the Org and not assigned to the site.
1. Similar to the assigned list, you can search for the name, mac address and QR code.
2. You can edit the unassigned list and assign the APs to the respective sites.
Switches
- Similar to AccessPoints, you can search switches by name, mac and QR code.
- You can also assign/unassign switches to/from a site.
Claim AP to Org
This is used to claim an Access point by scanning the QR code on AP or entering the Claim code directly. After successfully claiming the AP to the Org, you can find the claimed AP in the AP inventory ➡ Unassigned AP list.
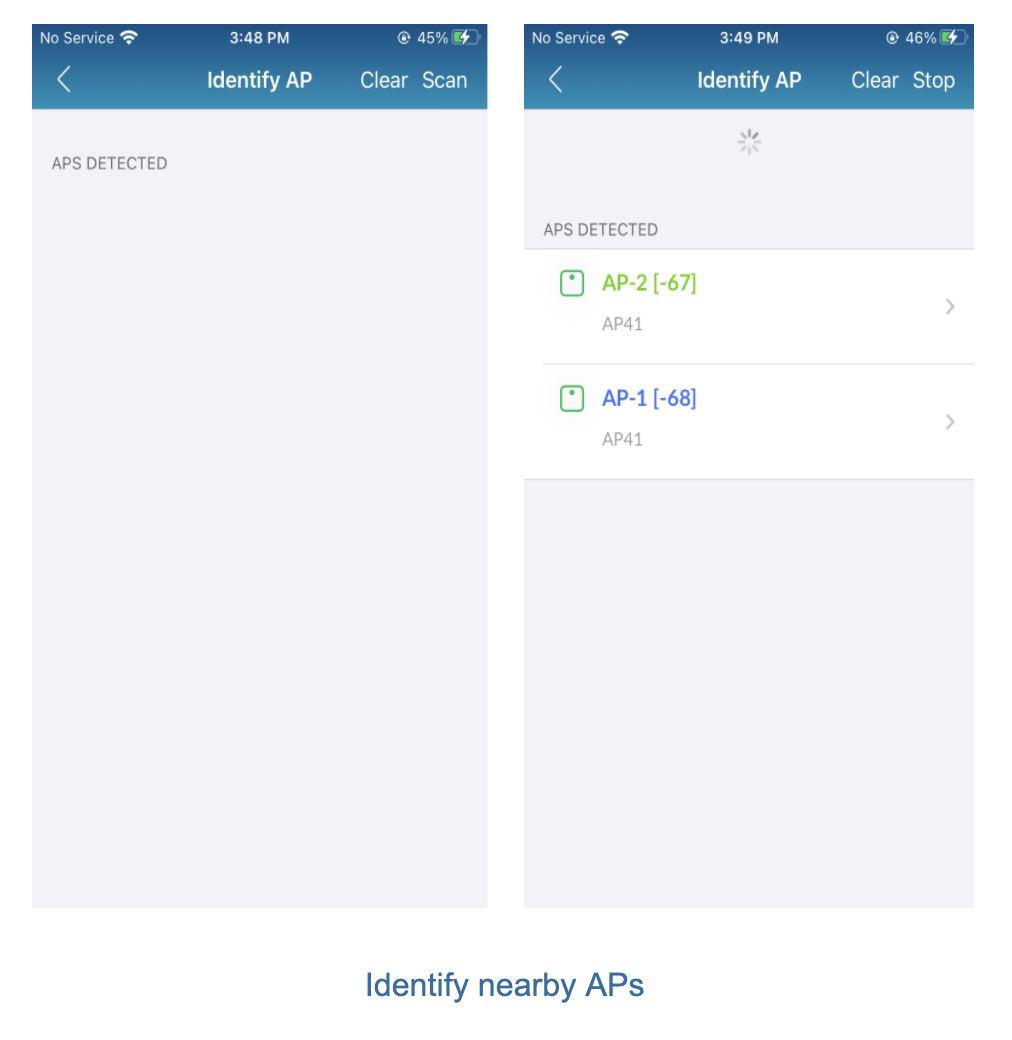
Identify AP (only in iOS)
This is where you can scan APs that are close by to identify APs. Before scanning, make sure vBLE Engagement is enabled and APs are placed on the floor map. Before scanning from the App, please enable Bluetooth on your iOS device. The “Identify AP” feature is only available in iOS.
Scan – start scanning for the nearby APs.
Clear – remove all the detected APs.
Stop – stop scanning for AP.
Select Site
- At the bottom of the home page, you can see all the sites that are on the selected org. From here you can select which site to go into and what APs are claimed to that site and the maps that are associated with the selected site.
- You can then select the APs, make changes, and save. Whatever changes you make on the Mist AI app will reflect back in the Mist portal.
- From here you can claim or assign the AP to the site by scanning QR code on the AP or using claim code.
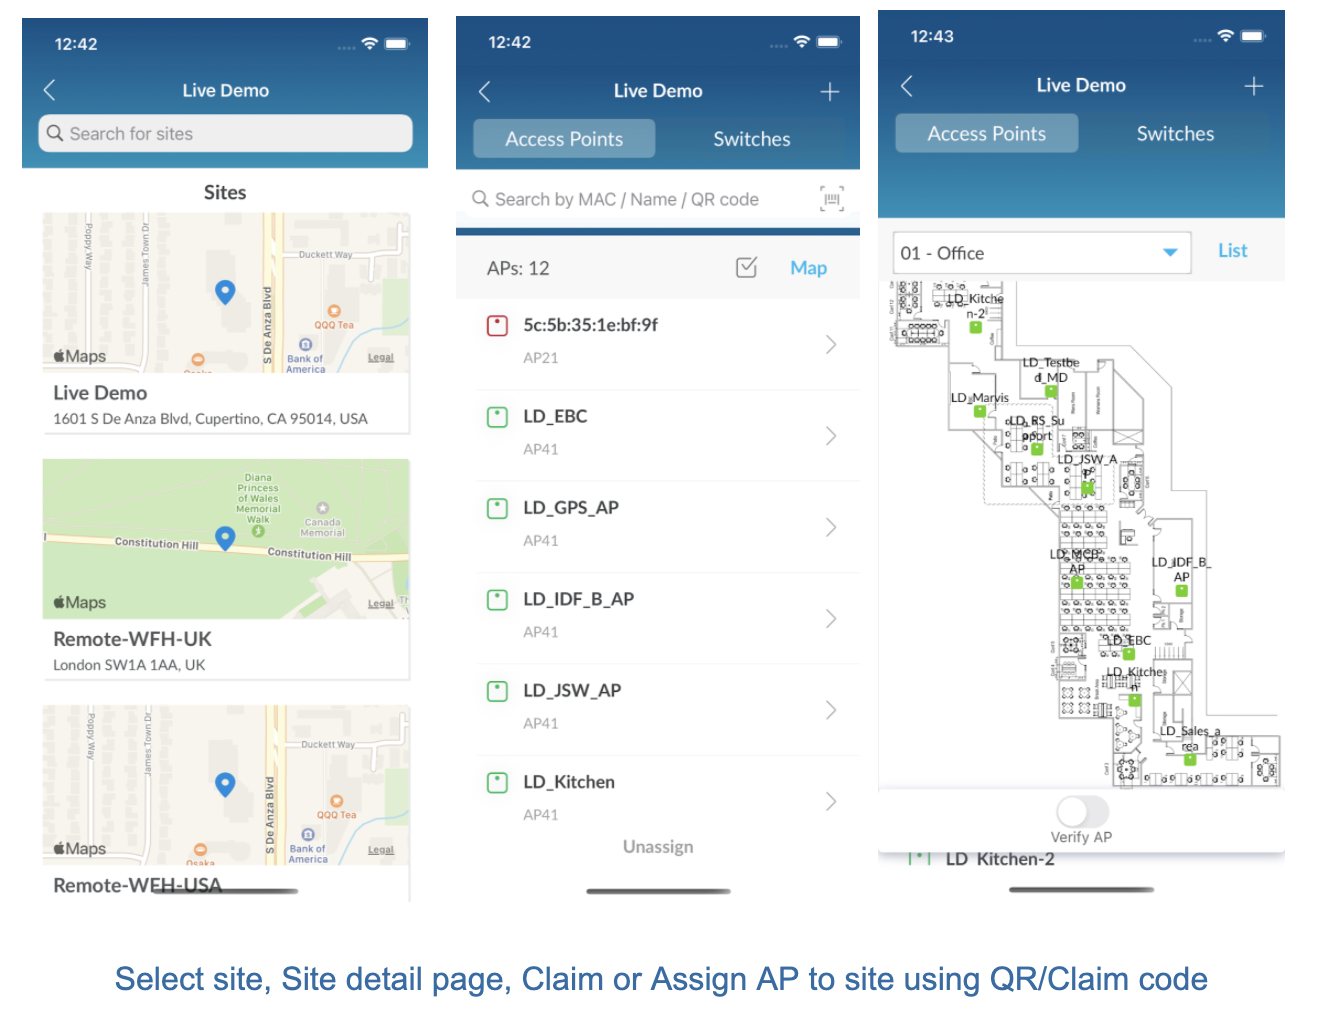
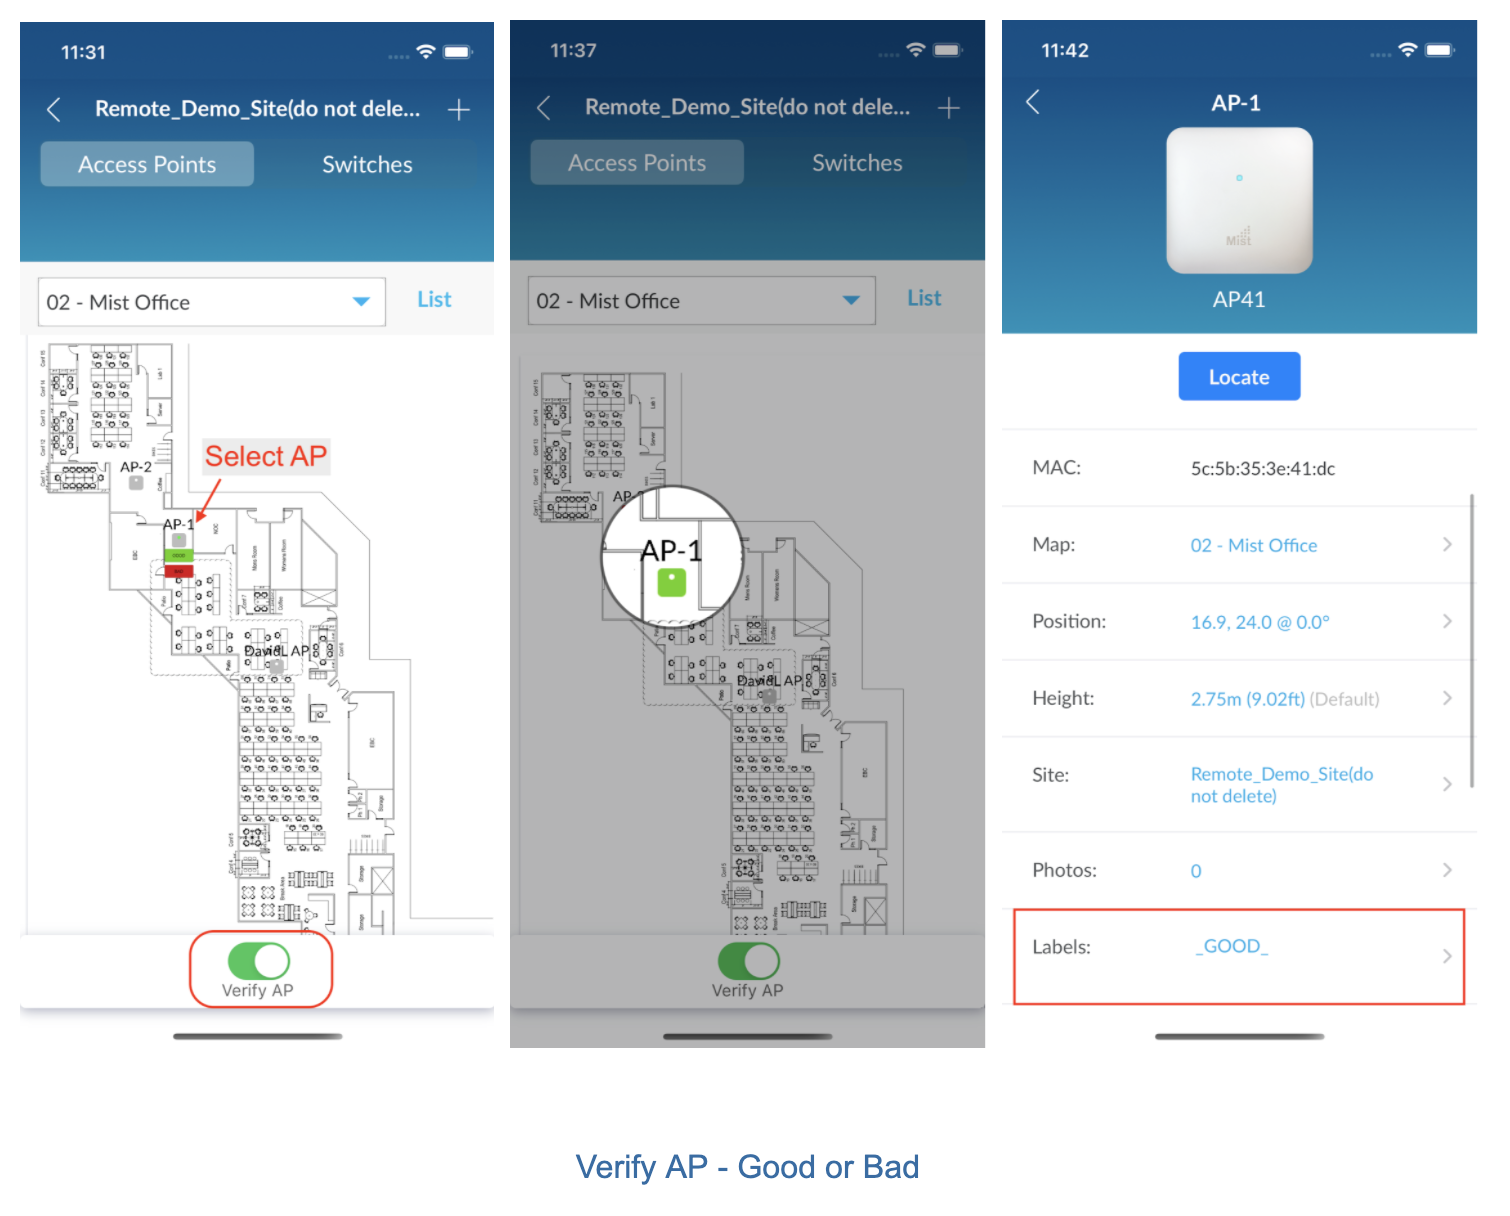
Verify AP (only in iOS)
- To verify an Access Point location and status, firstly, you need to place it on a floor map.
- Go to the Site details page, select Access Points.
- Select your map from the dropdown list.
- Tap on the “Map” button next to map names dropdown to view APs on floor map.
- Enable the “Verify AP” switch. This is where you can select AP and make a note if the AP placement is GOOD or BAD.
- By selecting GOOD/BAD, the AP icon turns green or red respectively. Label/tag is created and associated with that AP. You can view this label/tag on Mist Portal.
AP Details
When selecting an AP from AP inventory or Site, you can navigate to the AP detail page. You can update the AP name, set it on the floor-plan, and edit both the placement and orientation of the AP. By clicking Save, AP changes will reflect on the Mist Portal.
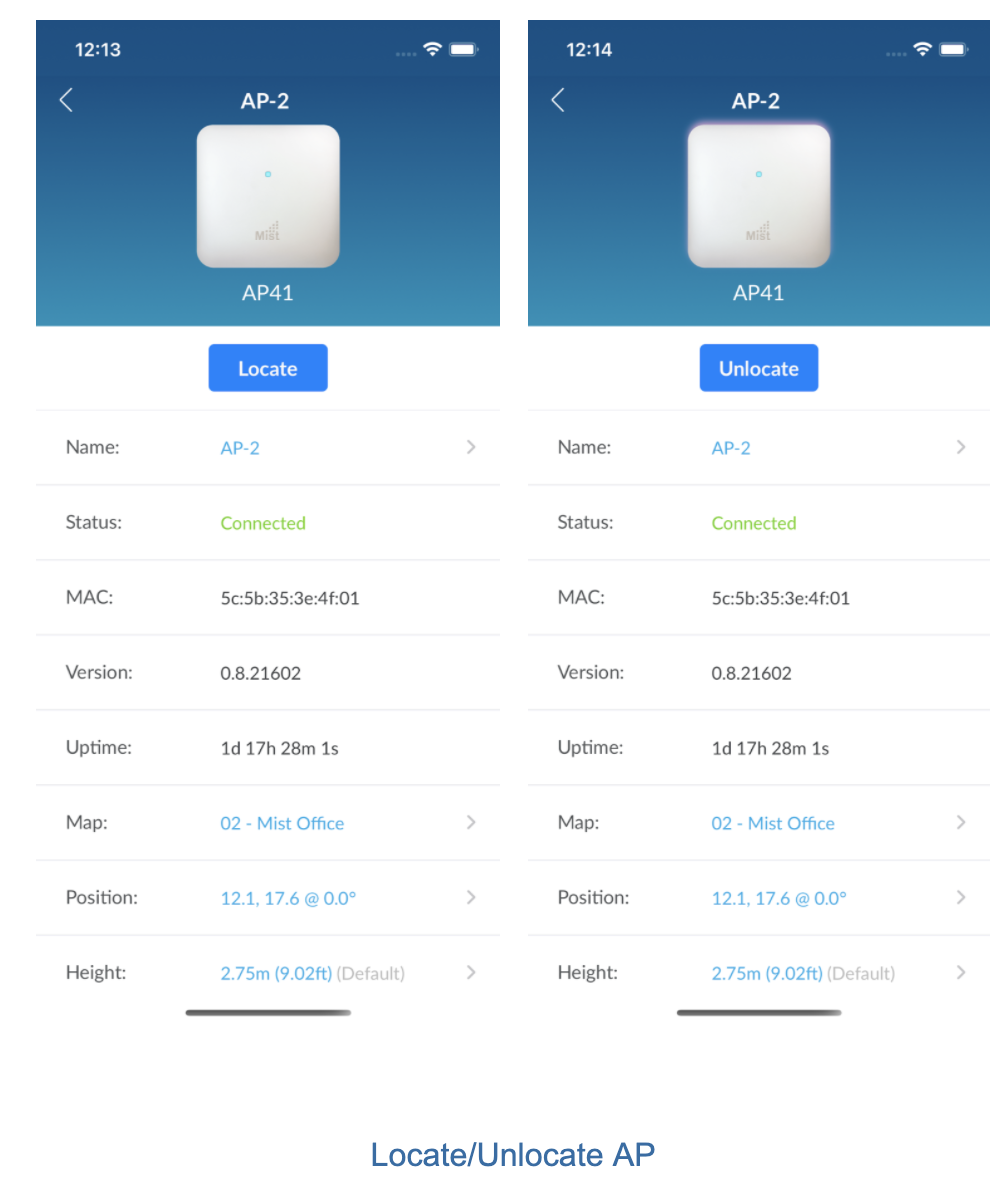
Locate – This can be used to verify the AP placement. On click locate, the LEDs on the physical AP will start blinking green and purple. Unlocate will help stop blinking.
Name – change the AP name. By default, the AP name would be a mac address if not set.
Status – current AP status (connected or disconnected)
Mac address – displays AP mac address
Uptime – display how long the AP has been up hh:mm:ss format.
Version – AP firmware version
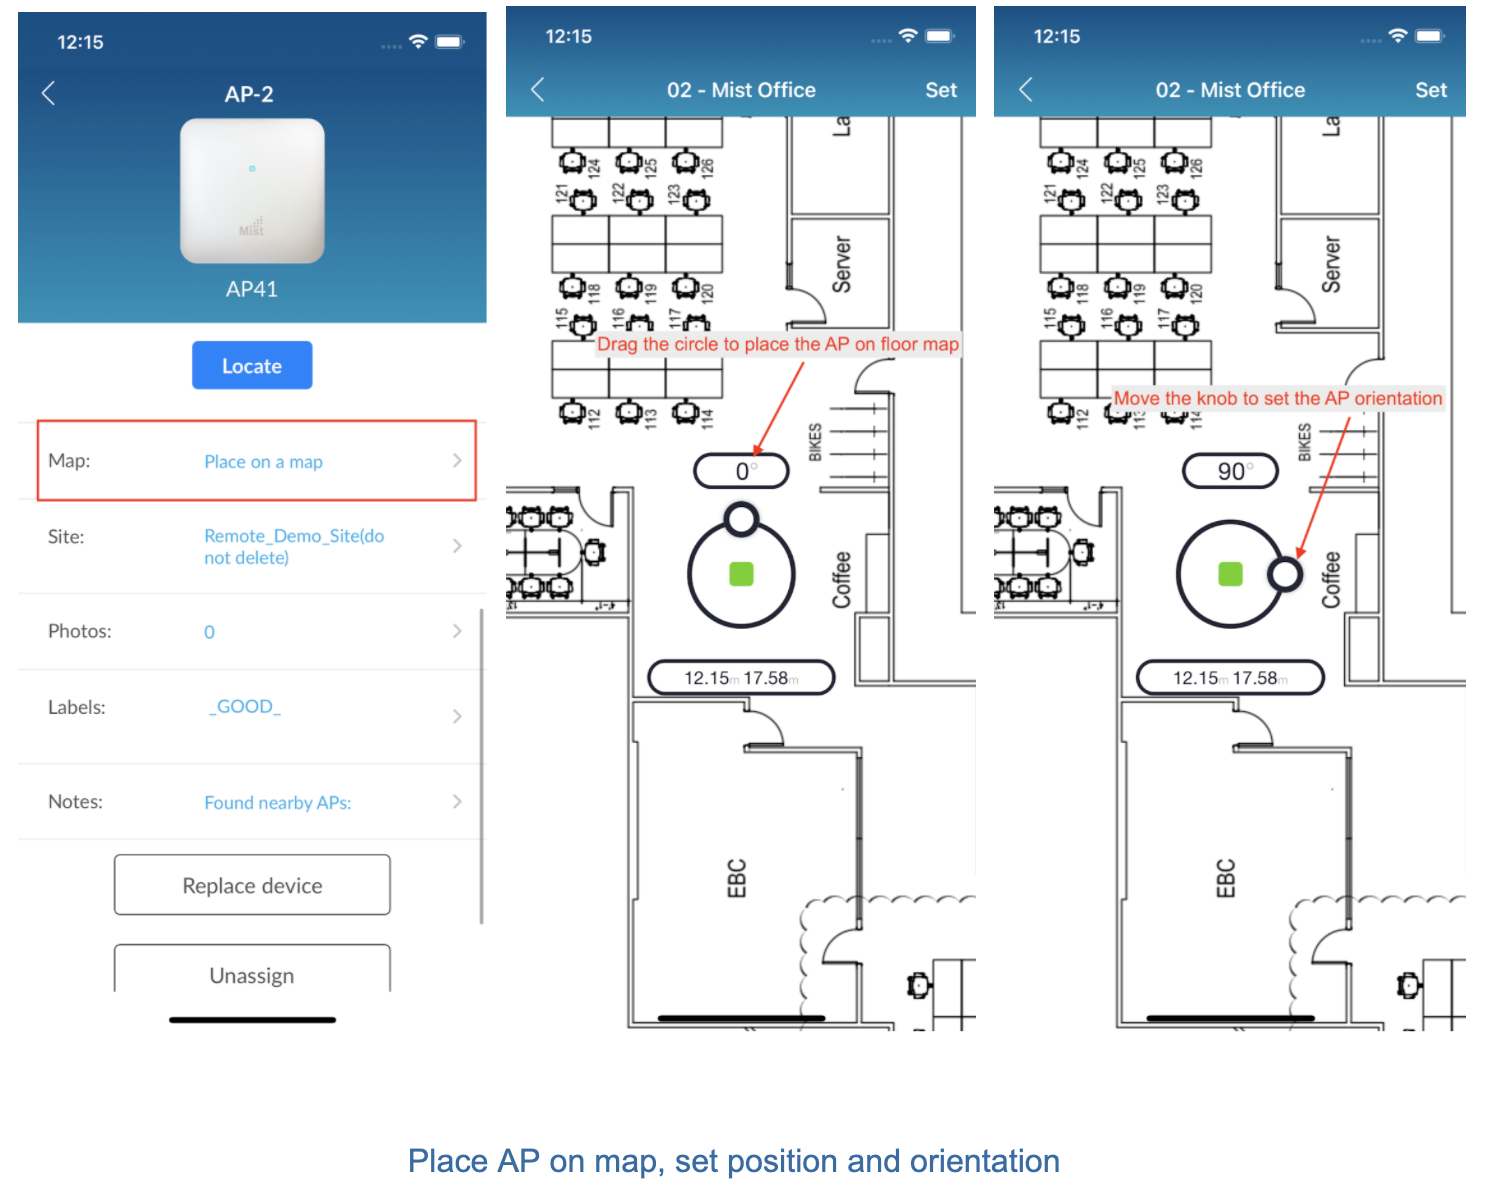
Map – if AP is not assigned to a map, it will show ”place on the map” otherwise, map name. You can place or Verify the AP location on the floor map.
Position: When selecting an AP you can set it on the floor-plan and edit both the placement and orientation of the AP, push “Set” to save, and apply the changes.
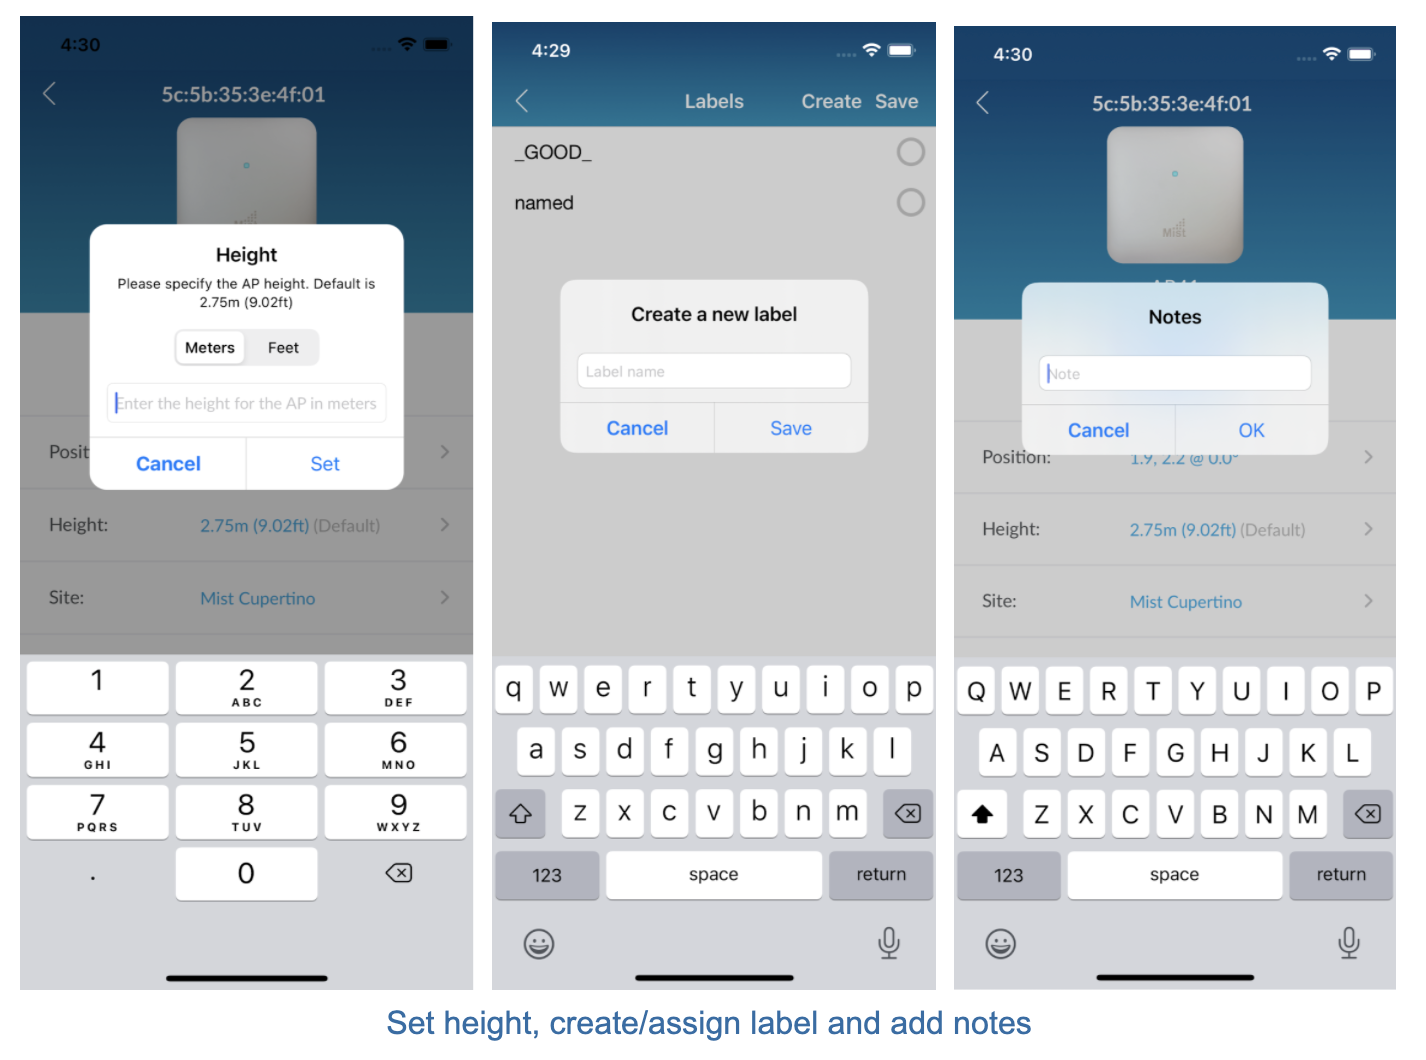
Height: You can change the AP height in meters or feet. By default, the height is set to 2.75m.
Site: Show the site to which the AP is assigned.
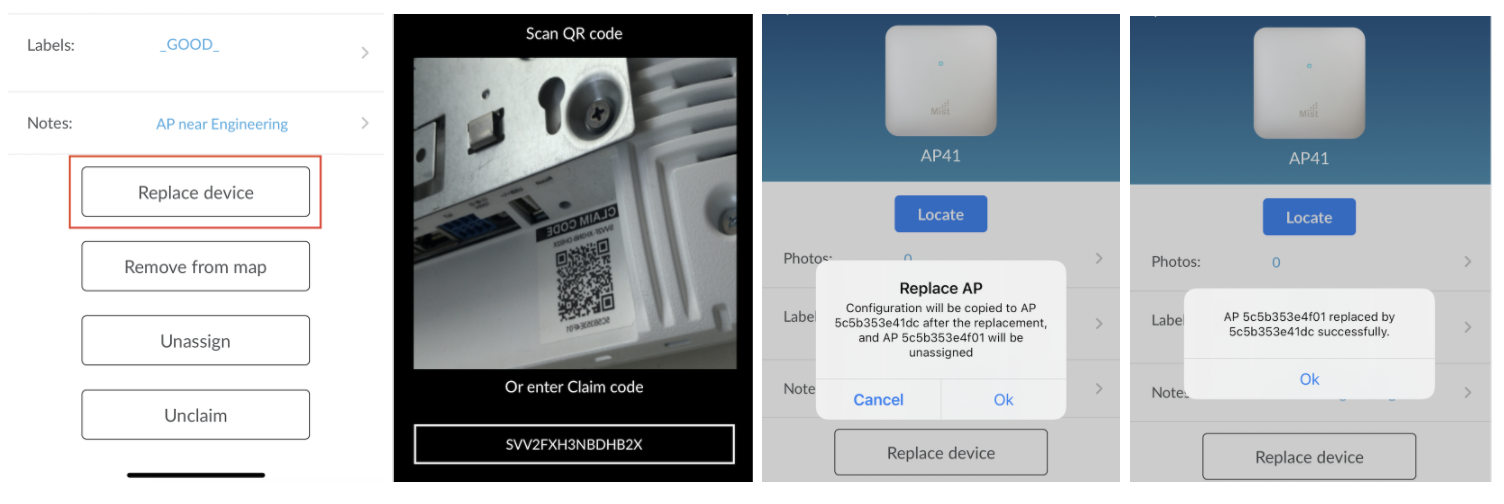
Labels: You can create labels/tags to help filter APs.
Notes: You can add notes to mark down troubled areas.
Replace device: This function allows the user to copy the entire configuration of an old AP (location settings) onto a new AP.
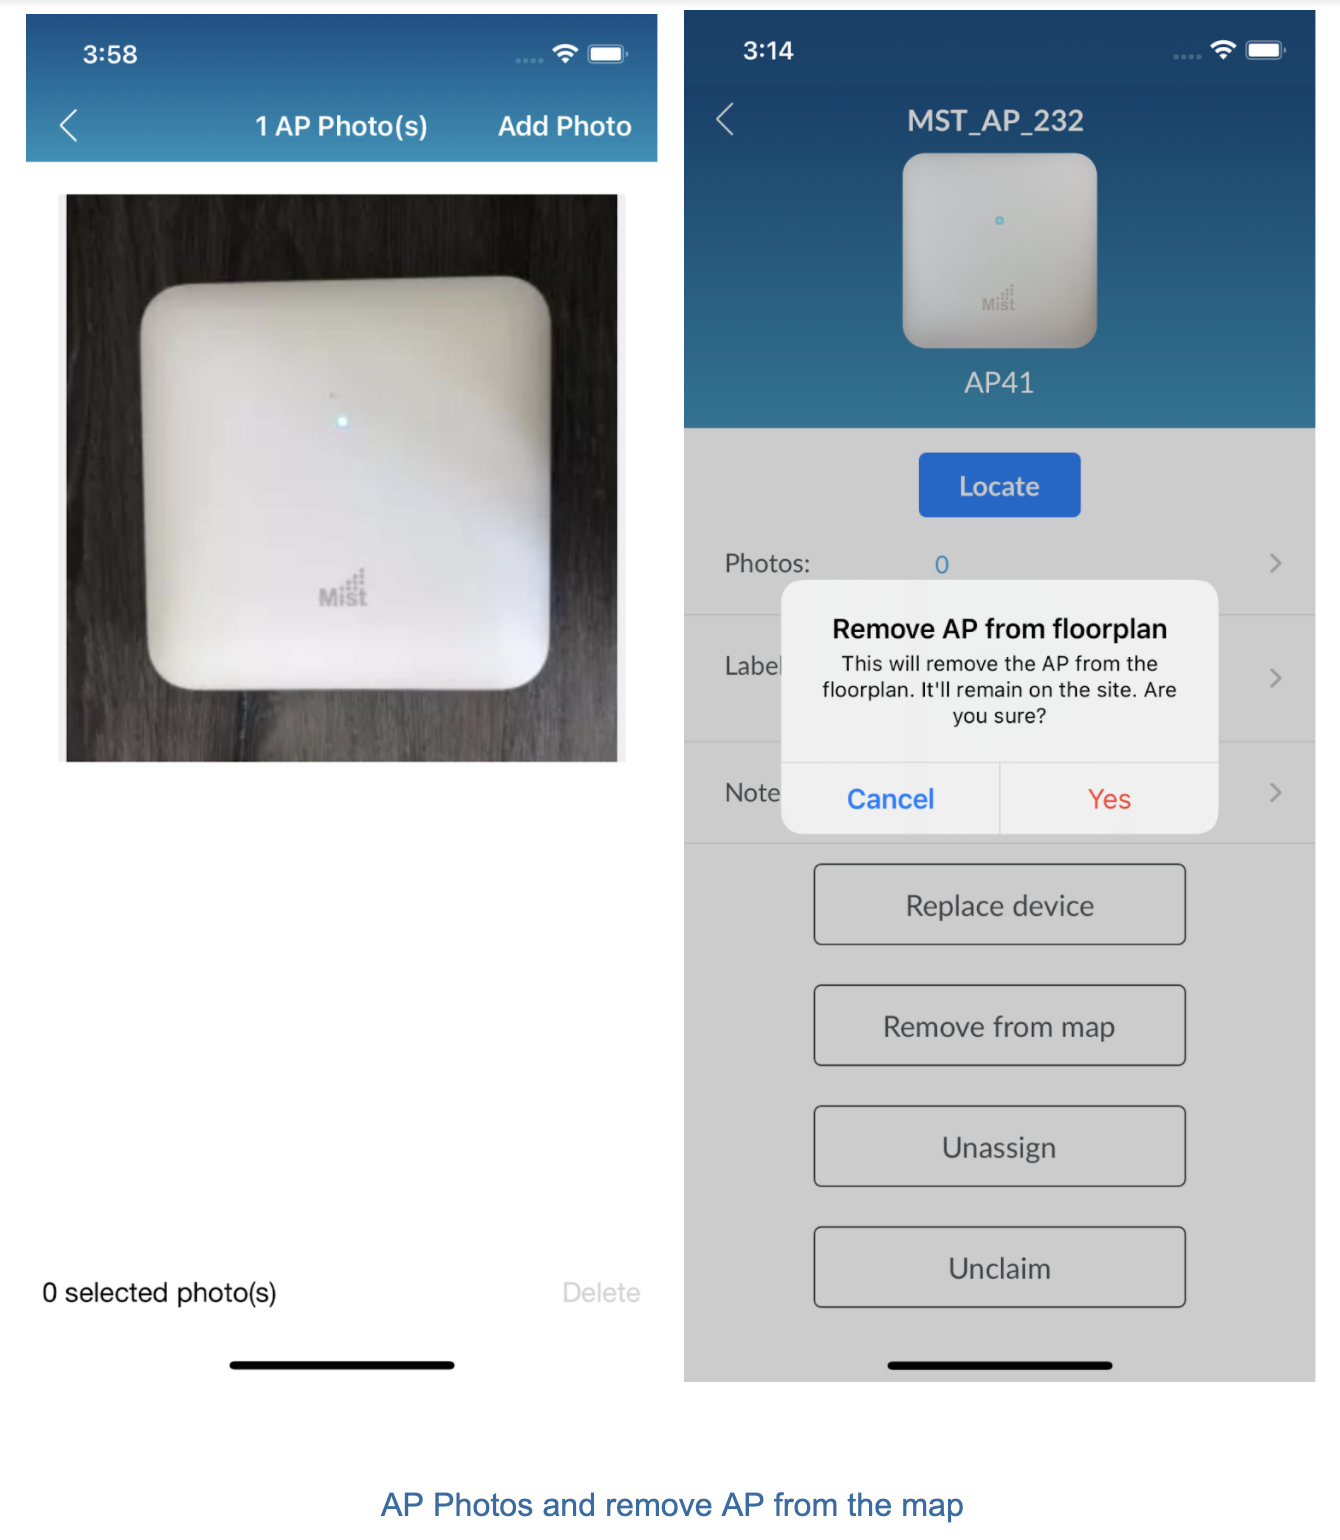
Show AP Photos: You can upload up to 3 photos. This will also reflect on the Mist UI dashboard.
Remove from map: This will remove the AP from the floor map. However, AP will still be in the assigned AP list.
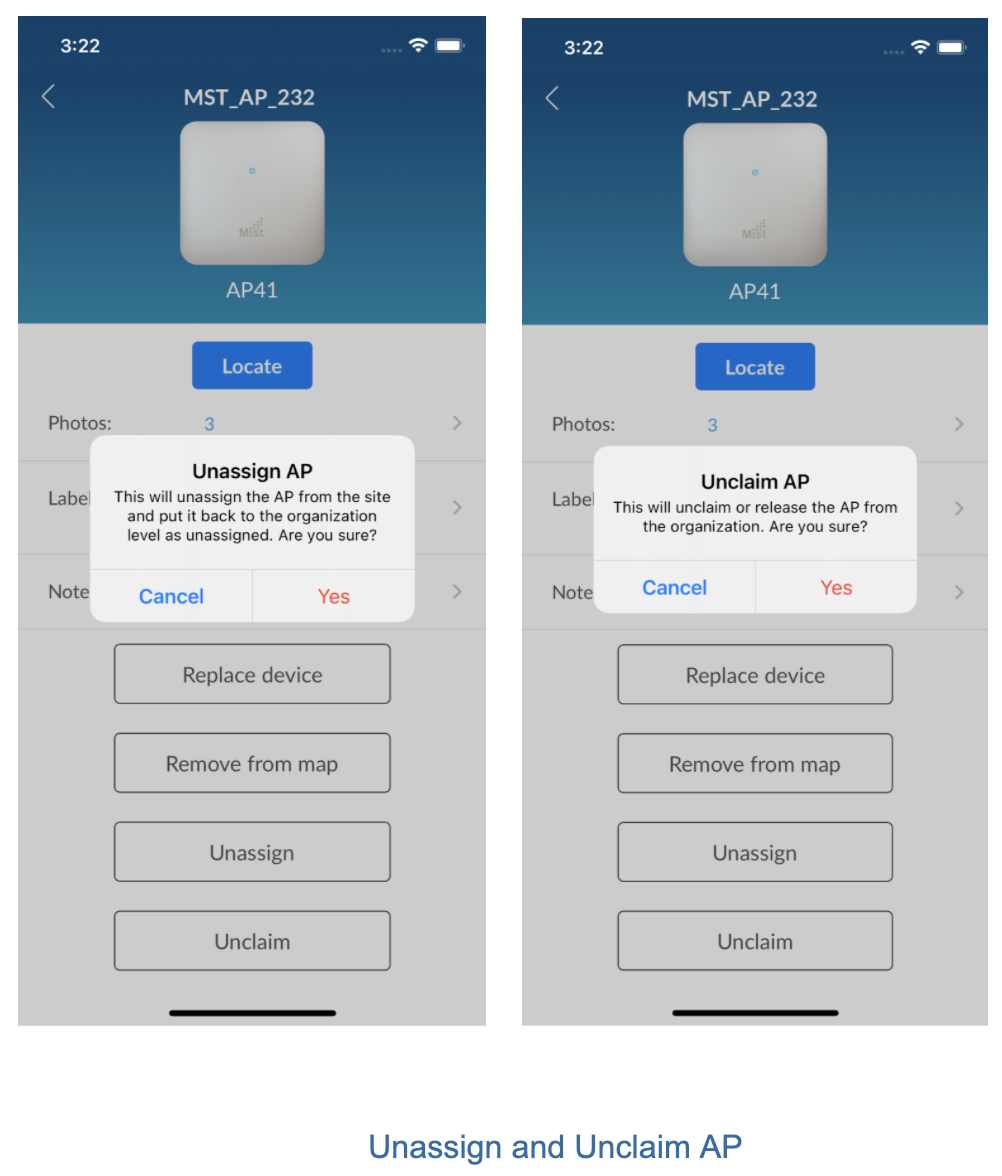
Unassign AP: This will remove the AP from the site and move it to the unassigned AP list in the AP inventory.
Unclaim AP: This will release/remove the AP from the Org.
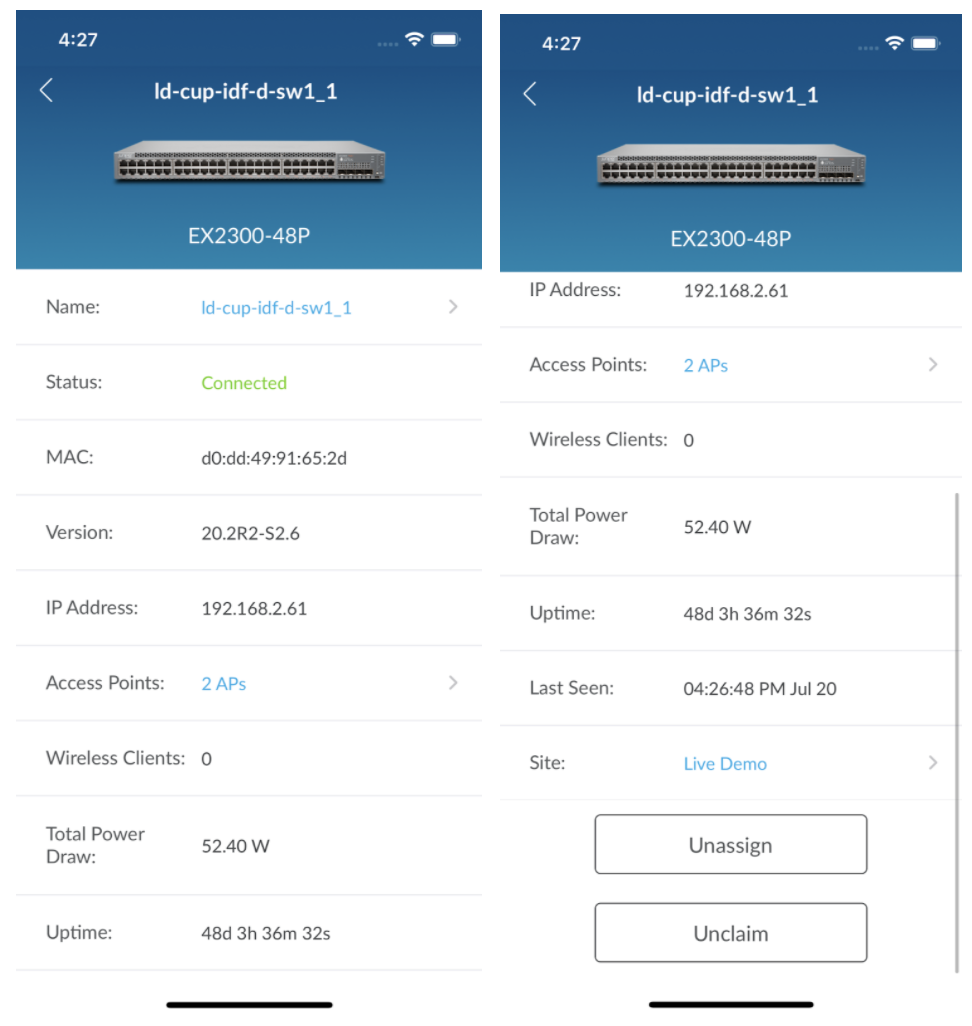
Switch Details
When selecting a switch from Switches inventory or Site, you can navigate to the Switch detail page. You can view significant switch details such as name, mac, status, firmware version, wireless clients, connected APs, total power draw.