The Marvis Microsoft Teams app makes it easy for you to access Marvis directly from your Teams desktop or web client. You can use the app to search for devices, view details, troubleshoot your network, and search for documentation without having to log in to the Mist portal. With the Marvis app, all the information is available on-demand right at your fingertips!
The Marvis application is integrated with Microsoft Teams. You can set it up quite easily. Using this application, you can log in to your organization and access information similar to how you would access the information in the Mist portal. You can troubleshoot devices, search for devices, and troubleshoot sites from Teams. Network Operation Center (NOC) users can use this app to debug all aspects of support tickets.
You can use the Marvis app as an individual user or as part of a team through a Teams channel.
Enable or Integrate the Marvis App in Microsoft Teams
Microsoft Teams administrators can enable or integrate a third-party application such as Marvis in Teams. This topic provides the procedures to integrate the Marvis App in Teams.

Enable the Marvis App in Your Teams Environment
To enable the Marvis app in your Teams environment:
- In your web browser, go to Microsoft Teams Admin Center (https://admin.teams.microsoft.com).
- Log in using your admin account (Teams admin or Global admin) credentials
- In the left menu, select Teams apps > Manage apps
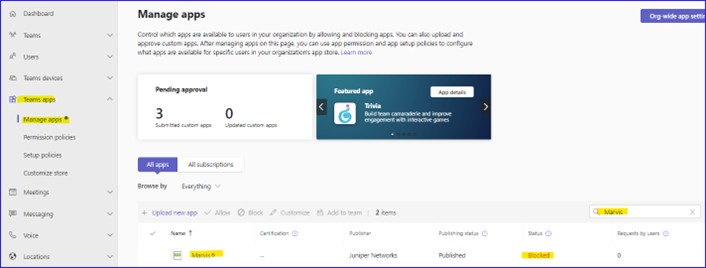
- In the Manage apps page, search for “Marvis”. You’ll see the Marvis app listed with the status as Blocked
- Click the Marvis app
- In the Marvis details page, change the status to Allowed
The Marvis app is now enabled in your Teams environment.
Add the Permission Policy for the Marvis App
Permission policies allow you to control which users can use the Marvis app. You can control access by creating and applying the policy to specific users. You can either create a policy or edit the default policy. We recommend that you create a policy.
To create a policy:
- In the left menu of the Microsoft Teams Admin Center window, select Teams apps > Permission policies
- Click Provide a name and description for the policy.
- Under Third-party apps, select an option that suits your organization’s We recommend that you select Allow specific apps and block all others. This option enables you to select the apps that you want to allow in your Teams environment.
- Click Allow apps
- Search for the Marvis app
- Select the Marvis app from the search results and click Add
- Click Allow
- Click Save
Assign the Policy to Users
You can assign the policy to specific users or to a group of users.
- In the left menu of the Microsoft Teams Admin Center window, go to the policy page
To assign the policy to specific users:
- Select the policy, click Manage users, and then click Assign
- Add the users and then click

After you assign the policy, the Marvis app will be available to the users or Teams channels based on the assigned permission policy.
Install the Marvis App in Microsoft Teams
Teams users can install and use the Marvis app only if their administrator allows the app in the Teams environment. Additionally, the administrator must make the app available to you through permission policies. See “Enable or Integrate the Marvis App in Microsoft Teams” above
Install the Marvis App
To install the Marvis app in Teams:
- In the left pane of your Microsoft Teams window, select Apps
- Enter Marvis in the Search box and click the Search icon
- You’ll see the Marvis app listed in the search results.
- Select the app and click Open
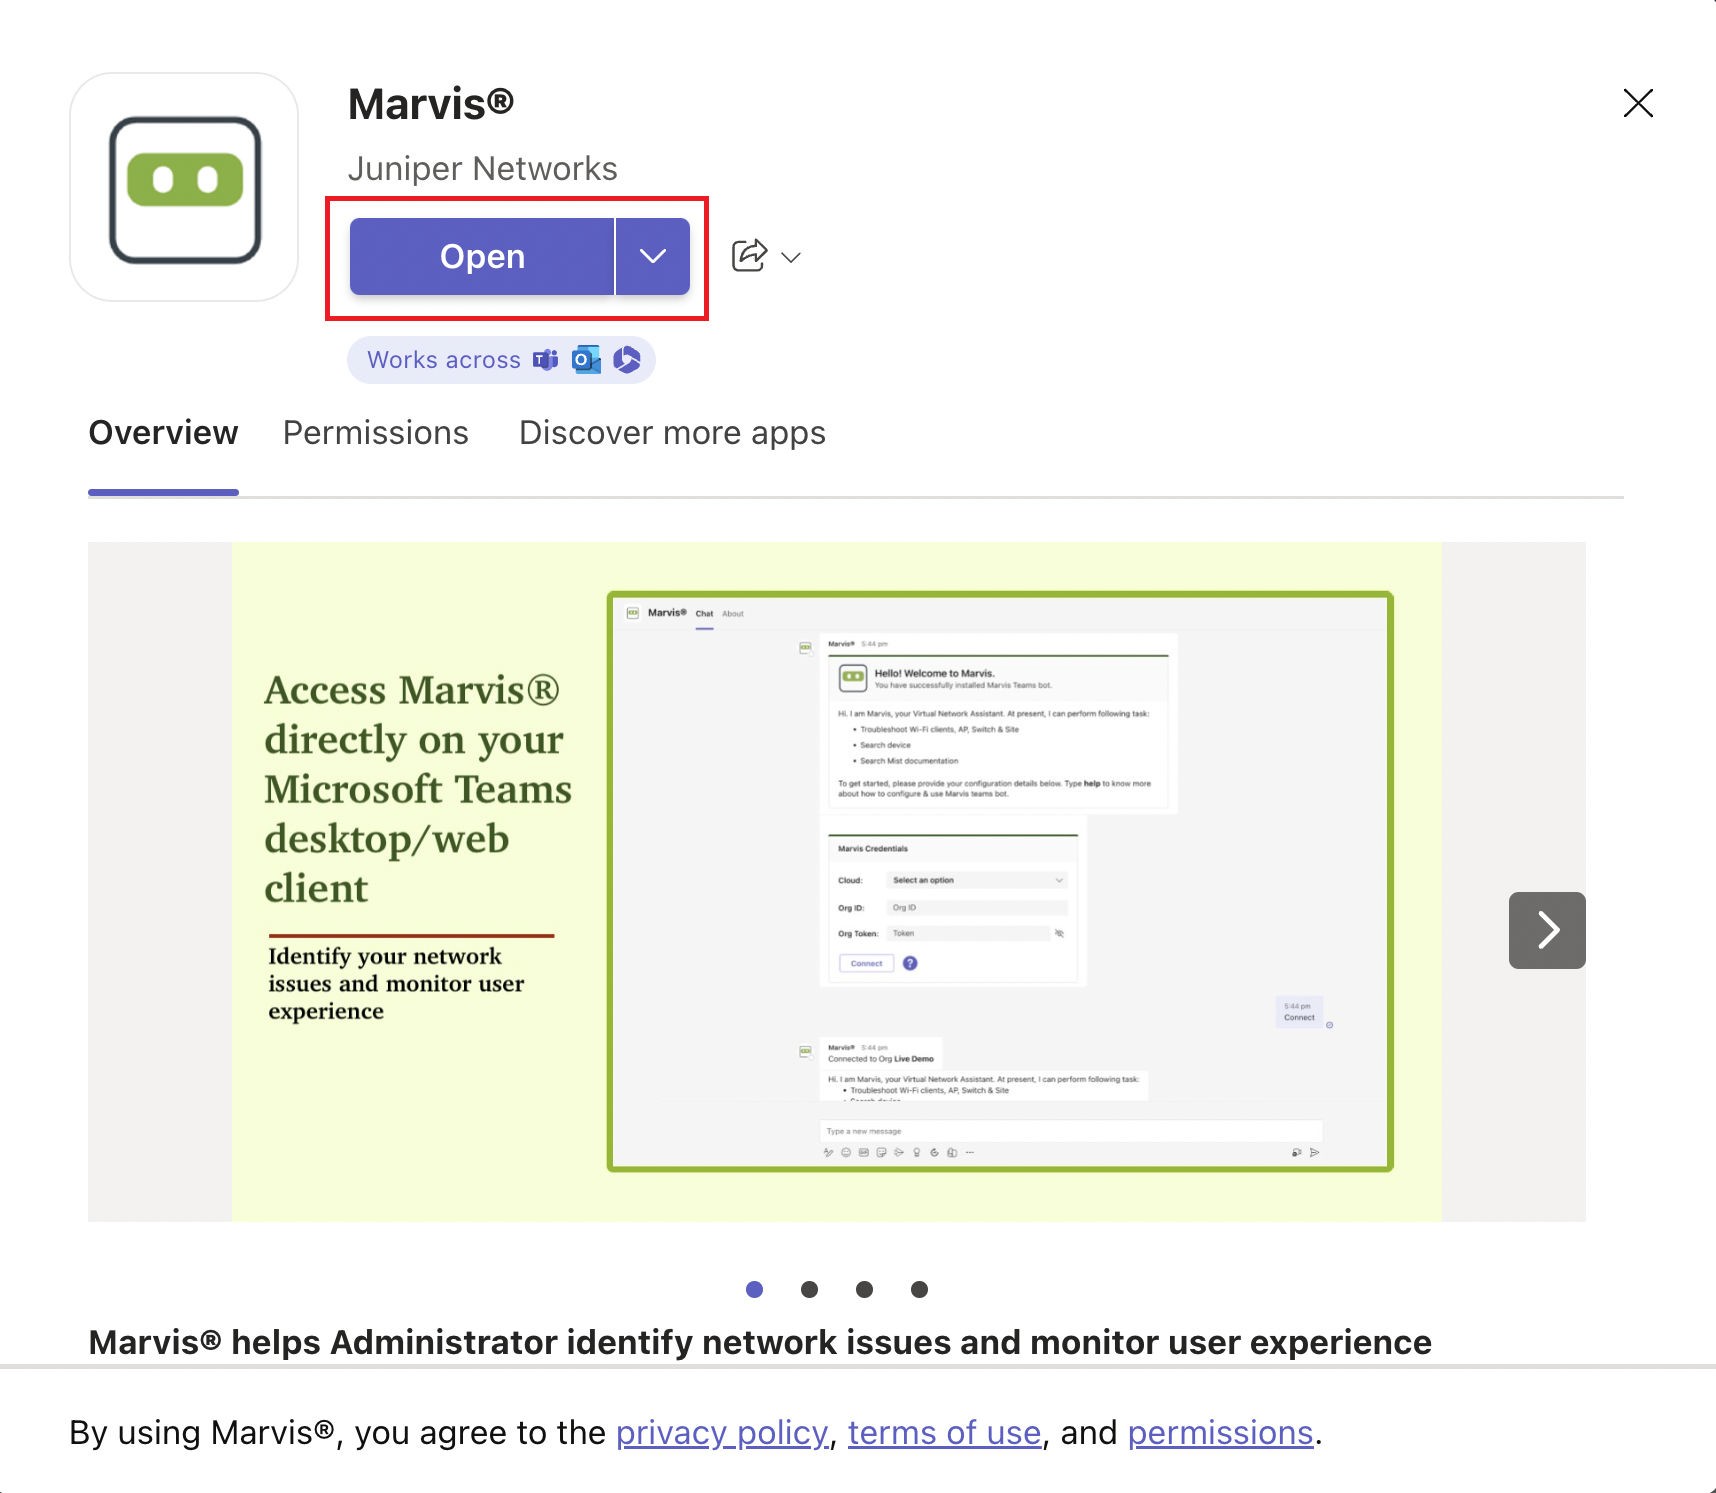
You’ll see the following window, which indicates that you have successfully installed the app.
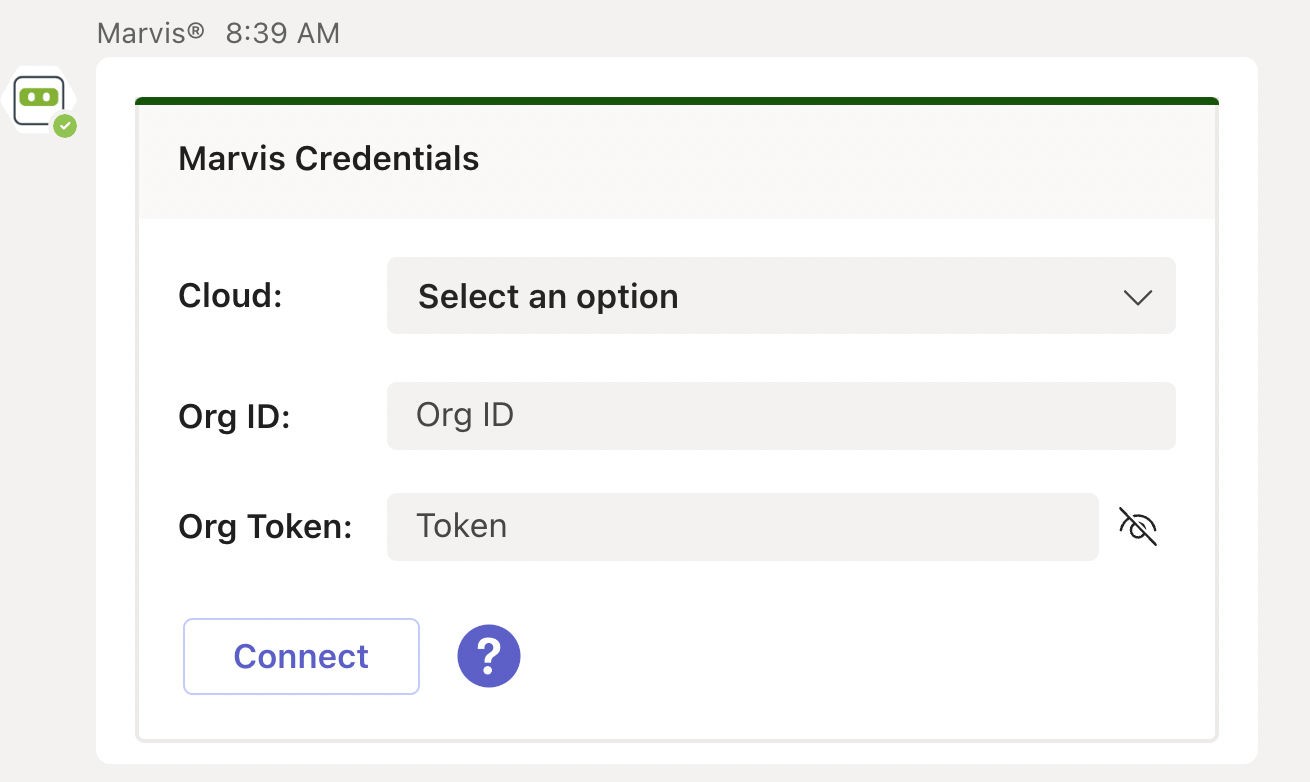
Next, you’ll need to connect to your organization in the Mist portal.
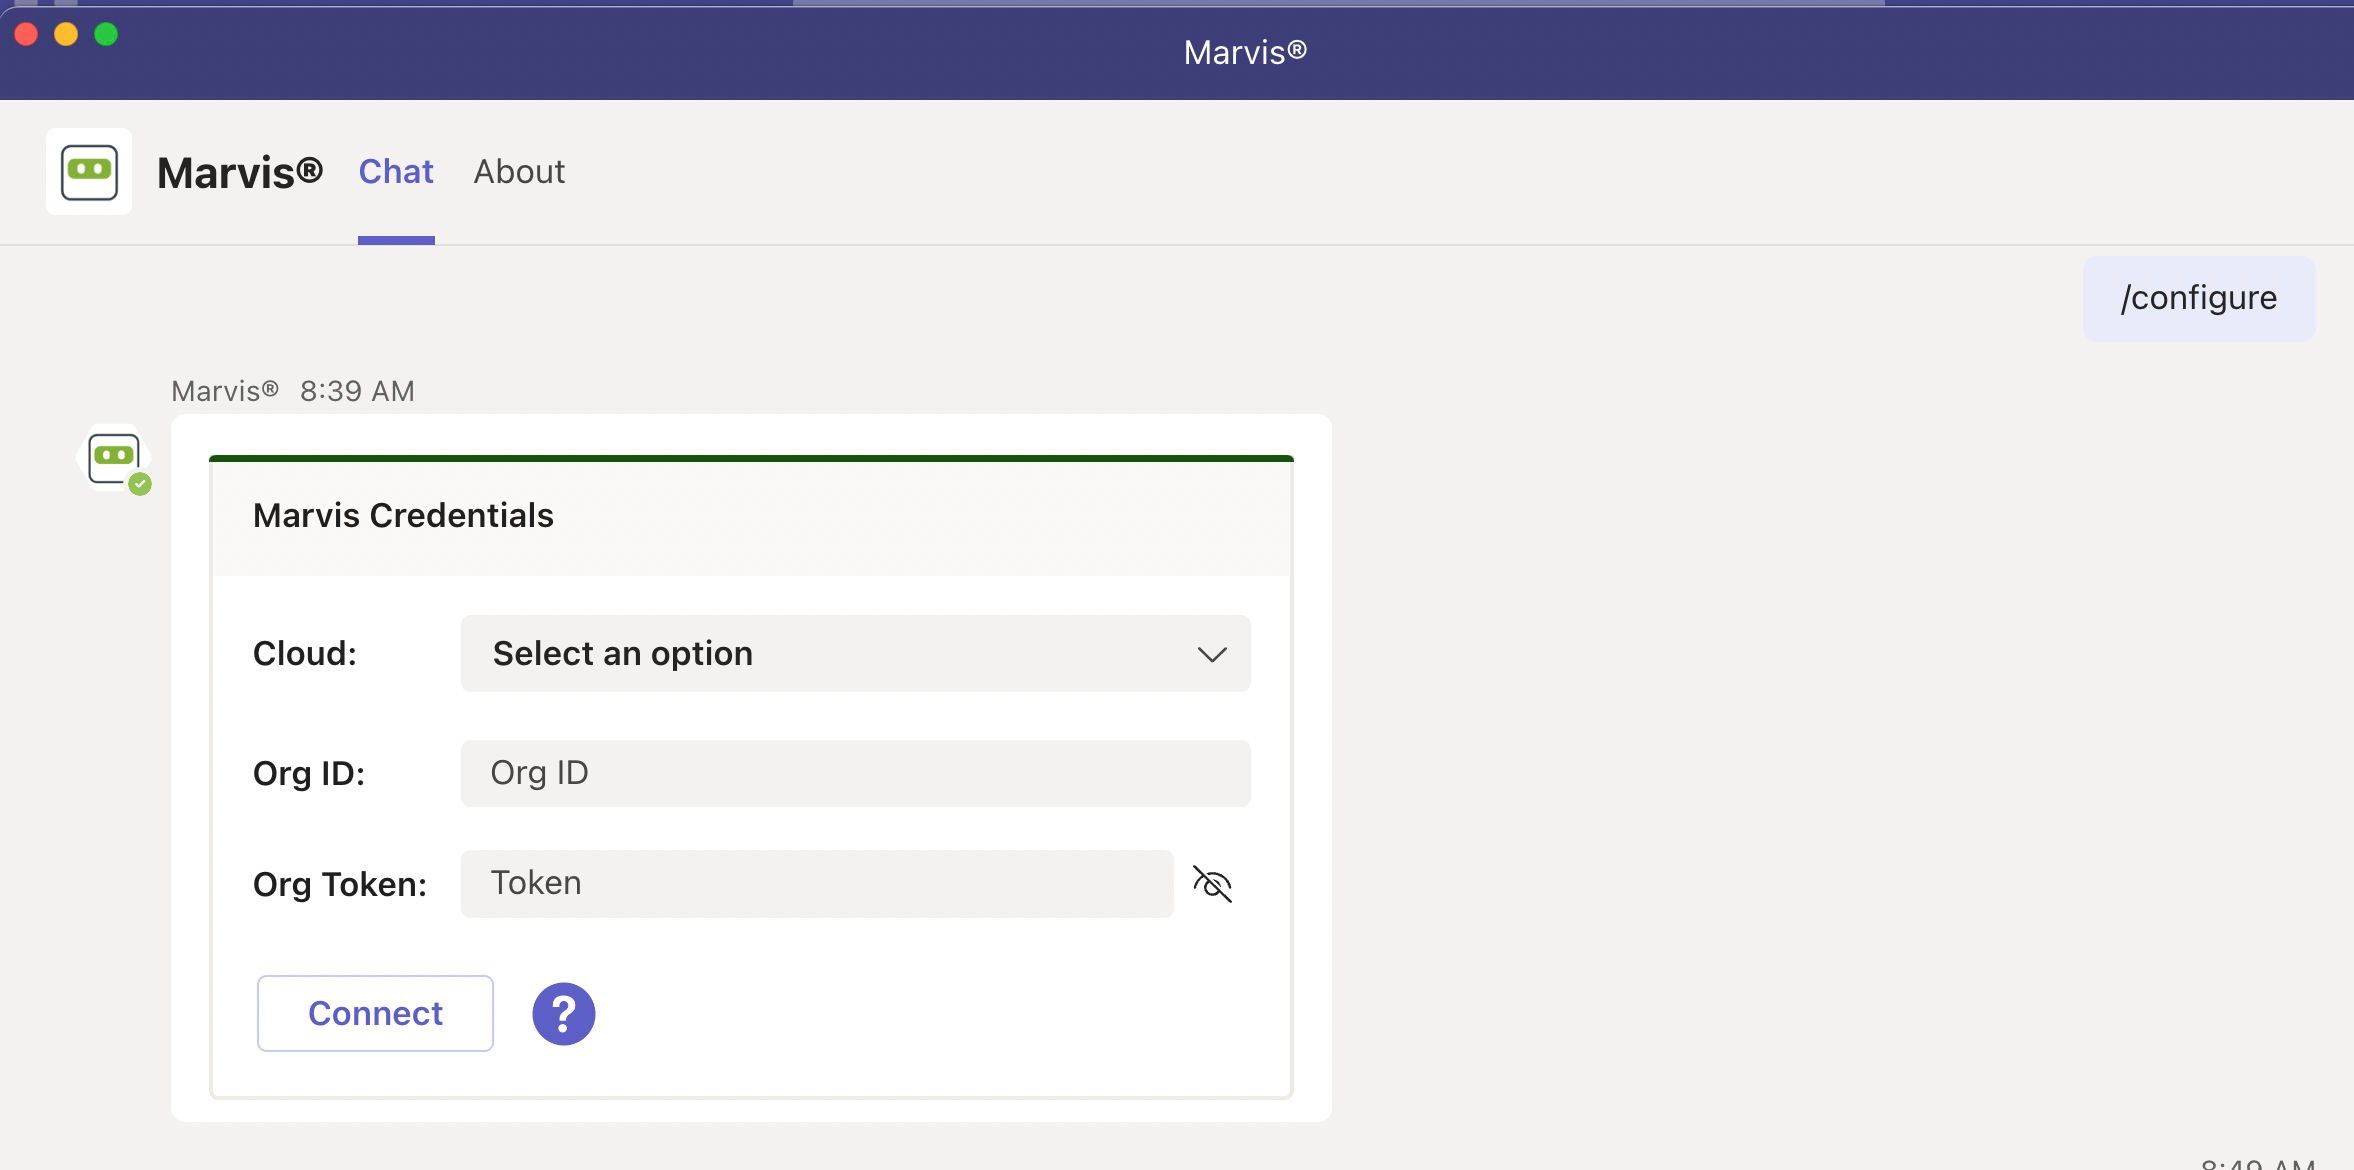
Connect to Your Mist Organization
To connect to your Mist organization:
- Enter the following details to log in to your organization:
-
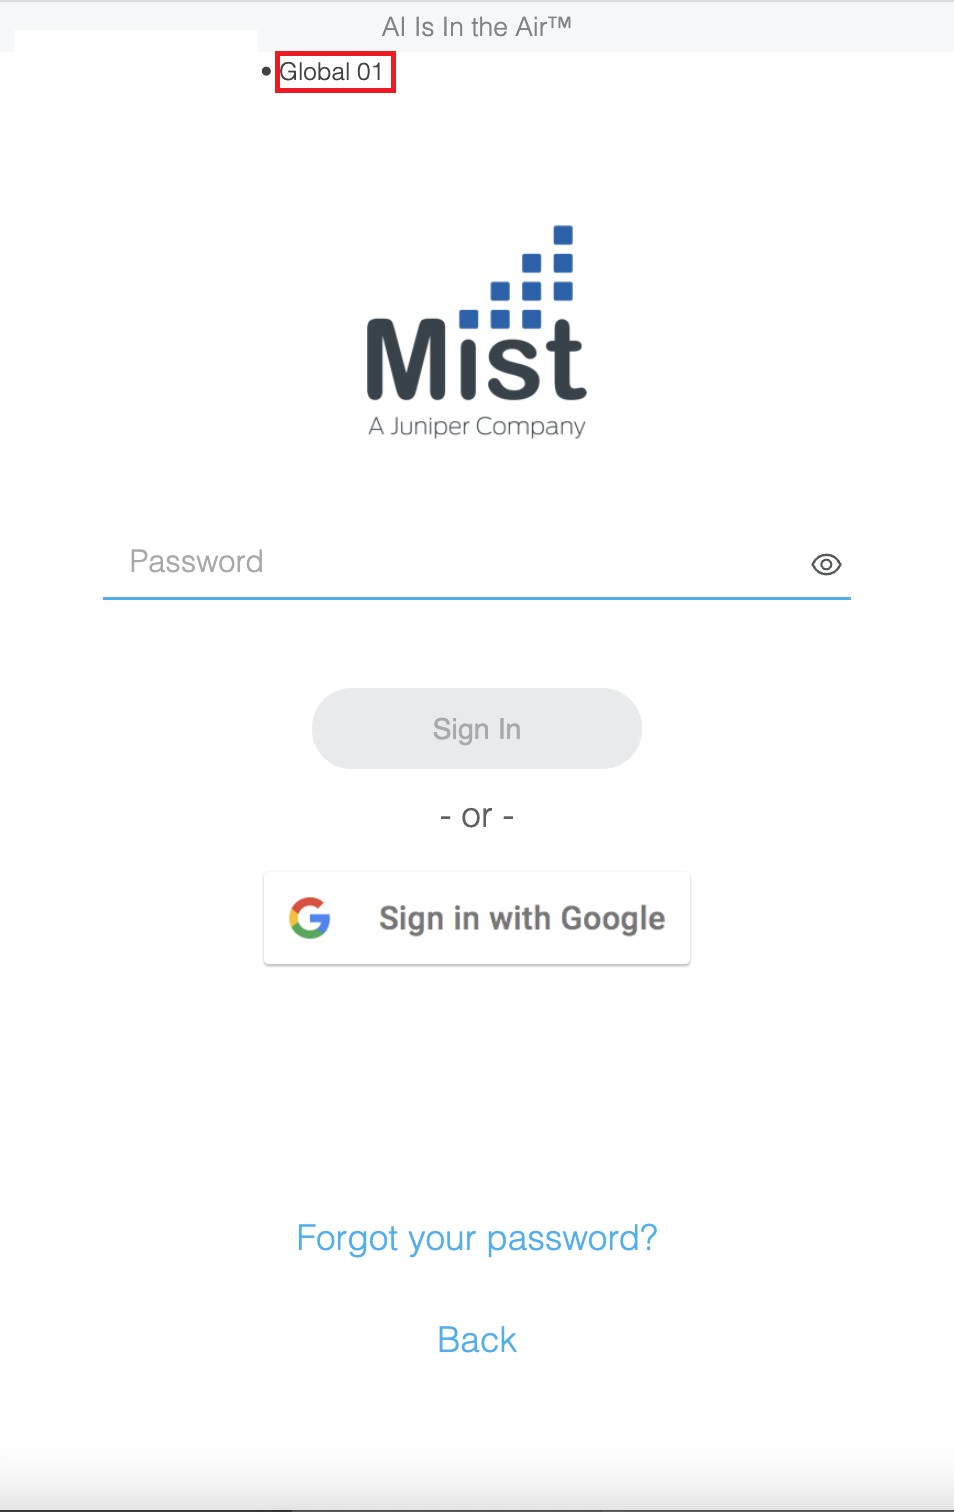
- Cloud environment name (for example, Global 01, Global 02). You can obtain this information from the Mist portal login screen.
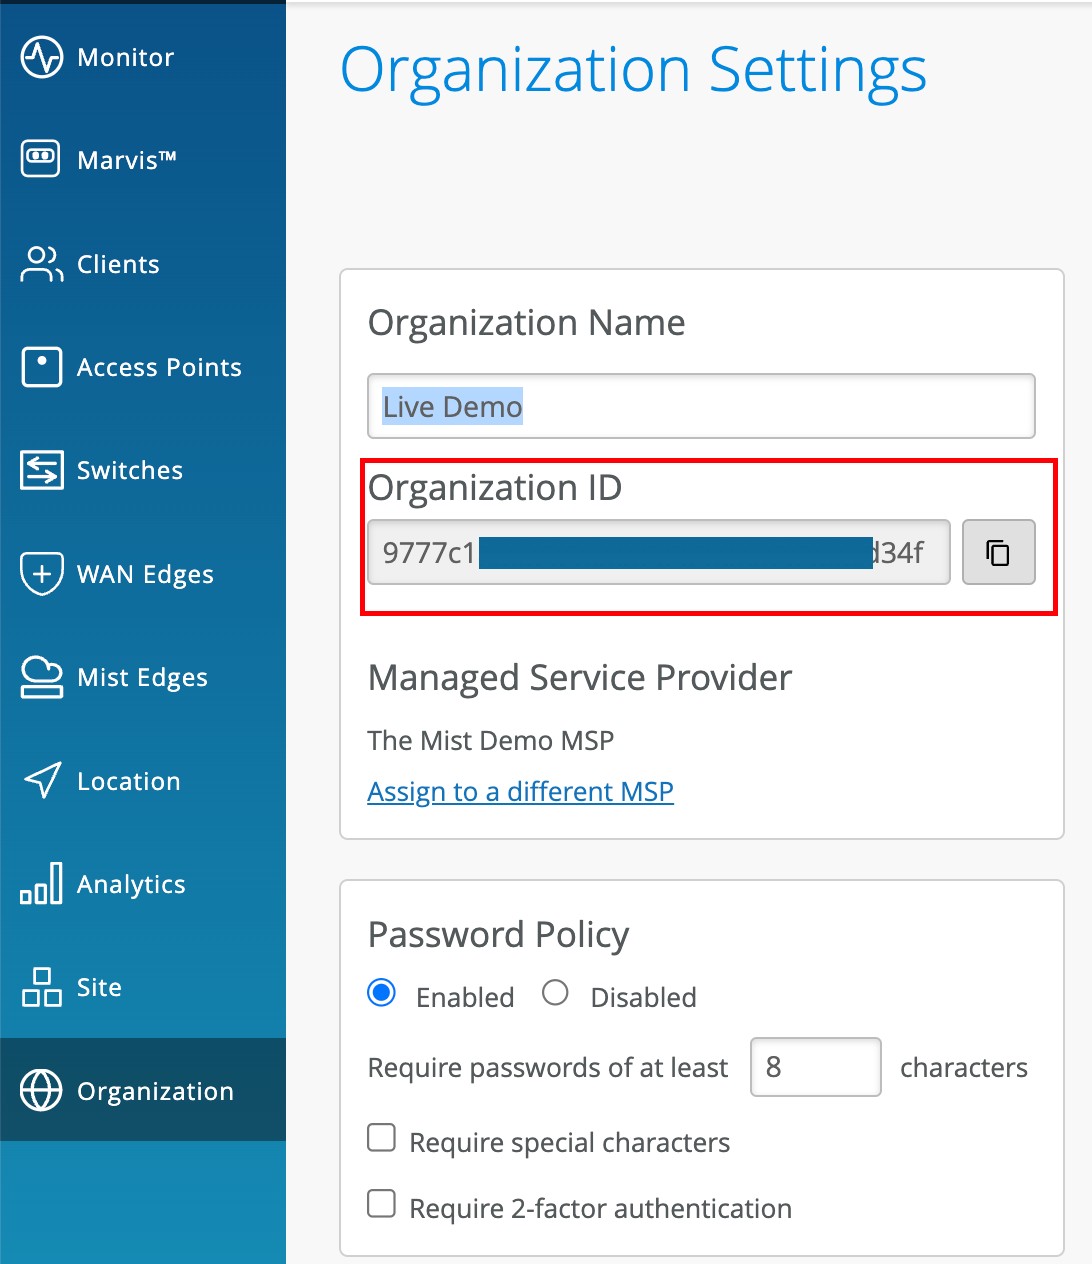
- Organization ID (Org ID)
- You can find your Org ID in the Organization > Settings page in the Mist portal.
- Org Token
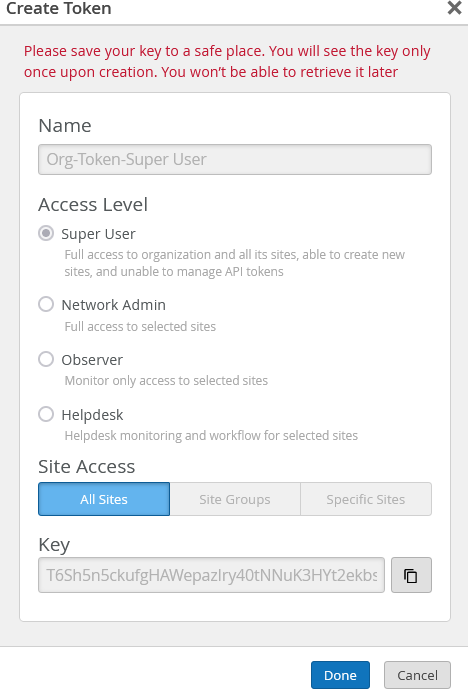
You can generate the Org token in the Organization > Settings page in the Mist portal. The Org token operates like the user-based API token, but it is tied to a particular organization. Org token permission is based on the Access Level and Site Access options you select. To create a token:
-
- Click Create Token under the API Token section in the Settings page
- Enter a name and click The generated key is the Org Token.
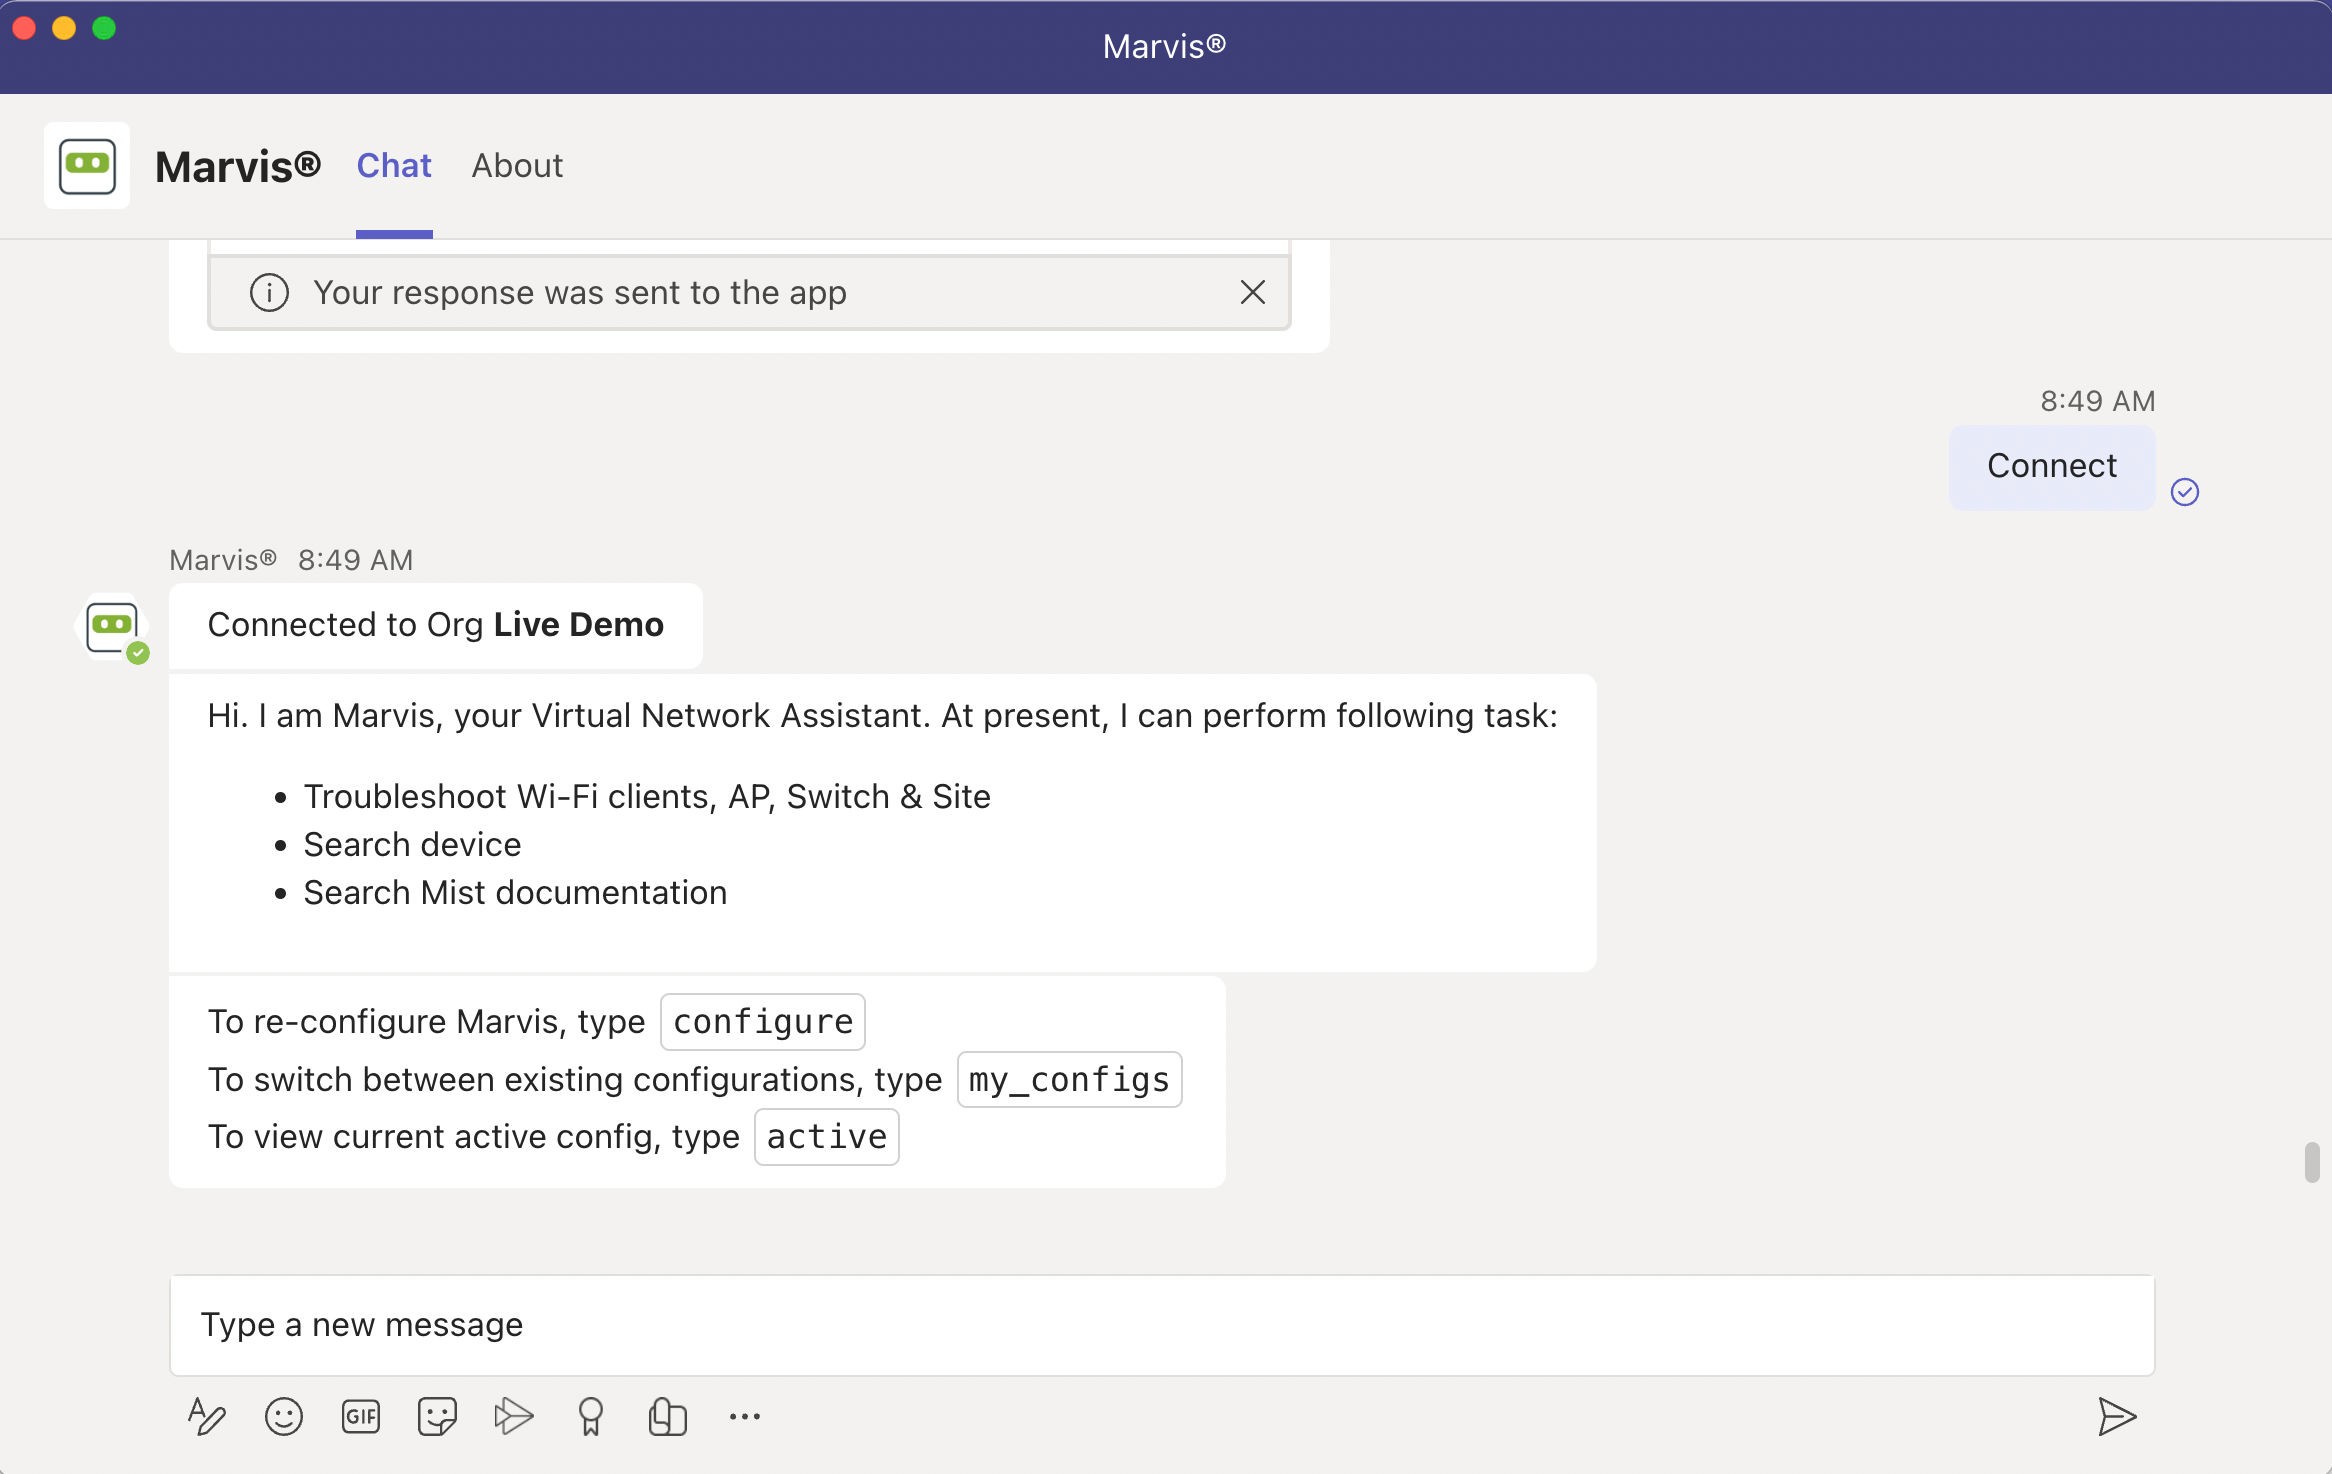
- Click A successful connect displays the following window:
Add Marvis to a Microsoft Teams Channel
When you troubleshoot an issue along with a team, you can add Marvis to the Teams channel as a team member. Members of the channel can query Marvis for information.
Before you add Marvis to a Teams channel, you must install the app in Teams and connect to the organization as described in the previous sections.
To add the Marvis app to a Teams channel:
- In the left pane of your Microsoft Teams window, select Apps
- Enter Marvis in the Search box and click the Search icon
- You’ll see the Marvis app listed in the search results.
- Click the app and select Add to a Team
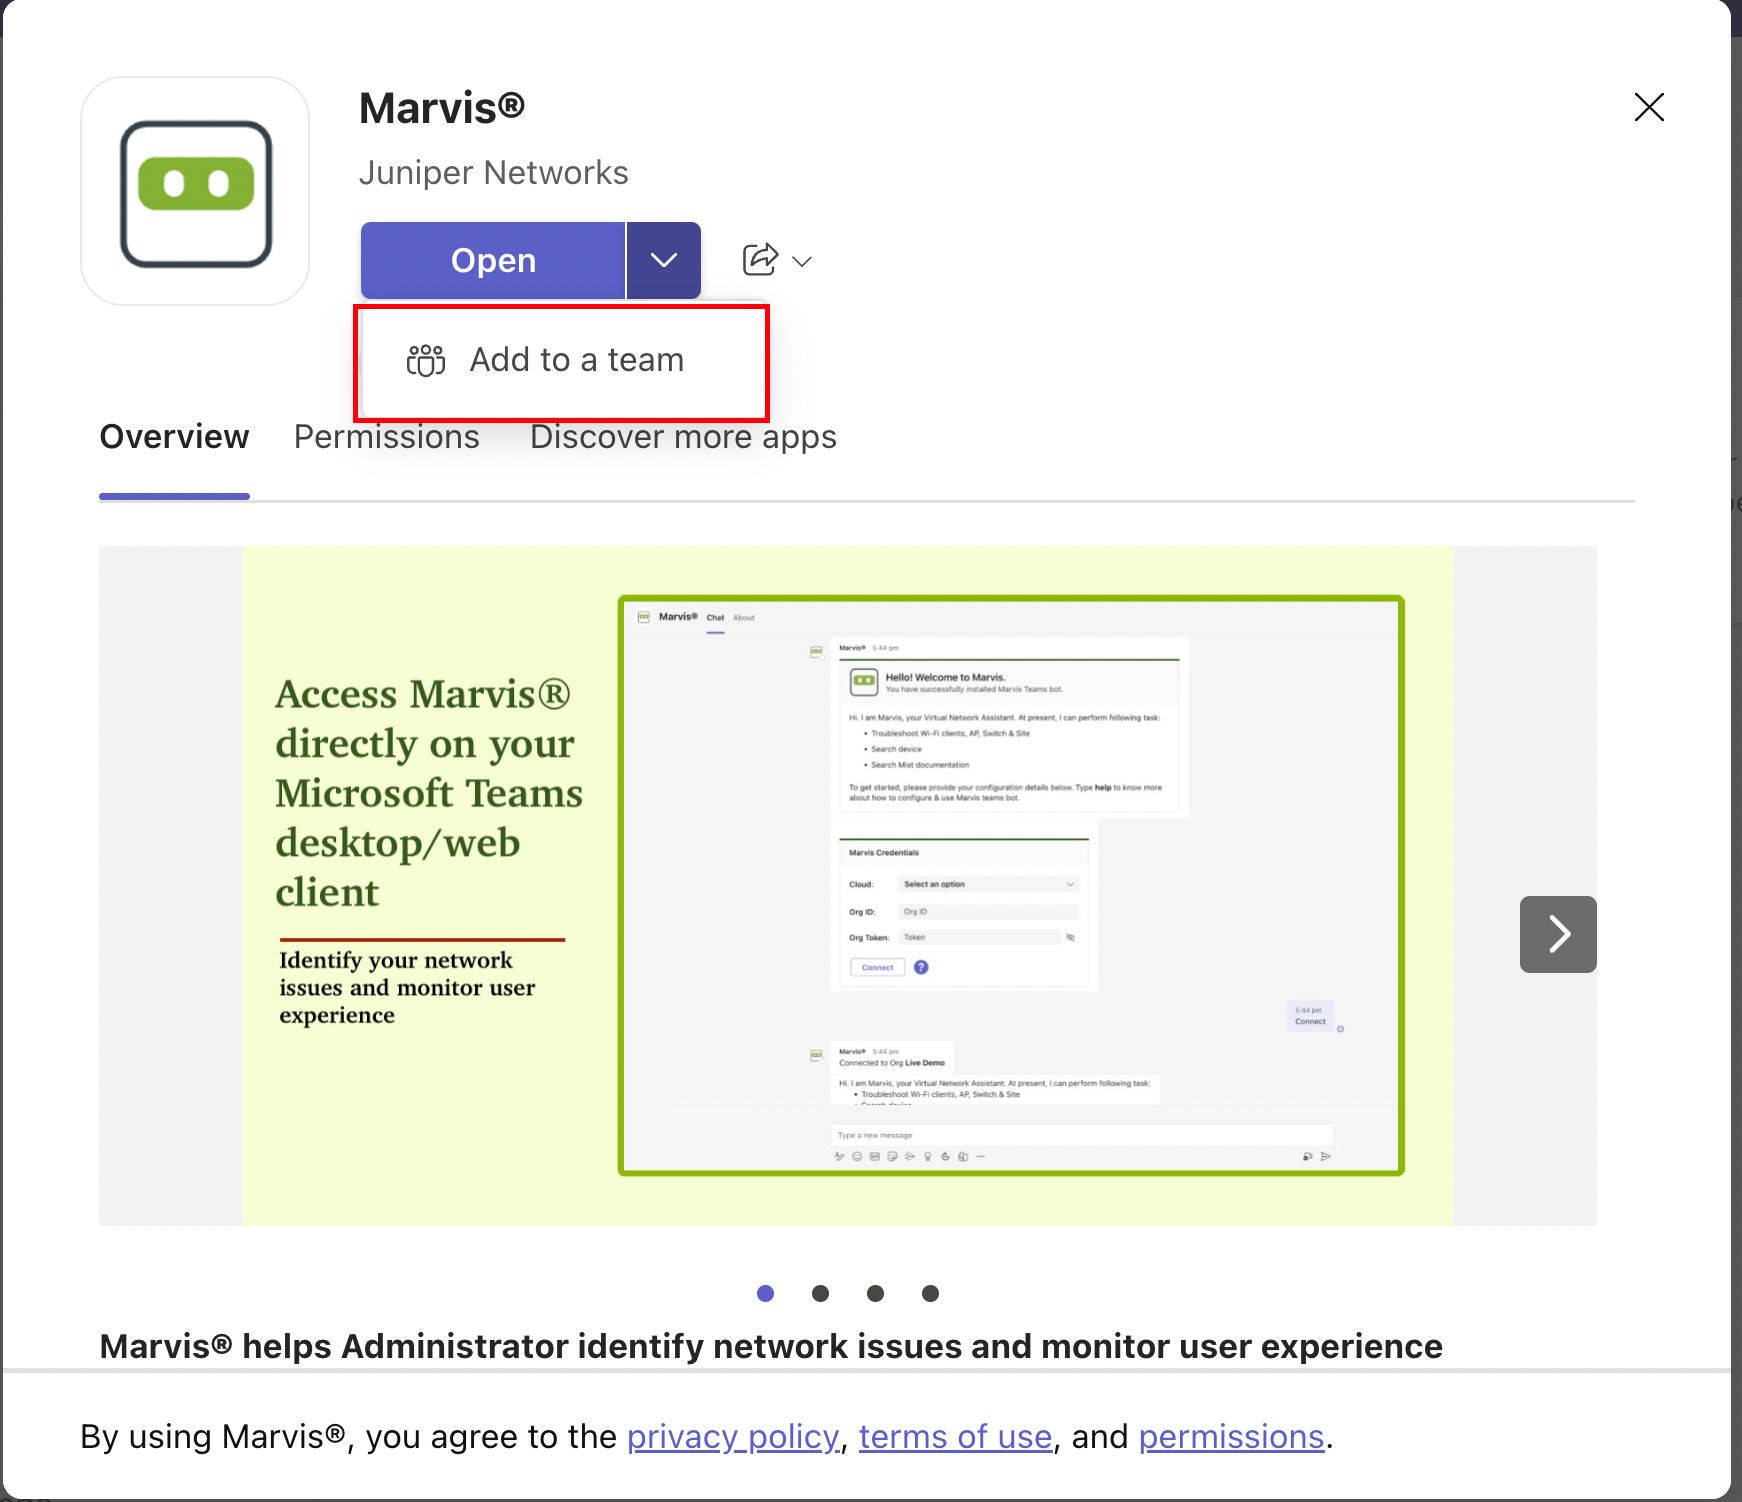
- Select the Teams That’s it! Team members can start asking questions. Use the @marvis prompt and enter the question.
Troubleshoot Using the Marvis App
Troubleshoot a Wireless Client
You can view failures of a wireless client and its associated access point (AP).
To check whether a wireless client is experiencing any issues, enter a phrase such as “Troubleshoot client name” in the Teams window.
Here’s an example that shows the details Marvis provides for the phrase “troubleshoot client name.” In this case, Marvis reports that the client is experiencing an authorization error due to a connection timeout.
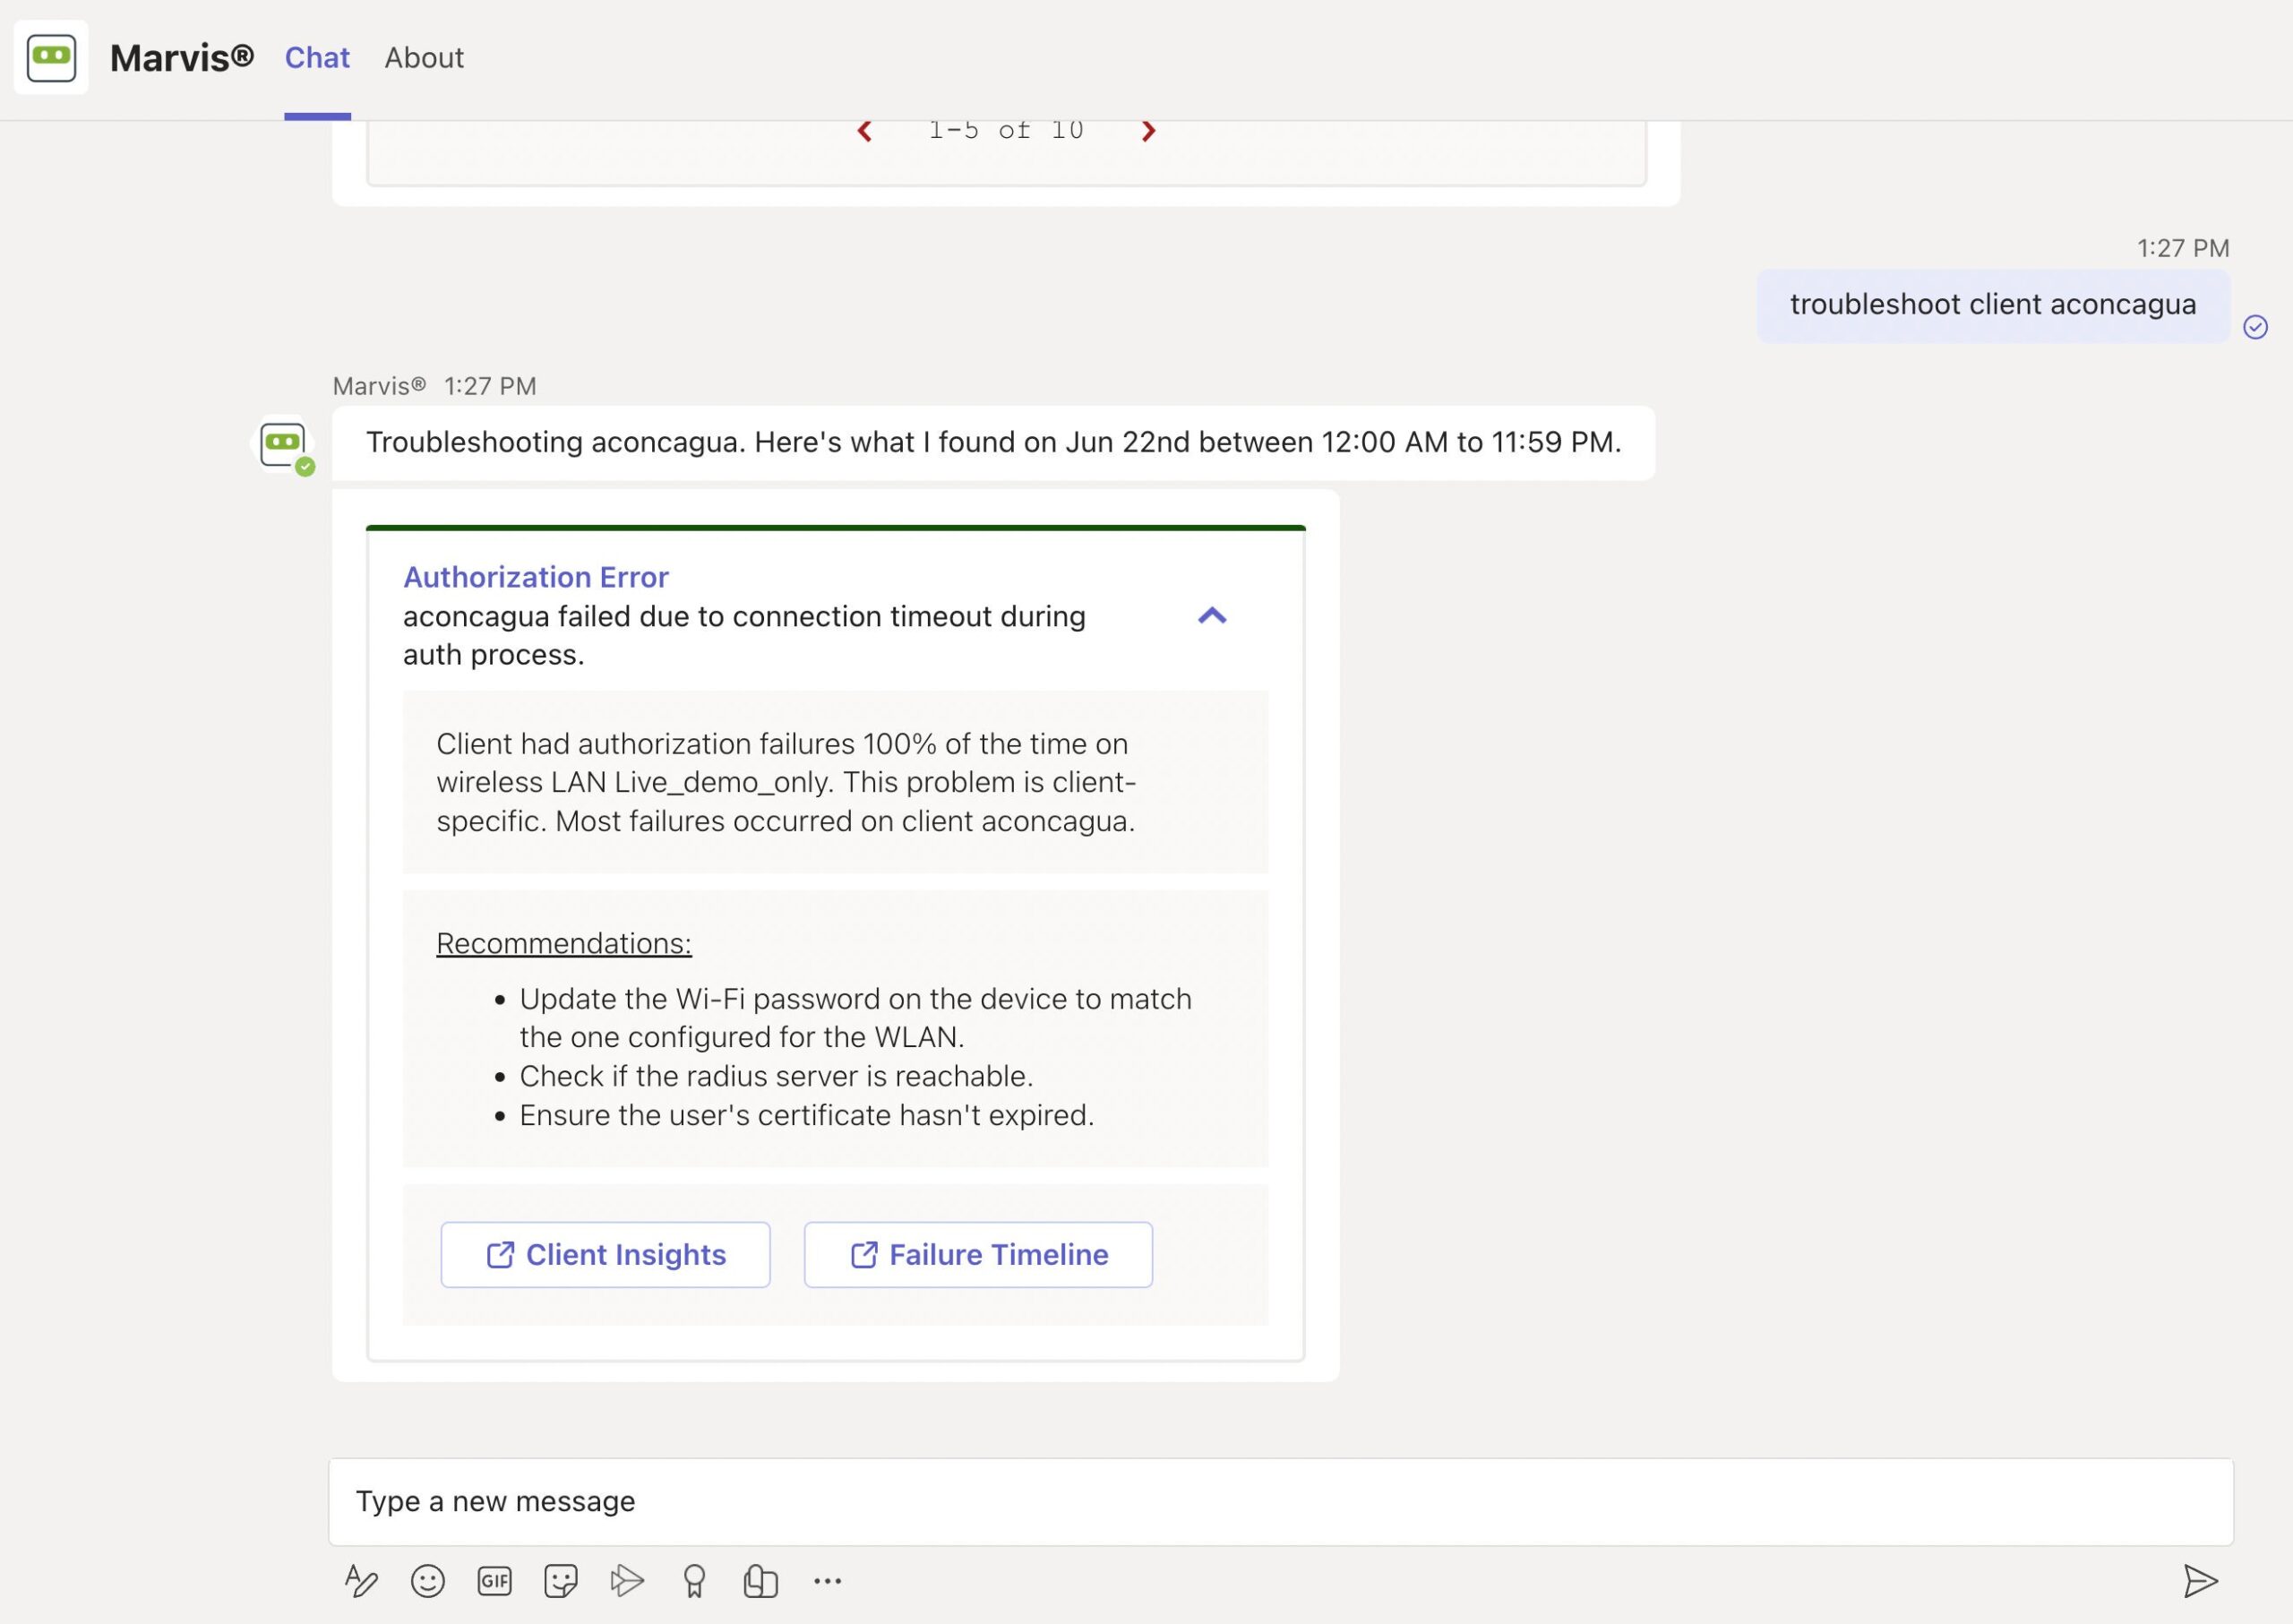
You can click the issue to view details. You can click the Client Insights or Failure Timeline option for more details. In some cases, Marvis also provides recommendations to fix the issue, as the screenshot shows.
Here are some sample phrases that you can use to troubleshoot wireless clients:
- how was <client name> on June 22nd
- tshoot client <mac or name> on June 21
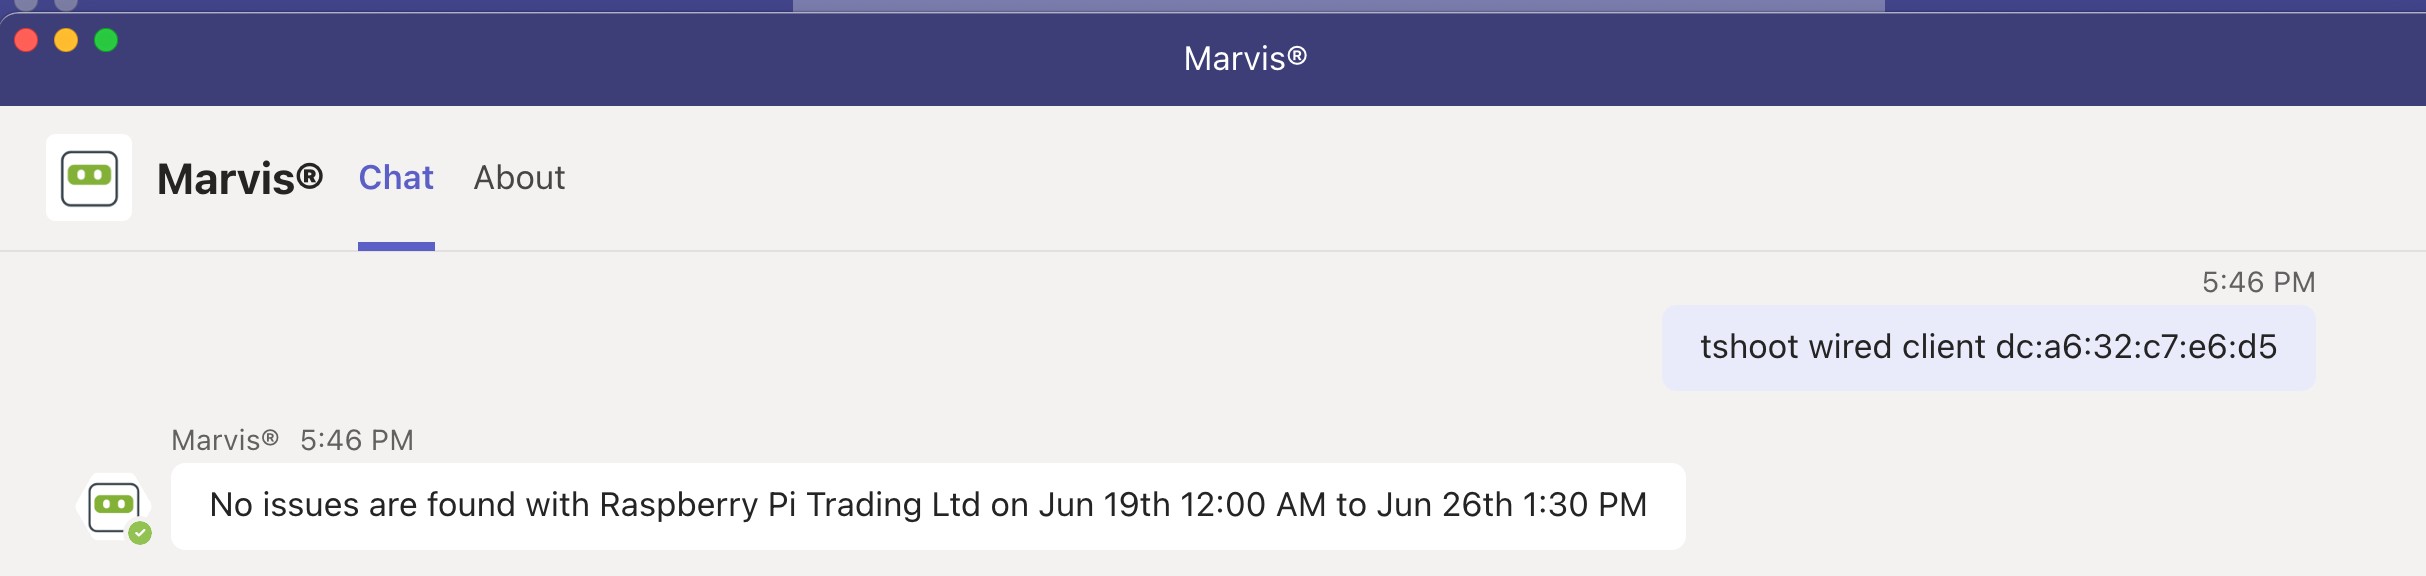
Troubleshoot a Wired Client
To view wired clients that are experiencing issues, use phrases such as the following:
- tshoot wired client <mac>
- troubleshoot client name
Here’s an example that shows the details Marvis provides for the phrase “tshoot wired client <mac>”.
Troubleshoot a Device
You can use the Marvis app to check for issues on APs, switches, or WAN edge devices.
To check whether a device is experiencing any issues, enter a phrase such as “tshoot switch name” or “tshoot device name” in the Teams window.
Here’s an example that shows the details Marvis provides for the phrase “tshoot switch name.” In this case, Marvis reports that two clients connected to the switch experienced an authentication failure.
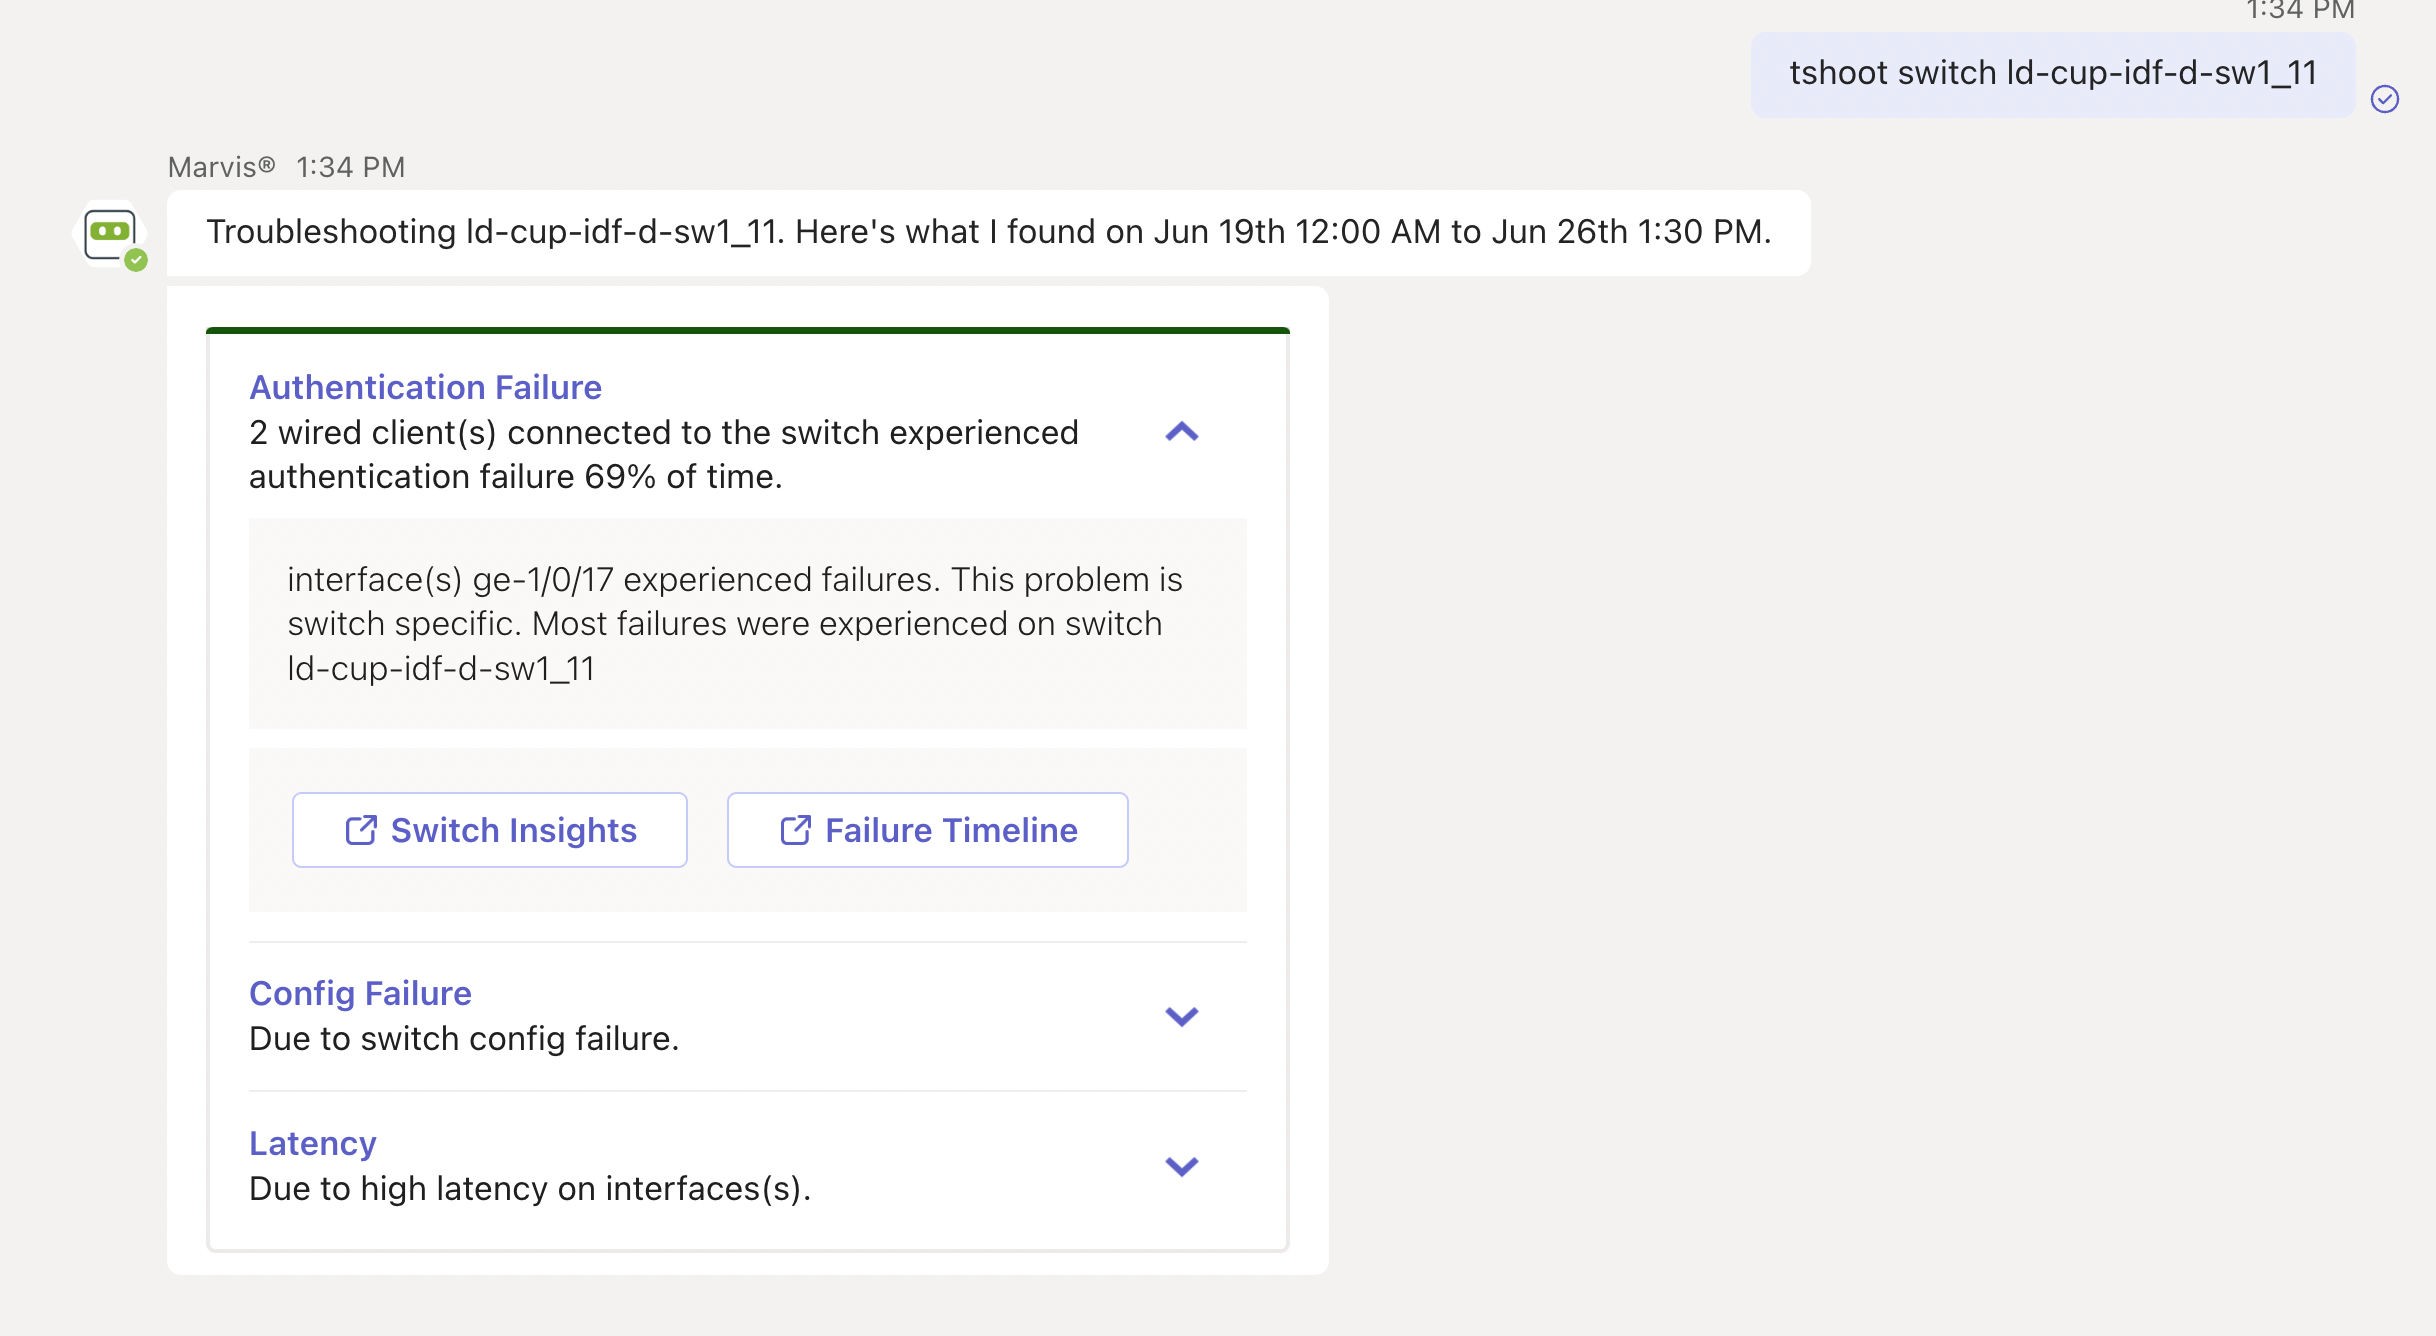
You can click the issue to view details. You can click the Switch Insights or Failure Timeline option for more details. In some cases, Marvis also provides recommendations to fix the issue, as the following screenshot shows:

Troubleshoot Unhappy Devices or Clients
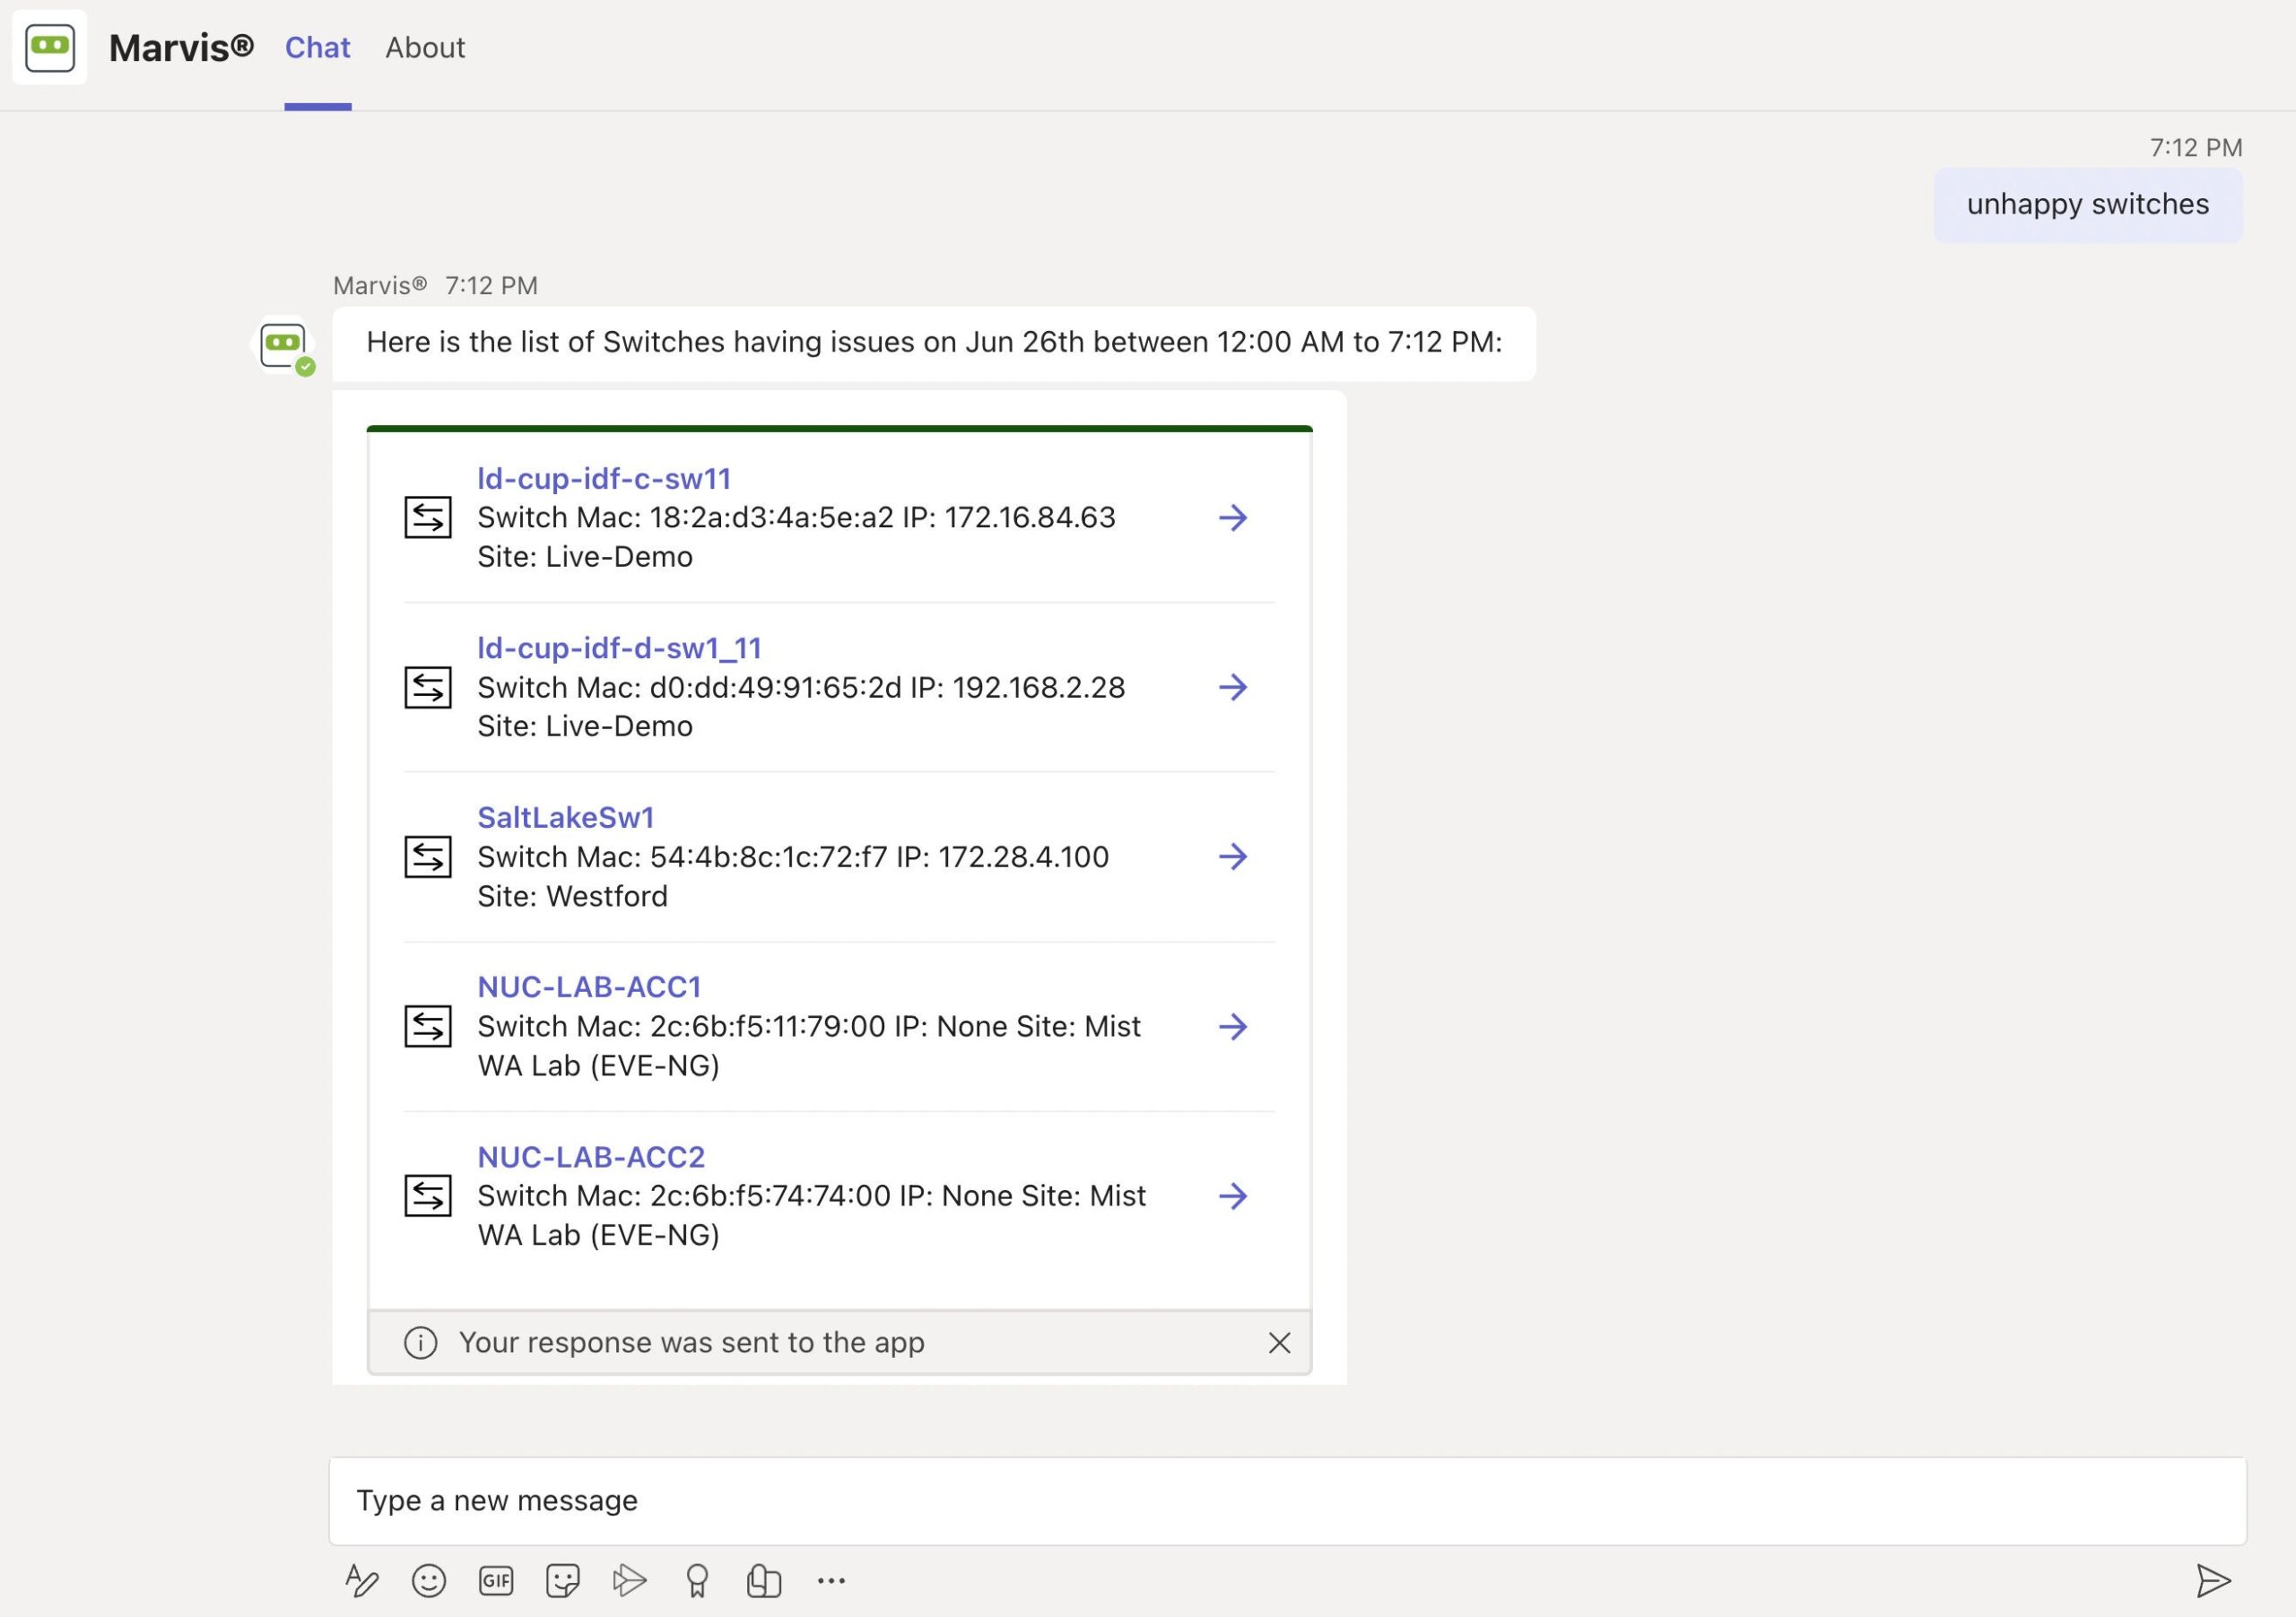
To check for devices experiencing issues (unhappy devices), simply enter the phrase “unhappy <device type>” in the Marvis chat window. For example, if you want to view unhappy WAN edge devices, enter “unhappy WAN edges” and Marvis will show all the WAN edges that are experiencing issues.
Here are a few examples. You can click any device to view the issues.
Unhappy WAN edges:
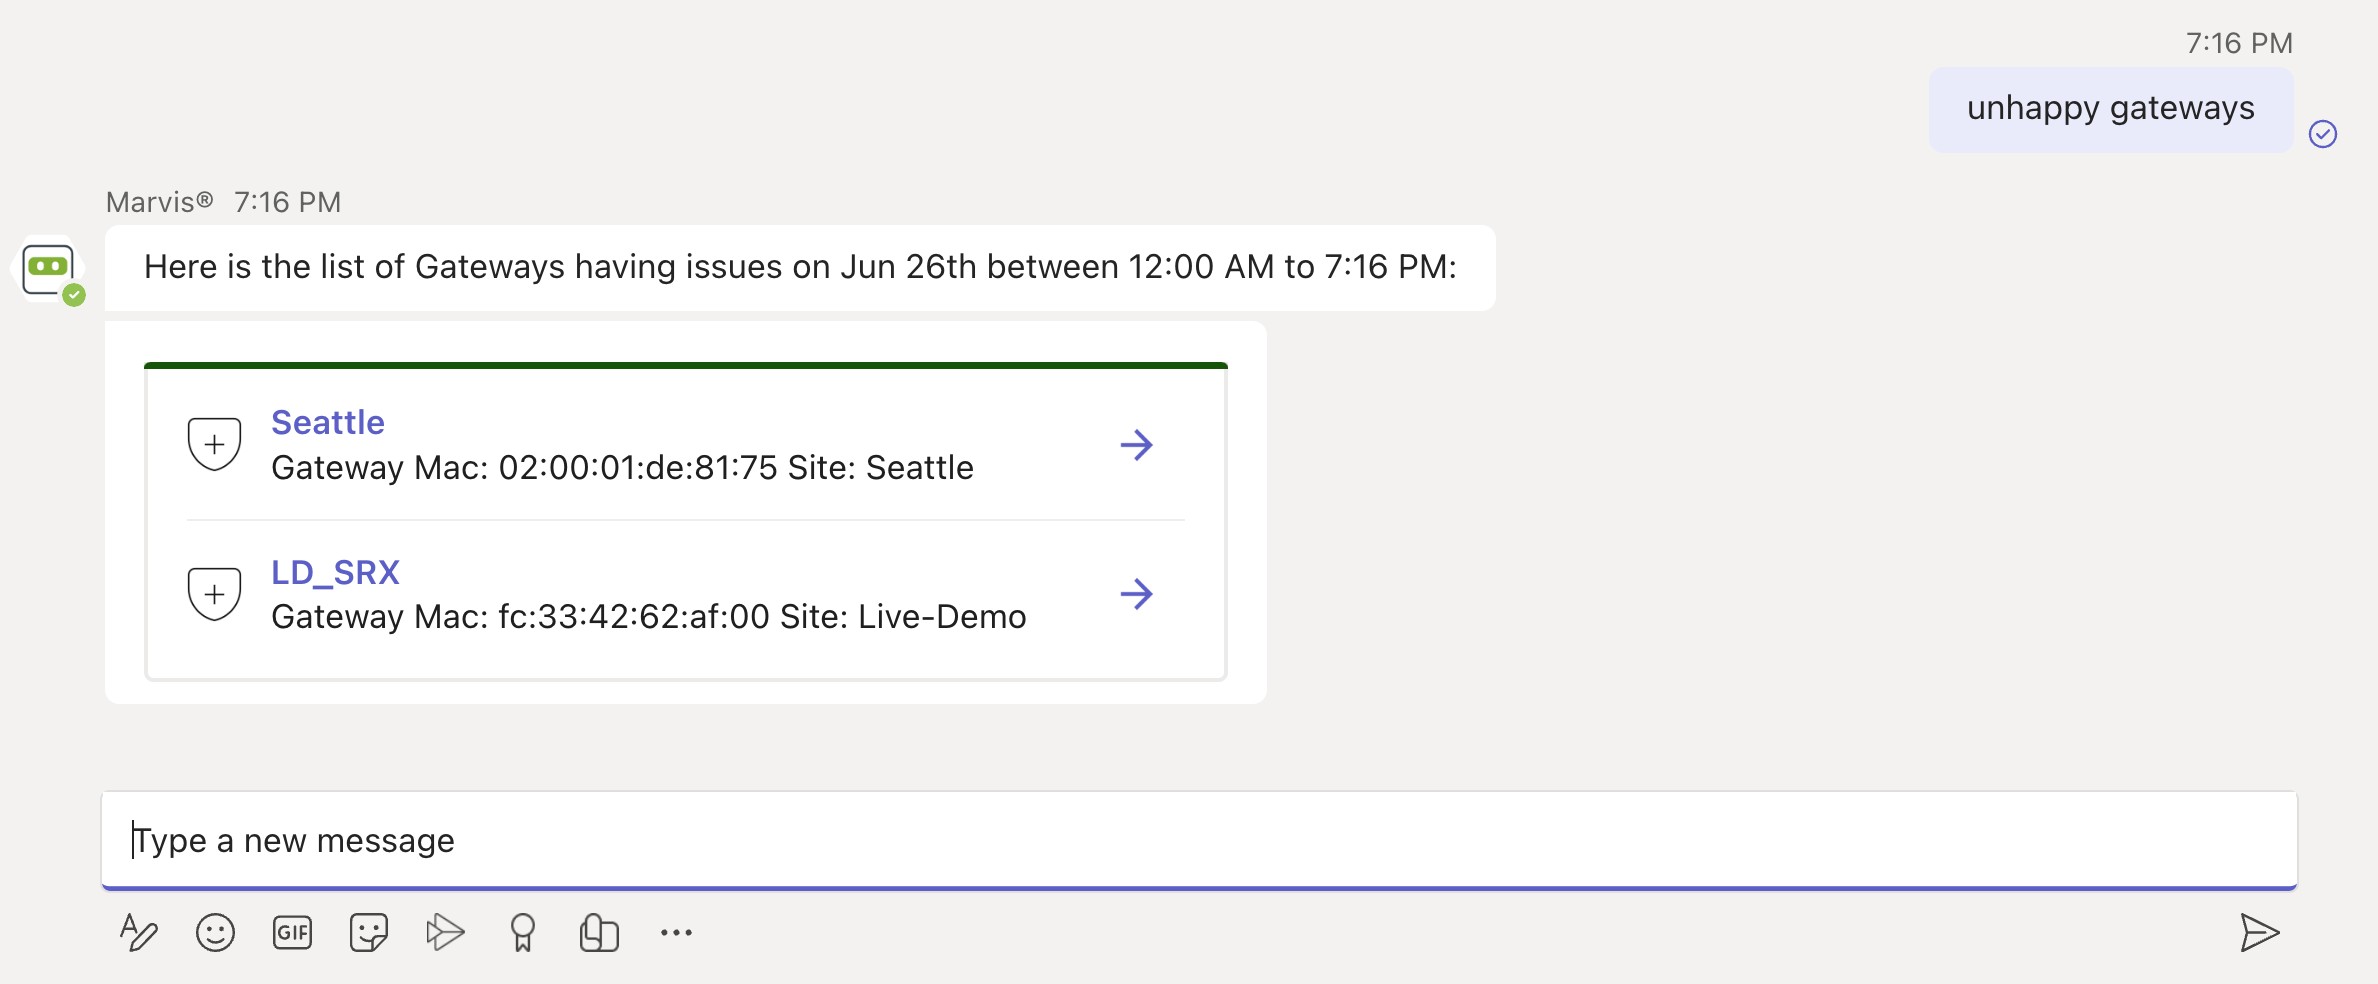
Unhappy APs:

Unhappy Switches:
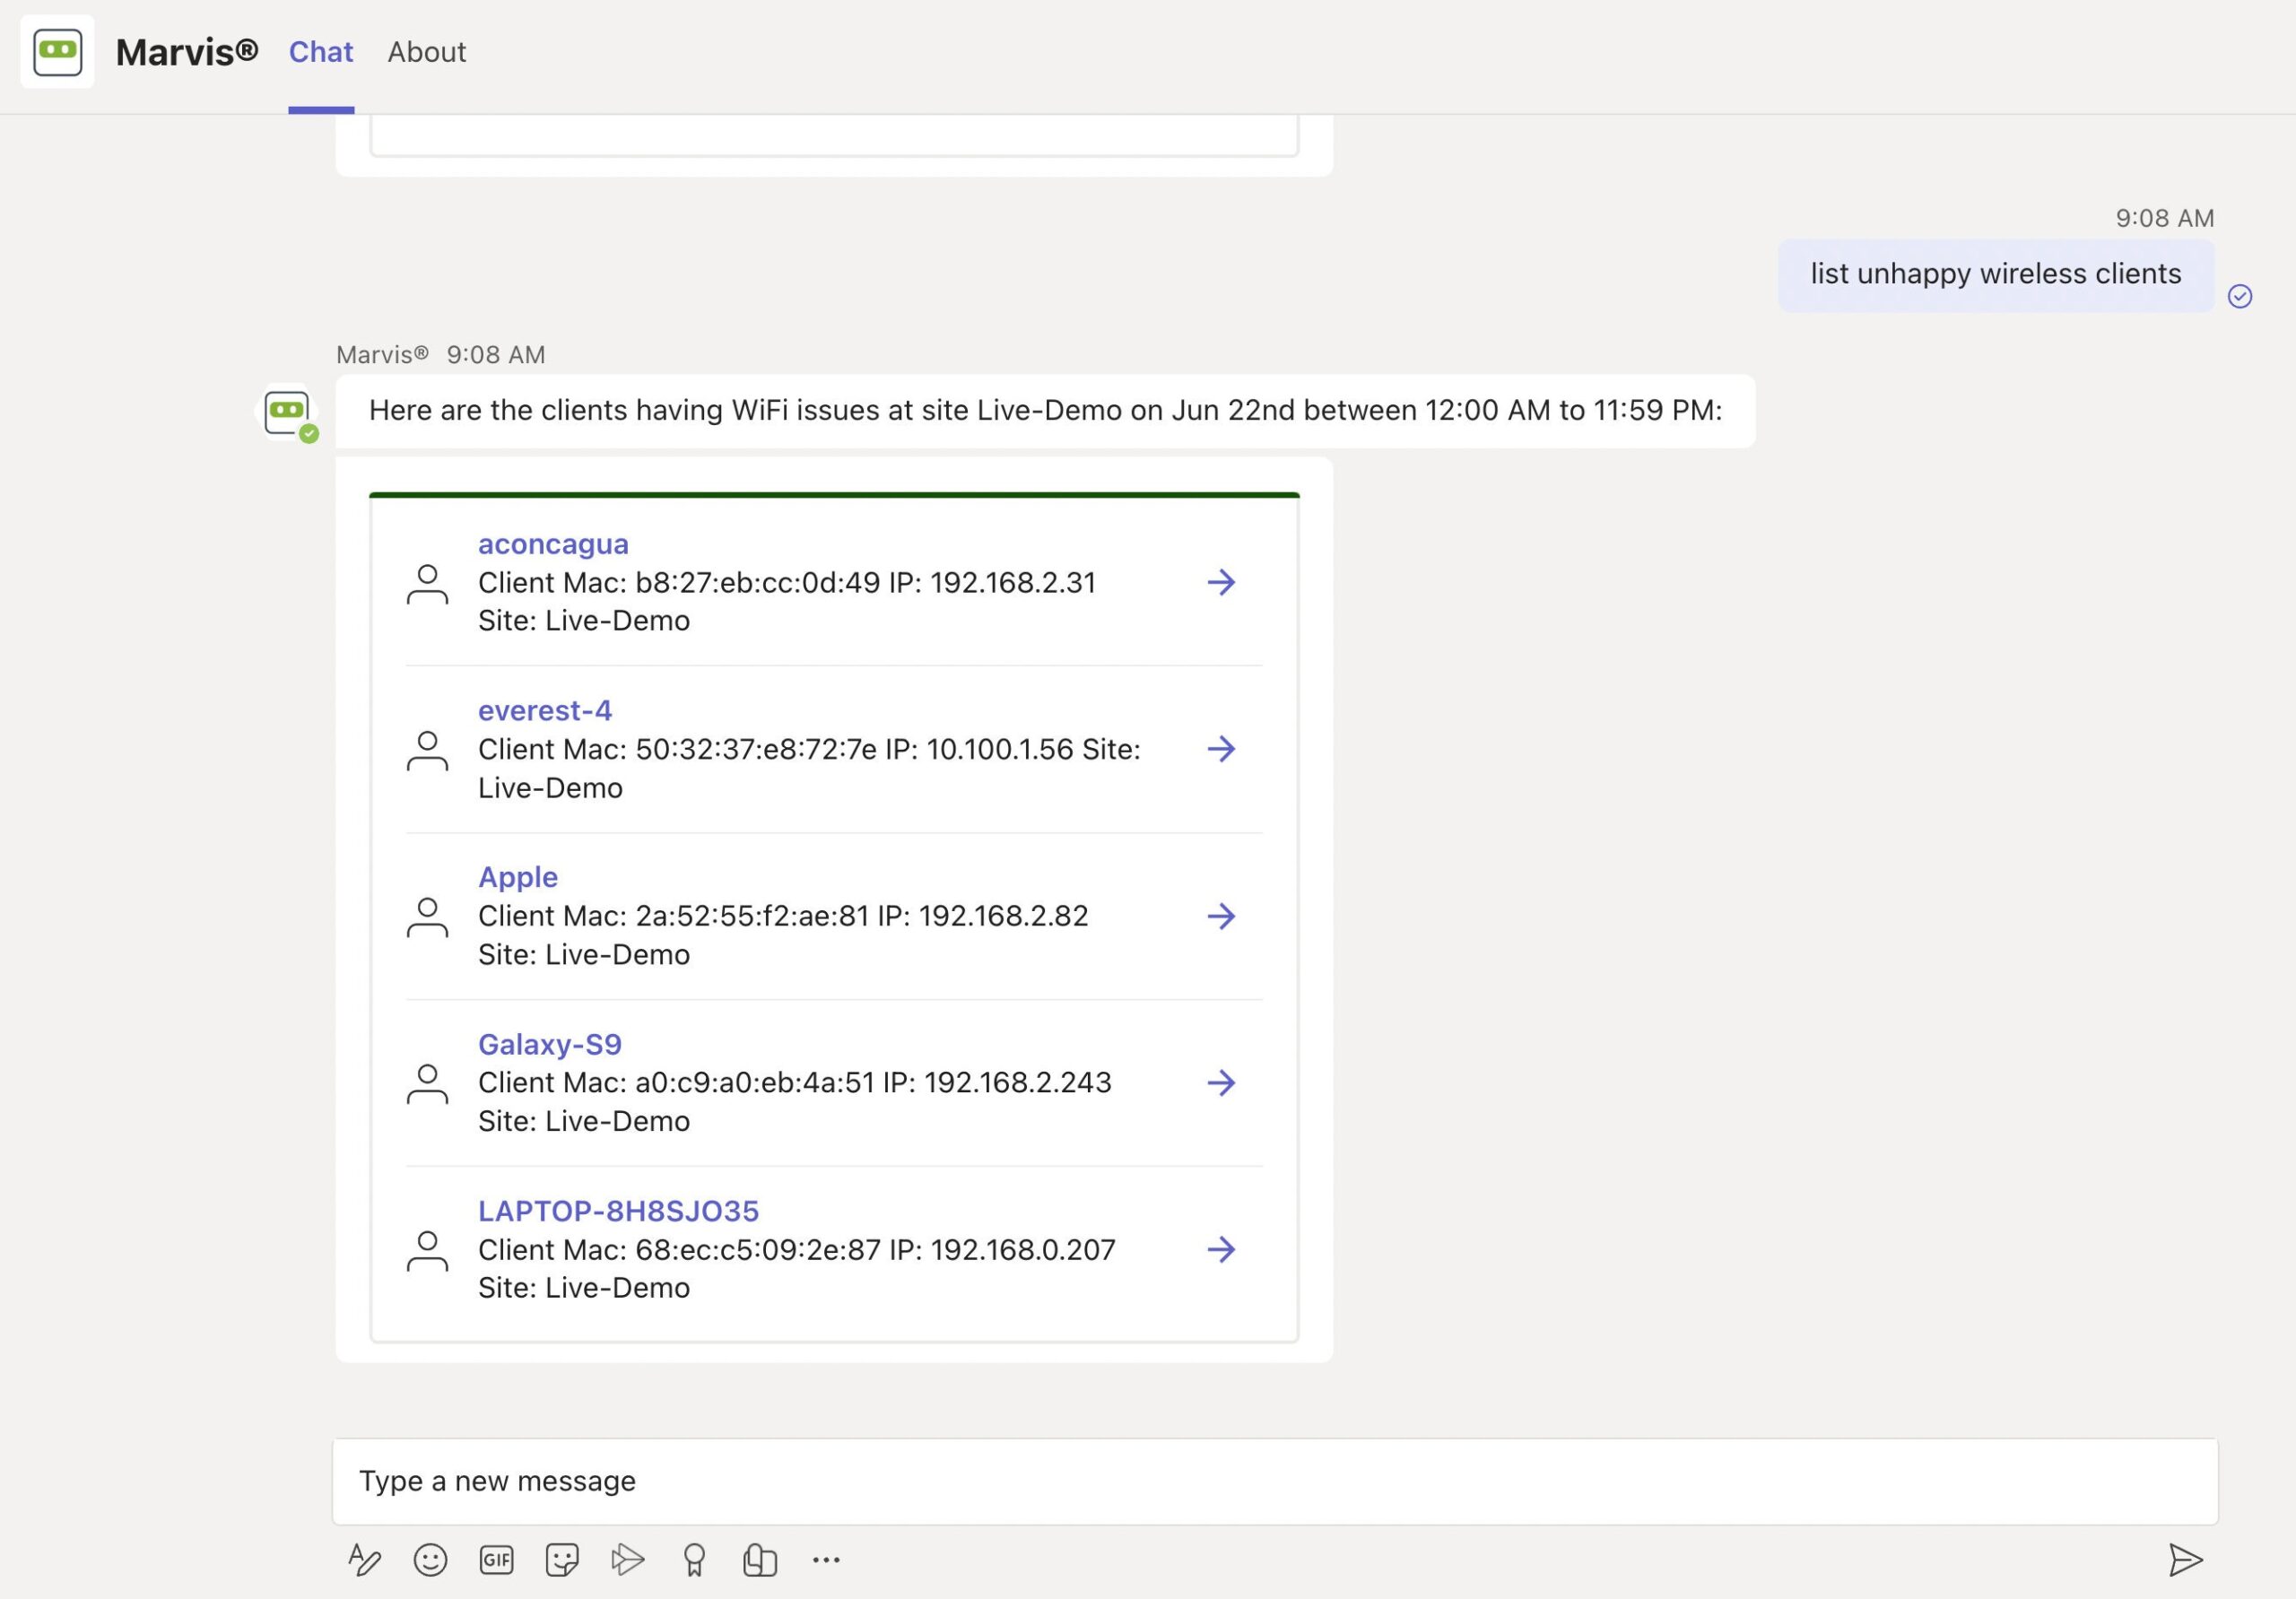
Unhappy Wireless Clients:
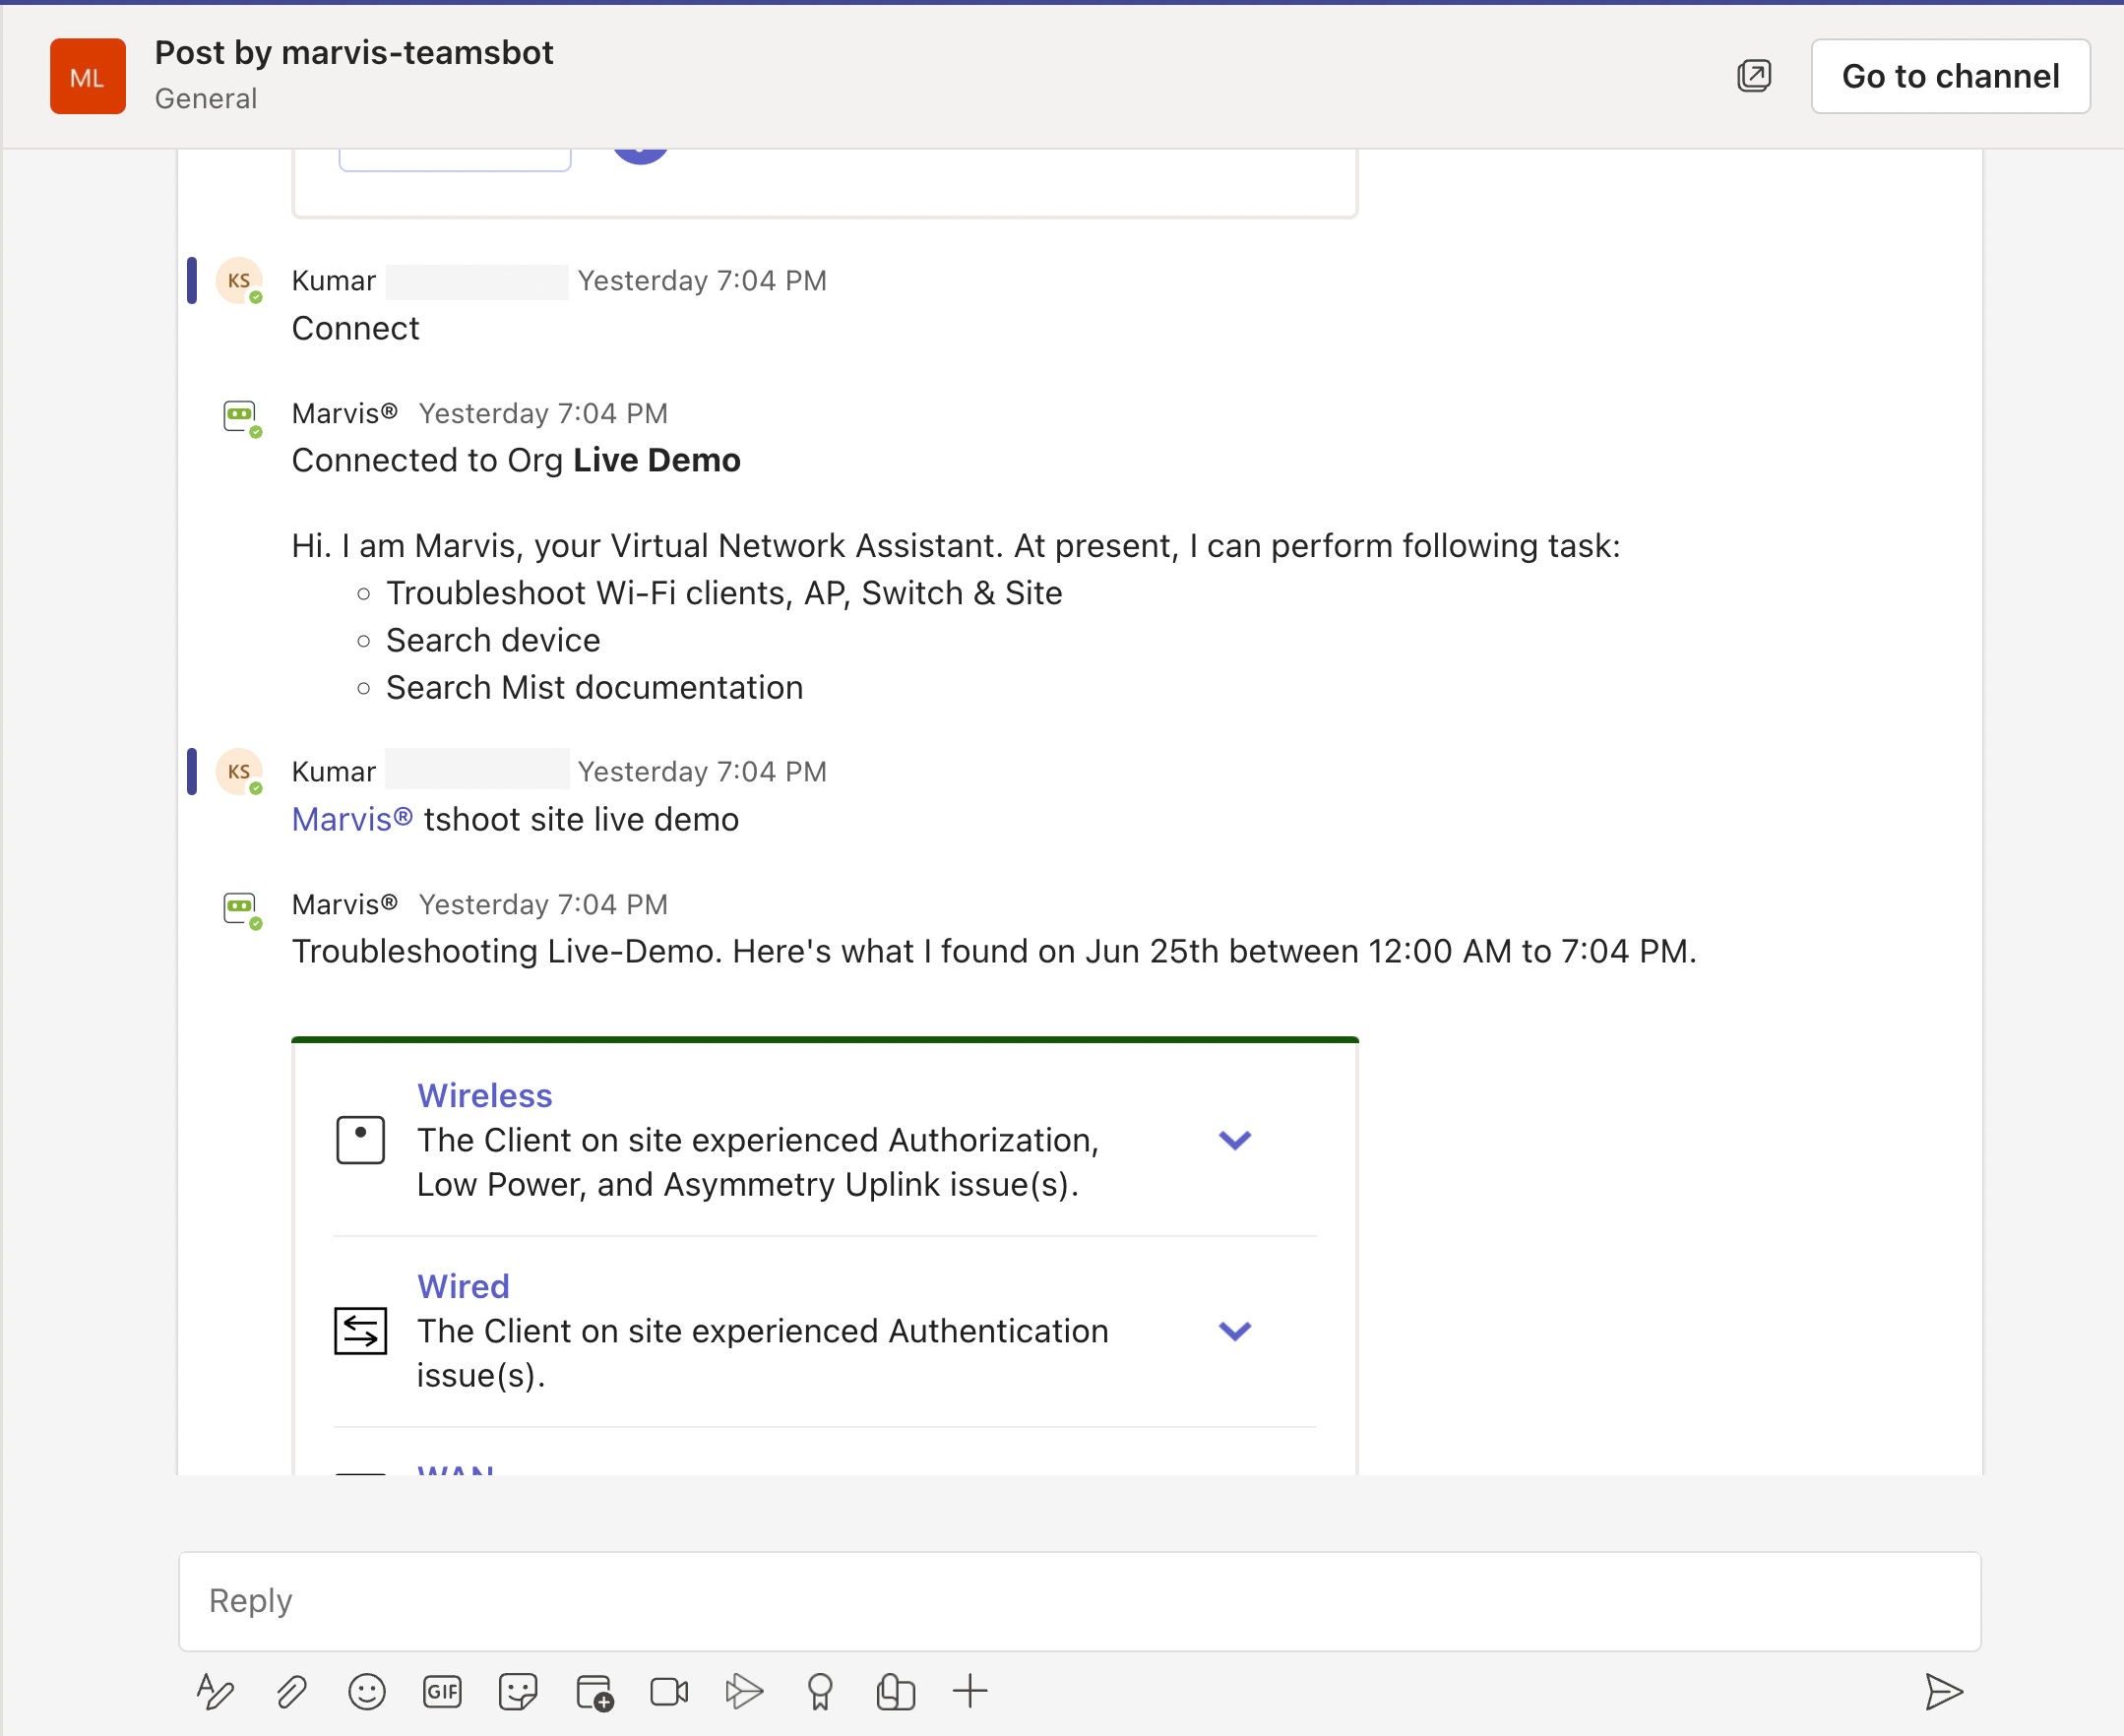
Troubleshoot a Site
You can use the Marvis app to troubleshoot sites to identify site-level failures.
To check whether a device is experiencing any issues, enter a phrase such as “troubleshoot site name” in the Teams window.
Here’s an example that shows the details Marvis provides for the phrase “troubleshoot site name“. Marvis shows the troubleshooting results for the site. Marvis classifies these failures under the following categories:
-
- Wireless
- Wired
- WAN
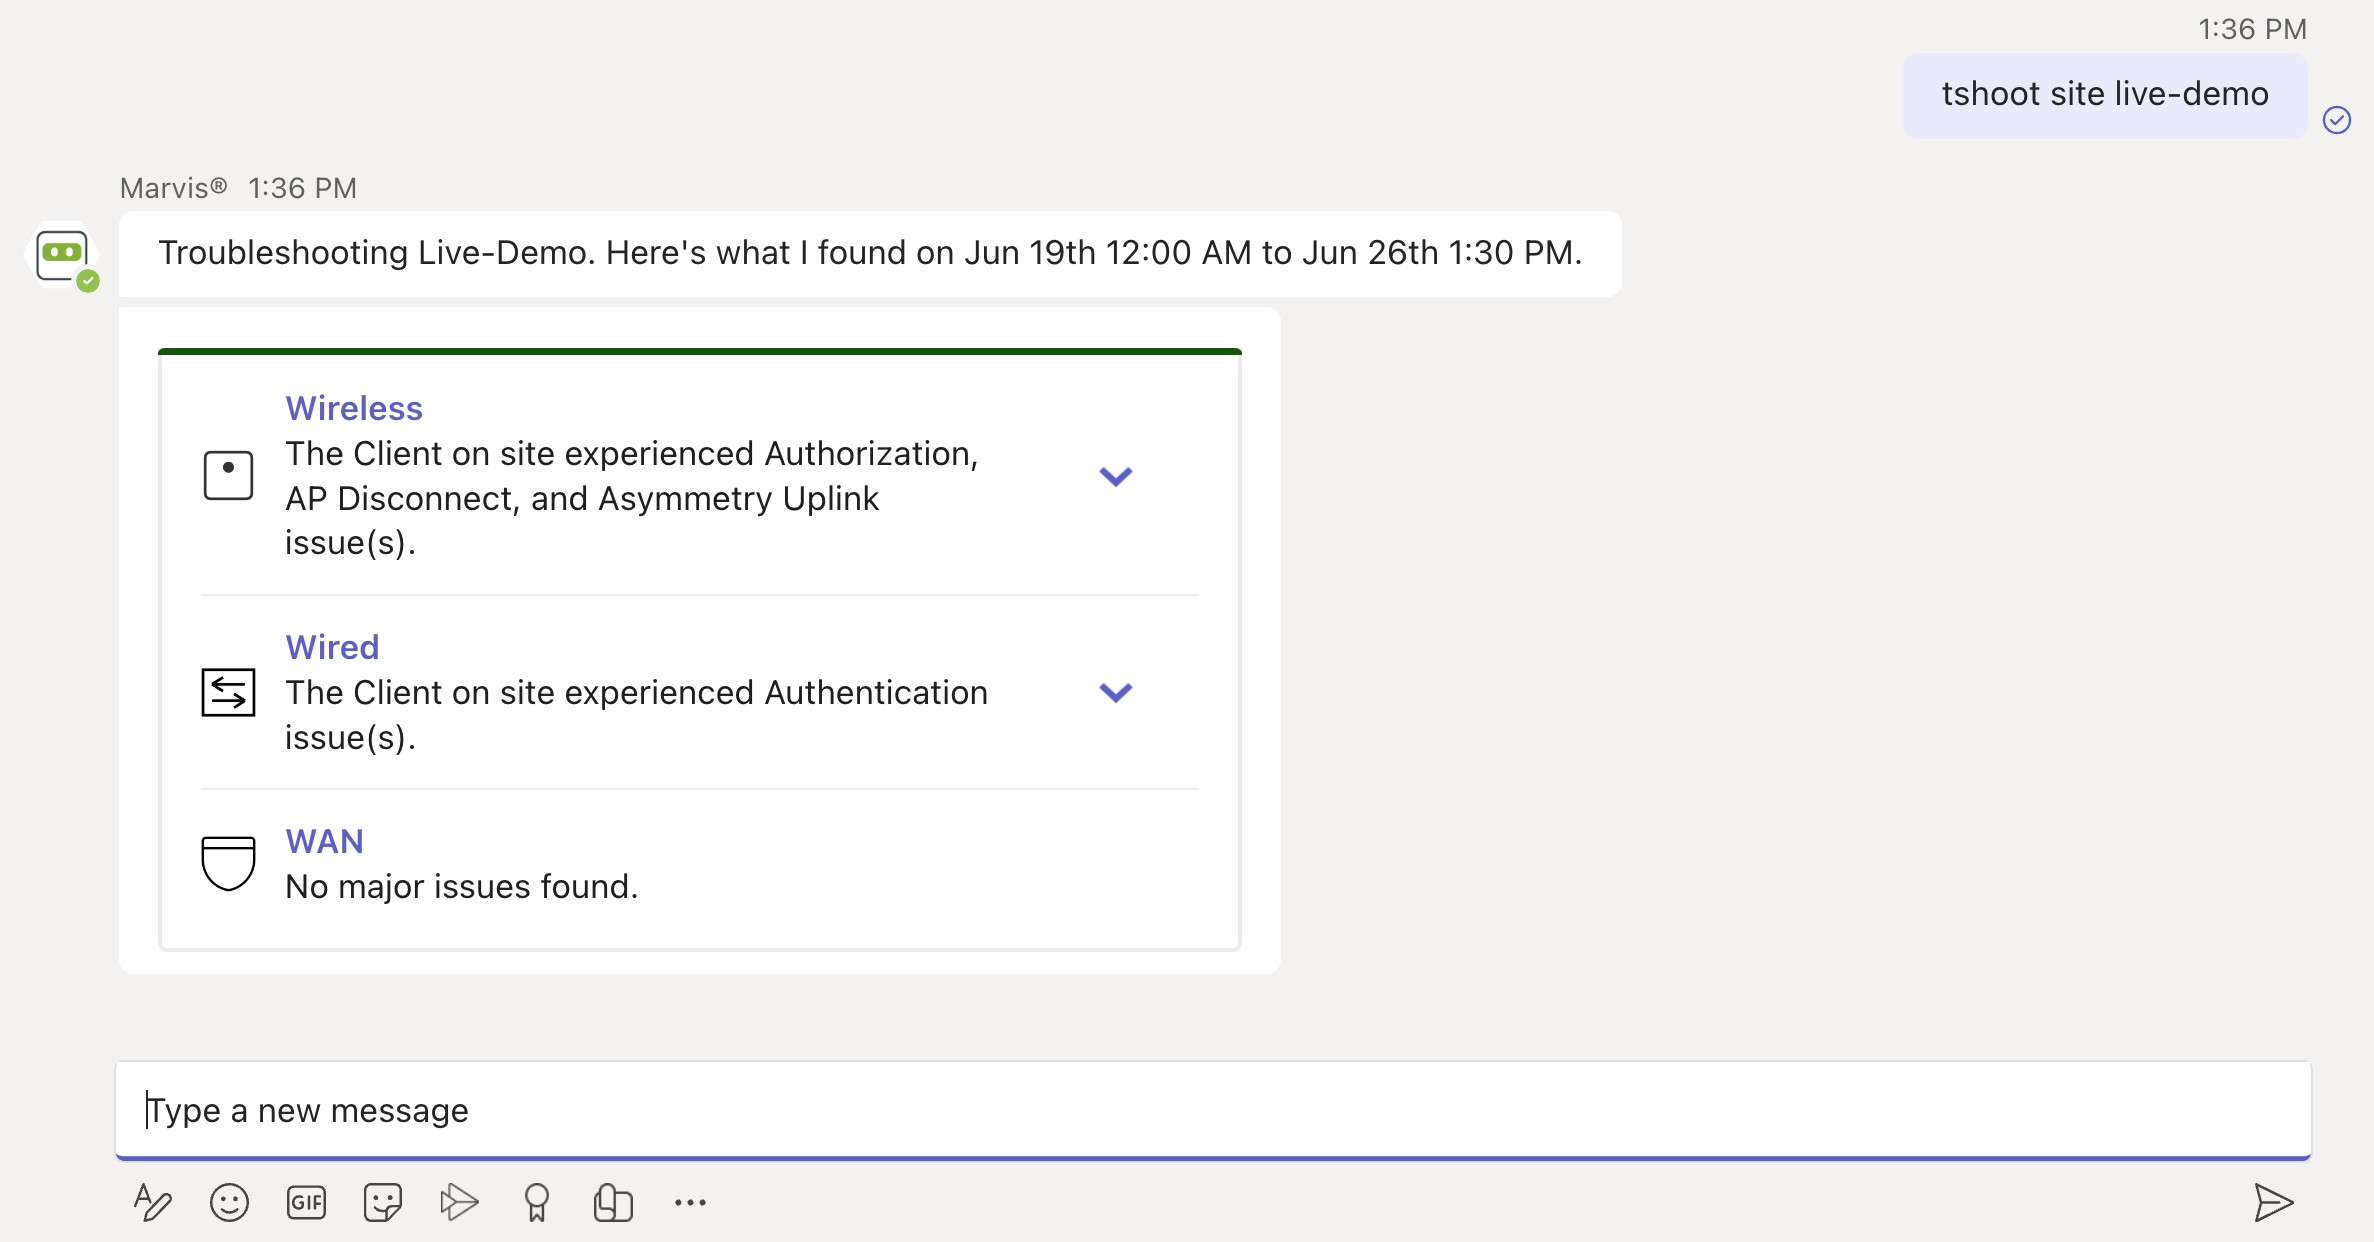
You can click the expand arrow to view more details. You can drill down further to view site-level insights and device-level insights.

Search and List Functions in the Marvis App
You can use the Marvis App to search for devices and sites. You can also search for documentation.
Search for Devices and Sites
You can use the Marvis App to search for devices such as wireless or wired clients, access points (APs), switches, and WAN edge devices based on the device’s name or MAC address. You can also search for sites by site name. To search for a device or site, simply enter the device or site name in the Marvis chat window.
The search results provide links to the Insights page for the device or site. Note that you can even search using partial names.
Here’s an example:
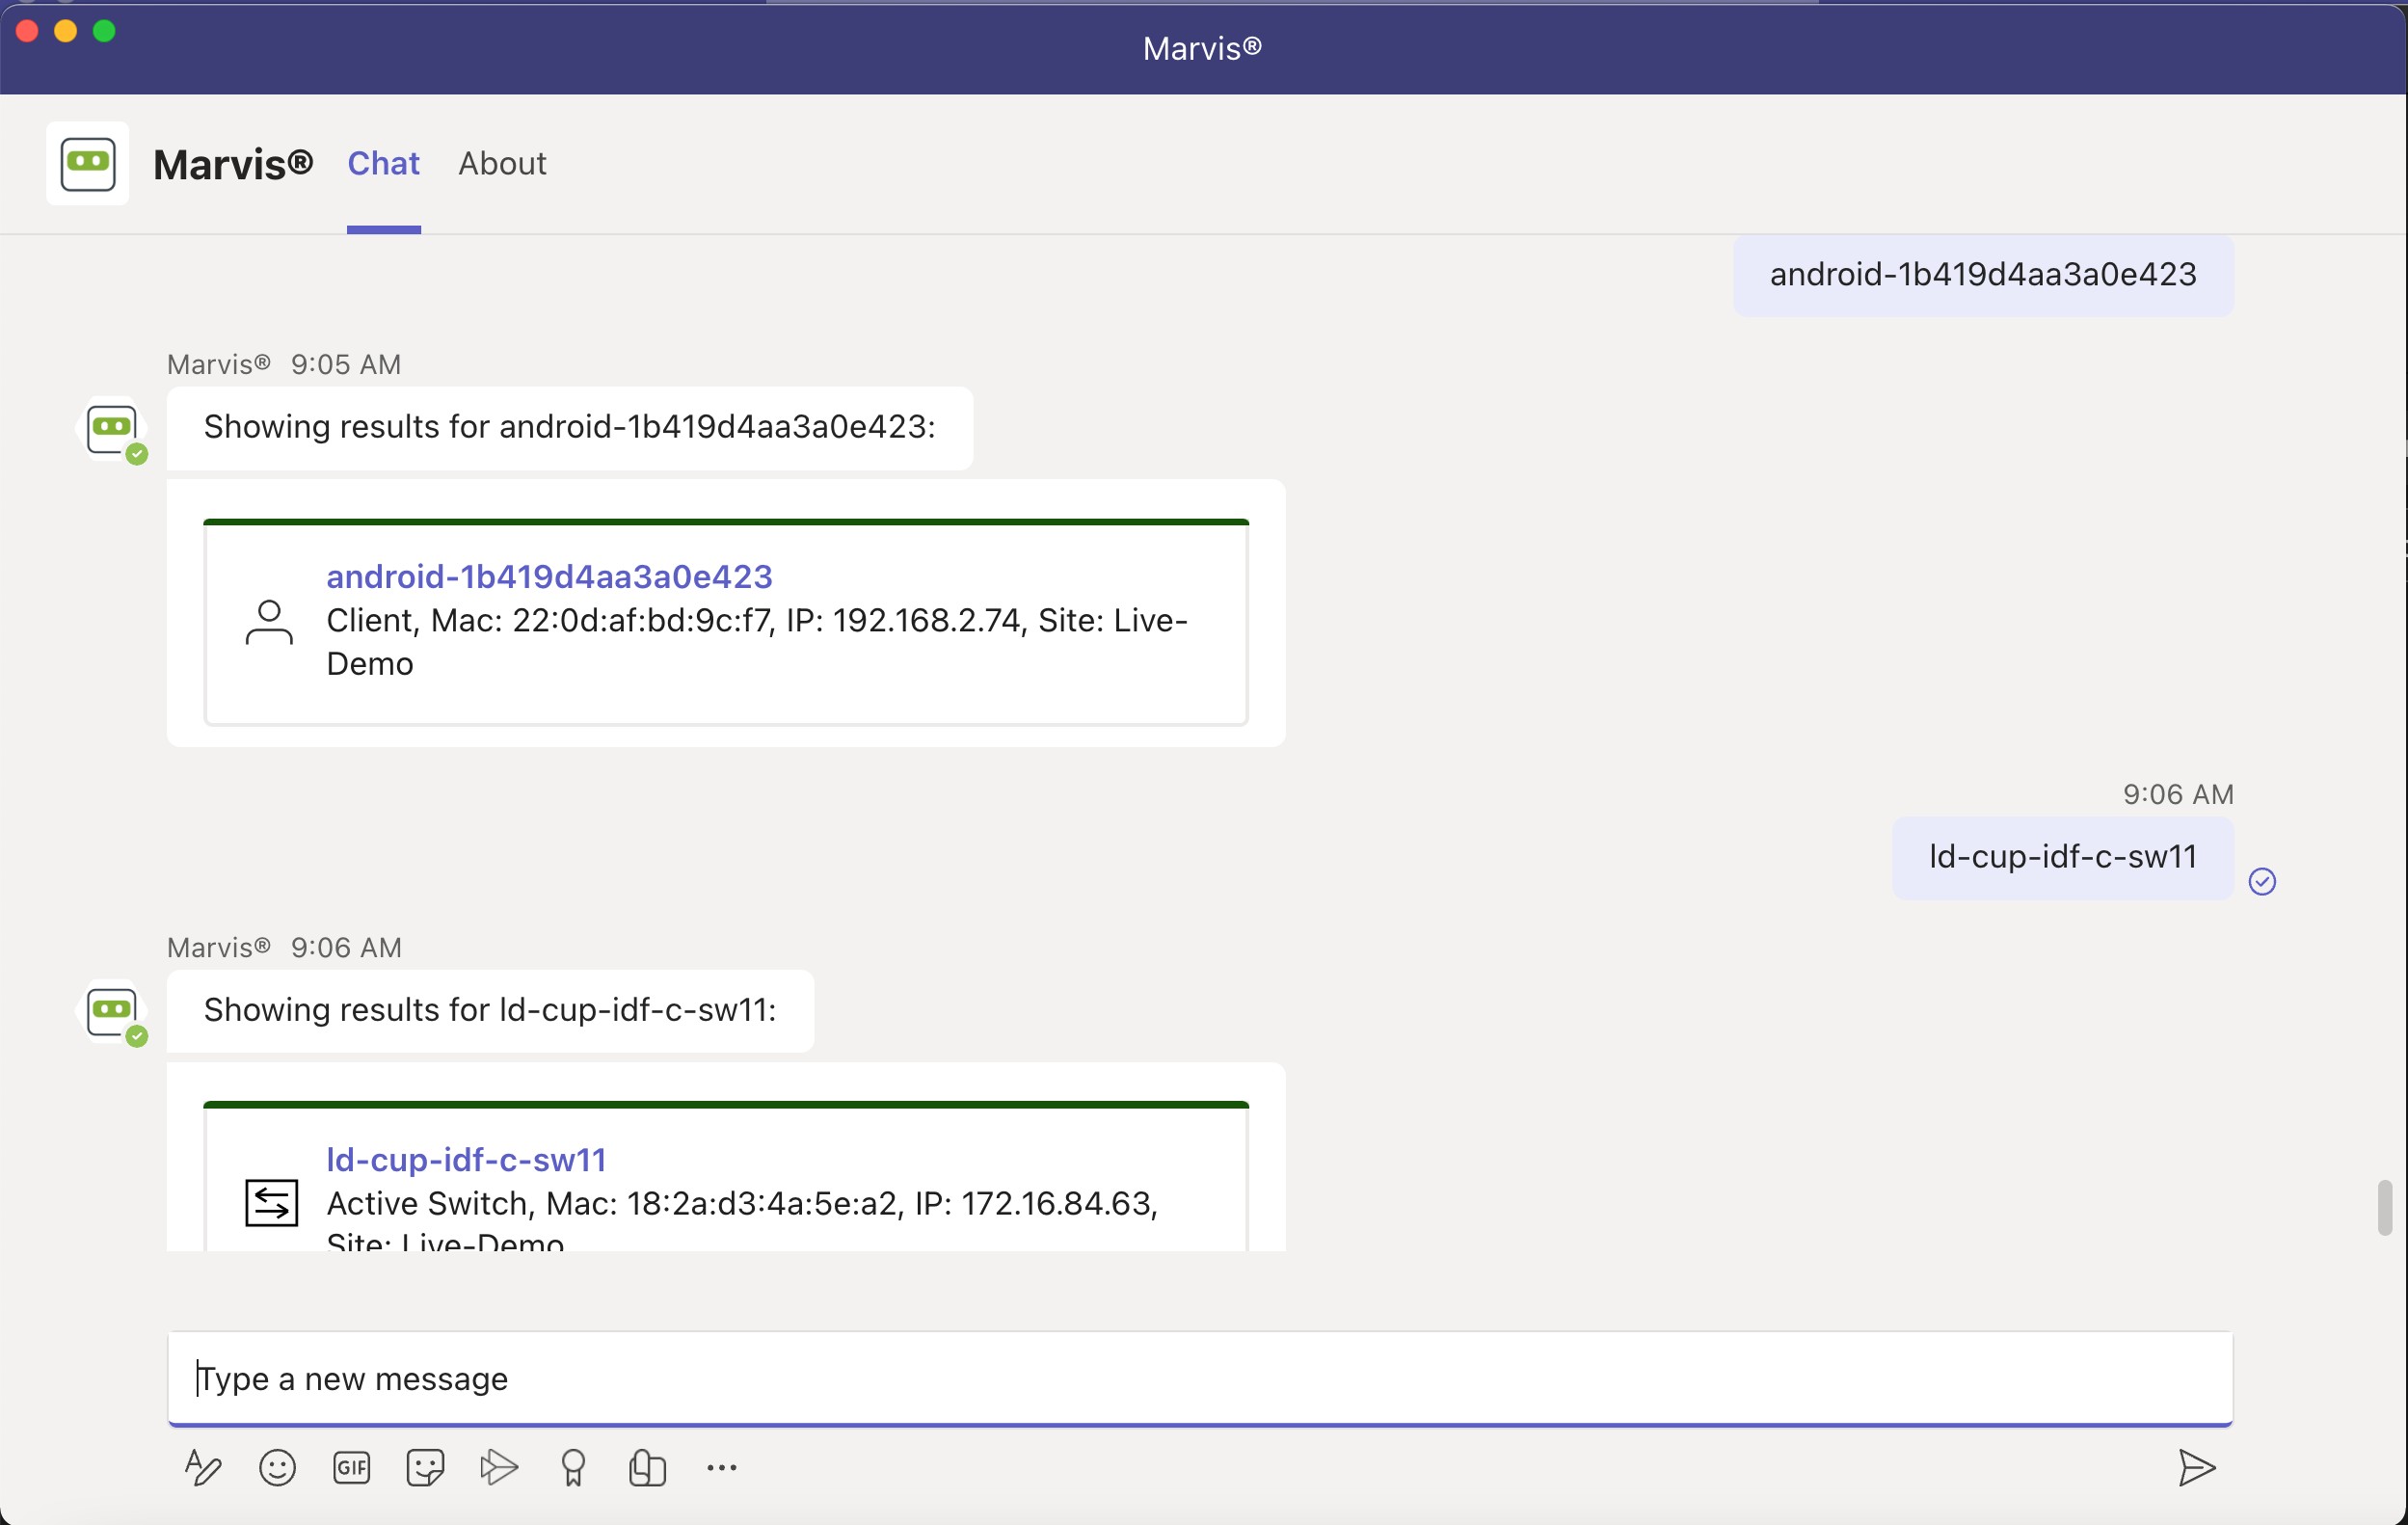
Here are some examples of phrases that you can use to search for a device or site:
- <client name>
- Search <ap mac> <switch model>
- Find <WAN edge mac>
- <wired client mac>
- <site partial name>
- Locate <client username>
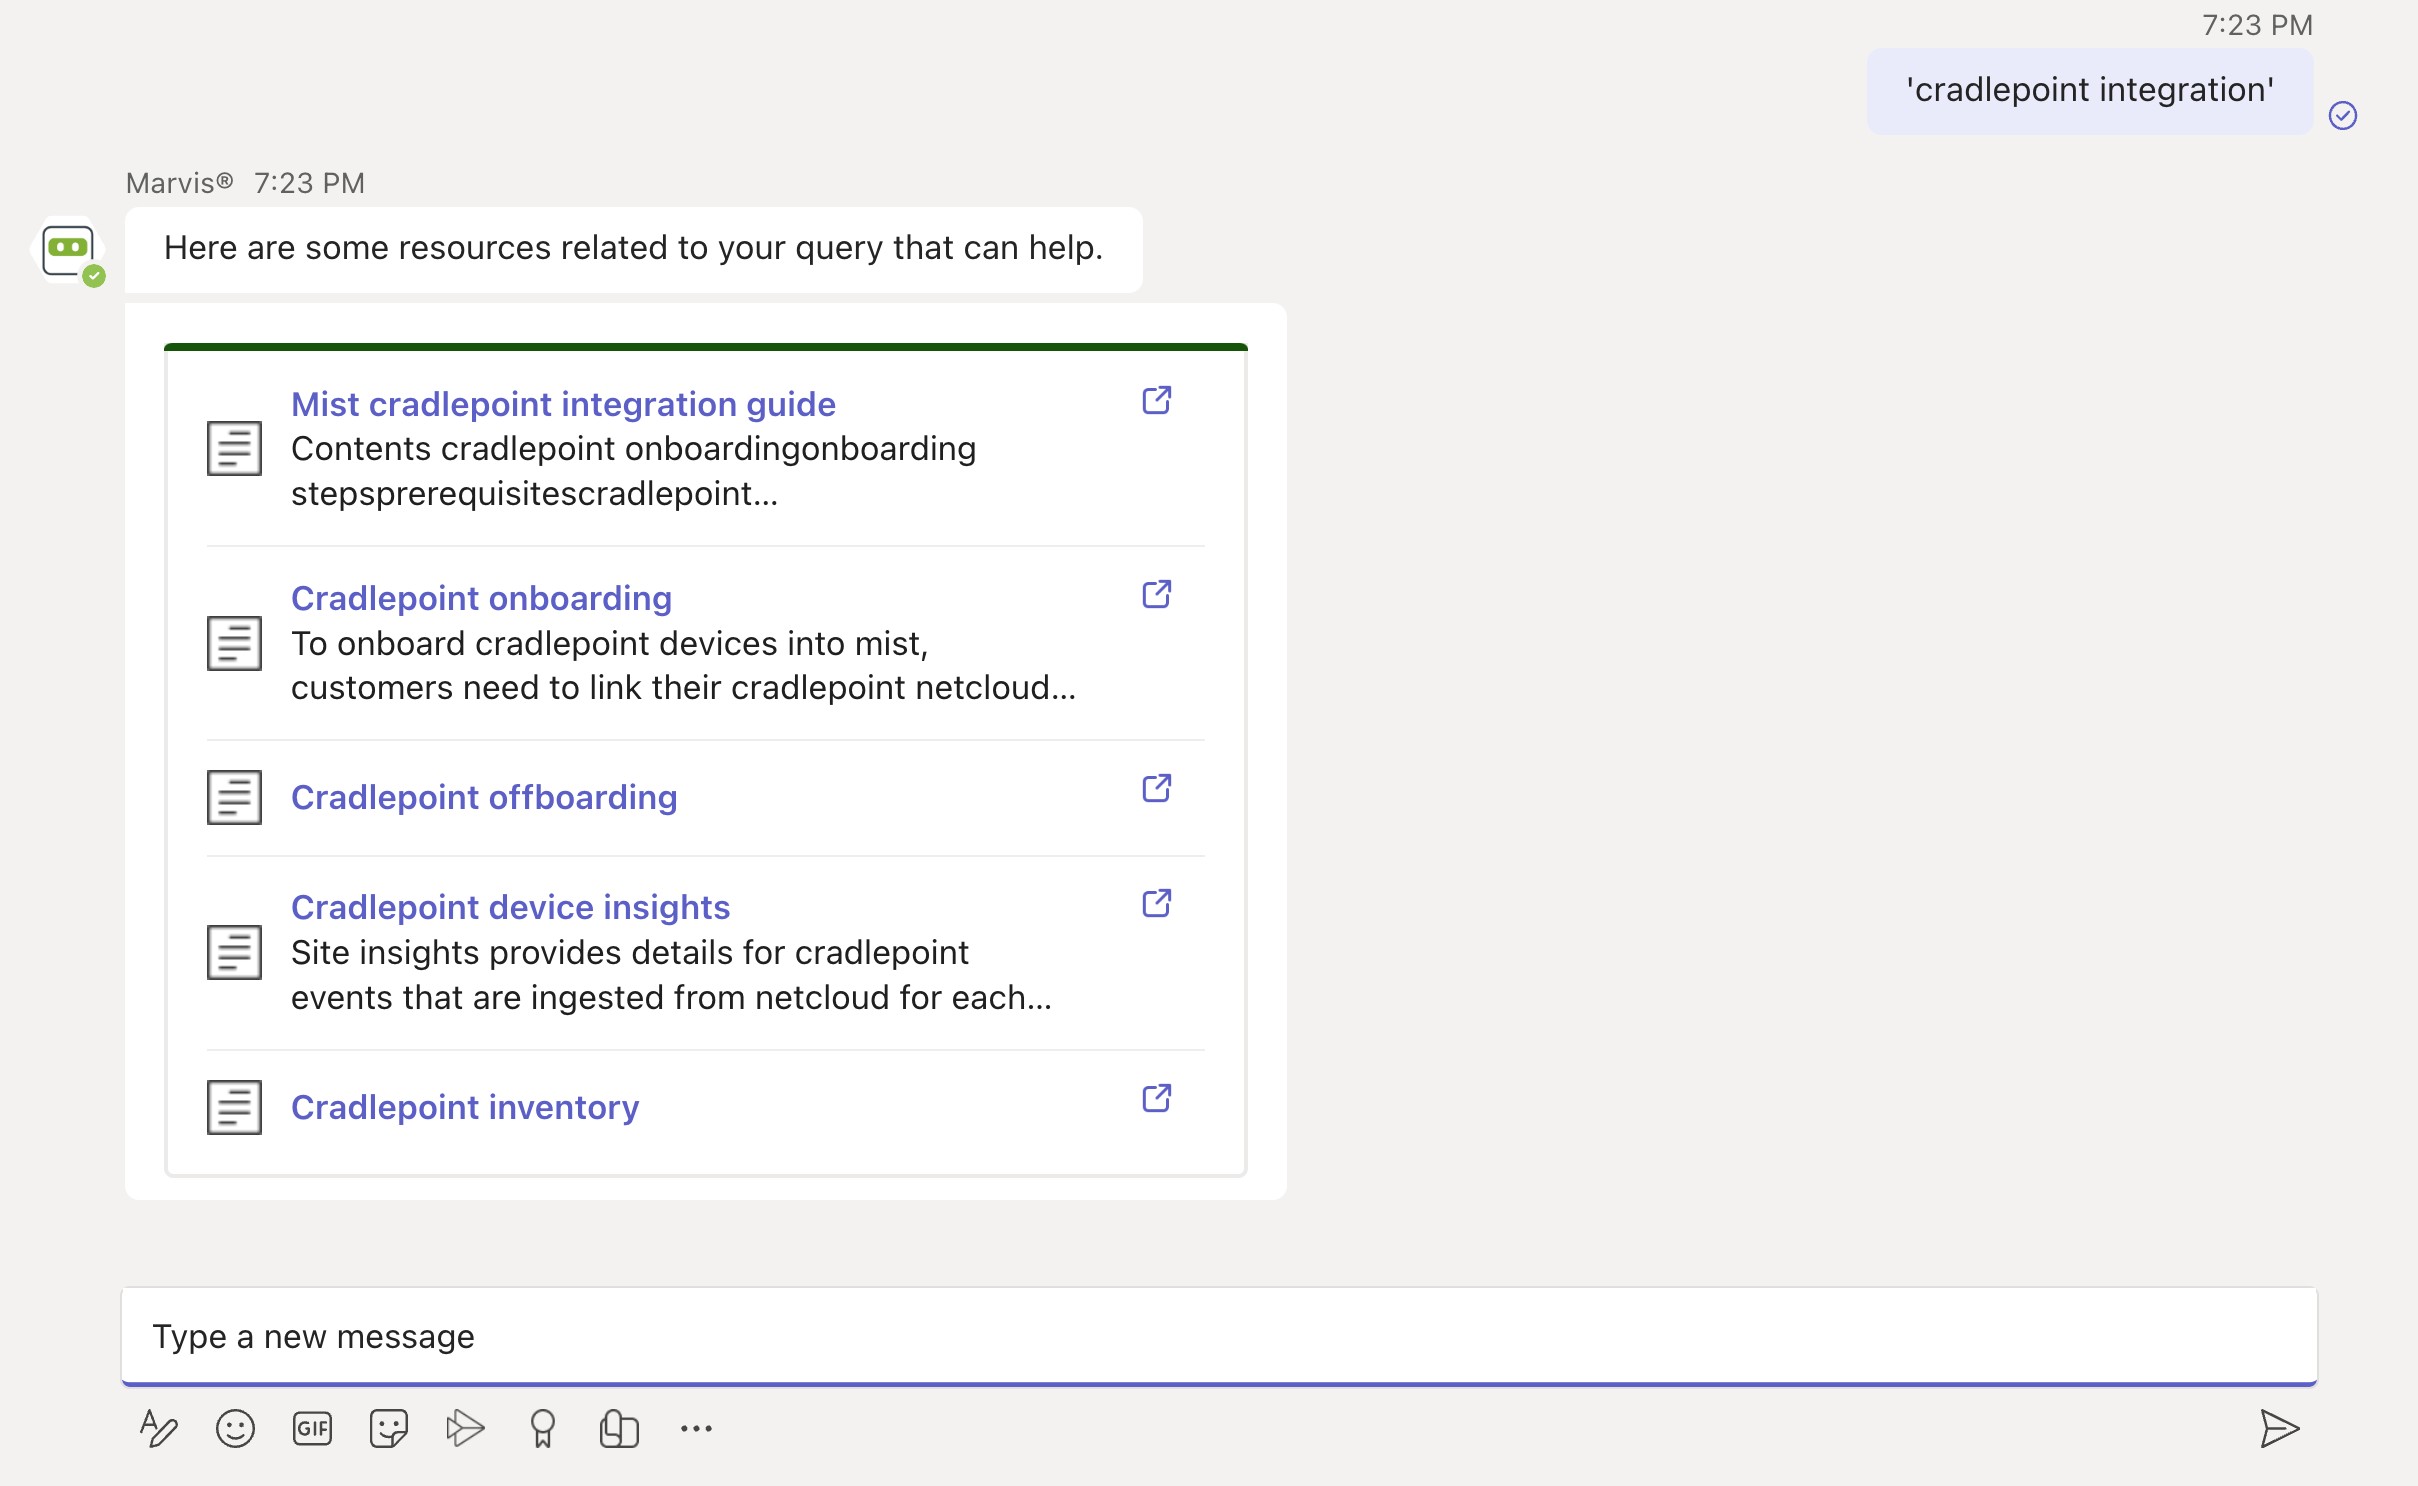
Search for Documentation
You can search for documentation without having to go to the Juniper documentation portal. To search for documentation, enter a phrase such as “doc search <text>” in the Marvis chat window. It is not necessary to enter the exact name of the topic. You can enter a word or phrase and Marvis displays all topics containing the text you entered. The following screenshot shows the results of a documentation search using the phrase “doc search <text>”.
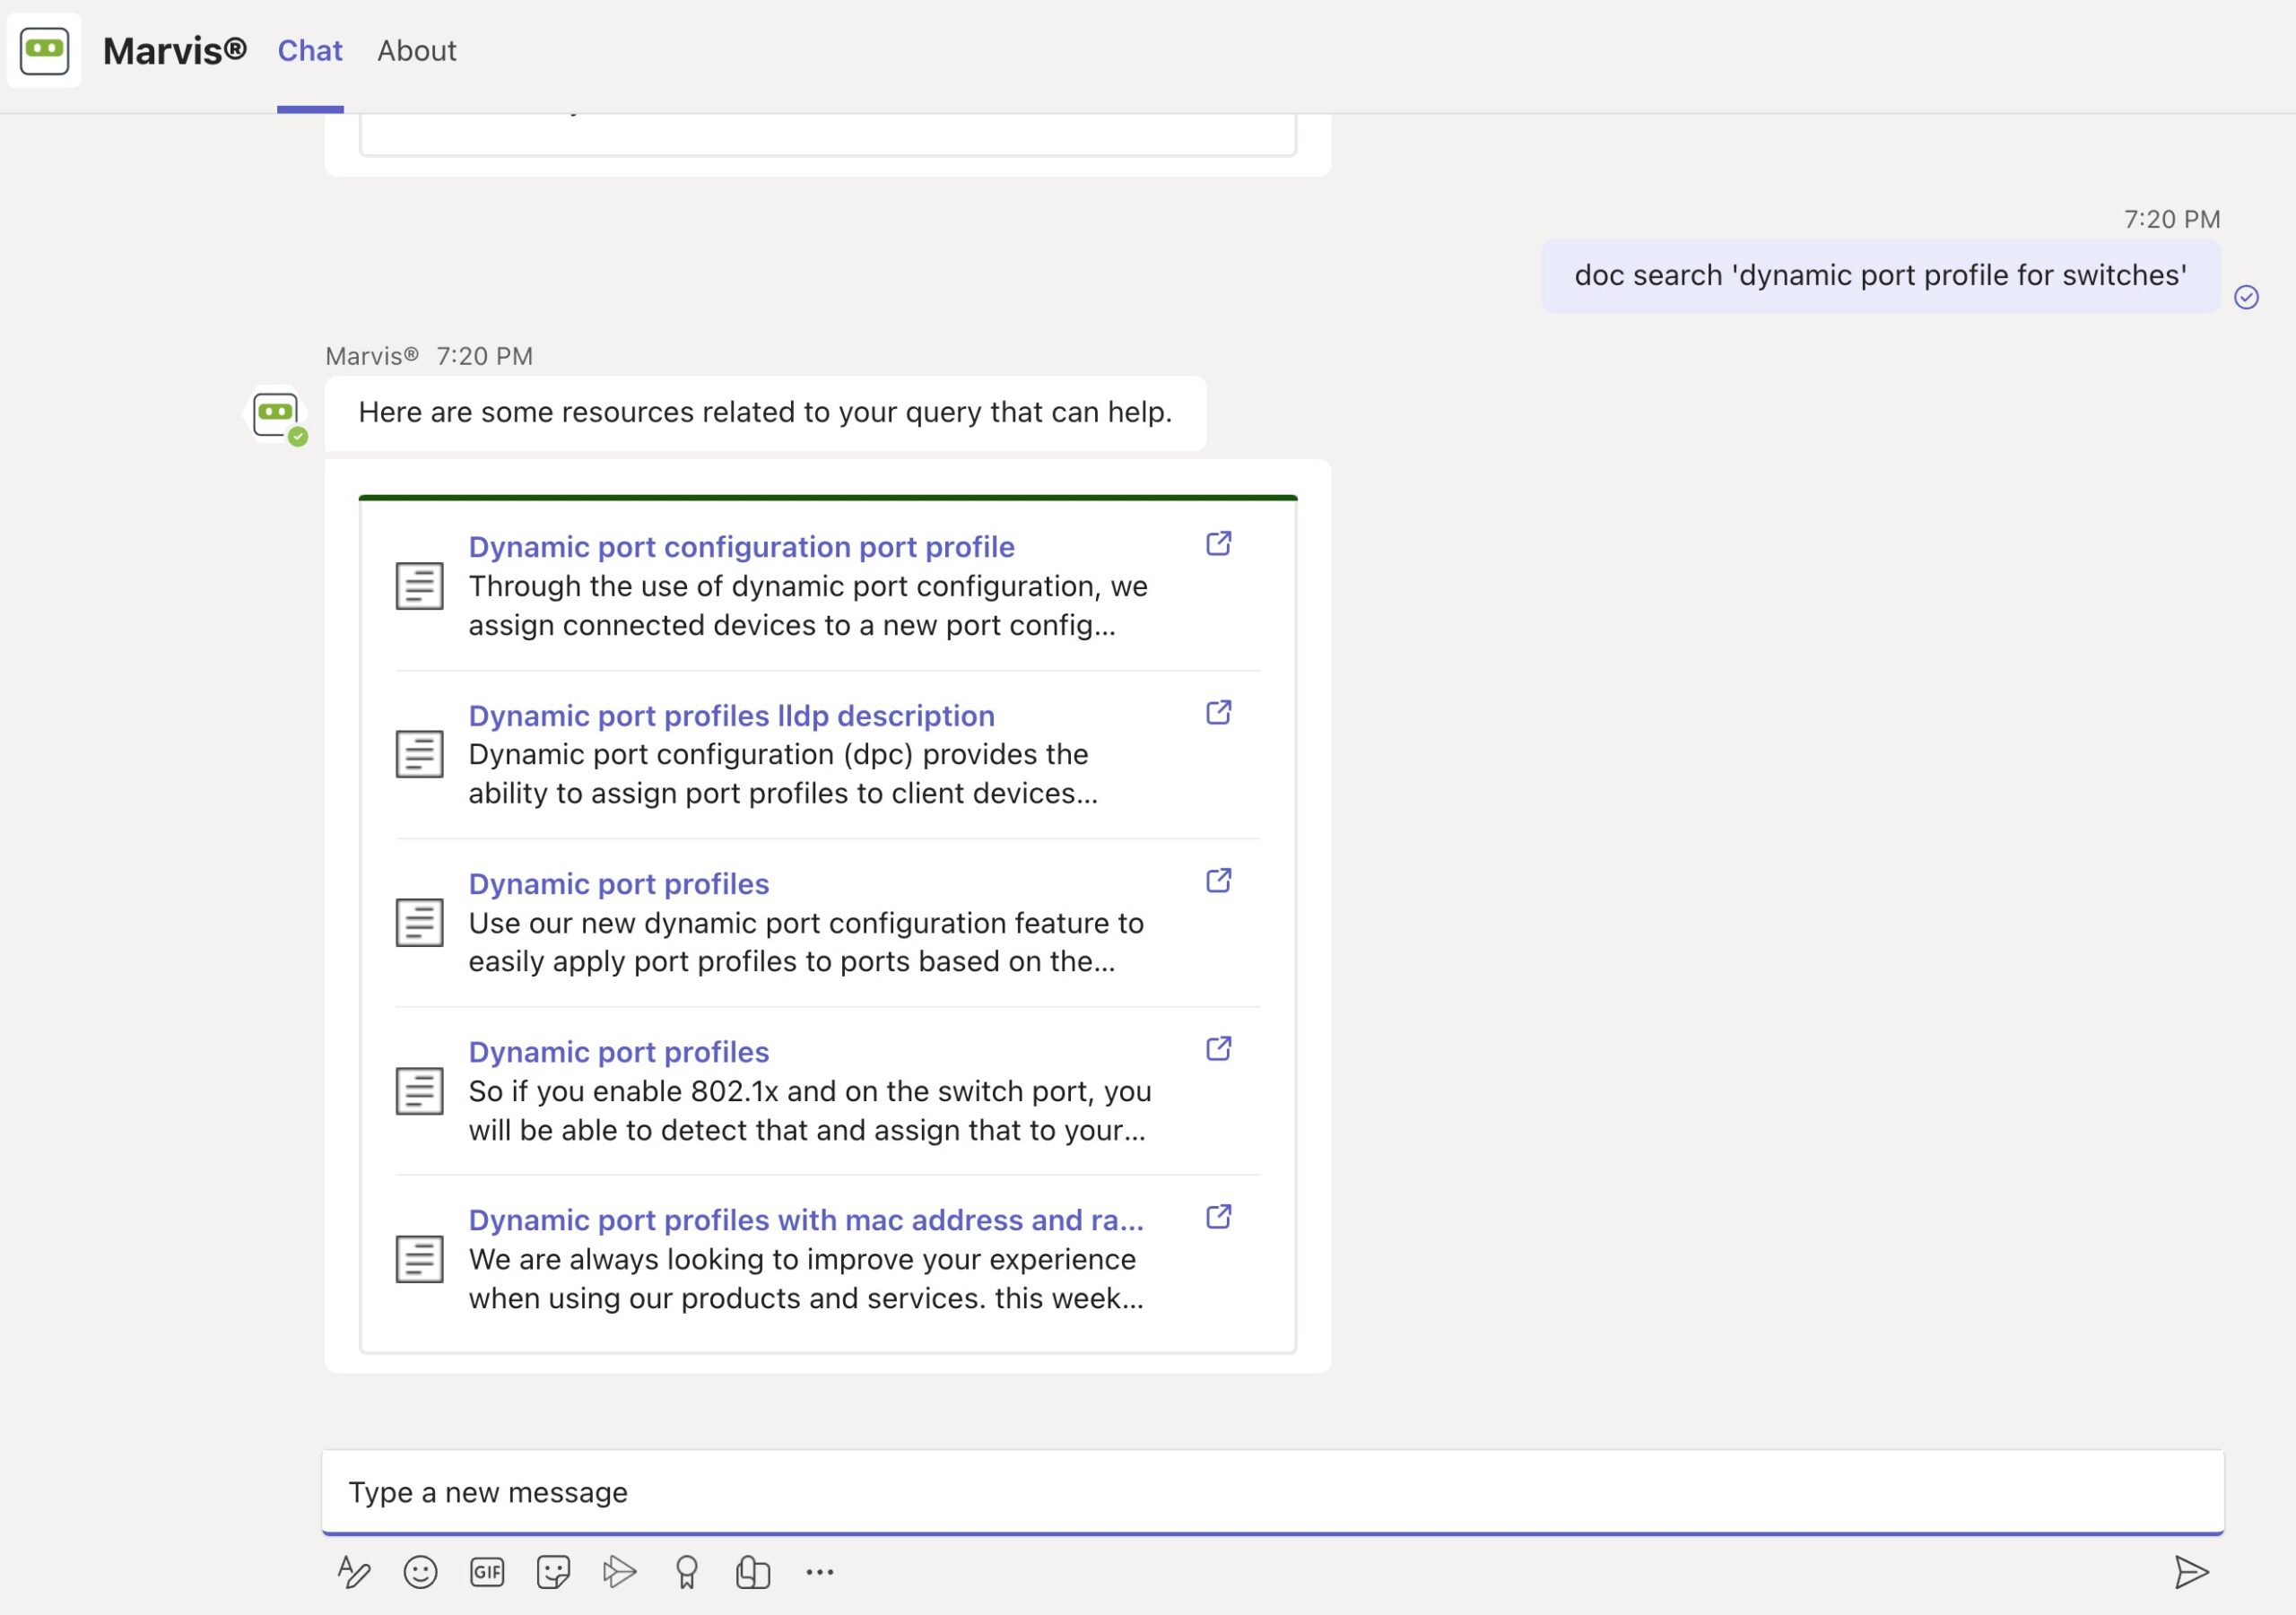
In the following screenshot, notice that Marvis displays documentation links even though the phrase does not contain the key words such as “doc” or “search”.
List Function
You can also use the list function to view information such as unhappy clients, access points (APs) running an incorrect firmware version, and switches in a site.
To determine which clients are experiencing connectivity issues (which we also refer to as unhappy clients), use phrases such as, “list unhappy wireless clients” or “list unhappy clients” without providing details.
Marvis displays a list of clients that are experiencing issues. You can select any client from the list to view the details.
Here is an example that shows the details that Marvis displays for “unhappy clients”.
View or Change the Organization in the Marvis App
You can run queries against multiple organizations and also switch between organizations using the Marvis app, The Marvis app enables you to:
- Switch between organizations
- View the current active organization (that is, the organization to which you’re connected currently).
- Connect to a new organization or reconnect to the active organization
Simply type “help” in the Marvis chat window, and you’ll see details about the configure, my_configs, and active options:
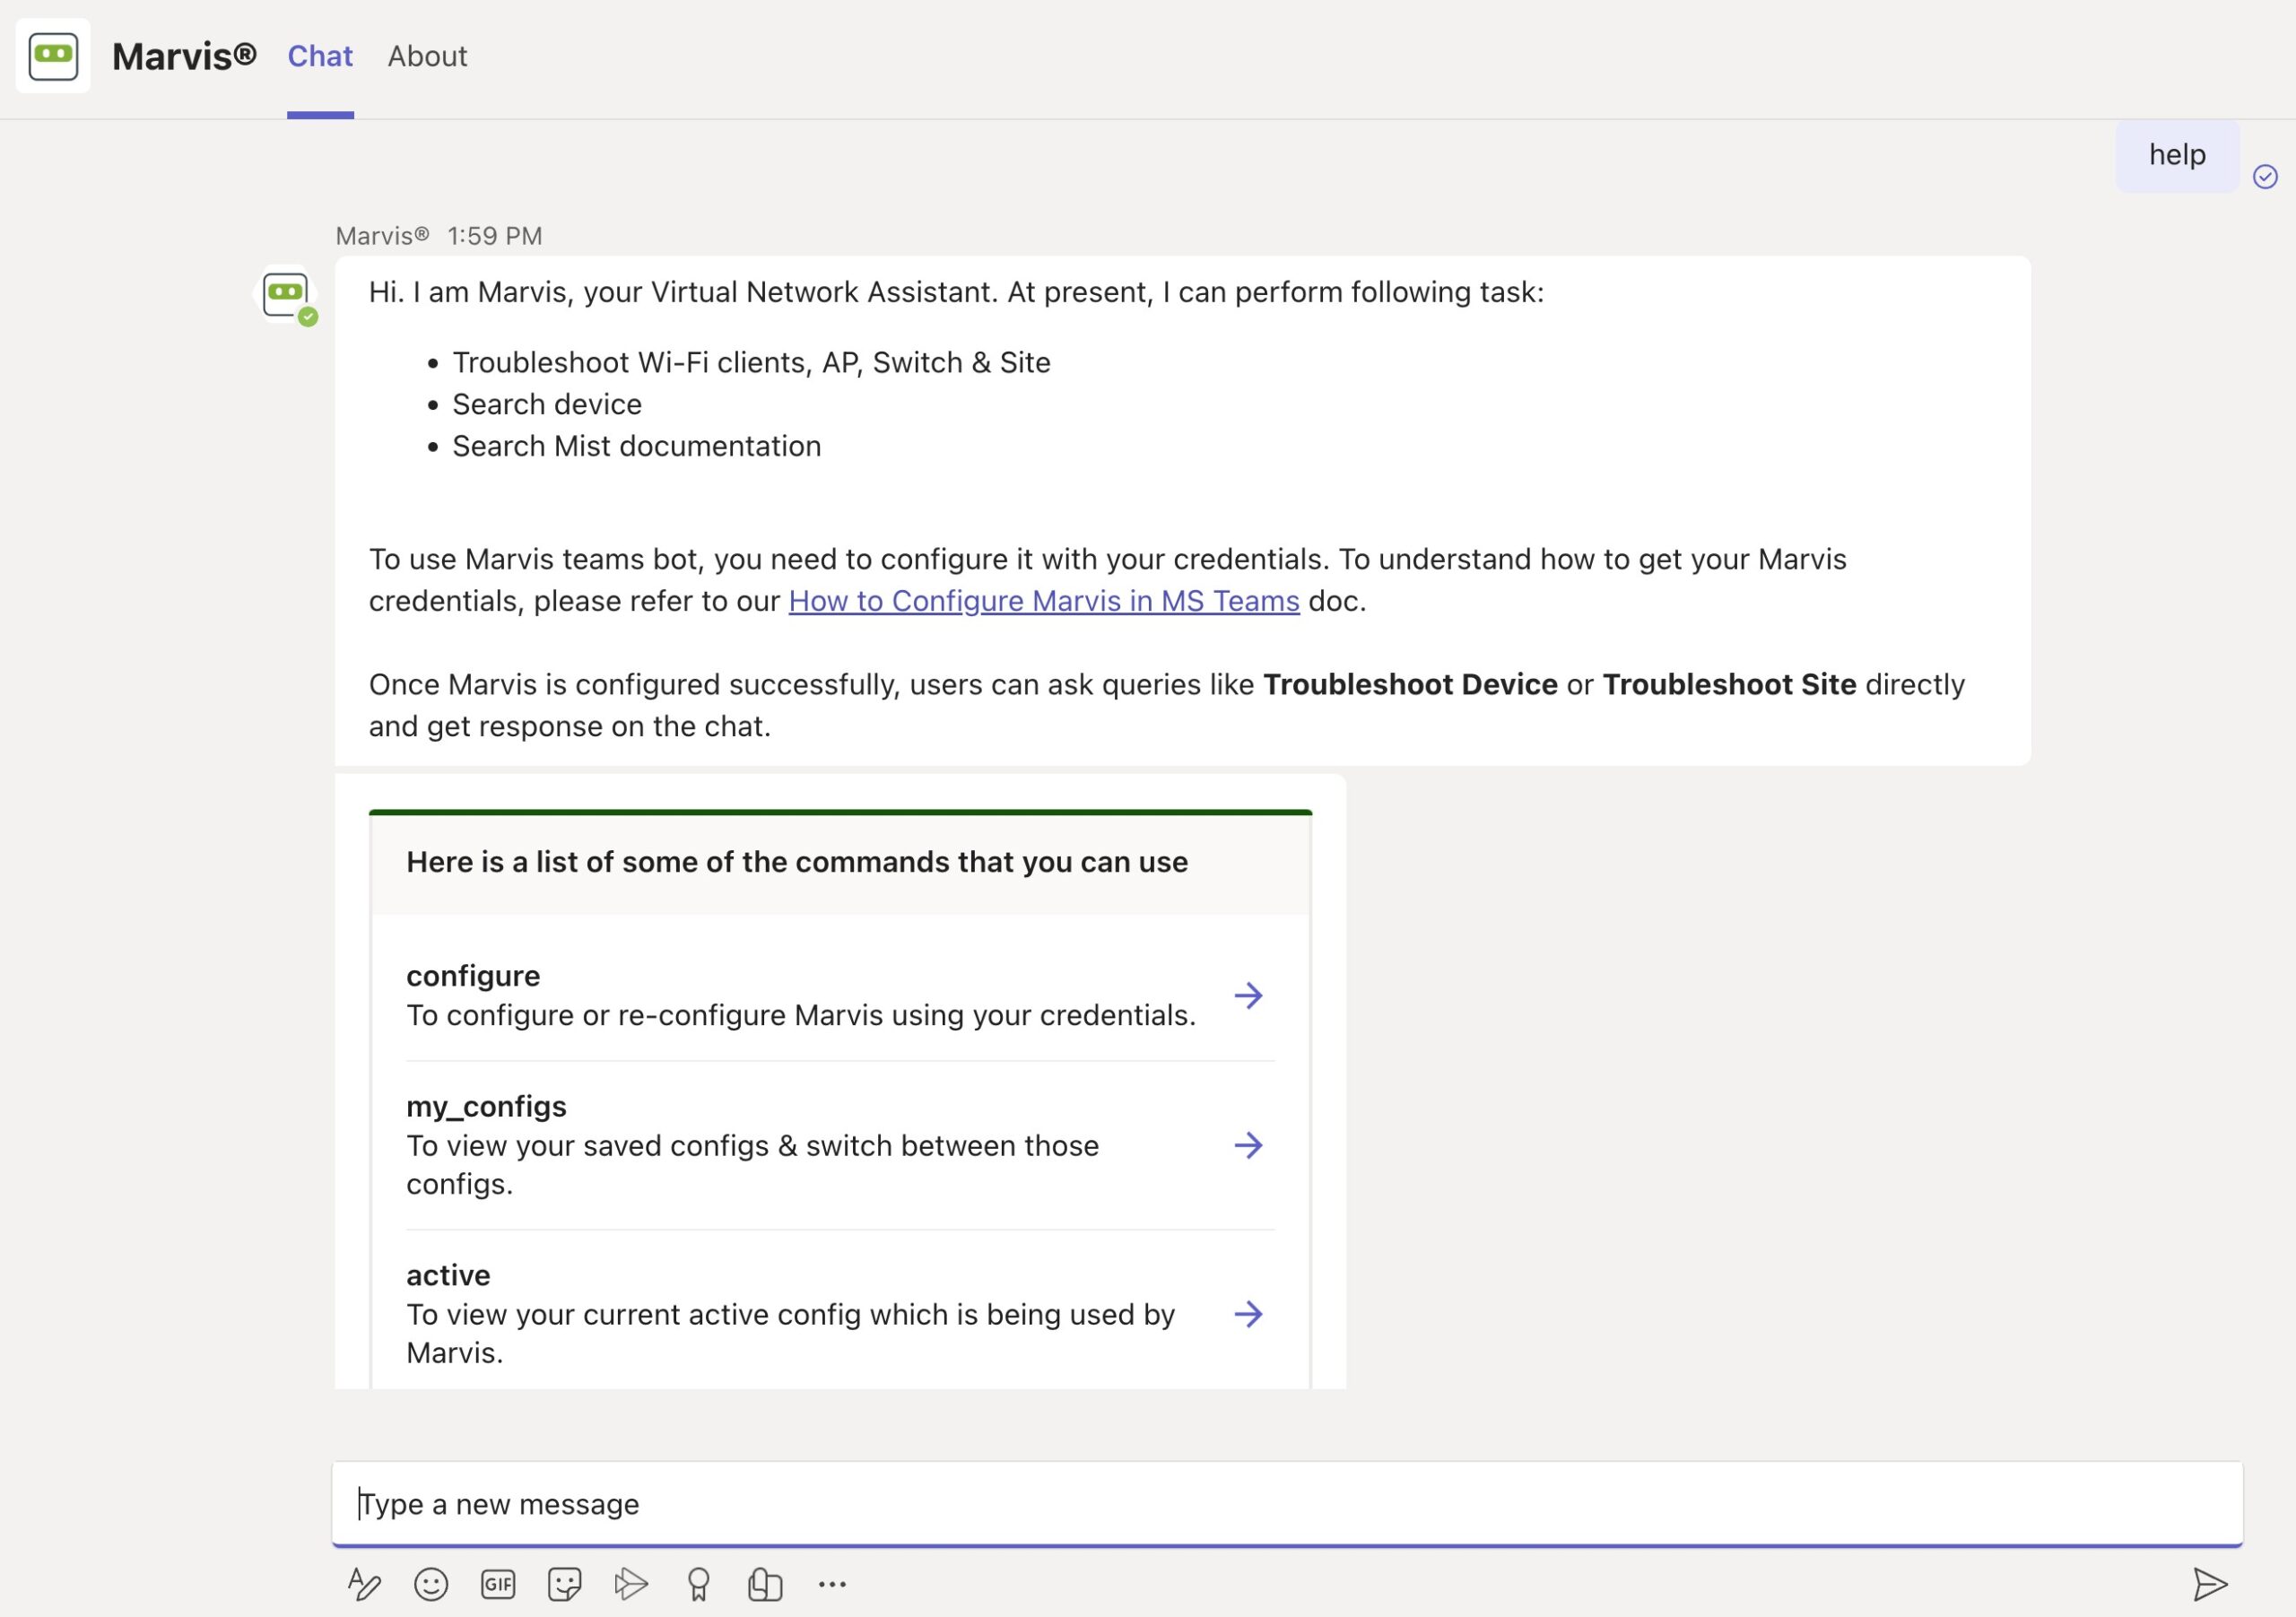
- If you enter configure, Marvis displays the login You can either reconnect to the current active organization or connect to a different organization.
- If you enter my_configs, Marvis displays the following:
- Organizations to which you are connected
- The current active organization
Clicking on the other organization makes it the active organization. You can query for information pertaining to the devices and sites that are part of that organization.

- If you enter active, Marvis displays the organization that is currently active