If you would like to create your own guest portal page with custom options for your personalized network instead of using the default portal, Mist also supports integrating with an externally hosted captive portal. This guide will walk you through configuring your external captive portal with Mist, using the attached PHP files as an example.
Follow these steps:
1. Create a landing page with which your unauthorized guests will be presented. This is the index.php file in the attached example.
2. Create an authorization page that calls Mist to authorize the guest device. This is the authme.php file in the attached example.
Note: When a user connects to a Guest WLAN, Mist will check whether the device is already authorized with the Mist backend. If the device is authorized, then the user will automatically be allowed broader access to the network resources. If the device is not authorized, then Mist will redirect the user to the external captive portal for authentication. The authorization how-to guide can be found here: https://portal.mist.com/authorize-howto.
3. Fill out the necessary fields. When an unauthorized guest is redirected to the external captive portal, Mist sends parameters to the portal landing page on the 302 redirect:
- wlan_id – The WLAN object’s UUID. This is required for guest authorization.
- ap_mac – The MAC address of the AP. This is required for guest authorization.
- client_mac – The MAC address of the client device. This is required for guest authorization.
- url – The originally requested url by the client, for example: https://www.mist.com
- ap_name – The name of the AP.
- site_name – The name of the Site.
4. As an optional step, configure your landing page to capture any additional guest information:
- name – The user’s name.
- email – The user’s email address.
- company – The user’s company.
- field1 – A custom field #1, which can be configured to pass any additional guest information.
- field2 – A custom field #2, which can be configured to pass any additional guest information.
- field3 – A custom field #3, which can be configured to pass any additional guest information.
- field4 – A custom field #4, which can be configured to pass any additional guest information.
5. Pass the required and optional fields from the landing page (index.php) to the authorization page (authme.php).
6. Configure your authorization page with additional settings pertaining to the guest’s authorization limits:
- authorize_min – Duration (minutes) for which the guest MAC address is authorized before being redirected back to the portal landing page.
7. In the Mist Web GUI, create a Guest WLAN to use your captive portal pages. This requires an administrator account Network Admin privilege or higher.
Note: To create a Guest WLAN that can be applied to multiple sites, use an administrator account with Super User privilege and navigate to the Organization > Configuration Template page. After creating a Configuration Template, follow steps 2-8 to create a Template Guest WLAN.
- To start, create a new WLAN by navigating to Network > WLANs and selecting the Add WLAN button on the upper right.

- Under the Security section, select the desired WLAN security mode.
- Go to the Guest Portal box and select Forward to external portal. Here, please provide the Portal URL where your external captive portal landing page is hosted.
- Optional: Supply the Hostname Exceptions to block unauthorized guests from accessing these specific hostnames, even if the parent domain is allowed in the above steps.
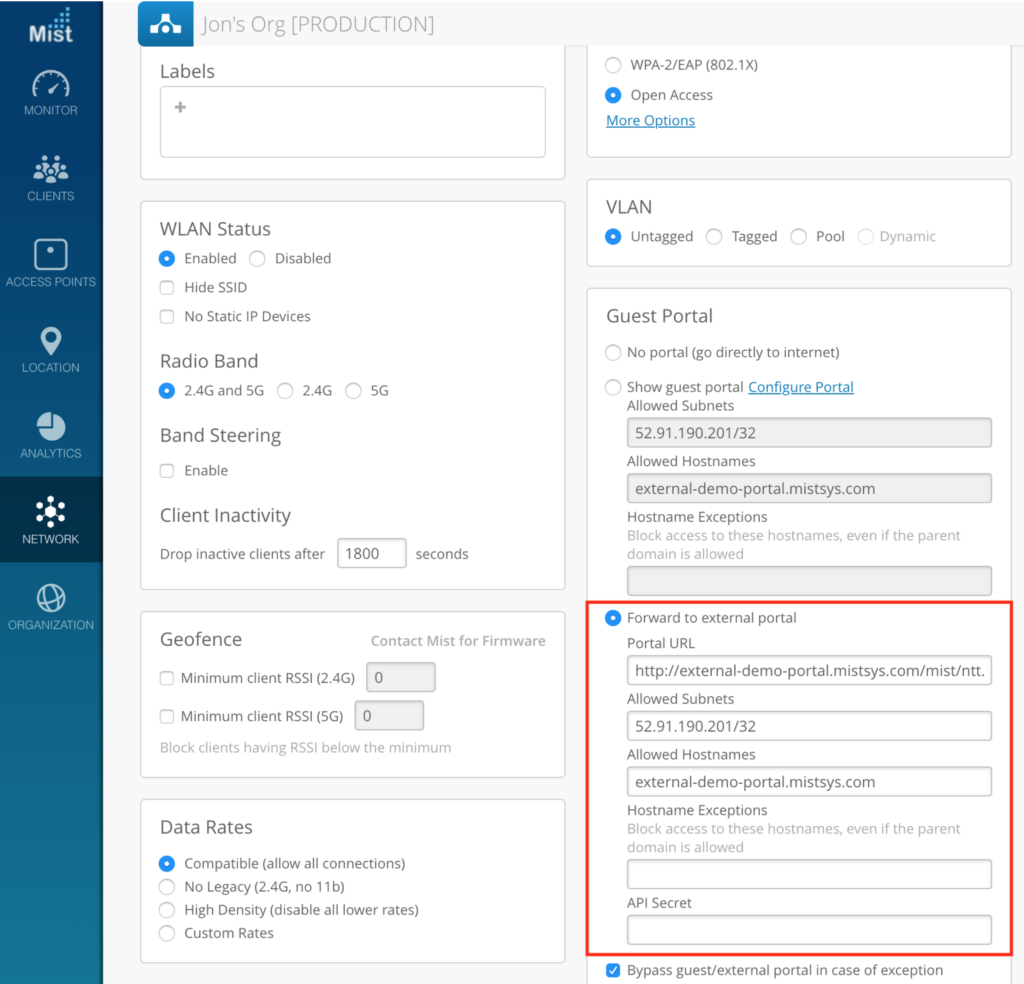
- Click Create to create the new WLAN on your site. The API Secret will automatically be created for you.
8. Open the new Guest WLAN to see the API Secret. This will be used shortly.
9. In the captive portal files, configure the authorization page (authme.php) to call the Mist backend with the required query string parameters: ?signature=signature&expires=expires&token=token&optional
- expires – The epoch timestamp until which the authorization URL is valid.
For example: 1768587994 (This means the authorization URL would expire on January 16, 2026 at 6:26:34 PM UTC.) - token – A base64 string having format: wlan_id/ap_mac/client_mac/authorize_min/0/0/0
For example: be22bba7-8e22-e1cf-5185-b880816fe2cf/5c5b35001234/d58f6bb4c9d8/480/0/0/0 - signature – A base64 string of hashed values, using sha1 as the hashing algorithm and the Guest WLAN’s API Secret as the key. This would have the following format: expires=expires&token=token&optional
For example: J7VJlf2Zlcs%2BOxhVxCf8hL0XYC0%3D - optional – The optional guest details and the URL to which the user is forwarded after authorization, having the following format: forward=url&name=name&email=email&company=company&field1=field1&field2=field2&field3=field3&field4=field4
Note: Ensure all parameter values are passed as base64.
For example: forward=http%3A%2F%2Fwww.mist.com%2F
10. Configure your authorization page to call Mist for guest authorization. The final authorization URL would look something like this: http://portal.mist.com/authorize?signature=J7VJlf2Zlcs%2BOxhVxCf8hL0XYC0%3D&expires=1768587994&token=YmUyMmJiYTctOGUyMi1lMWNmLTUxODUtYjg4MDgxNmZlMmNmLzVjNWIzNTAwMTIzNC9kNThmNmJiNGM5ZDgvNDgwLzAvMC8w&forward=http%3A%2F%2Fwww.mist.com%2F
11. Test the external captive portal by connecting a device and attempting to authenticate. The device should be redirected to the Mist portal for authorization with the Mist backend. If authentication is successful, the Mist portal will then redirect the guest to the URL as defined in your external captive portal code.
Note: Use /authorize for the live portal. /authorize-test can be used for testing purposes only, and requires the dummy example values as provided in the guide.
Please Note
Please refer to https://www.mist.com/documentation/ports-enable-firewall/
to pick appropriate Guest Wi-Fi Portal URL instead of portal.mist.com based on the Cloud instance the Org has been created.