Second in a series about our first deployment of a Mist Systems wireless network.
Originally posted on 5/10/18 by Ian Beyer at CaNerdlan
In my last post, I gave you an overview of the various components of the Mist Wireless system. This post will go into some of the design considerations pertaining to this particular project.
Because we’re now designing for more than just Wi-Fi, there are a few additional things to factor in when planning the network.
Floor Plans
It’s not uncommon for your floor plans to have a “Plan North” that doesn’t always line up with “Geographic North”. Usually this isn’t a factor, but looking at it in hindsight, I would strongly encourage you to build your floor plans aimed at geographic north from the start, as the Mist AI will also use that floor plan for direction/wayfinding and the compass in mobile devices will be offset if you just go with straight plan north. You can also design on plan north, but then output a second floor plan file that is oriented to true north. Feature request to Mist: Be able to specify the angle offset of the plan from true north and correct that for user display in the SDK.
For this project, I had access to layered AutoCAD files for the entire facility, which (sort of) makes things easier in Ekahau Site Survey, but sort of doesn’t – the import can get a little overzealous with things like door frames. I had to go do a fair bit of cleanup afterwards, and might have been better off just drawing the walls in the first place. This was partly due to the general lack of any good CAD tools on MacOS that would have allowed me to look at the data in detail and massage it before attempting the import into Ekahau. The other challenge is that ESS imported the ENTIRE sheet as its view window, which made good reporting impossible as the images had wide swaths of white space. Having the ability to crop the CAD file would have been nice.
Density Considerations
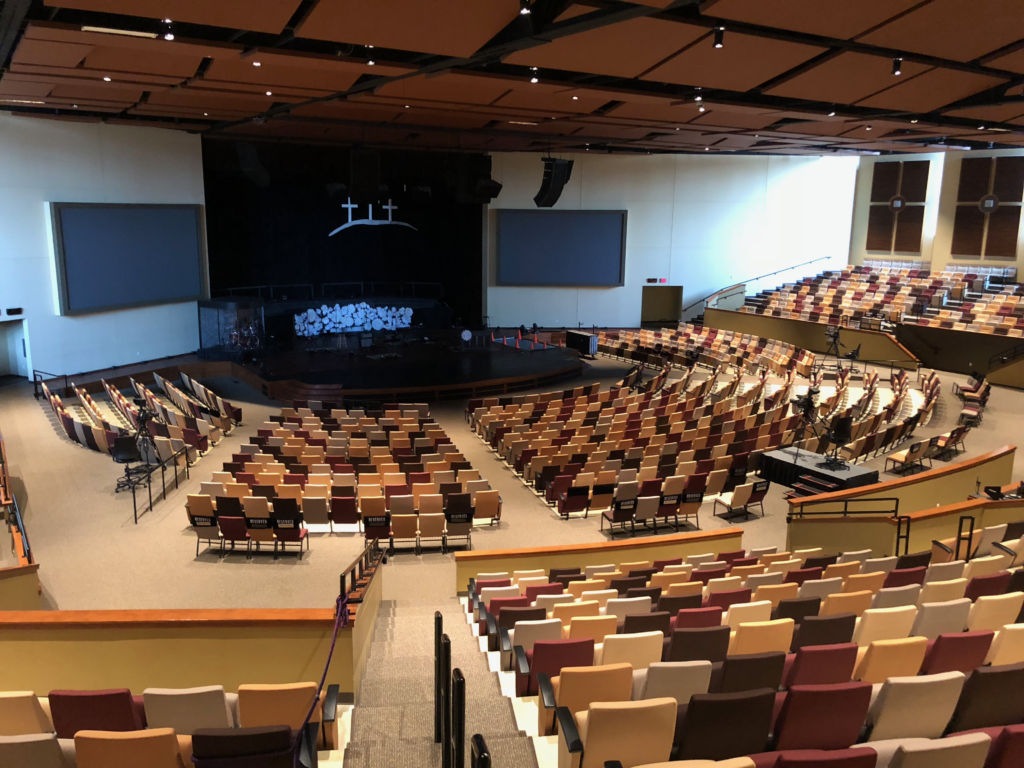
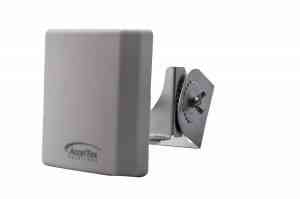
Since one of the areas being covered is a large auditorium, we had to plan on multiple small cells within the space. We needed to put the APs in the catwalks, as we did not have the option of mounting the units on the floor because of the sanctuary being constructed onslab (and while the cloud controller allows you to specify AP height and rotation from plan north, there is no provision to tell it the AP is facing *up* and located on/near the floor). This posed a few challenges, the first being that we were well above the recommended 4-5m (the APs were at 10m from the floor), the other being that we needed to create smaller cells. For this, we used the AP41E with an AccelTex 60-degree patch antenna.
We also needed to either run a whole lot of cables up to the theatrical catwalks, or place a couple of small managed PoE switches – we unsurprisingly opted for the latter, using two 8-port Meraki switches, and uplinked them using the existing data cabling that was feeding the two UniFi APs that were up there.
As an added bonus, the sanctuary area was built with tilt-up precast concrete panels, which allowed us to use that heavy attenuation to our benefit and flood the sanctuary space with APs and not worry about spilling out too much.
Capacity-wise, we used 10 APs in the space, which seats 1700. Over the course of several church designs, I’ve found that a ratio of one active user for every three seats usually works out pretty well – in most church sanctuaries, the space feels packed when 2/3 of the seats are occupied, which means that we’re actually planning for one client for every two seats. Now, we’re talking active clients here, not associated clients. An access point can handle a lot more associations than it can active clients. As a general rule, I try to keep it to about 40 or 50 active clients per AP, before airtime starts becoming a significant factor.
In an environment like this, you want as many client devices in the room to associate to your APs, even if they’re not actively using them – when they’re not associated, they’re sitting out there, banging away with probe requests (especially if you have any hidden SSIDs), chewing up airtime (kind of like that scene from Family Guy where Stewie is hounding Lois just to say “Hi.”). Once they associate, they quiet down a whole bunch.
In addition to the main sanctuary, there are also a couple of other smaller but dense spaces: the chapel (seats 300) and the East Room (large classroom that can seat up to 250). In these areas, design focused on capacity, rather than coverage.
Structural Considerations
As is often the case with church facilities, College Park Church is an amalgamation of several different buildings built over a span of many years, accommodating church growth. What this ends up meaning is that the original building is then surrounded on multiple sides with an addition, and you end up with a lot of exterior walls in the middle of the building, as well as many different types of construction. Some parts of the building were wood-frame, others were steel frame, and others were cast concrete. The initial planning on this building was done without an onsite visit, but the drawings made it pretty obvious where those exterior (brick!) walls were. Naturally, this also makes ancillary tasks like cabling a little interesting.
Fortunately, the church had a display wall that showed the growth of the church which included several construction pictures of the building, which was almost as good as having x-ray vision.
Aesthetic Considerations
Because this is a public space, the visual appearance of the APs is also a key factor – Sometimes putting an AP out of sight takes precendence over placing for optimal Wi-Fi or BLE performance.
Placement Considerations
Coverage Area
Mist specifies that the BLE array can cover about 2500 square feet. The wifi can cover a little more, but it doesn’t hurt to keep your wifi cells that size as well, since you’ll get more capacity out of it. In most public areas of the building, we’re planning for capacity, not coverage. With Mist, if you need to fill some BLE coverage holes where your wifi is sufficient, you can use the BT11 as a Bluetooth-only AP.
AP Height
Mist recommends placing the APs at a height of 4-5m above the floor, in order to provide optimal BLE coverage. The cloud controller has a field in the AP record where you can specify the actual height above the floor.
AP Orientation
Because the BLE array is directional, you can’t just mount the APs facing any direction you please. These APs are really designed to be mounted horizontally, the “front” of the AP should be consistently towards plan north, but the controller does have the ability to specify rotation from plan north in case mounting it that way isn’t practical. The area, orientation and height are critical to accurate calculation of location information.
AP Location
Several of the existing APs in older sections of the building were mounted to hard ceiling areas, and we had to not only reuse the data cable that was there, but also the location. Fortunately, the previous system (Ubiquiti UniFi) was reasonably well-placed to begin with, and we were able to keep good coverage and reuse those locations without any trouble.
There were also some co-existence issues in the sanctuary where we had to make sure we stayed out of the way of theatrical lighting and fixtures that would pose a problem with physical or RF interference. In the sanctuary, we also have to consider the safety factor of the APs and keeping them from falling onto congregants like an Australian Drop-Bear.
Planning for BLE
Since starting this project, I’ve begun working with Ekahau on testing BLE coverage modeling as part of the overall wifi coverage, and it’s looking very promising. I was able to go back to the CPC design and replan it with BLE radios, and it’s awesome. Those guys in Helsinki keep coming up with great ideas. As far as Ekahau is concerned, multi-radio APs are nothing too difficult – They’ve been doing this for Xirrus arrays for some time now, as well as the newer dual-5GHz APs.
Stay tuned for a post about BLE in Ekahau when Jussi says I’m allowed to talk about it.