Simplified Operations
Subscription Redesign
The subscription page has been revamped to better track subscriptions and initiate renewals of missing or expiring subs. These new enhancements include a subscription banner to notify you of insufficient subscriptions, new summary and detail views of your subscriptions, and a new add/renew modal to manage subscriptions.
Subscription Banner
From the mist dashboard, a subscription banner will be displayed if any subscriptions are expired, over-used, or about to expire in 90 days. This banner appears on every page until dismissed. From the banner, you may select the Add/Renew Subscriptions button to open up the Add/Renew modal (covered below), where you will be guided through the renewal process.
Summary View
The summary view can be found by navigating to Organization > Subscriptions, and depicts higher level information about all the subscriptions on your organization. It lists all subscription types: Active, Expired, Exceeded, and Trial. For each subscription, you can see the usage data as well as the expiry and renewal dates. Click on a subscription in the Summary View to see the Details View of that subscription.
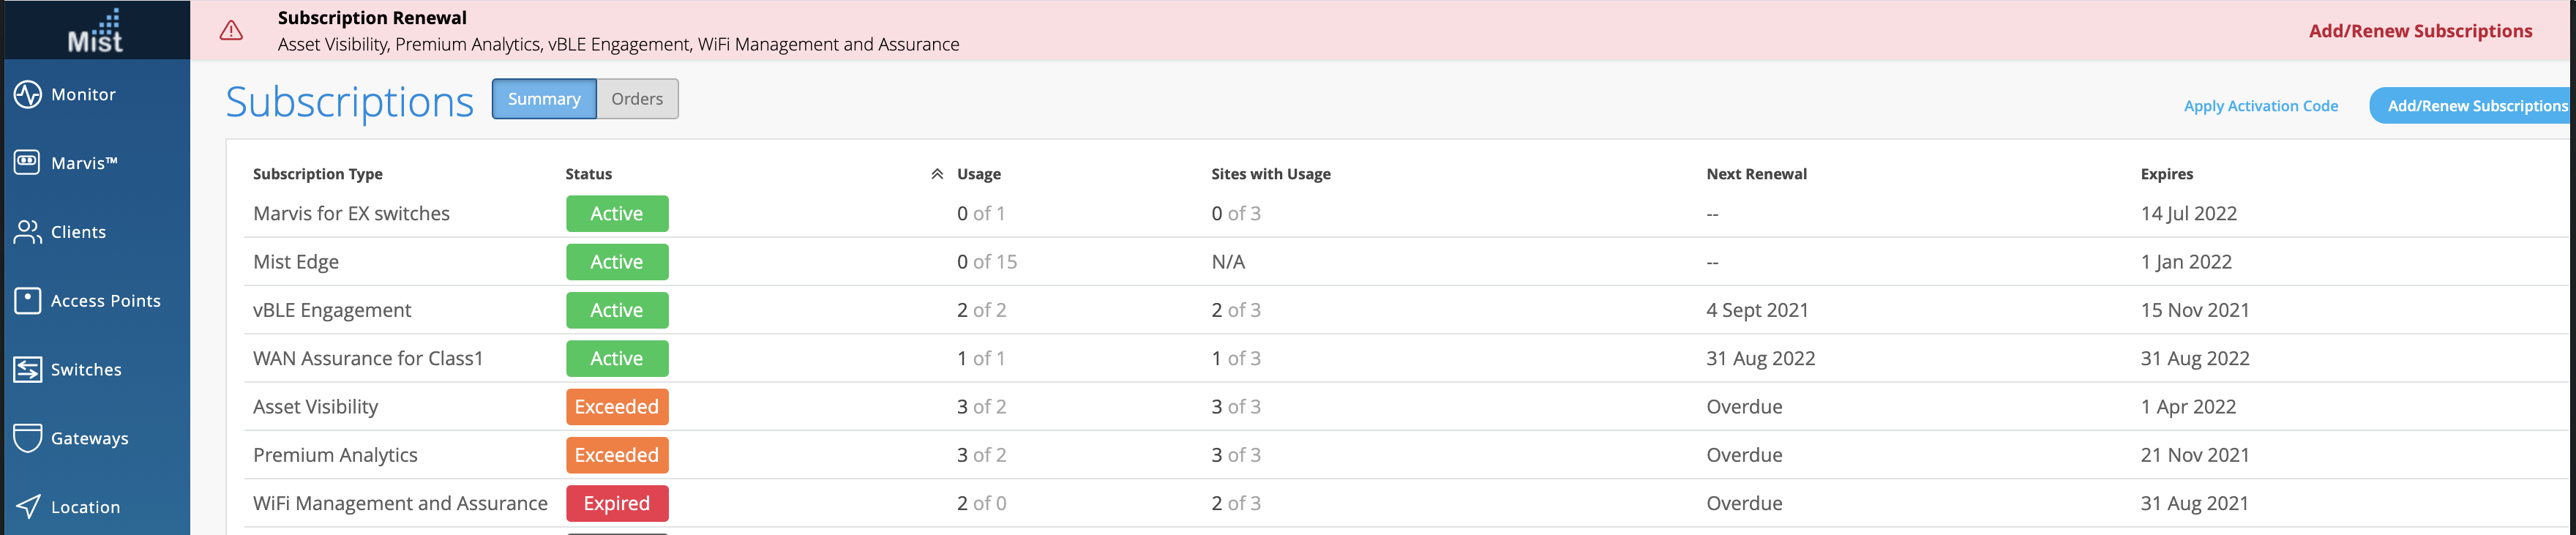
Details View
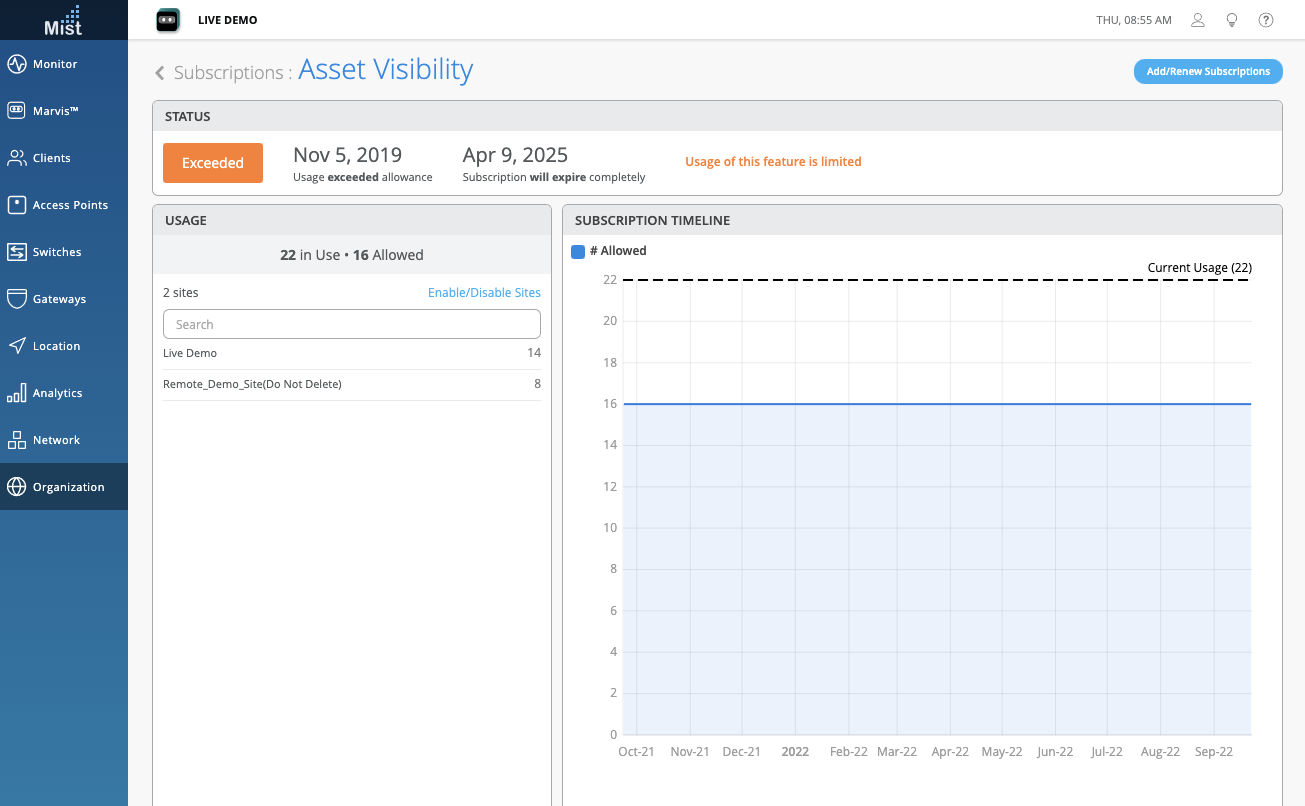
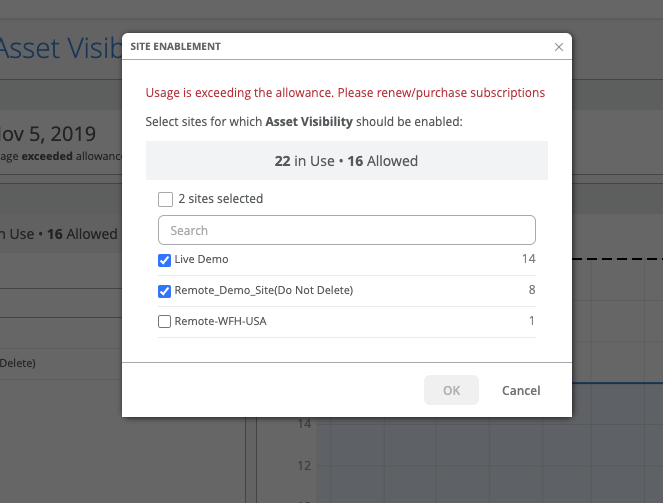
The main components of the Details View include a Status box, which provides the current status of the subscription (Active, Expired, Exceeded, and Trial), as well as the dates when the subscription will partially and fully expire. The Usage section lists out the number of devices with a claimed subscription compared to the total number of allowed subscriptions, as well as usage numbers per site on your organization. Select the Enable/Disable Sites button here to directly assign subscriptions to the desired sites. The Subscription Timeline gives a visual representation of subscription usage in your site. See the amount of subscriptions allowed compared to the current usage of subscriptions.
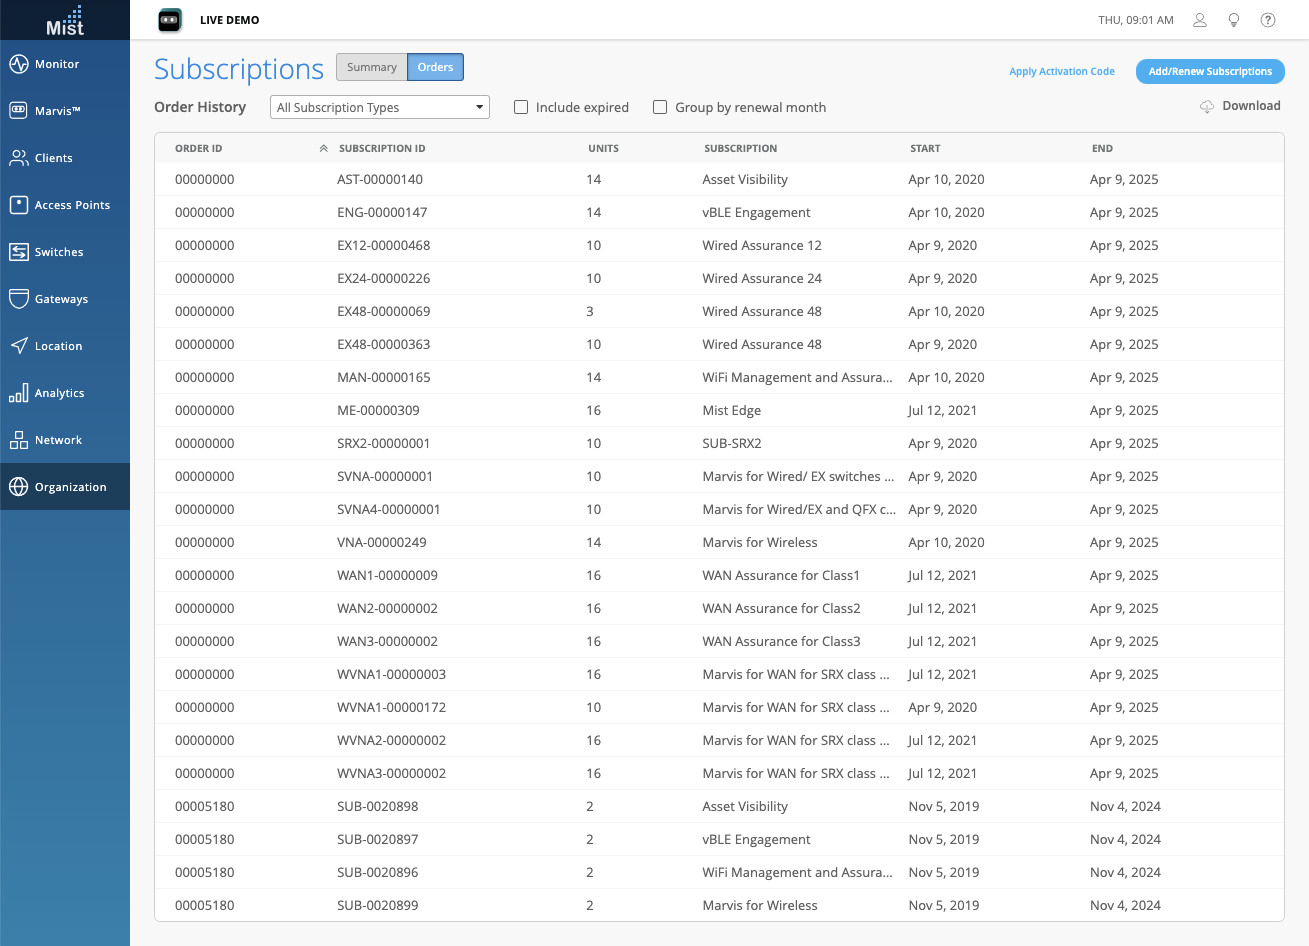
Orders View
In the Orders View (tab next to the Summary view) shows a detailed table view of subscriptions with order ID, subscription ID, # of units, subscription types, and start/end dates. Each order has a unique order ID which is shown as well. Filter through this list by selecting from the Subscription Types dropdown menu. You may also select to Include expired subscriptions or Group by renewal month. For a complete and easy to manage list, select the Download button which will download your list in a .CSV file format.
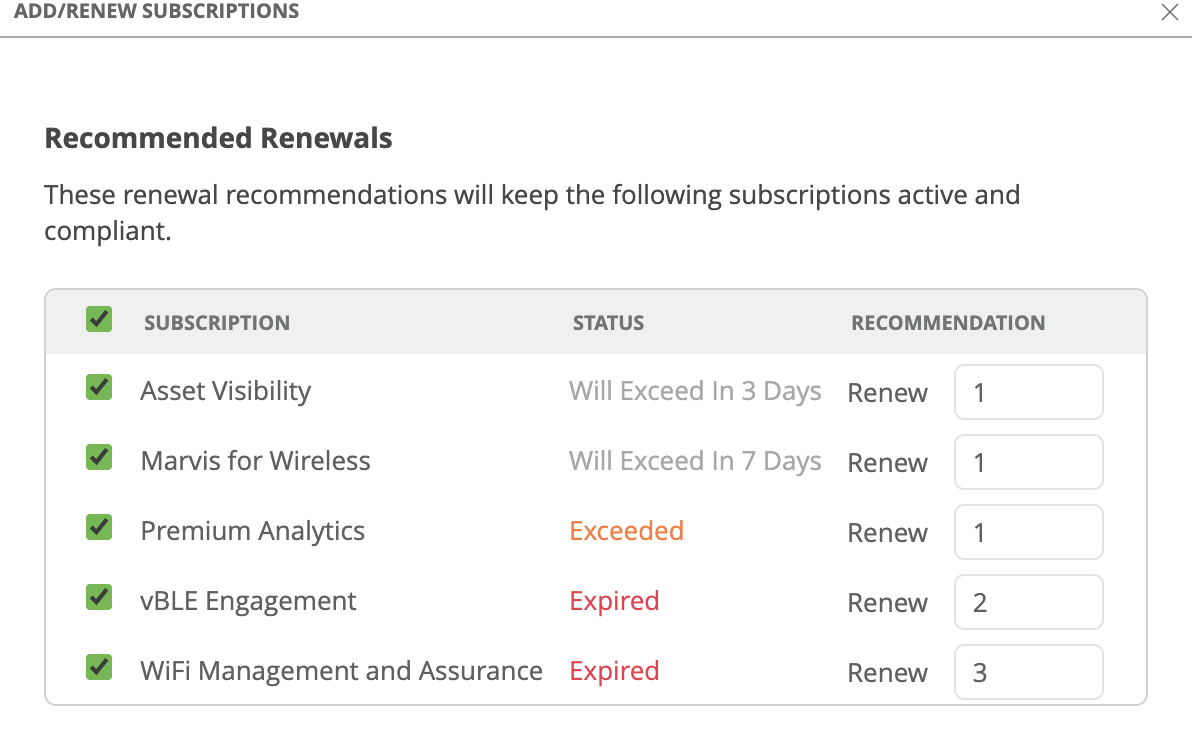
Add/Renew Modal
Access the Add/Renew Modal from any of the Subscriptions pages or directly through the notification banner. This modal shows a list of recommended renewal amounts to ensure subscriptions remain greater than the usage. From here, we give the recommended number of subscription renewals for each type, and allow you to directly Request via Email.
To learn more about the new Subscription redesign, please visit this page: https://www.mist.com/documentation/subscriptions-and-activations/
Simplify PPSK Options
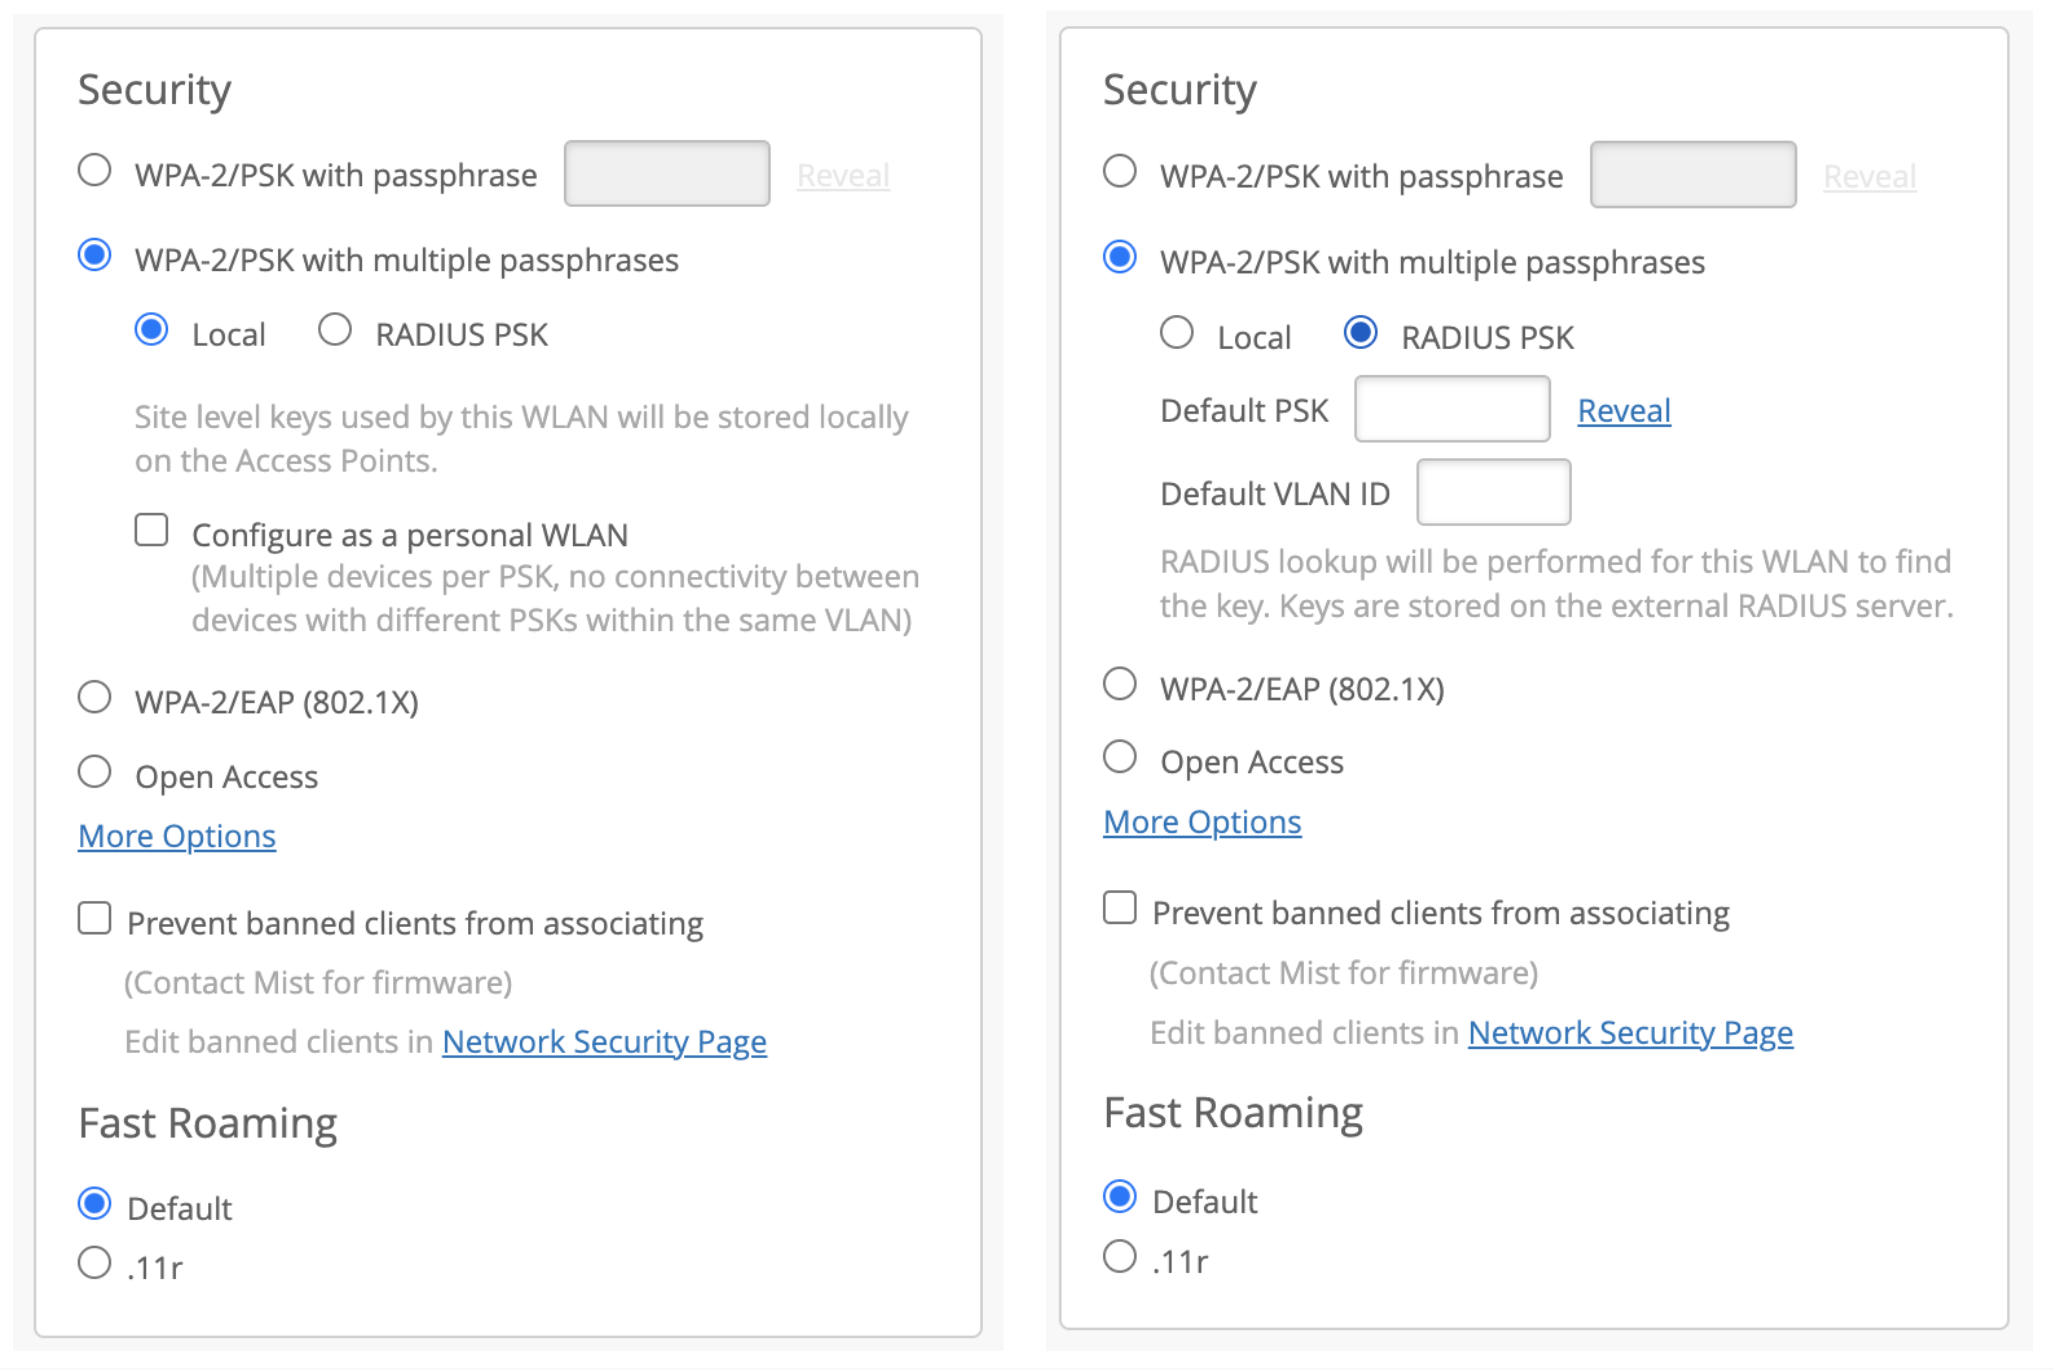
We have consolidated PPSK-related security options under the WLAN details page. The WPA-2/PSK with multiple passphrases security mode now has options for “Local” to represent pre-shared key usage, and “Radius PSK” to replace the WPA-2/PSK + PPSK RADIUS Mac Auth setting. These are just UI changes and will not impact any existing WLAN behaviors. Find the WLAN details page by navigating to Network > WLANs > Select or Create a WLAN.
Customer Engagement
Proximity Zones – General Release
Proximity Zones is an RSSI based feature where the users can create individual or grouped Proximity Zones per Mist AP. Proximity Zones have a similar function to normal polygon zones with the main difference being that Proximity Zones are triggered based on RSSI data from the clients. Earlier, this feature was announced as a BETA release but starting this week, it will be available for everyone.
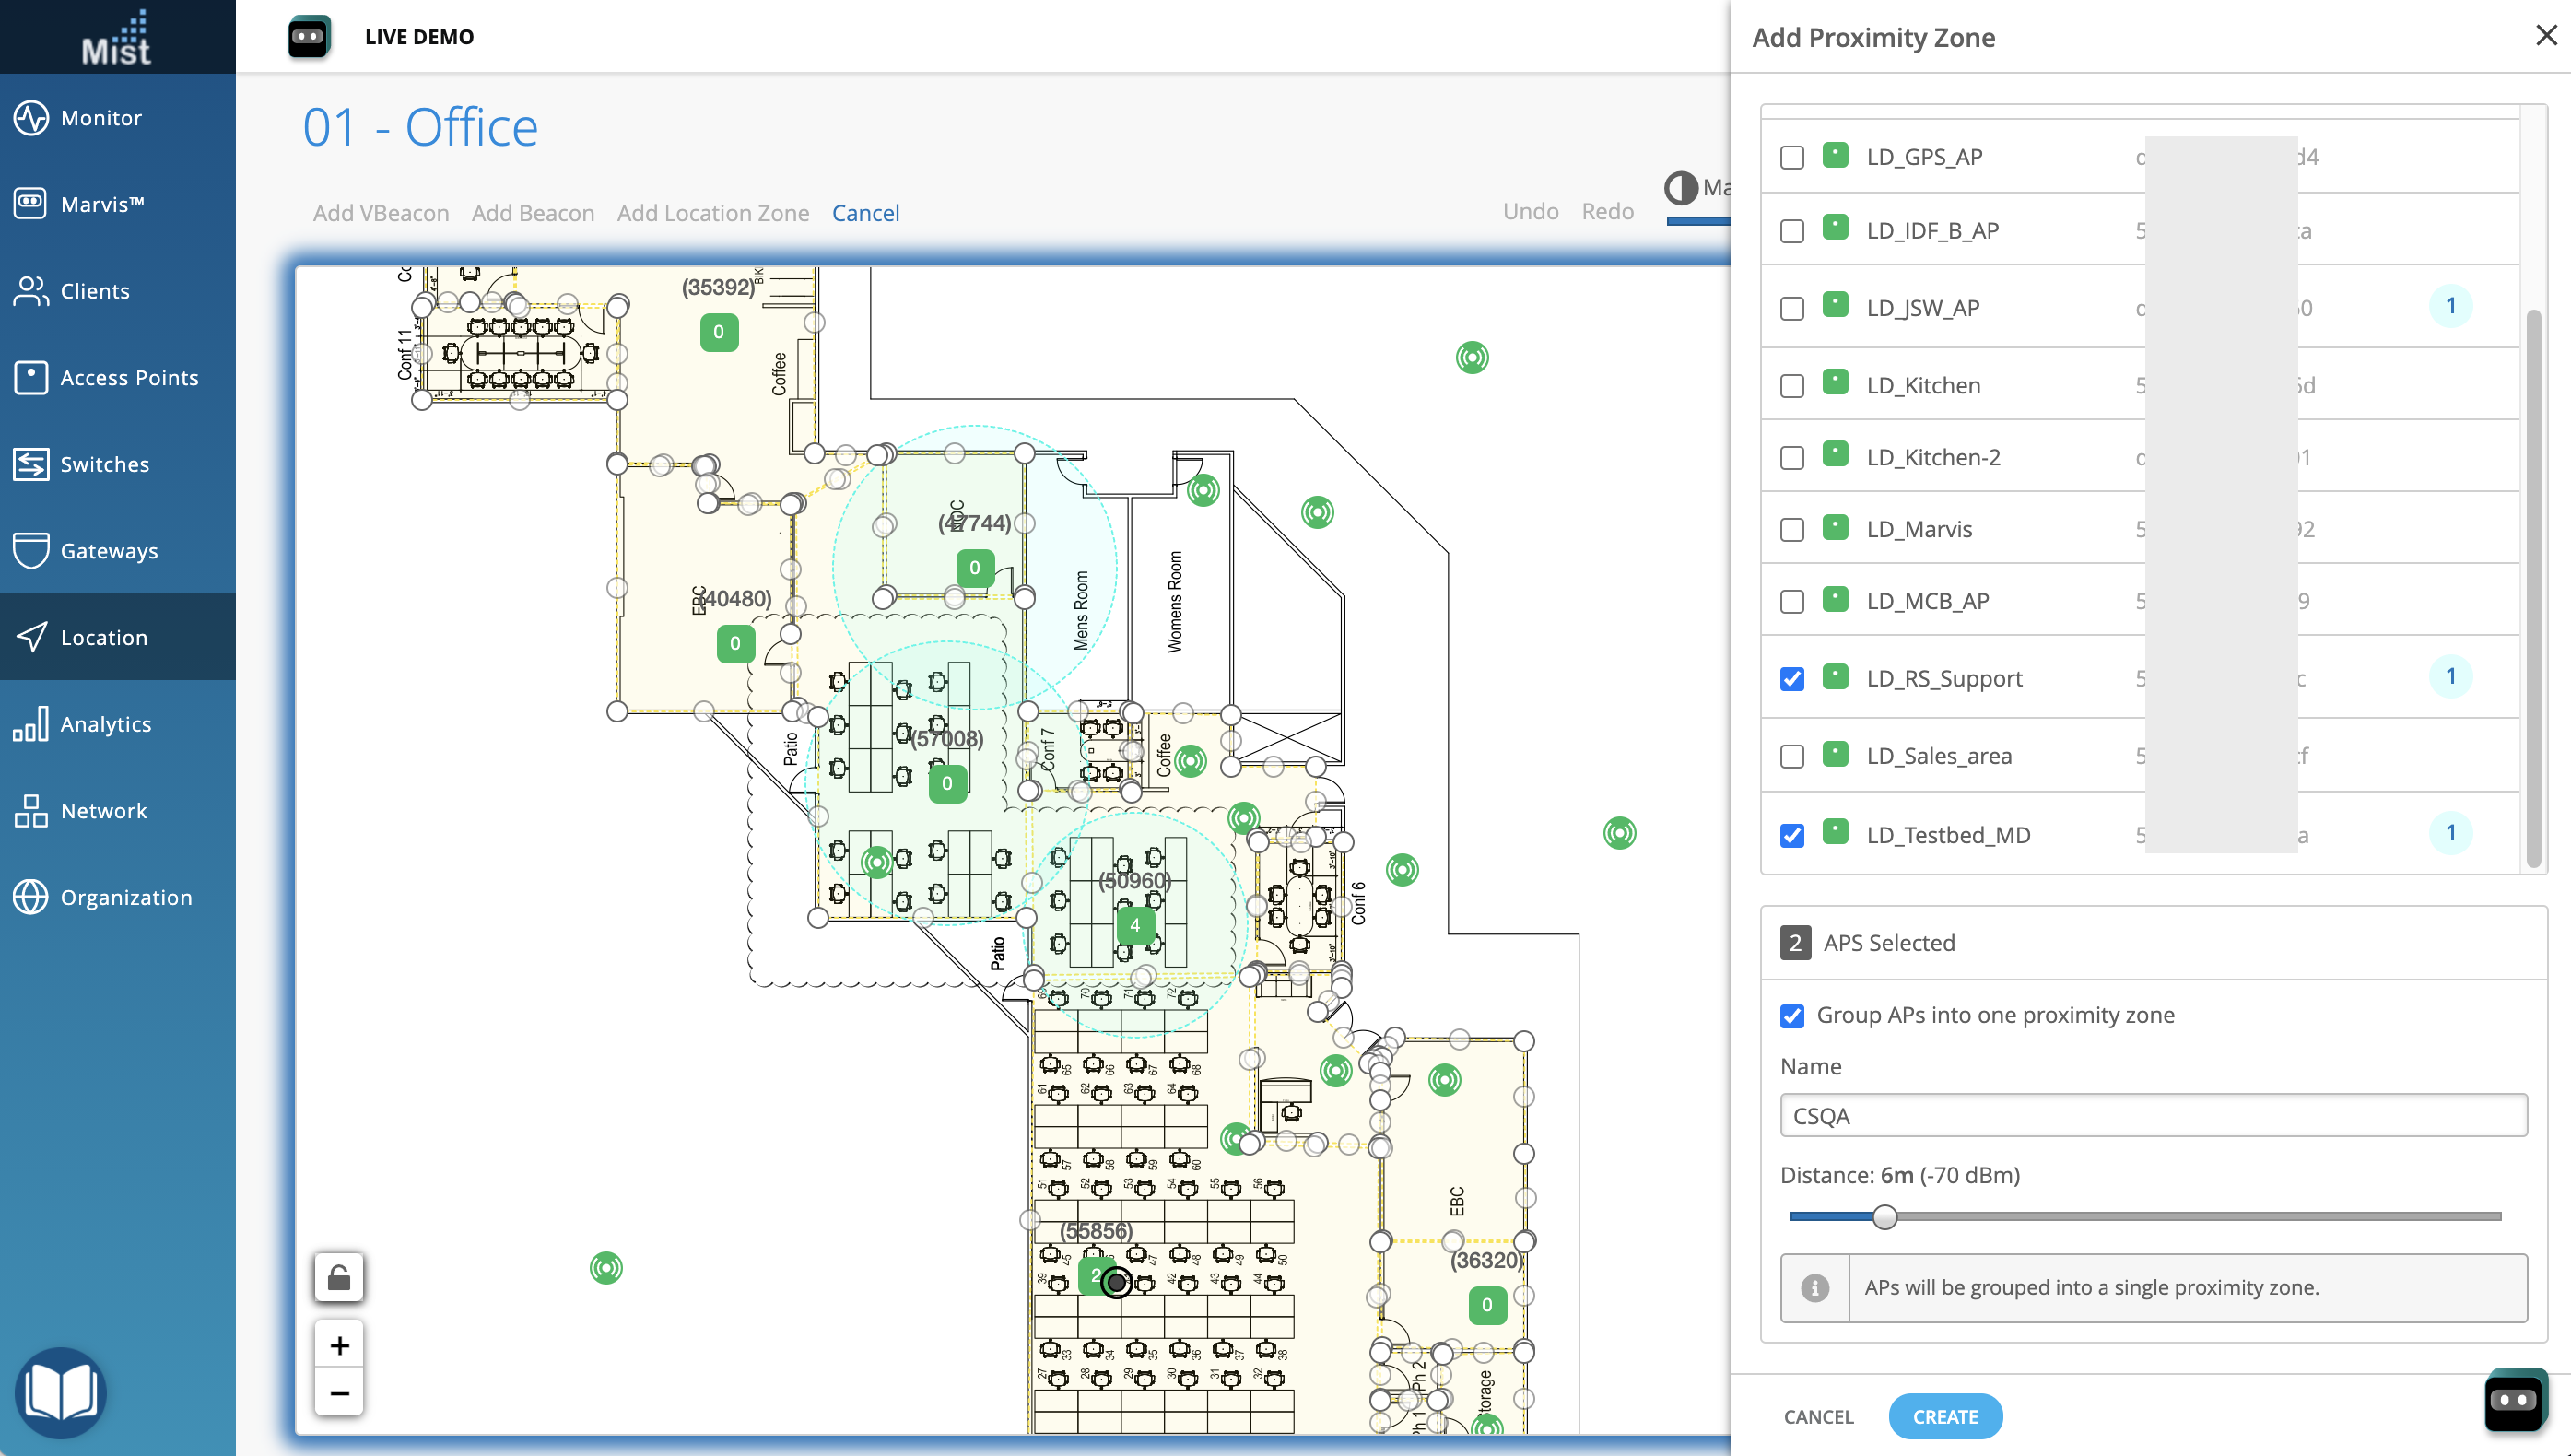
To create a Proximity zone, go to Location > Live View > Select Floorplan. Here, select the Beacons and Zones button and select Add Proximity Zone.
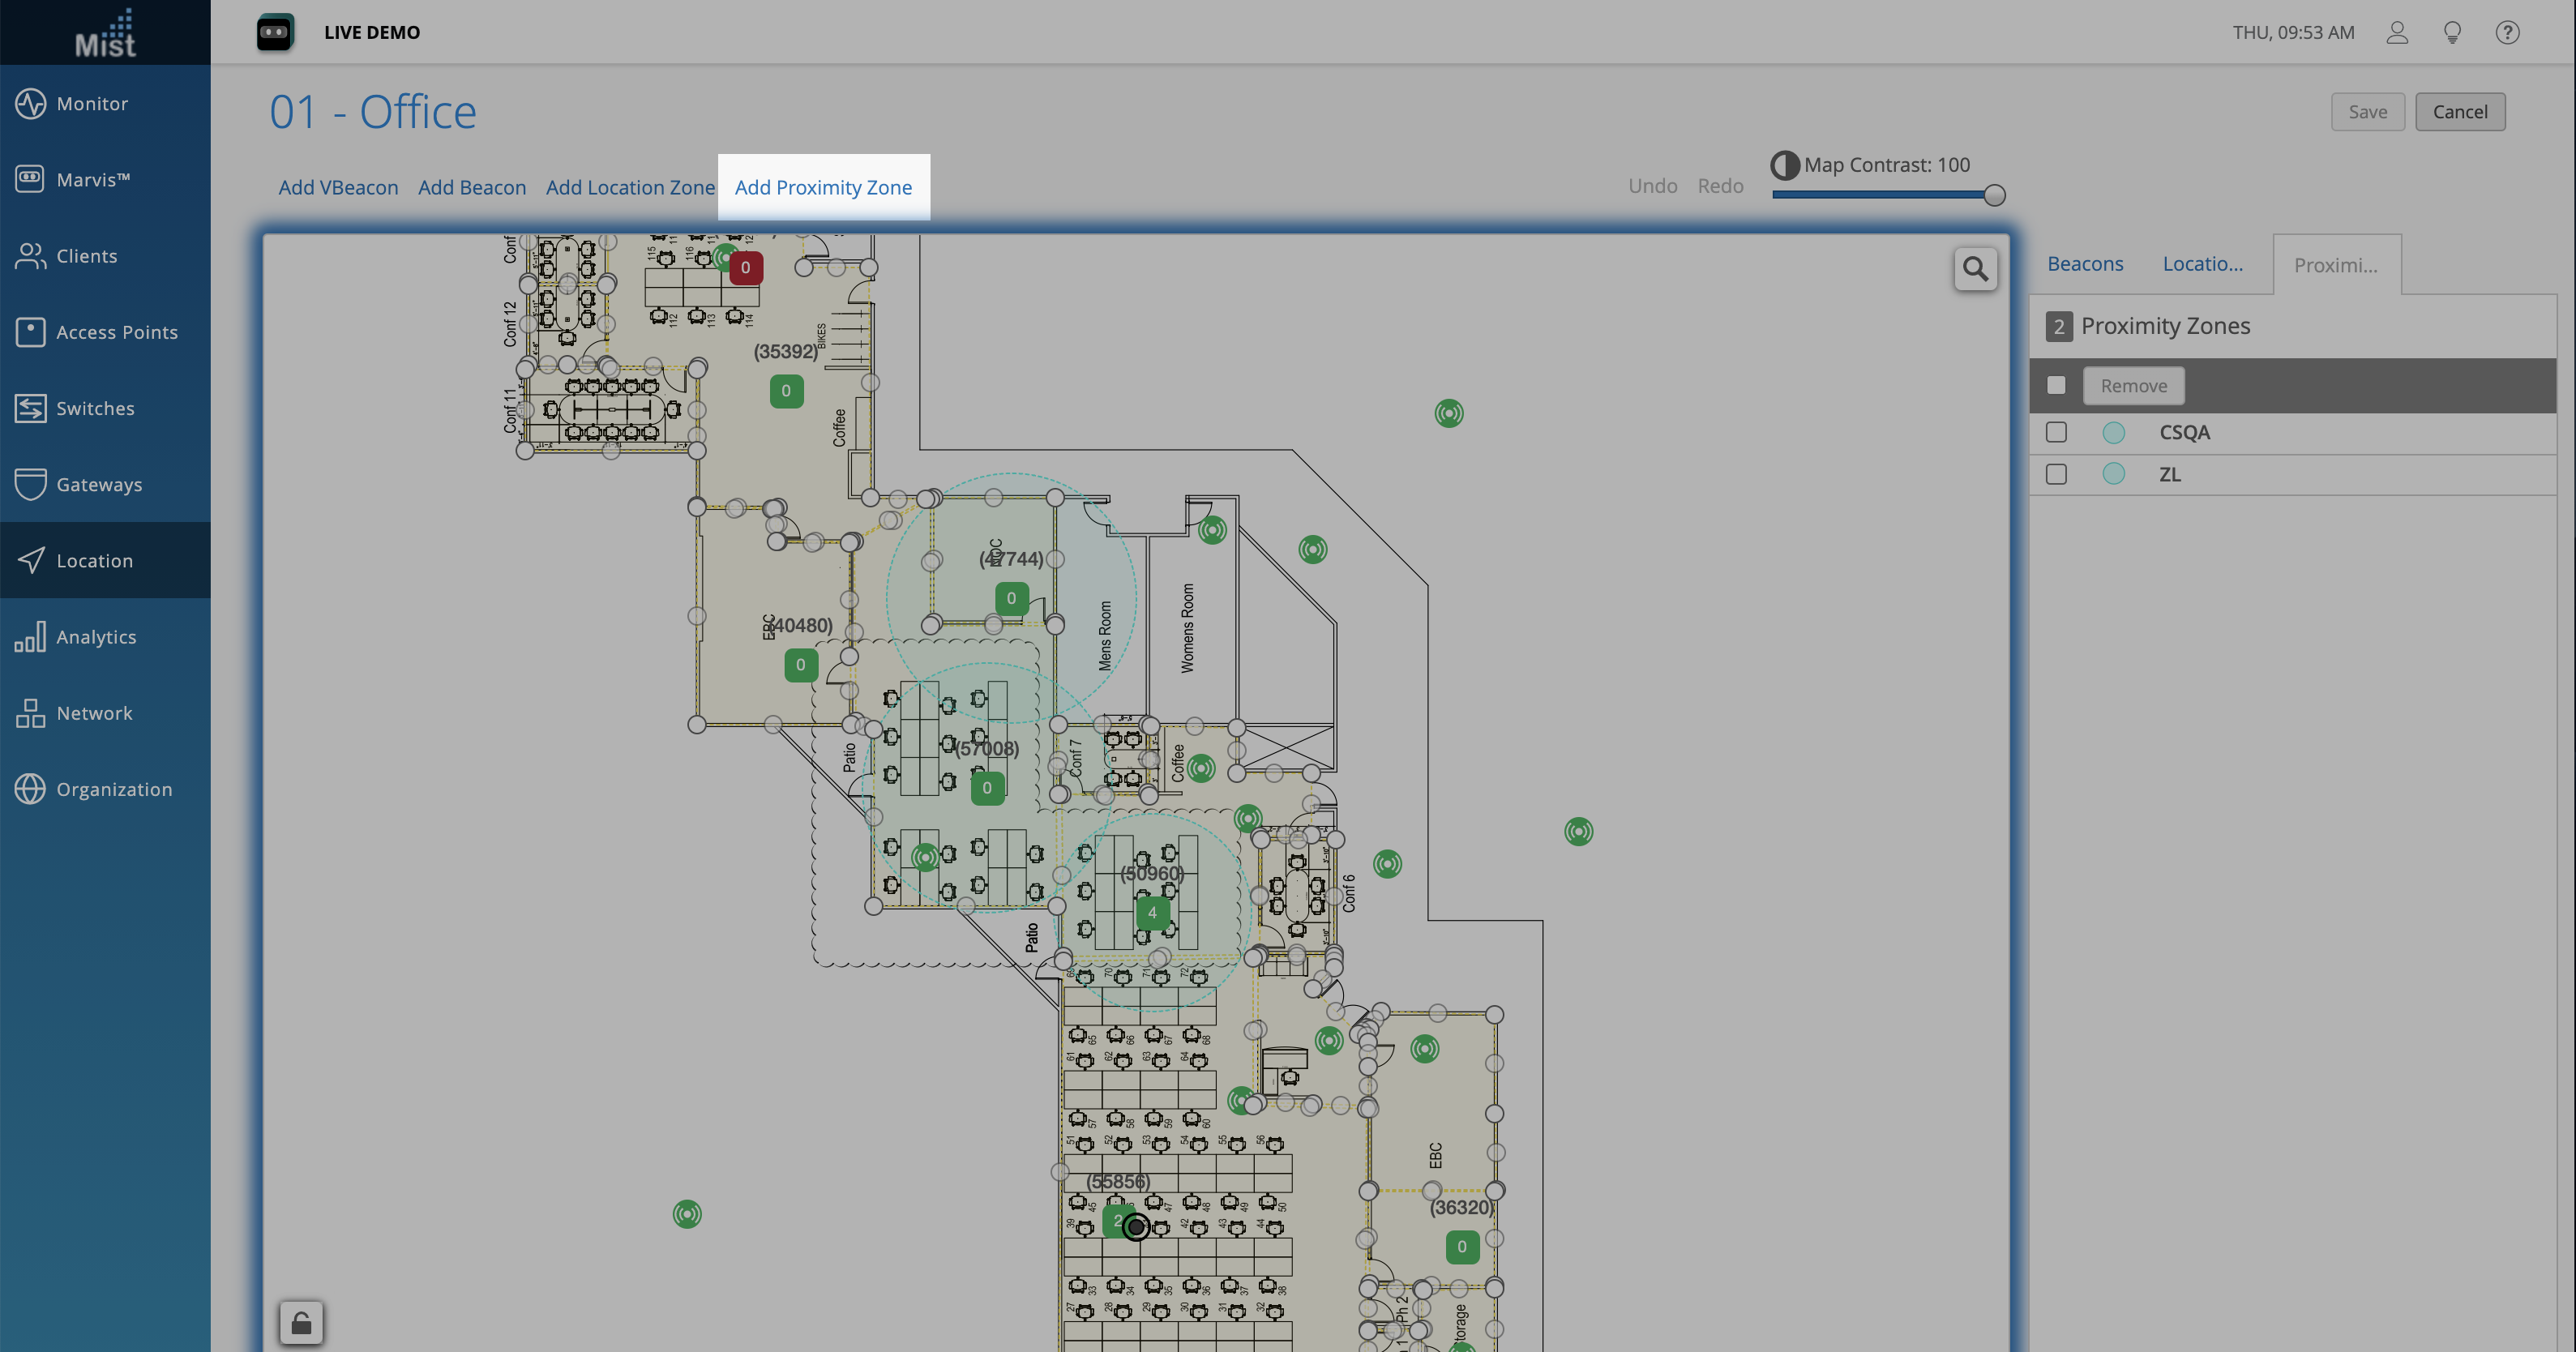
Here, you will see a list of all APs on the site. Select the desired APs to create a proximity zone for, and set the distance of the zone. You may group all selected APs into one zone, or create individual zones for each AP selected. Once finished, click on Create.
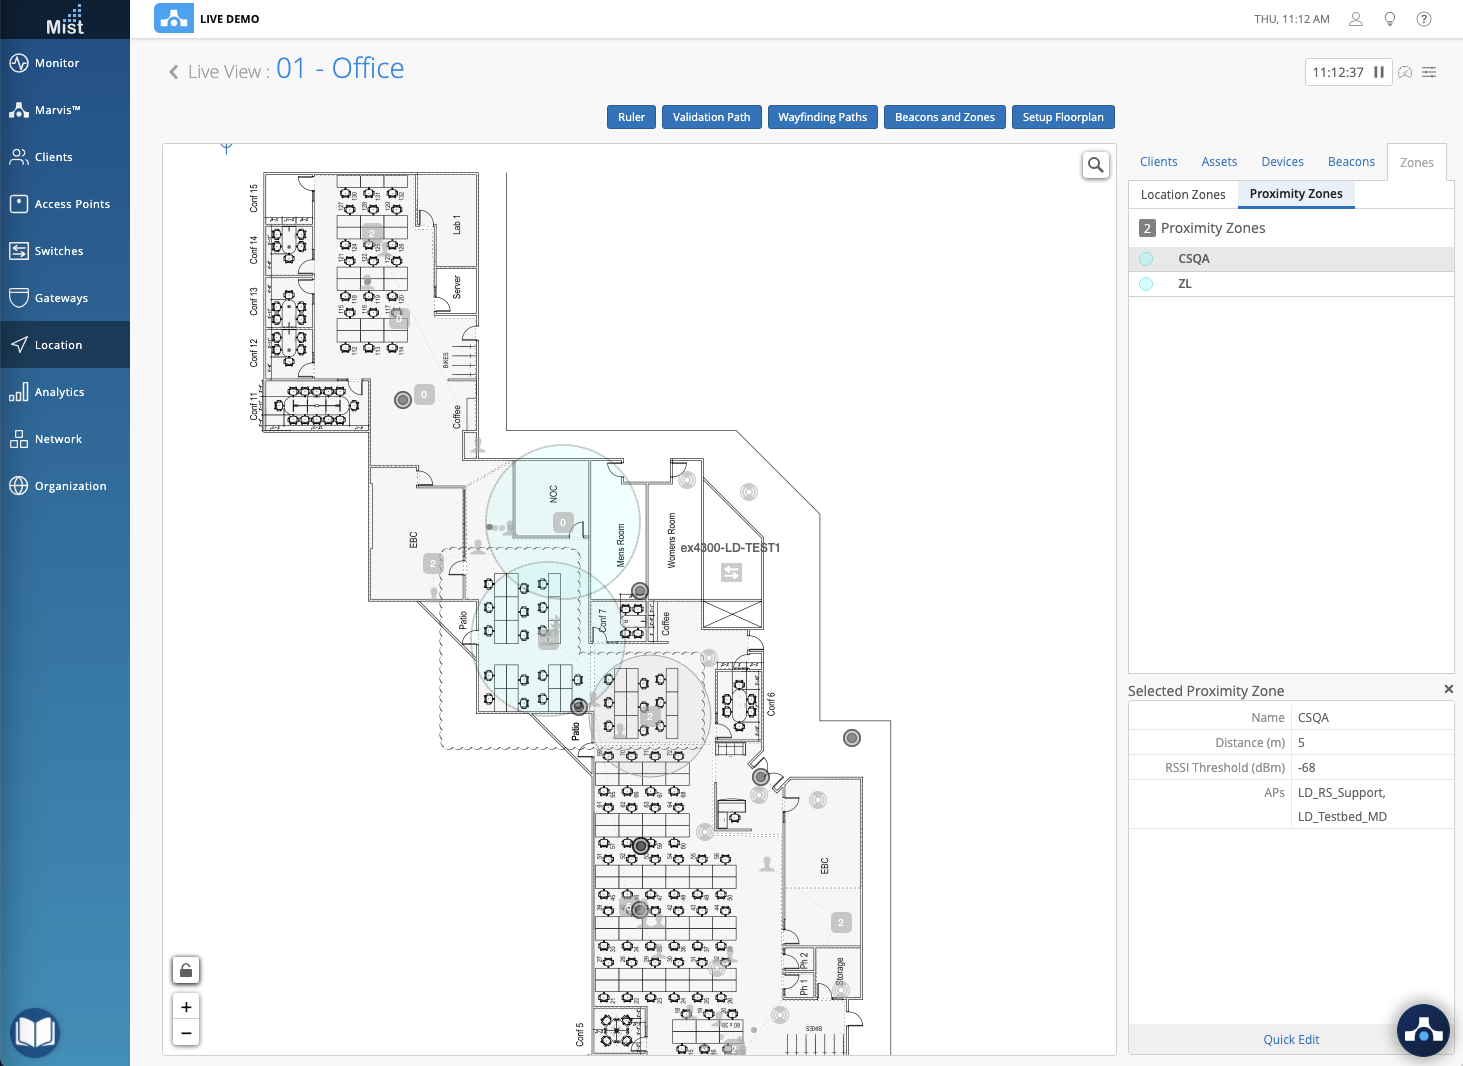
Select the Zones tab, click on Proximity Zones, and see the full list of created Proximity Zones. Clicking on one will highlight the Zones on your map. Here, we can see a created zone named “CSQA” which include the APs “LD_RS_Support” and “LD_Testbed_MD”
Currently you can collect data from a variety of sources like SDK Clients, Named Assets and Connected/Unconnected WiFi clients. Below are the main features that support Proximity Zones data:
Location Live View: See above
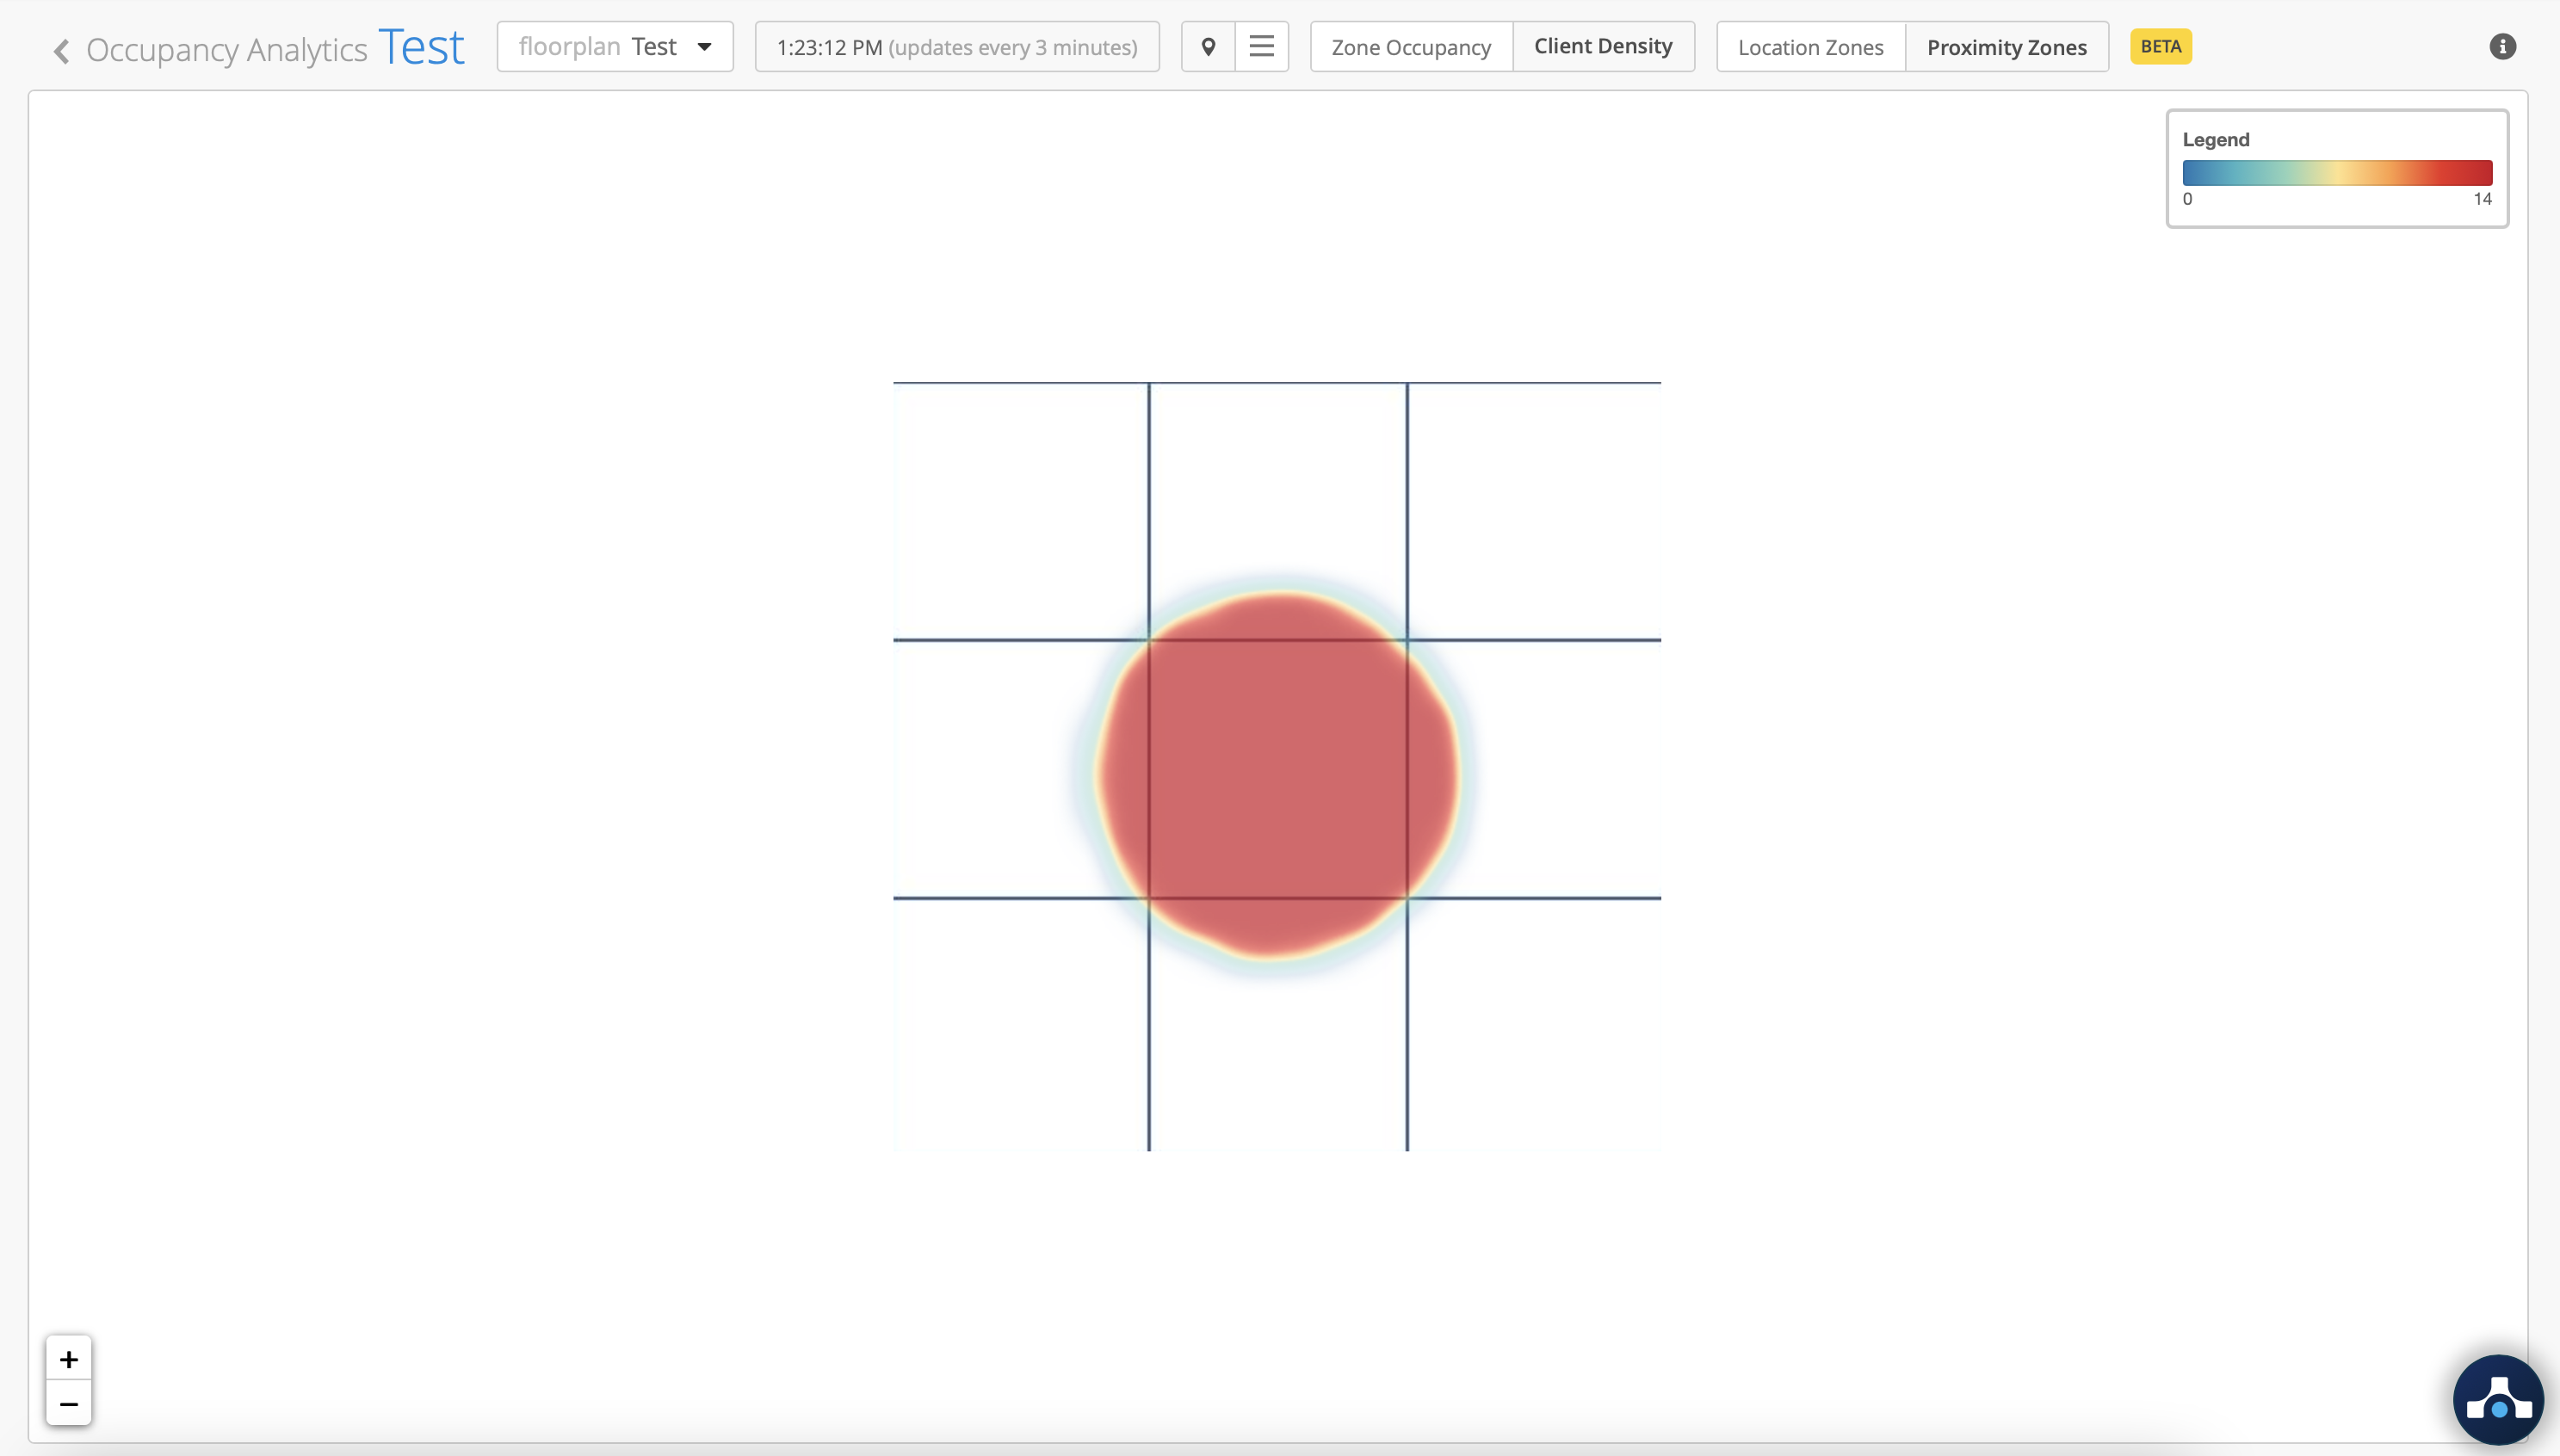
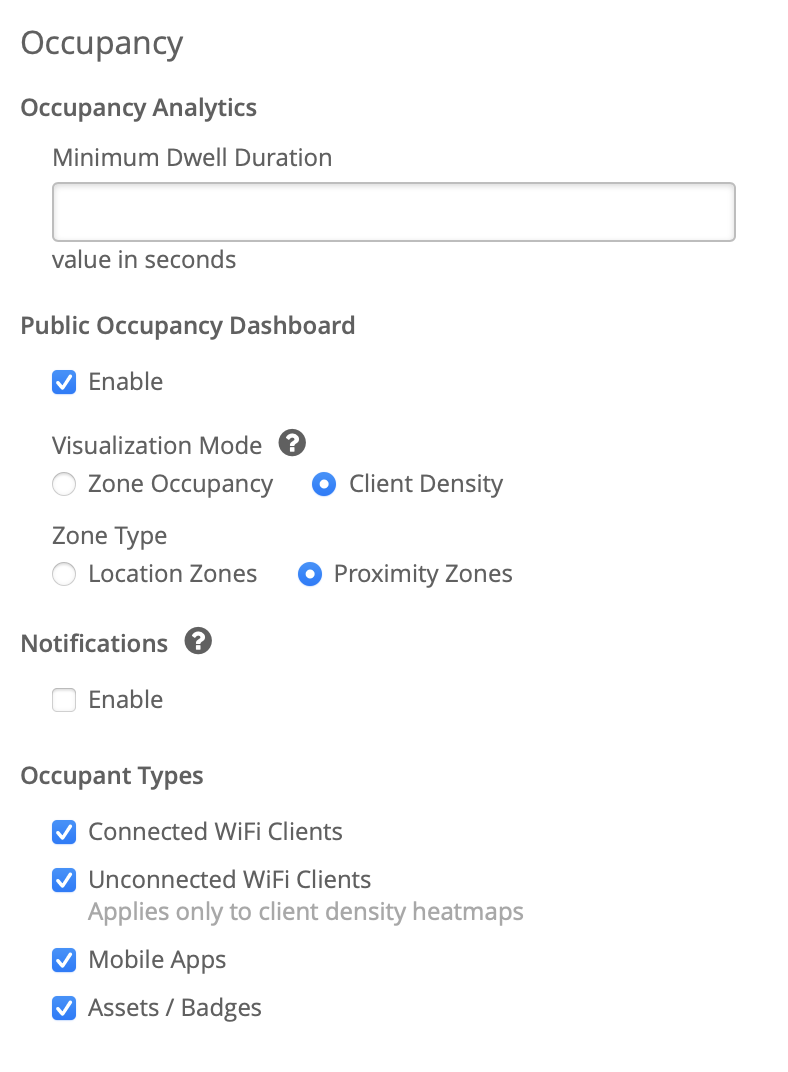
Occupancy Analytics (Analytics > Occupancy Analytics > Client Density > Proximity Zones)
Public Occupancy Dashboard (Organization > Site Configuration > Occupancy > Public Occupancy Dashboard)
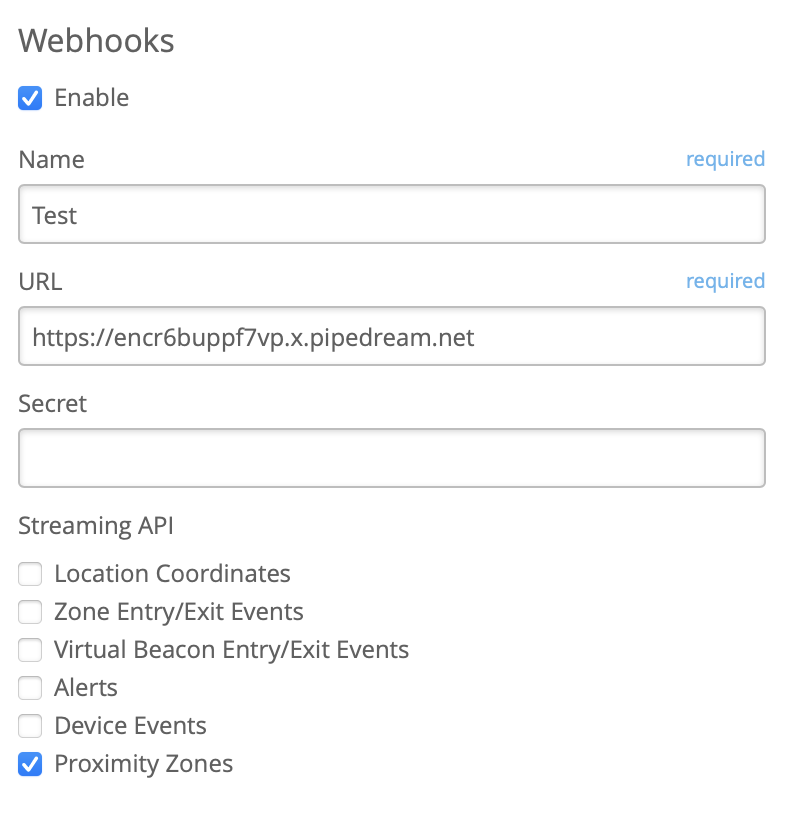
Webhooks (Organization > Site Configuration > Webhooks)
Be sure to select the Proximity Zones check box to get webhook events.
To learn more about Proximity zones, please visit this documentation page: https://www.mist.com/documentation/proximity-zones/
Marvis
Port Flap Actions – Disable Port
Earlier we announced the Marvis Action to catch cases where your EX switch is experiencing continuous flapping on particular ports. Starting this week we are excited to introduce the ability to disable these flapping ports directly through the Action Dashboard page.
In your Actions Dashboard page, find the Port Flap actions under the Switch section. Select your desired item with the check box and the Disable Port button will appear. Clicking on this will bring up a Disable Port modal that lists out the ports available for you to disable.
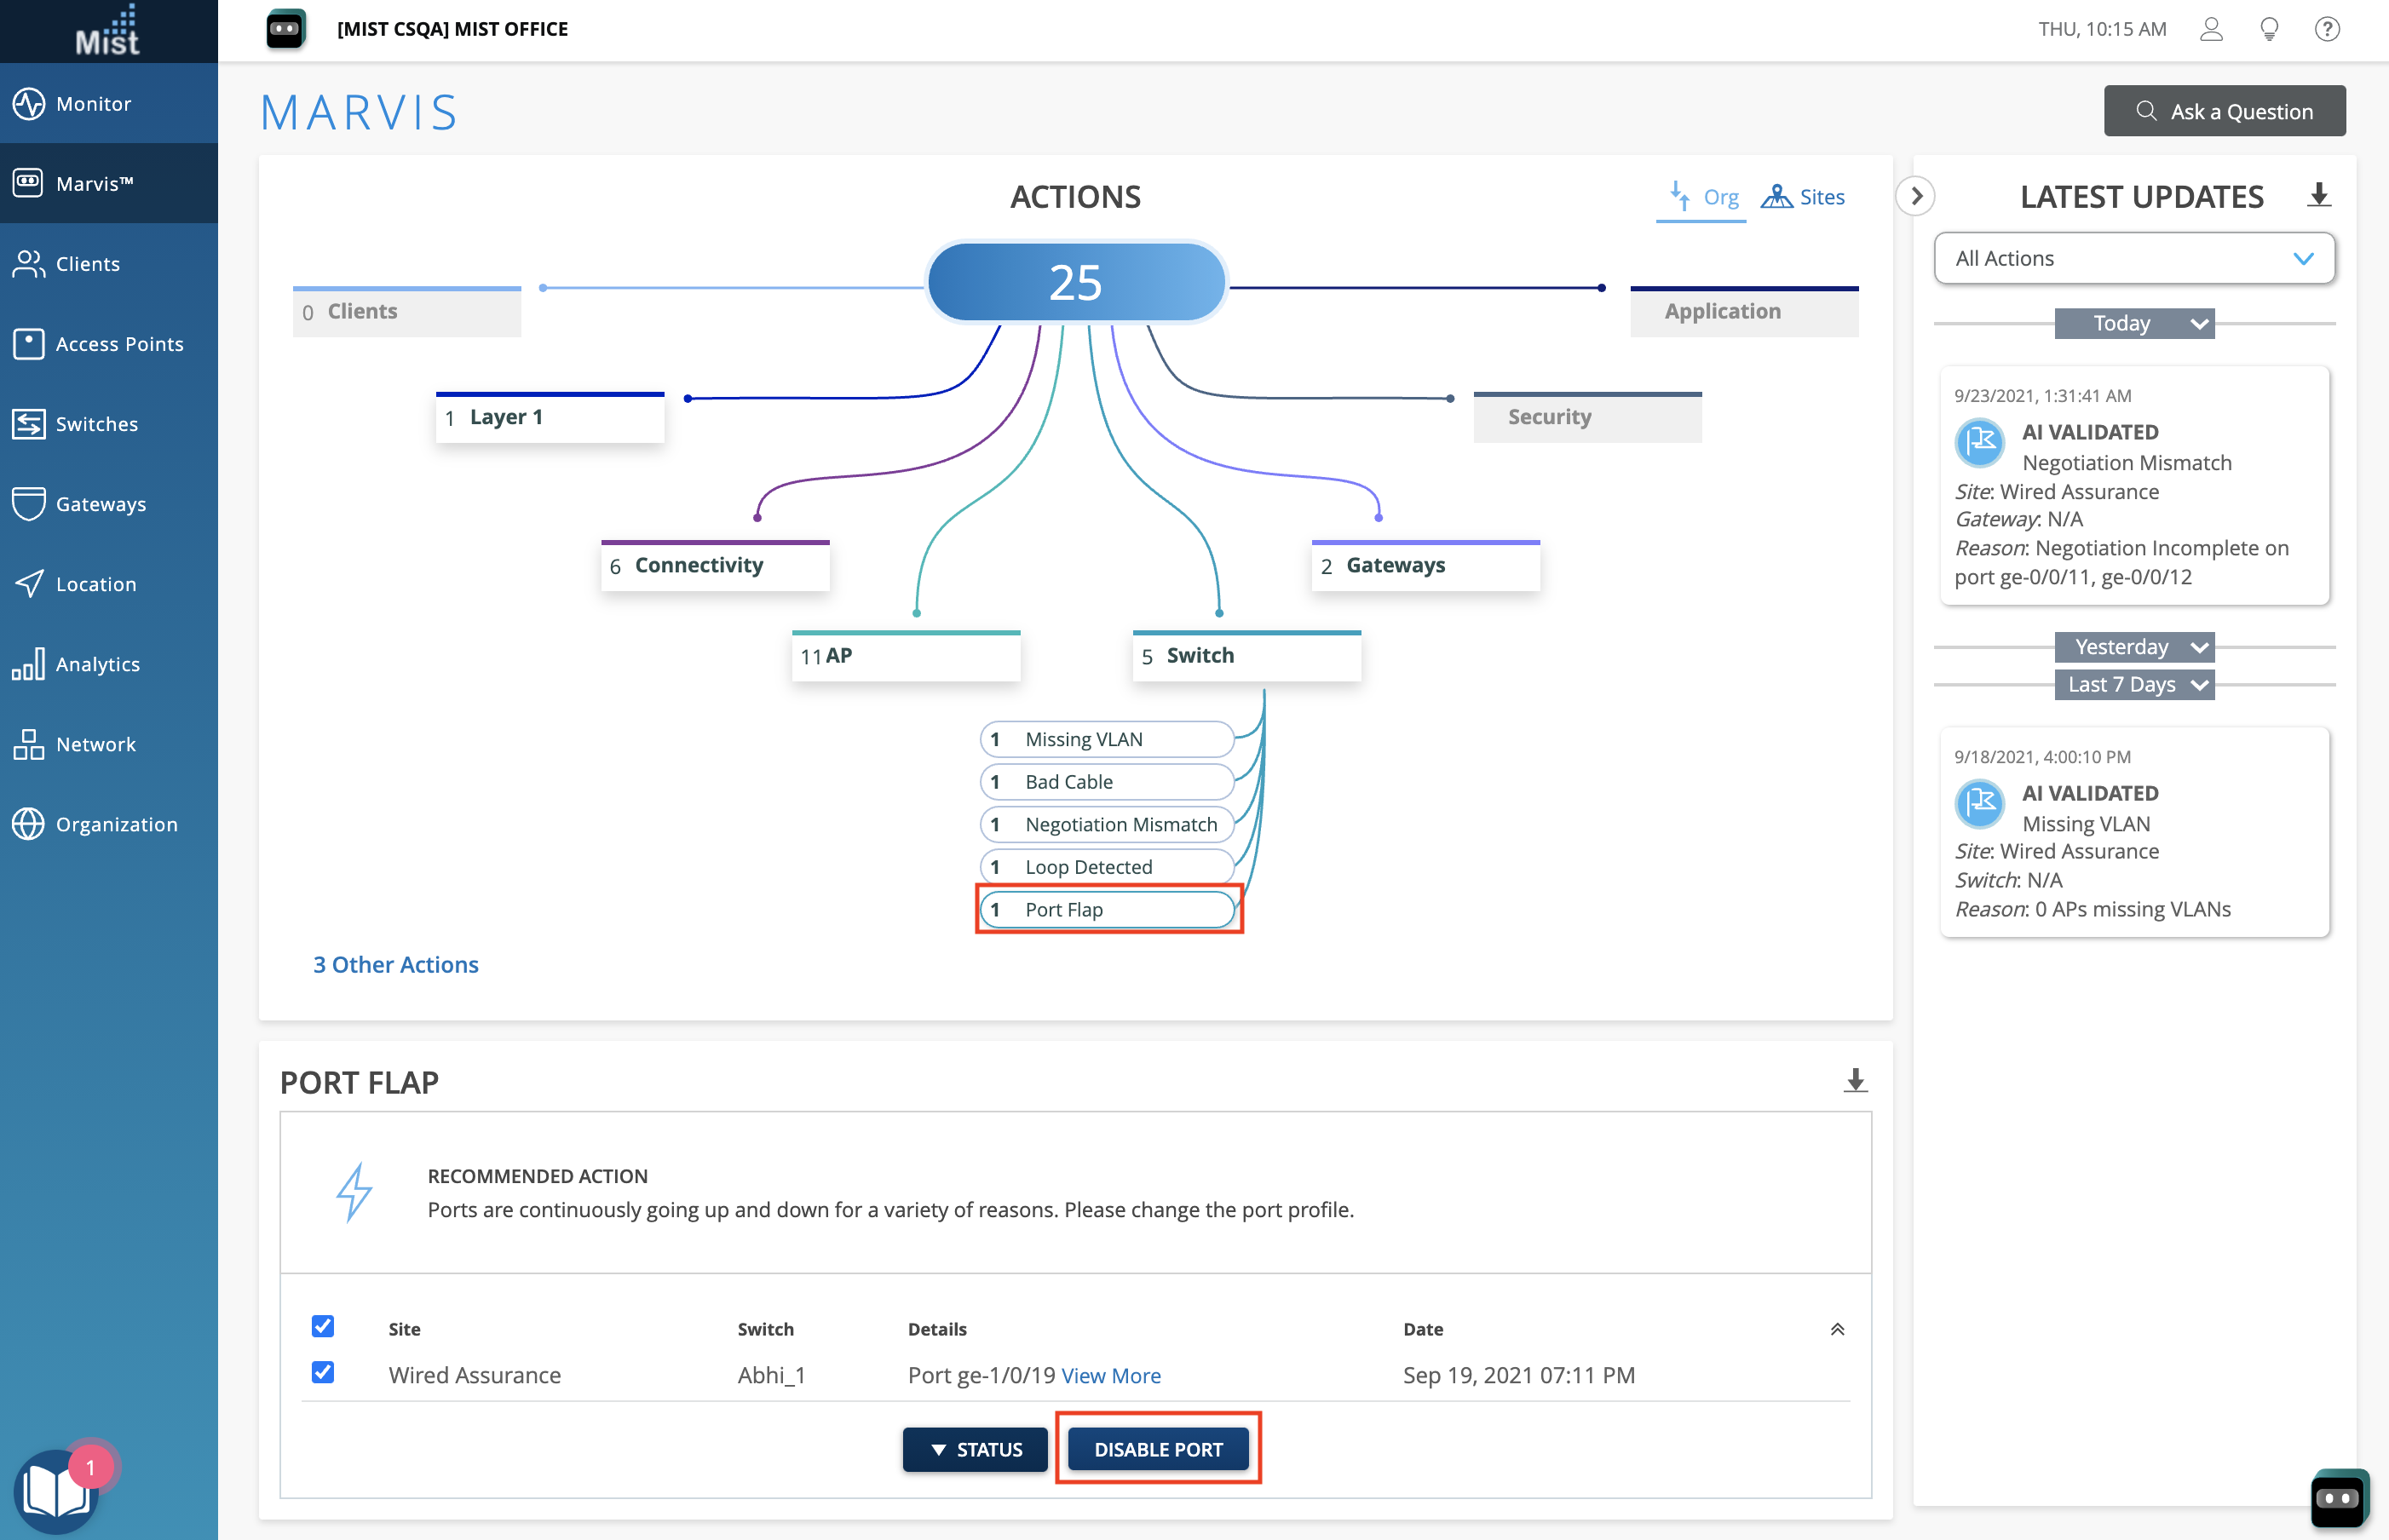
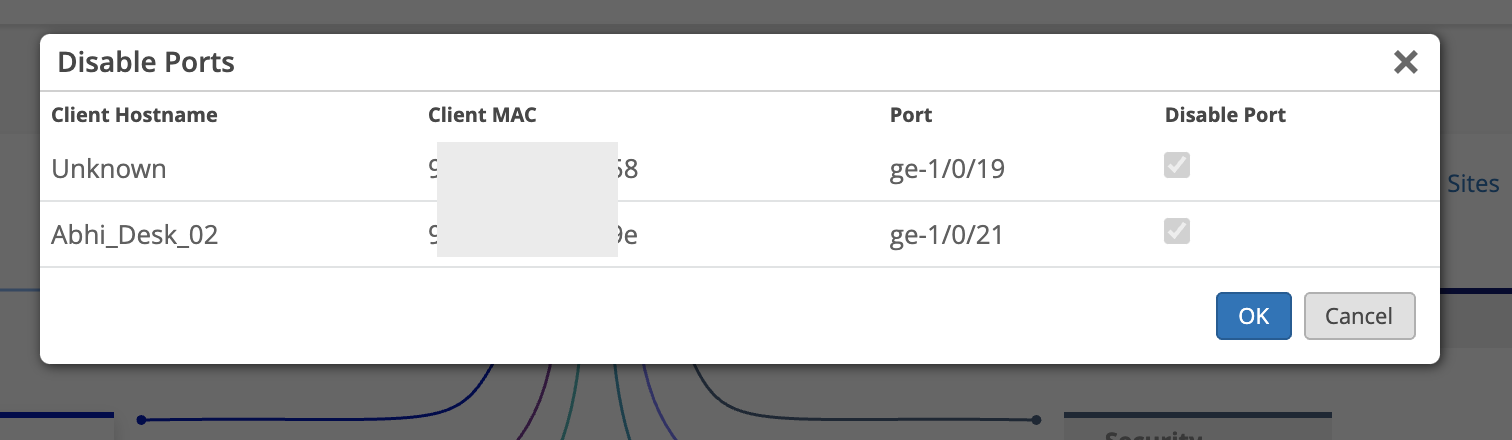
Please note that if a port is already disabled (either previously through the Action Dashboard or manually from the Switch Details page), the check box will be grayed out already.
Once you select OK, the port configurations on the selected ports will change to disabled and those ports will be down. You can re-enable these ports from the Switch Details page by selecting the port directly and editing the port configurations.
Actions – Redirect URLs
For easier navigation when troubleshooting issues caught by the Action Dashboard, we have added redirect URLs directly in the Actions Details box for several Marvis Actions. Clicking on these will open up a new tab and load the relevant page on our Dashboard UI for you to modify your configurations.
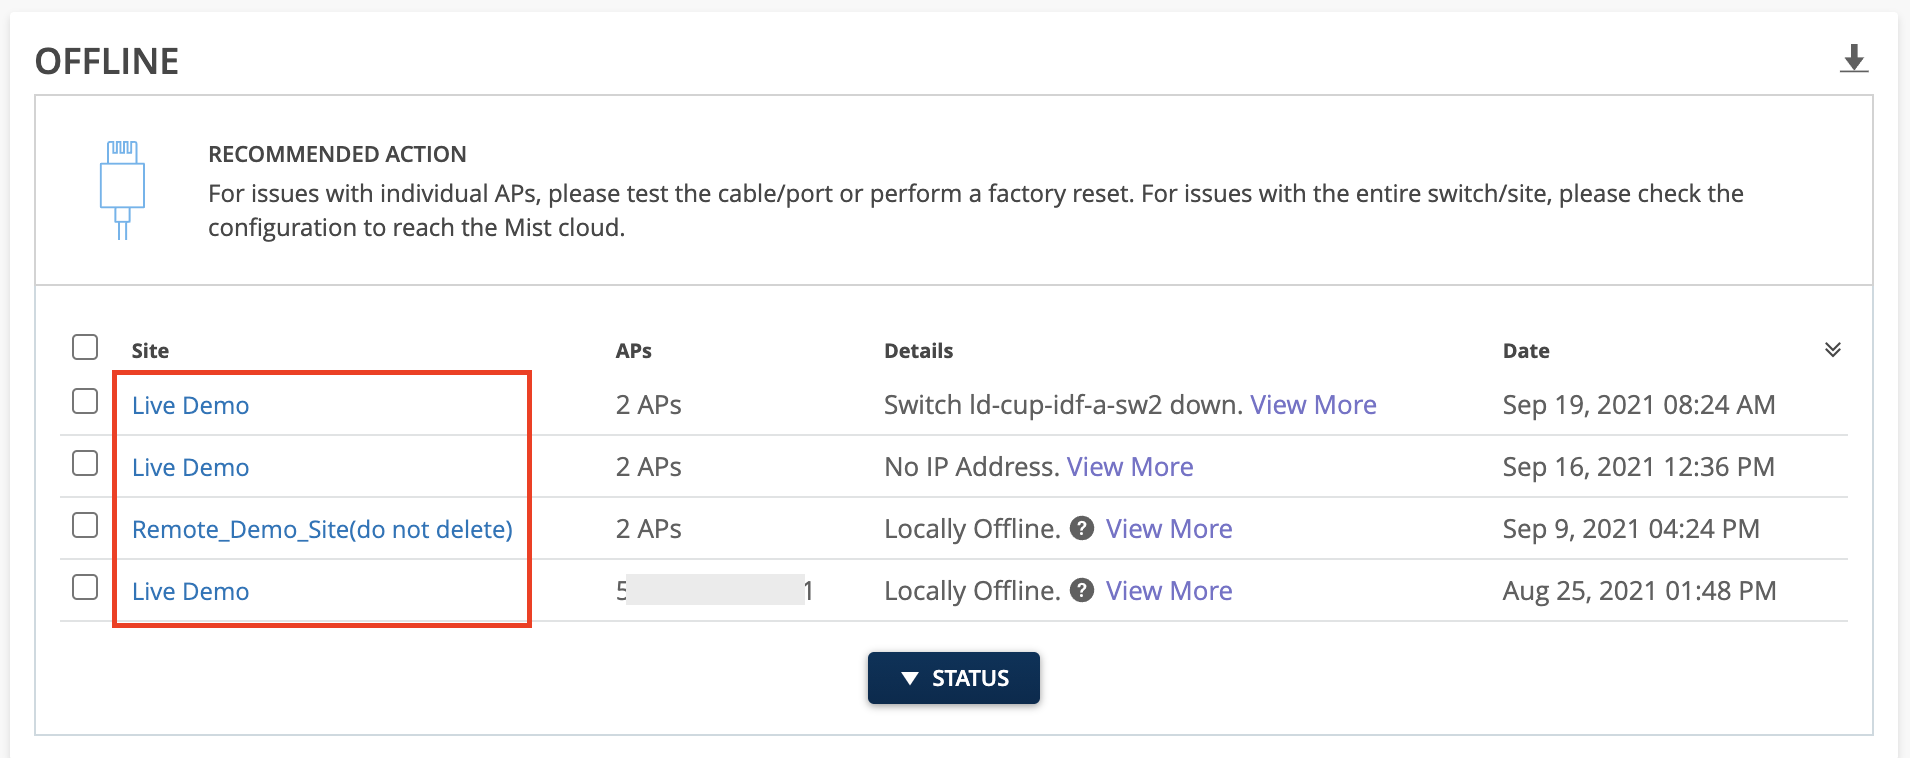
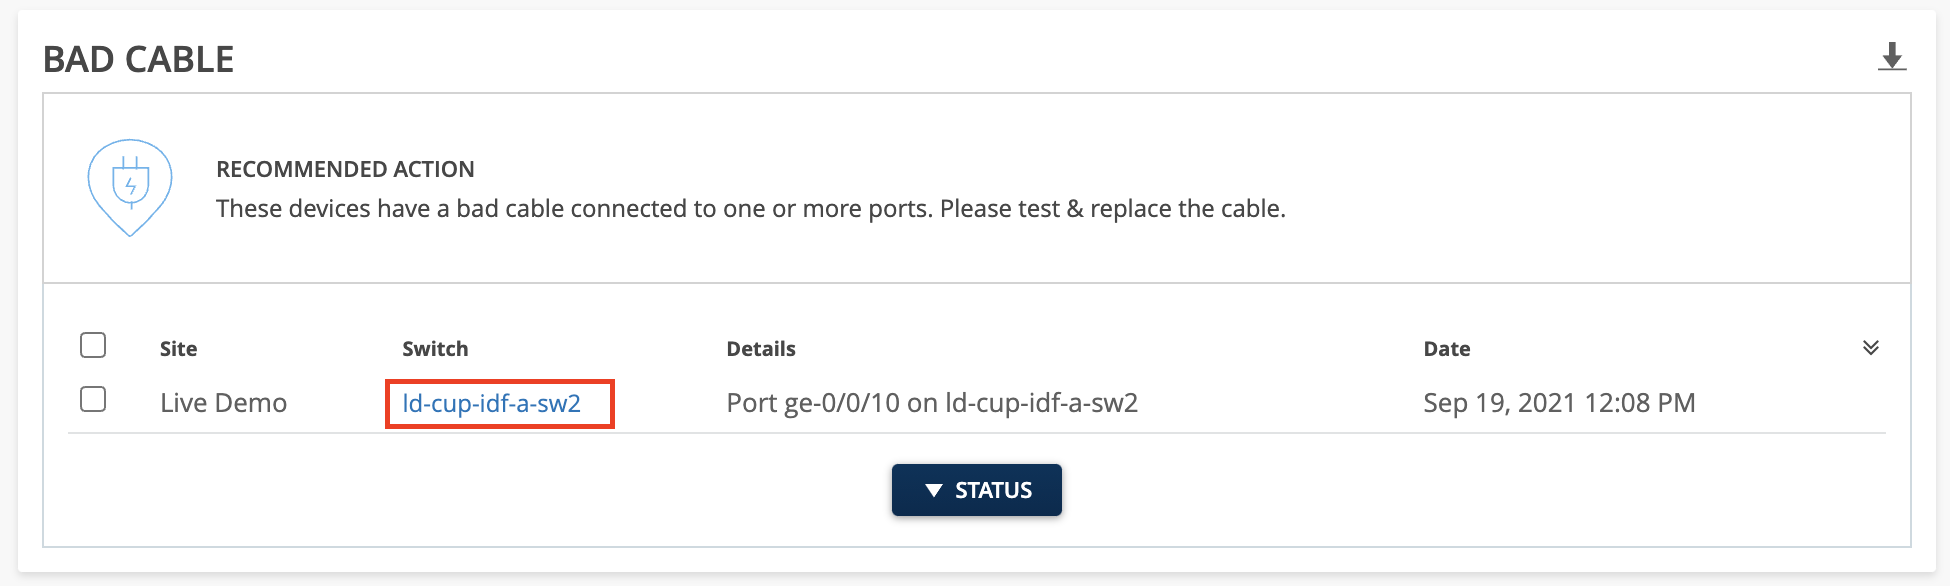
For example, when looking at AP – Offline issues, you can now click on the site link to open up the AP list page for that particular site. And when looking at Switch – Bad Cable issues, you can click on the Switch hyperlink to open the Switch Details page for the selected switch.
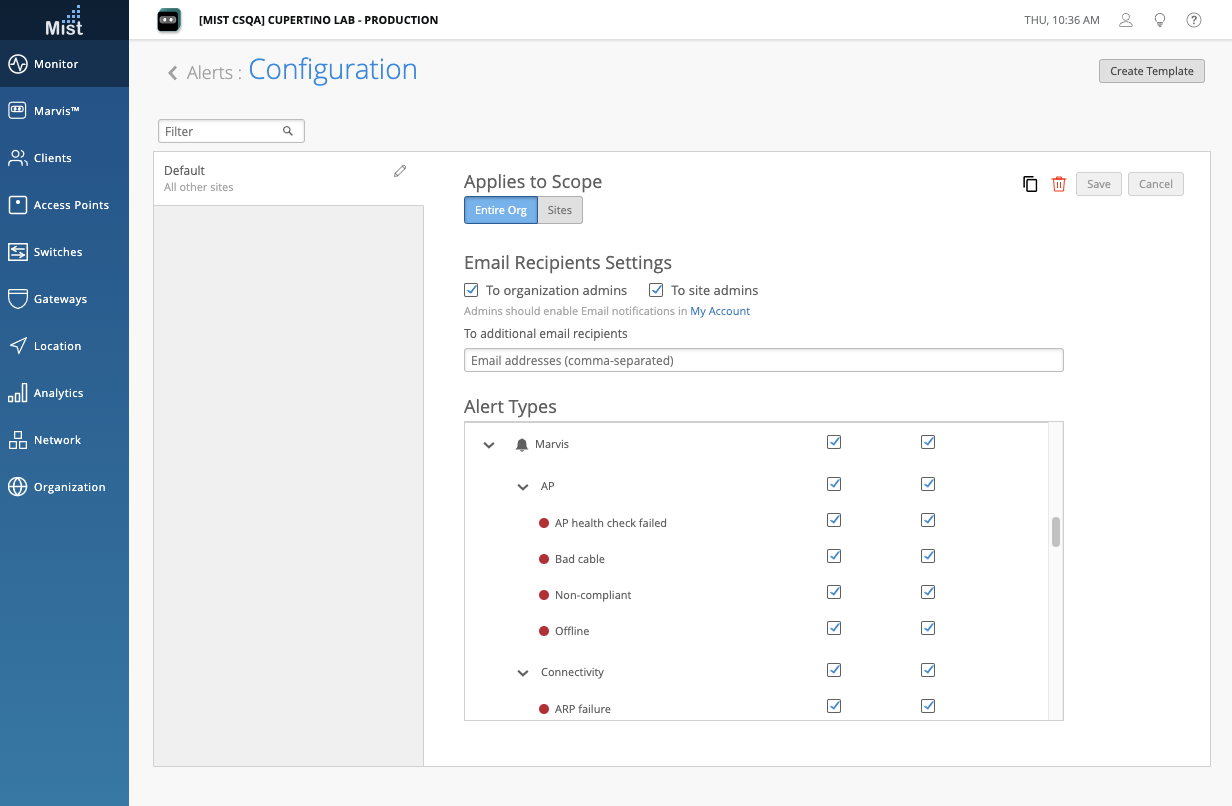
Actions – Email Notifications
Email alerts for Marvis Actions have been available for many Actions such as those in the AP and Switch sections of the Action Dashboard. Starting this week, we are enabling Email alerts for the remaining Marvis Actions as well. To configure Email alerts for your Actions, make sure you have an Alerts template set up (Monitor > Alerts. See this page for details: https://www.mist.com/documentation/alerts/ ) and enable the Email Notifications for Marvis alerts.
Now whenever your Action Dashboard detects an action, you will also be notified through Email:
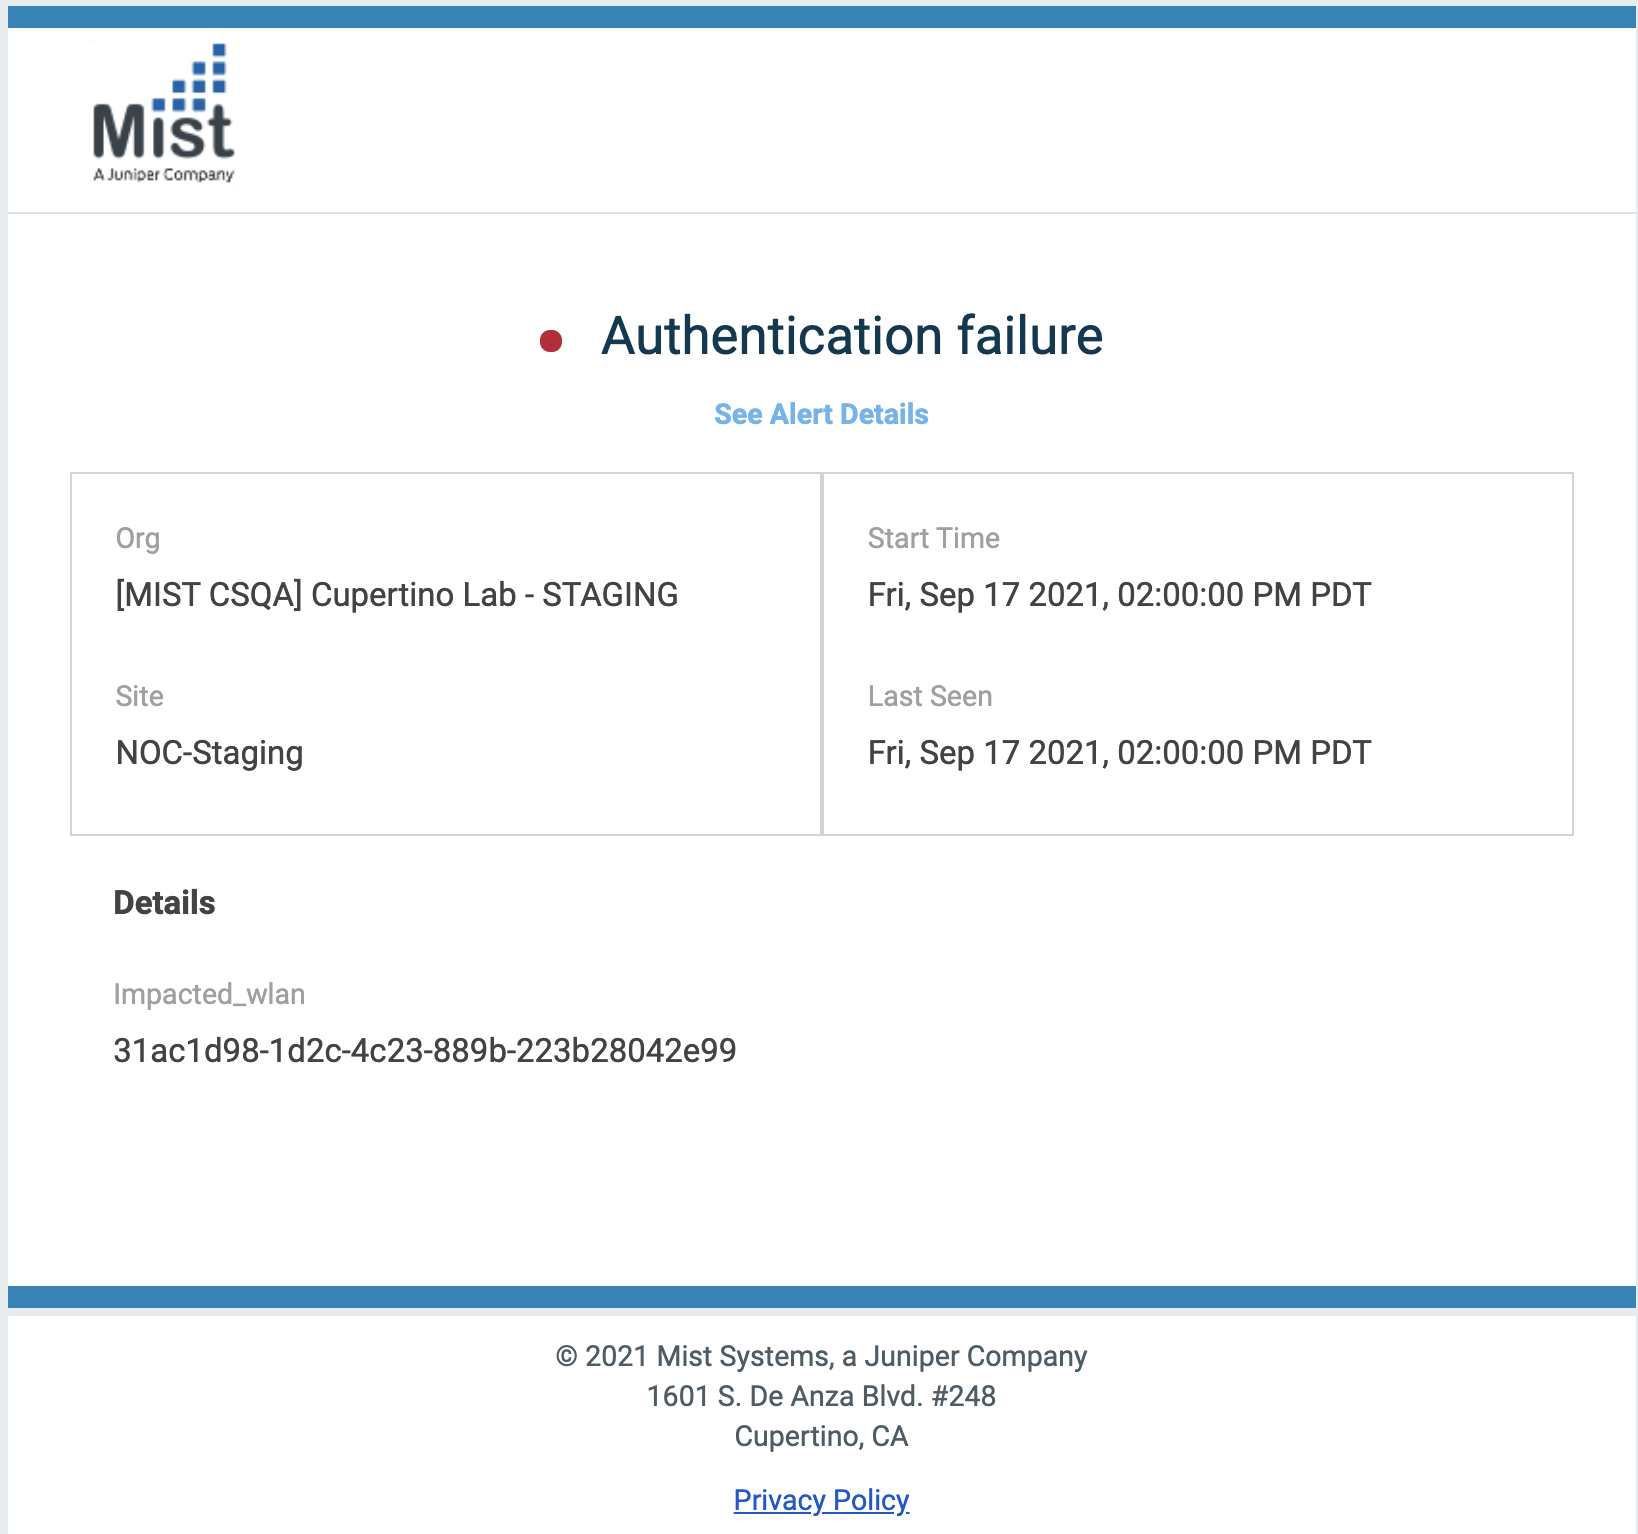
You may click the See Alert Details link to be redirected to the Alerts page.
Please note that we will be making further enhancements to these Email templates to provide all relevant information in an easy-to-read format.
Conversational Interface Enhancements
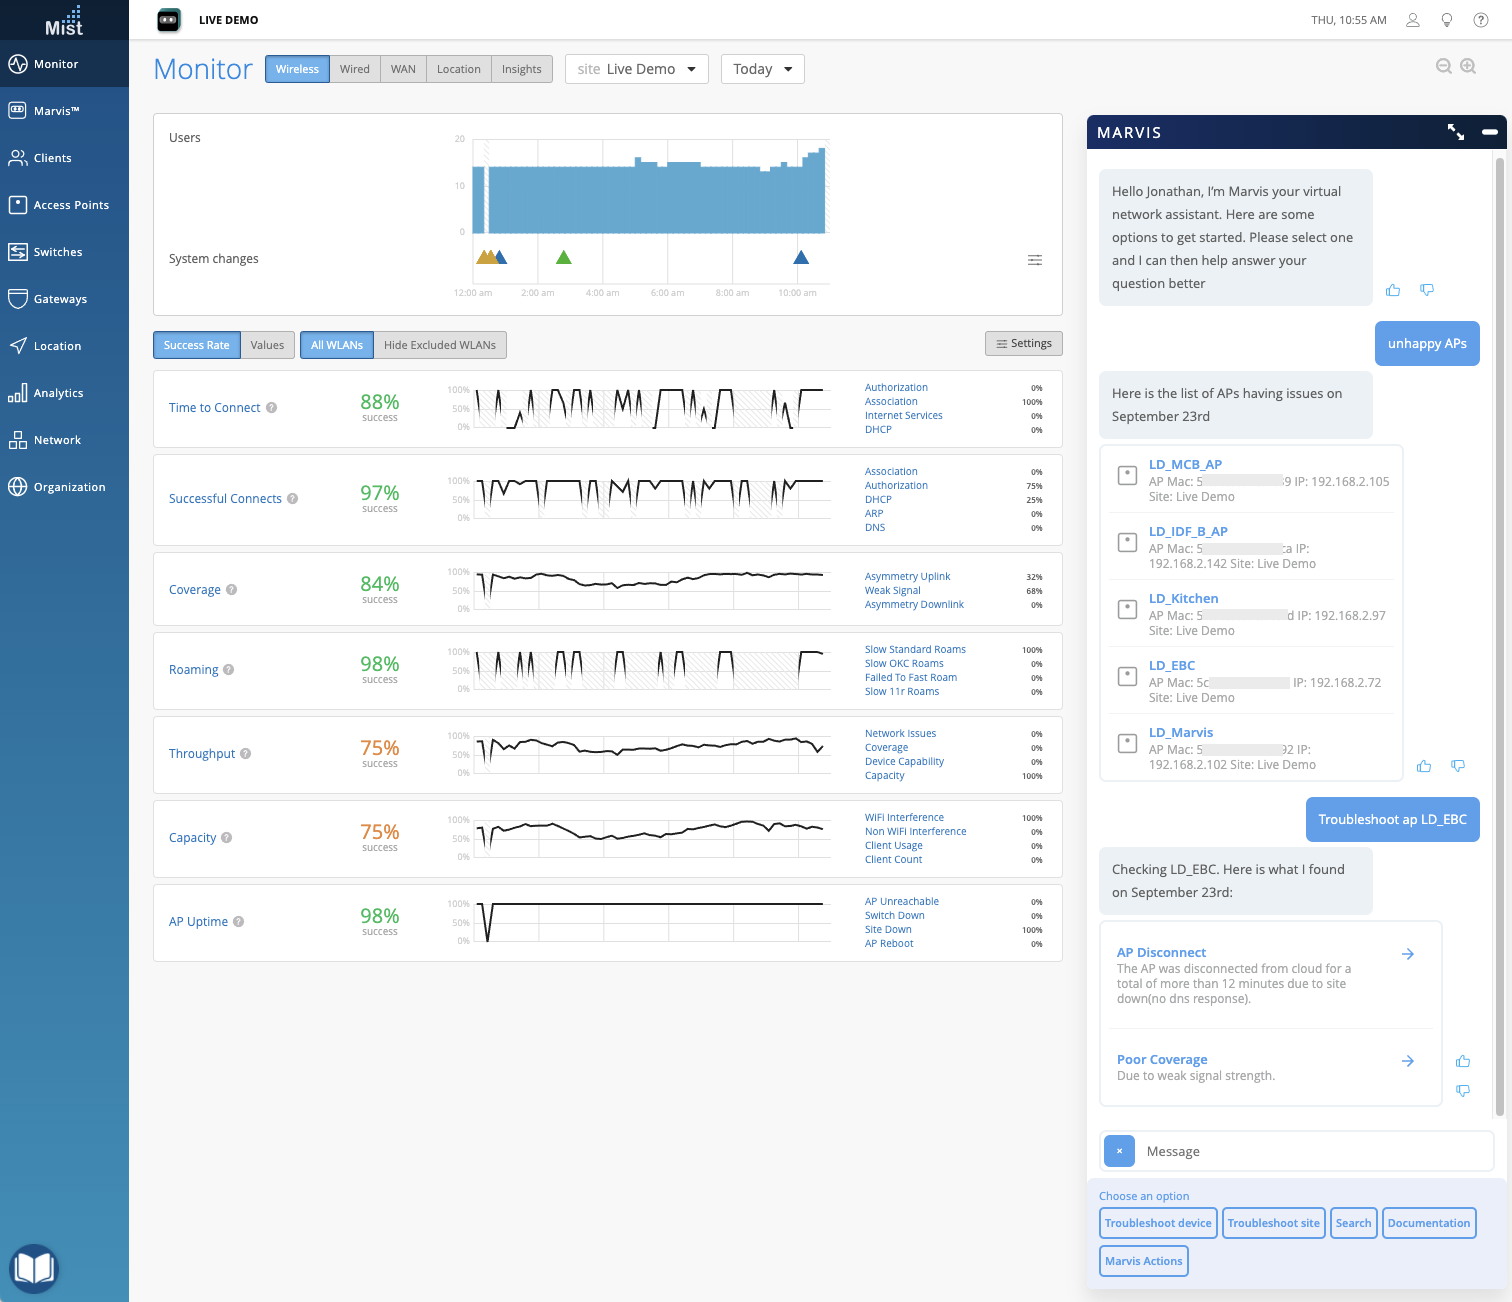
We are constantly working on updating the Conversational Assistant to give you the best possible experience, and with this week’s enhancements, Marvis can now understand and answer more questions.
Find “unhappy” APs, Switches, and users
Now, you can search for “unhappy” devices which are experiencing issues, and selecting the device from the resulting list will issue the “troubleshoot” command for that particular device:
Wired Assurance
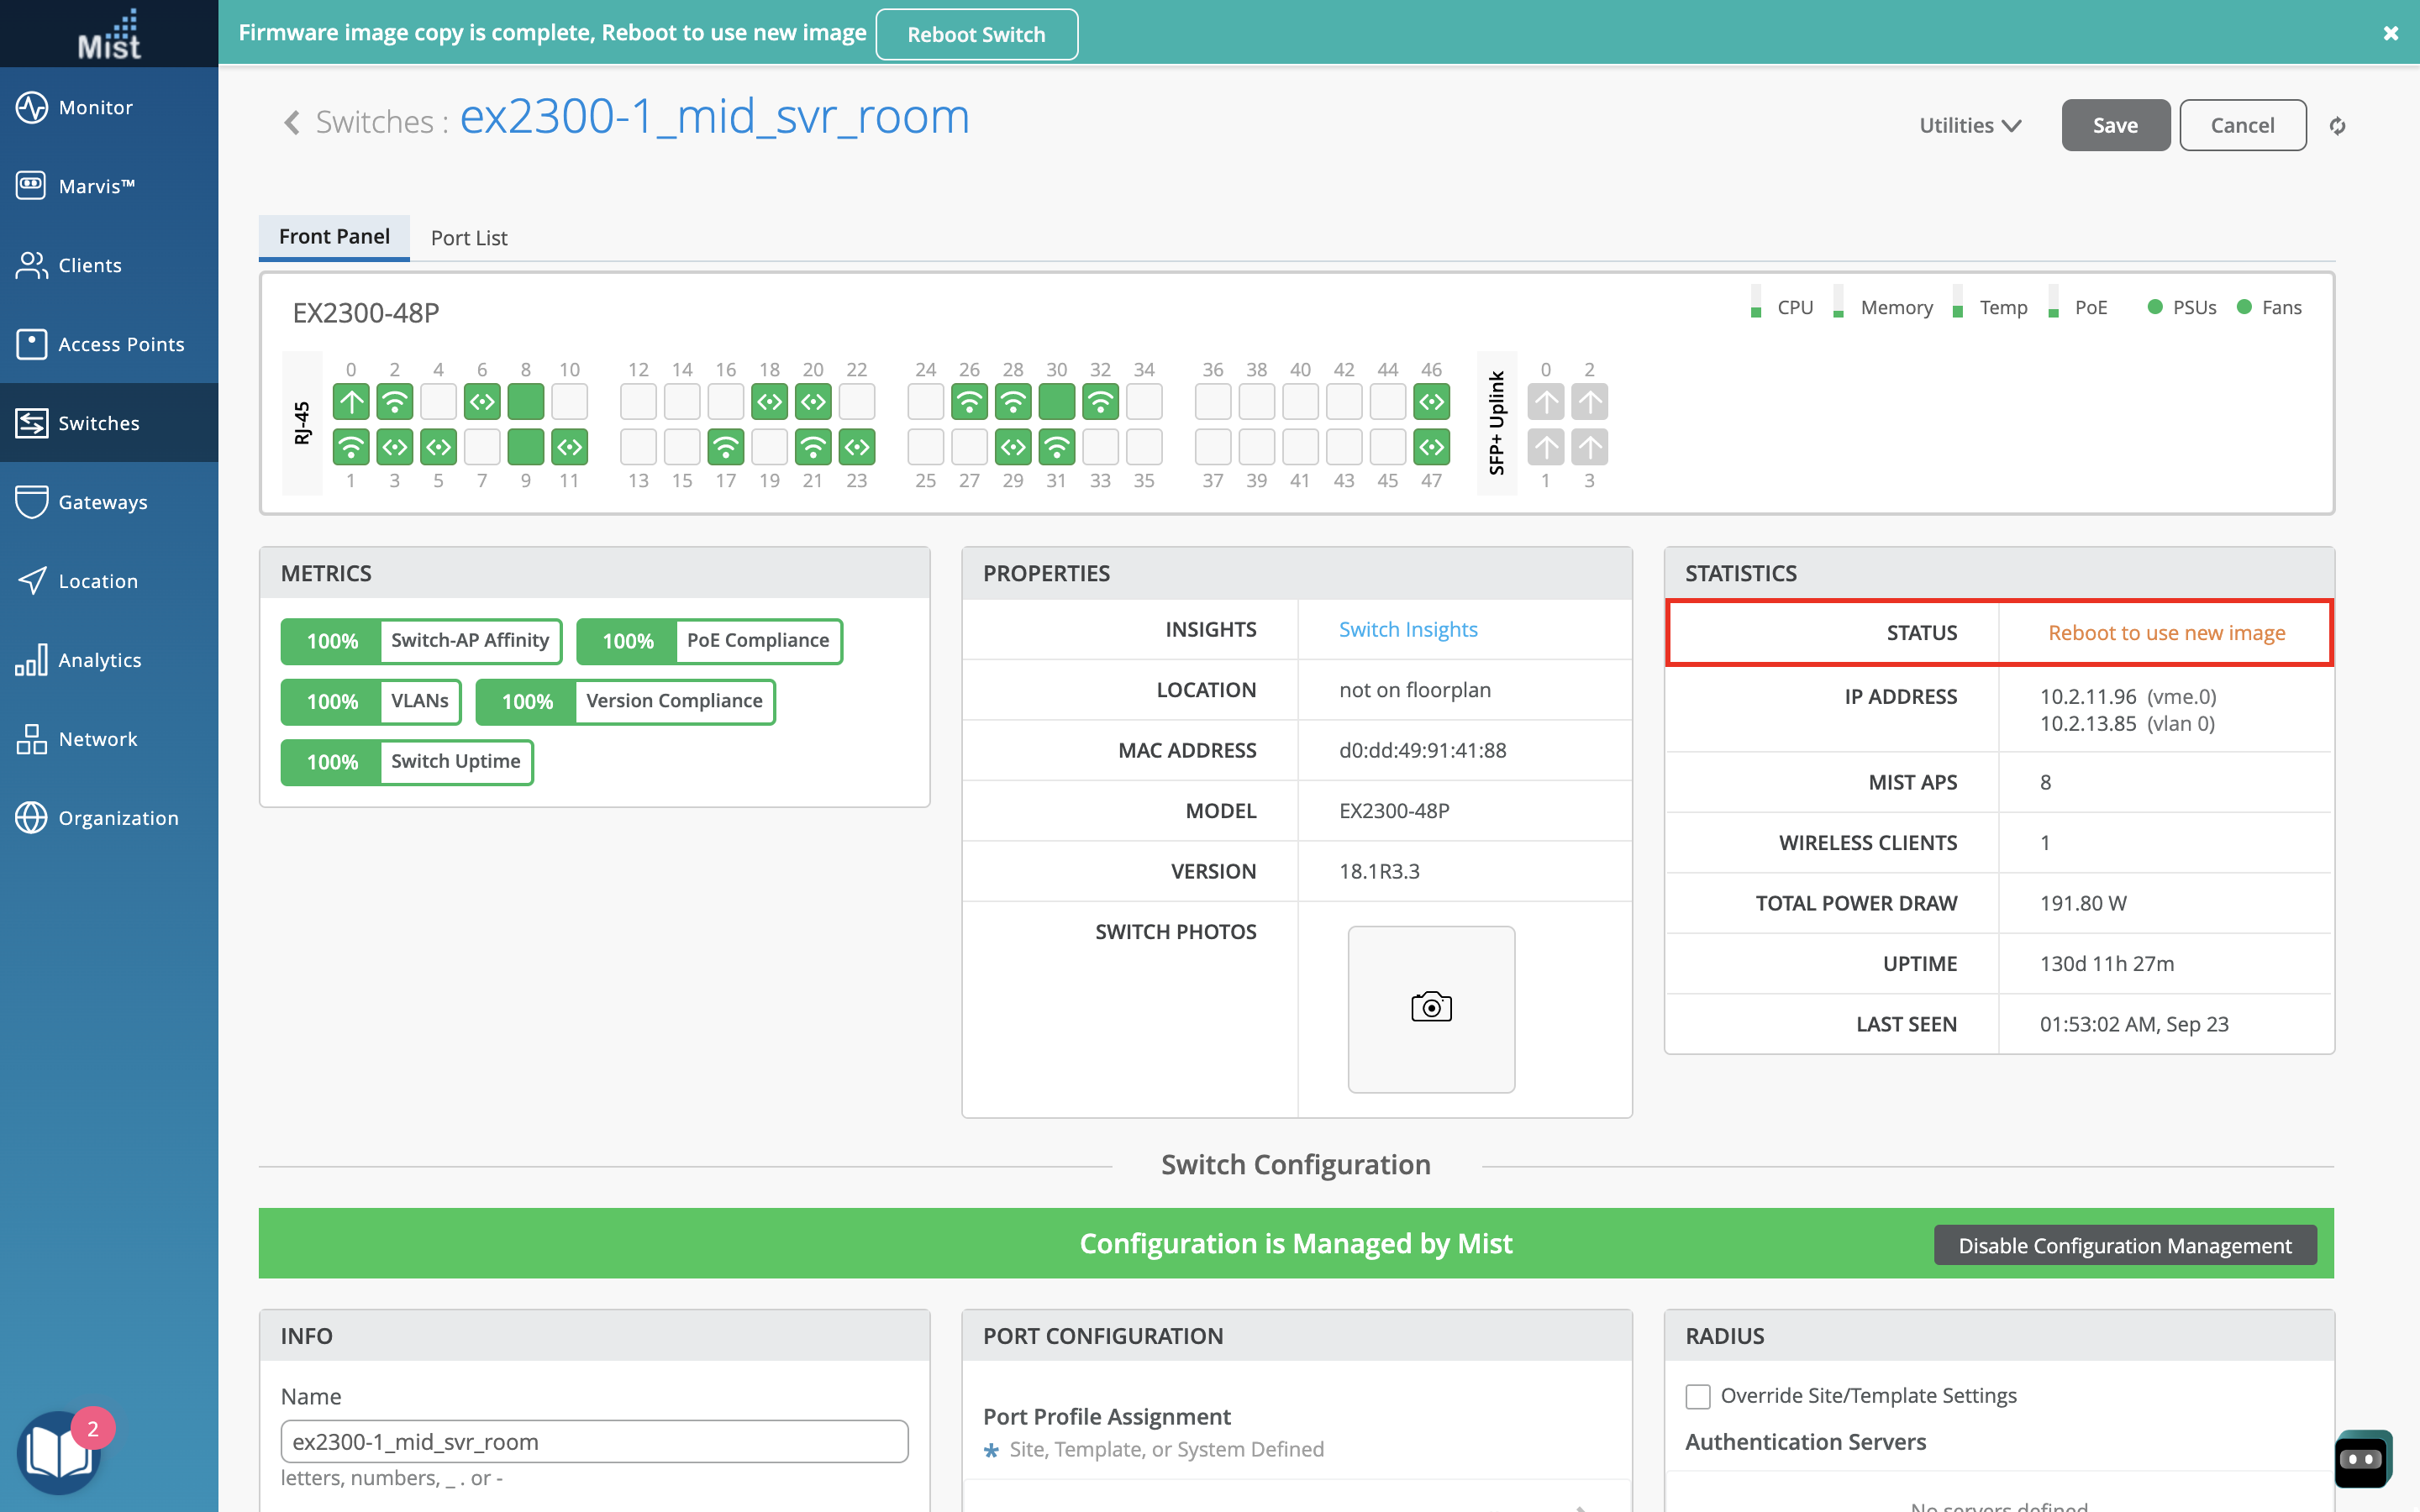
Switch Reboot Banner
Switch Firmware Upgrades require a reboot to complete the process, but you may choose to reboot at a later time if you need your switch to stay up at the moment. To help you keep track and not forget to complete this last step of the switch upgrade, you will now see a banner indicating that the Firmware image copy is complete, and that your switch requires a reboot to start using the new image. You can see the Reboot message in the Switch Status section as well.