Network Programmability
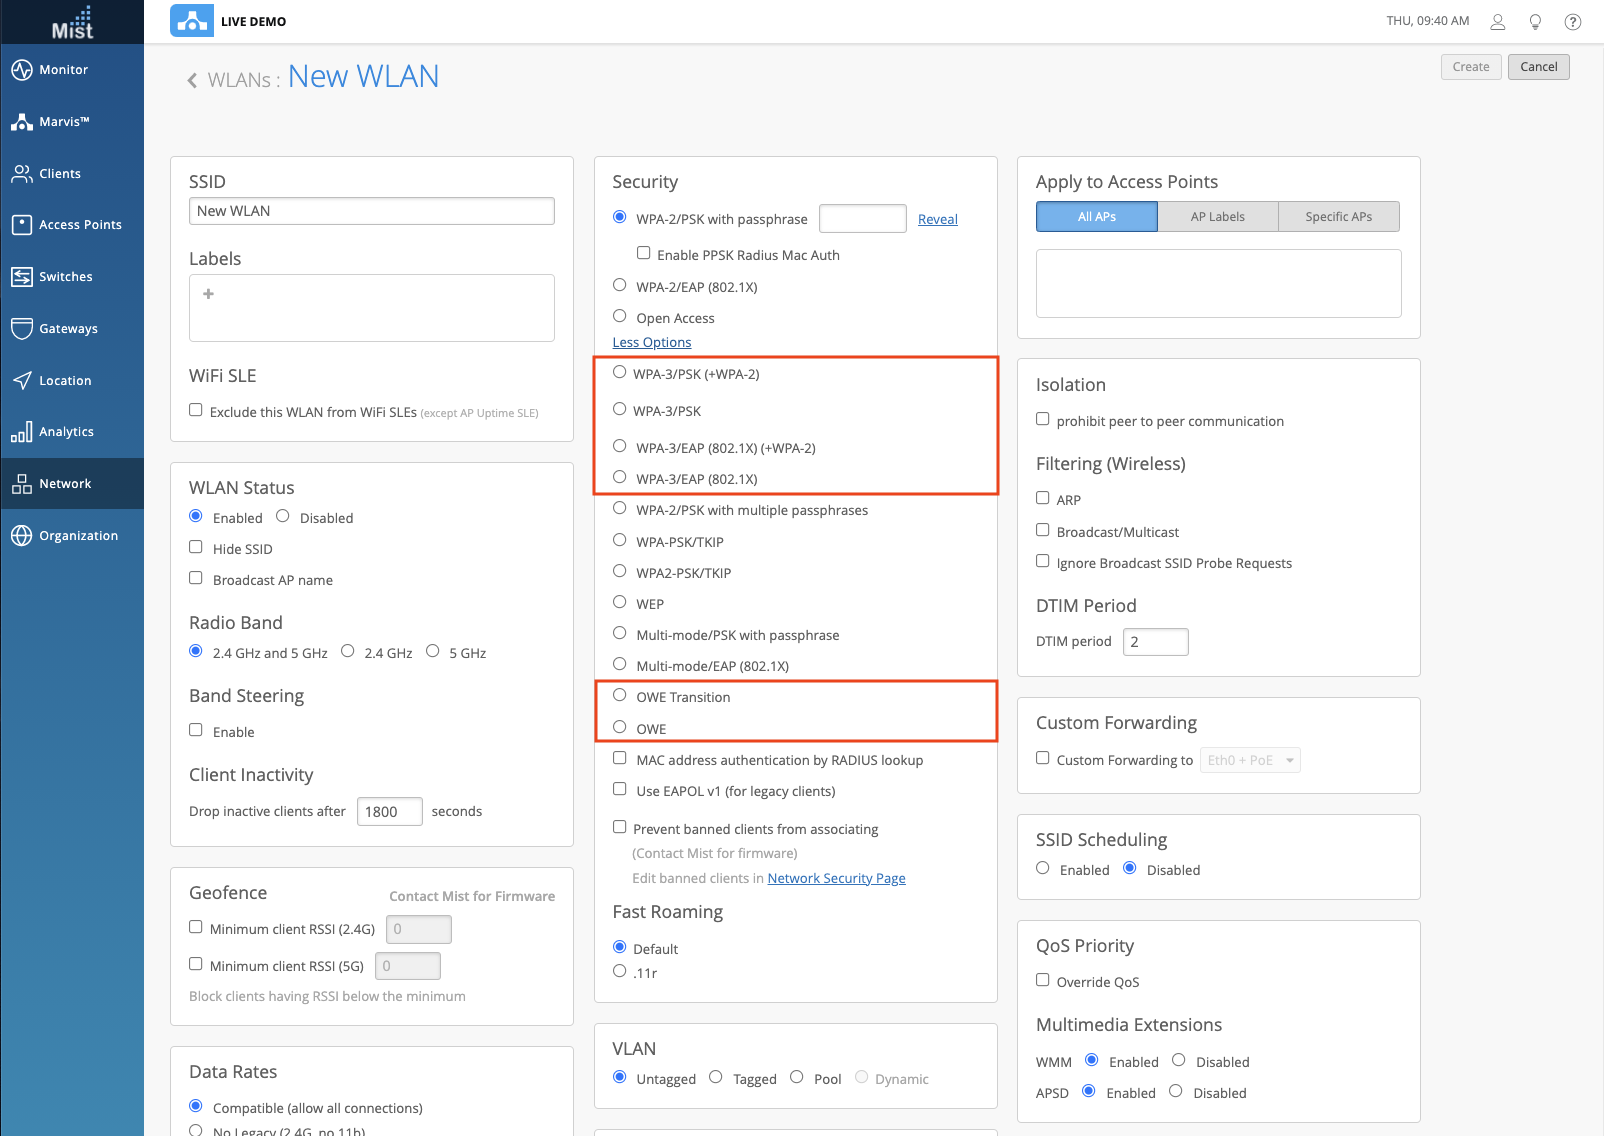
WPA-3 and OWE Security Modes
0.8.X or newer Firmware required for WPA-3/PSK
0.9.X or newer Firmware required for WPA-3/EAP and OWE
This week we are excited to bring you WPA-3 and OWE security modes for your network WLANs. WPA-3, also known as Wi-Fi Protected Access 3, is the third iteration of a security certification program developed by the WiFi Alliance. Here are some key security improvements when compared to WPA-2.
| WPA-2 | WPA-3 |
| Developed by 2004 to replace WEP and WPA | Launched in 2018 to increase the level of security. |
| WPA2 uses AES instead of RC4 and CCMP instead of TKIP. | WPA3 replaces the traditional PSK with simultaneous authentication.
WPA3 Personal – 128 bit Encryption |
| Auth frame -> 1 (Open)
(Note: During initial association) |
Auth Frame -> 2 (SAE – Commit, Confirm)
(Note: During initial association) |
| 11w can be configurable (Disabled/Optional and Mandatory) | By default, 11w is mandatory |
| More prone to KRACK attacks | Uses initial SAE Key exchanges to address the KRACK issue, as it provides secrecy and is resistant to offline decryption attacks. |
OWE, or Opportunistic Wireless Encryption, allows communication between pairs of endpoints to be encrypted and protected even without the use of authentication or password. OWE provides a higher level of security than other types of public networks by providing protections against passive eavesdropping. Use OWE in your public networks for enhanced security for your users.
To use these new security features, navigate to your WLAN Details page (Network > WLANs > Select a WLAN), and select the More Options button in the Security box. From here, you may choose which type of WPA-3 and OWE security mode you want.
Simplified Operations
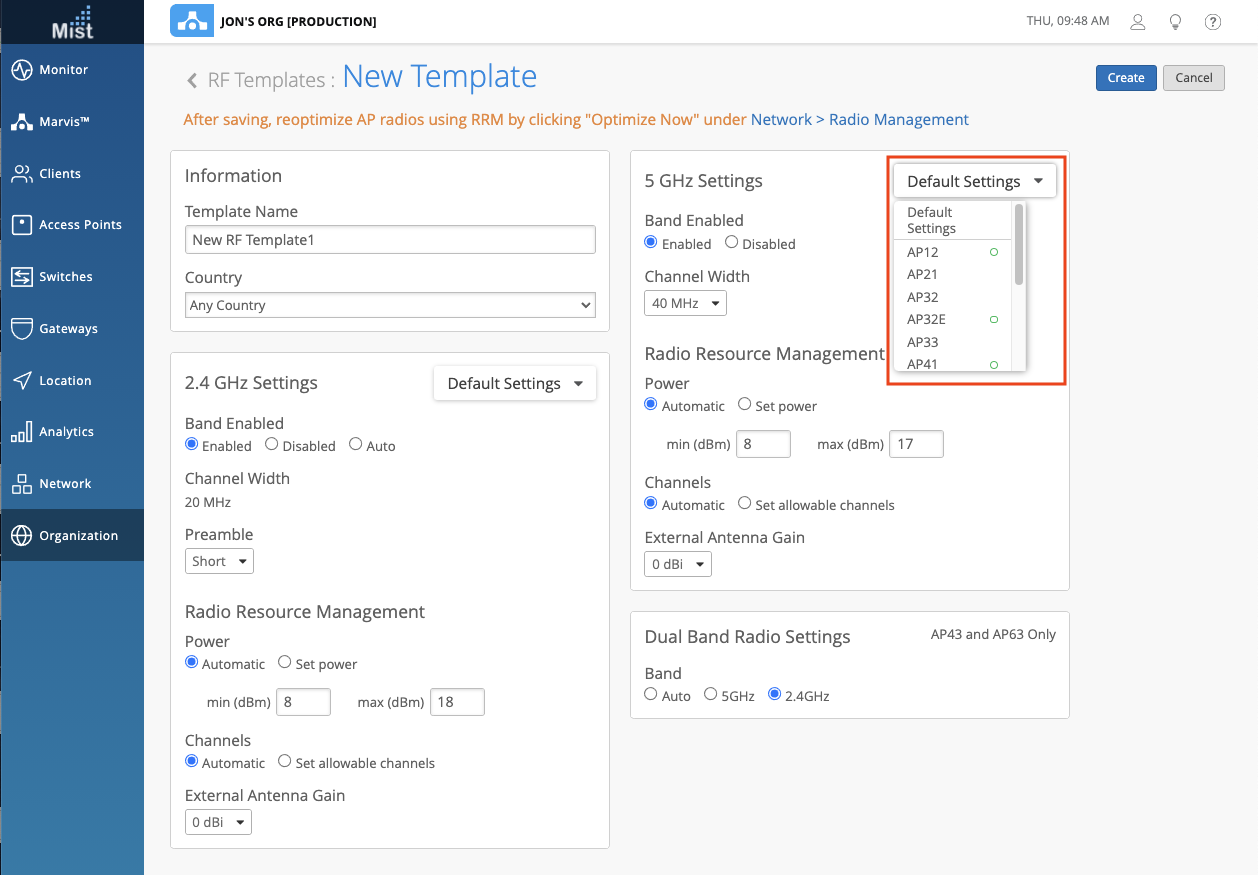
RF Templates to Include All AP Models
We now include all available WiFi AP models to be selected when configuring an RF Template to be used for RRM settings. These are the newer AP models now supported in RF Template:
AP32
AP32E
AP33
AP12
AP63
AP63E
To configure RRM Settings, such as power, channels, and antenna gain, navigate to Organization > RF Templates and create a new one (or edit an existing one). Here, select the dropdown menu which should read Default Settings by default. Select from this list your desired AP Model, and configure your settings accordingly. AP Models with configurations set will have a green circle next to them to indicate so.
To learn more about RRM and RF Templates, please visit this section in our documentation protal: https://www.mist.com/documentation/category/rrm-and-rf-config/
Device Profile Assignment – Current Profile
Keep in mind that Device Profiles is not a GA feature at this moment. If you would like this functionality on your organization, or have any additional questions about use cases, please reach out to support@mist.com
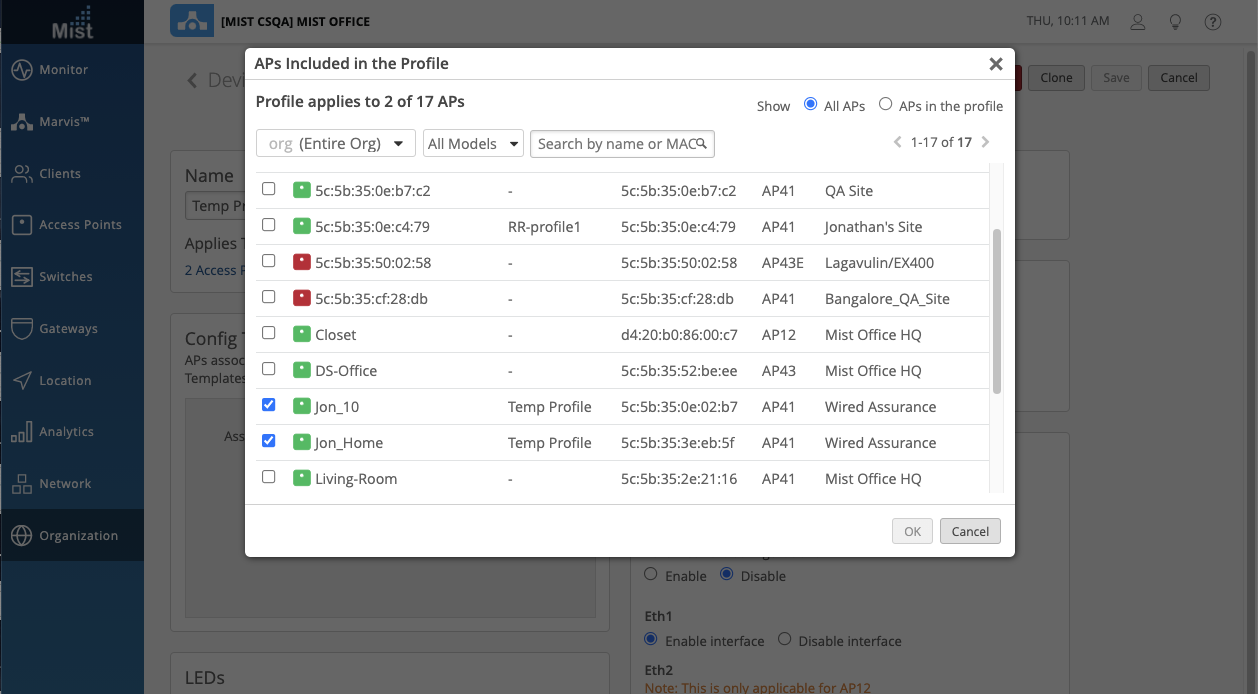
Device Profile assignment just got even simpler with the new addition of a Current Profile column in the Device Profile assignment modal. With this column, you can easily see the current Device Profile assignment for each individual AP. This prevents the need to click into APs one by one to see if they already have a profile assigned.
To see this new Current Profile column, select one of your Device Profiles (Organization > Device Profiles), and click on the Access Points Link under the Applies To section:
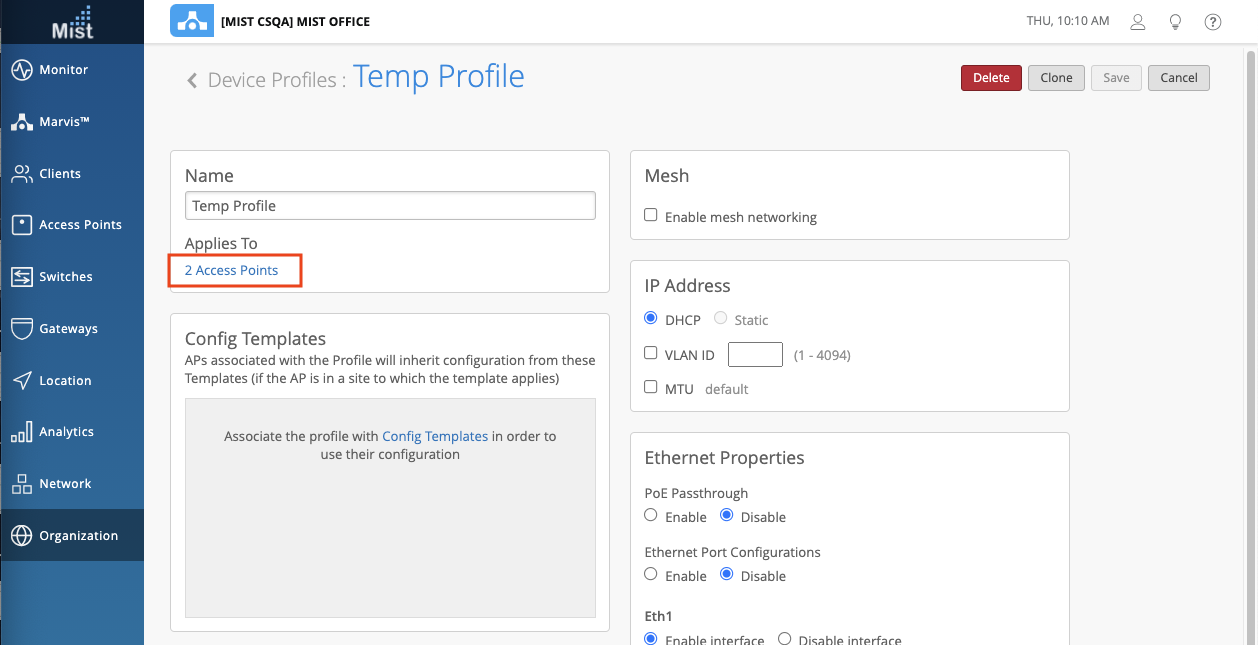
Click it and the assignment modal will appear. Here, you can see a full list of APs and their specific Device Profile assignment. We can see that two APs are assigned to the ‘Temp Profile’ and one AP is already assigned to the ‘RR-profile1.’
Replace Unassigned APs Table
To clean up the UI and improve your user experience, we have removed the section of Unassigned APs that used to appear underneath the list of APs on your site. This is now replaced with a link that reads “Assign APs to the site from the Inventory Page.” From there, you may select the Unassigned APs and assign them accordingly. This frees up the clutter at the bottom of your Access Points page, while directing you to use the Inventory Page as designed.

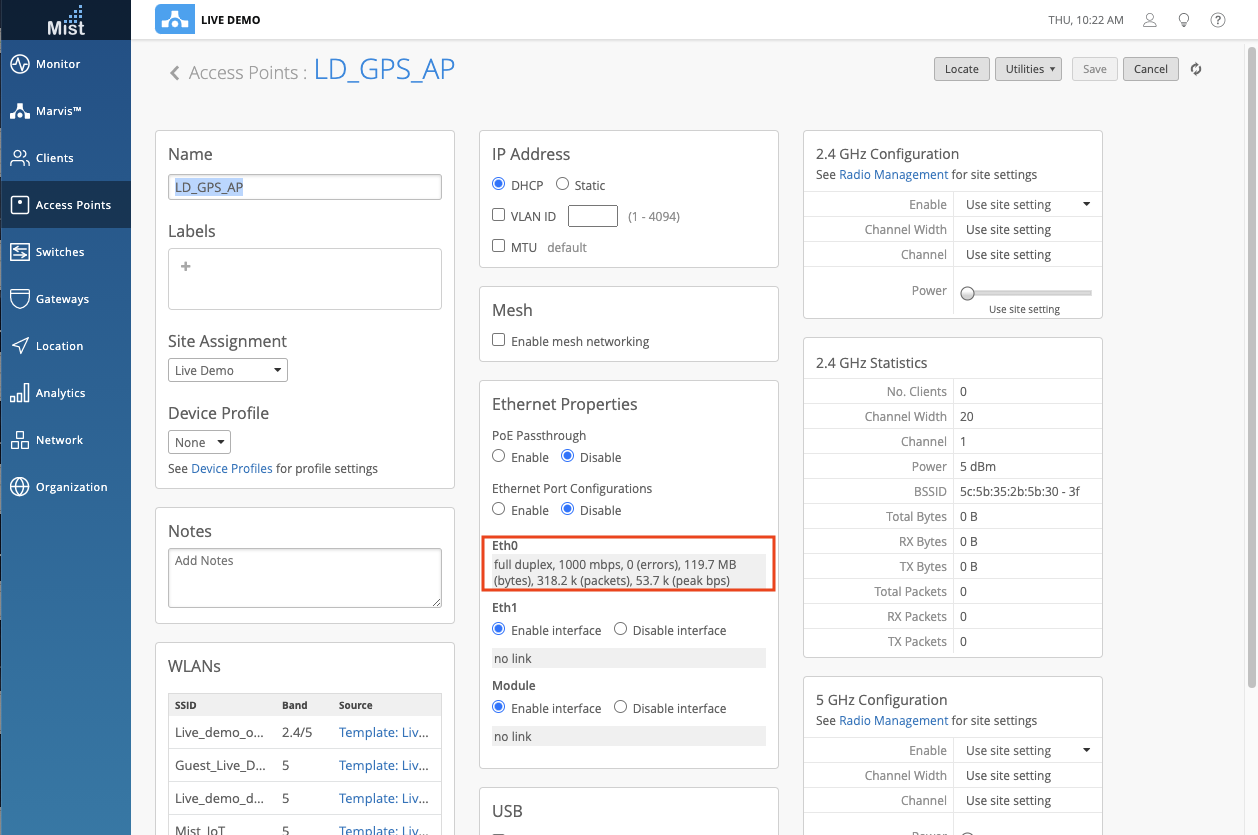
Peak TX and RX bps for AP Ethernet Port
For improved visibility of your AP port stats, we now expose the peak TX and RX bps on the Eth interfaces of the AP. It can be beneficial to see if the AP uplink is oversubscribed and now you may do so by monitoring the peak TX and RX bps for your specific AP ports. The value displayed is the peak bps during the last 60 seconds. You can see this information in your Access Points Details page (Access Points > Select an Access Point). You will find this under Ethernet Properties
Customer Engagement
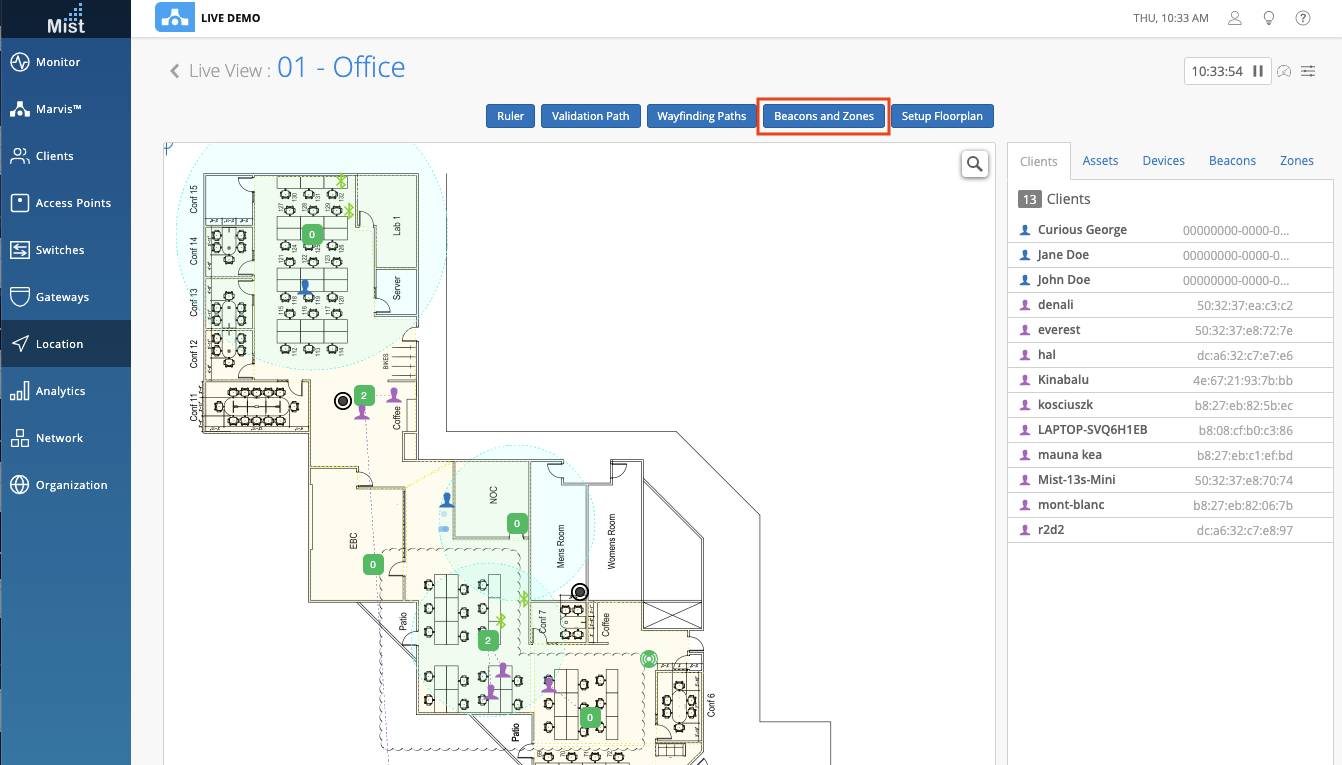
Proximity Zones (Beta Feature)
We are glad to announce an easier way to enable zones across your deployments! In our previous iteration, you were required to draw out zones, which could take time depending on map size and the need to duplicate zones on multiple maps. With our new Proximity Zones feature, APs on your map can automatically apply RSSI thresholds which are indicated by a blue ring around the AP. With this automatic Proximity Zone, you can now easily locate nearby clients on the map, collect client density data by the AP for Occupancy Analytics, and publish proximity zone entry/exit events through the use of webhooks.
To set up Proximity Zones on your site, navigate to Location > Live View and select the Beacons and Zones button at the top.
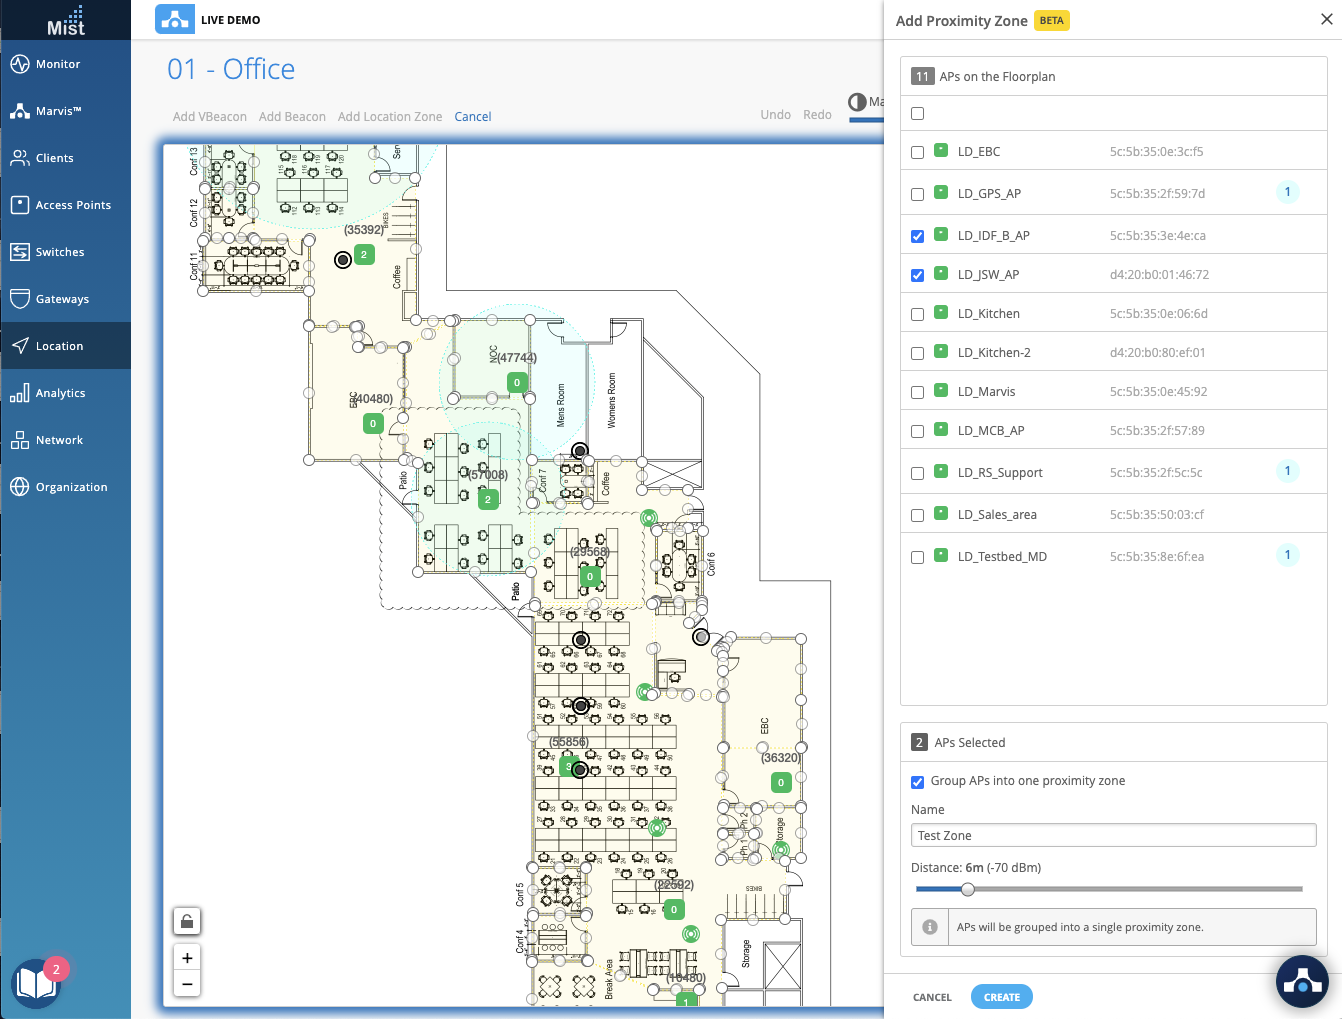
Then, select Add Proximity Zone
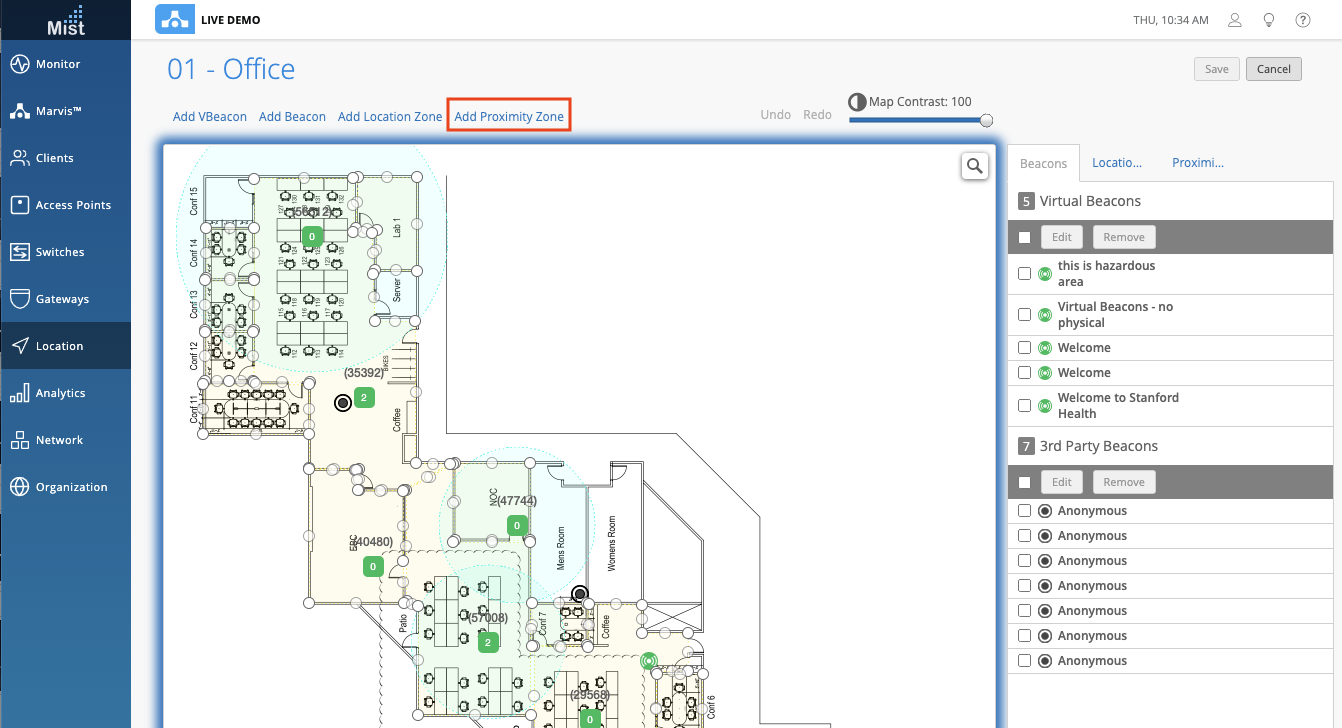
A column will appear on the right hand side. Here, you may select the AP you wish to create a Proximity zone for. You may select multiple APs to be part of the same Proximity zone group. Create a name and specify the distance of the zone – by default we have the distance set to 6m (-70dBm). Once you are done, click Create and your selected APs will have their Proximity zones set up!
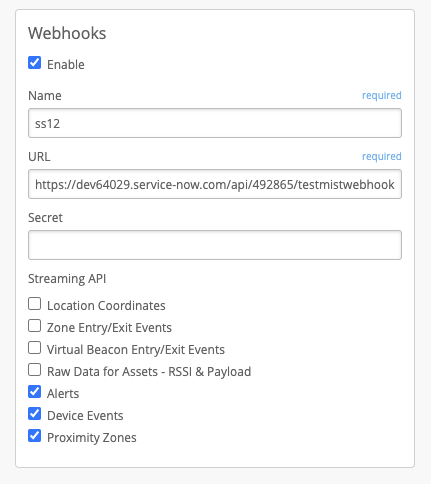
To get Webhook alerts about activity in and out of your Proximity zones, please make sure to enable the Proximity Zones checkbox under your Webhook settings (Organization > Site Configuration > Select a Site > Webhooks.
Wired/WAN Assurance
Switch Config Download – Improvements
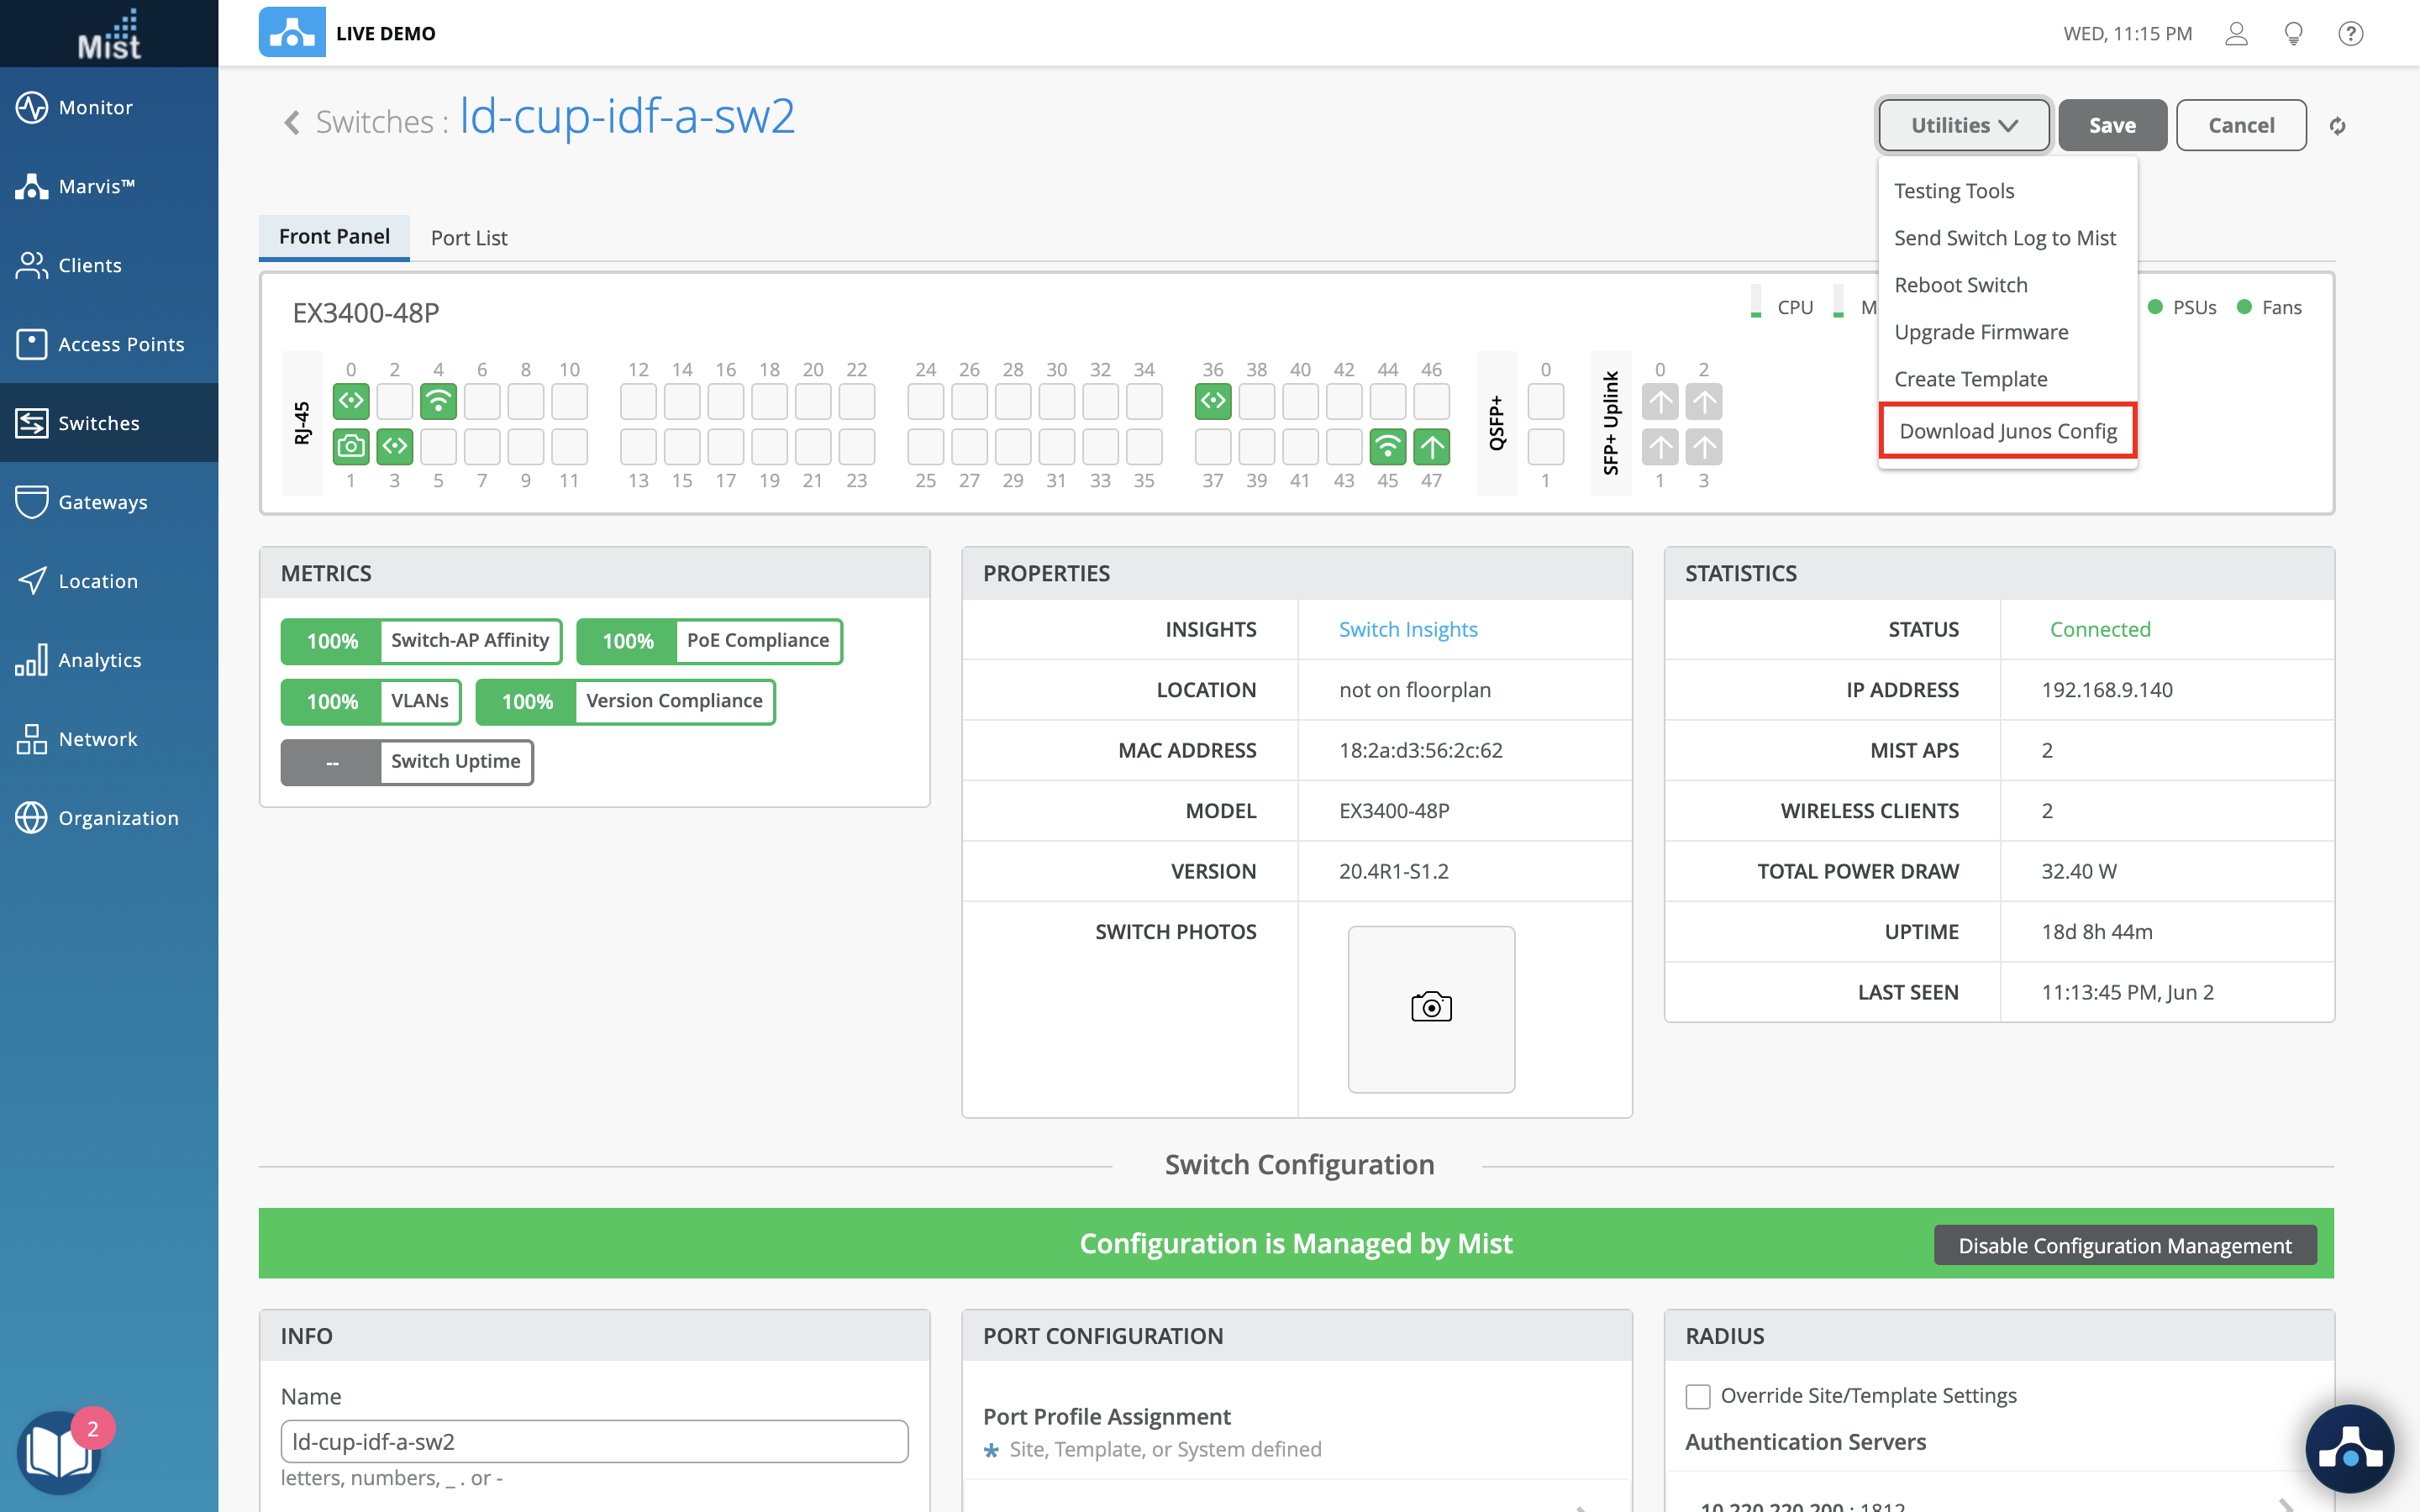
Last time we introduced the ability to download your Switch configuration as a text file showing the Junos configurations. For better clarity on our UI we are renaming the download button to Download Junos Config. The downloaded text file will also be named appropriately in this format: <switch_hostname>-config.txt.
Find the Switch configuration download button under Switches > Select a switch > Utilities Dropdown
Switch Upgrade Failure – More Details
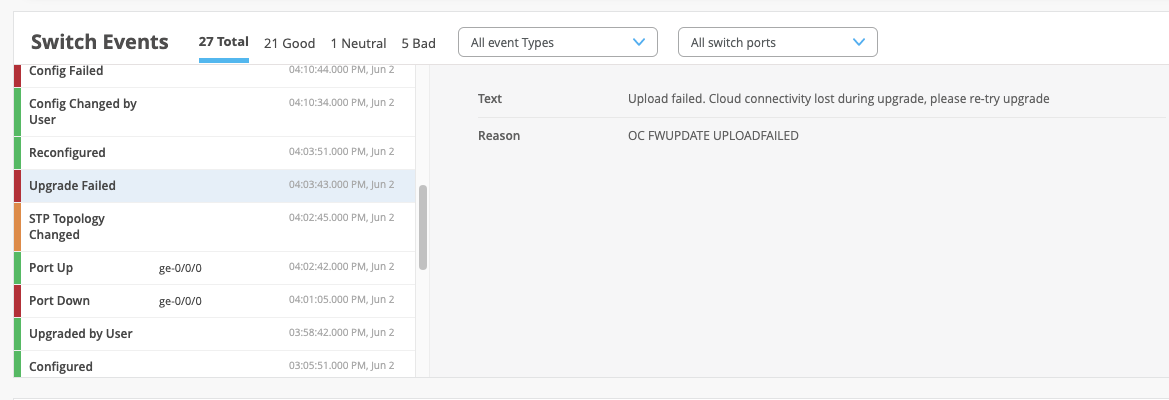
We are now providing more information whenever your switch experiences a failure when attempting an upgrade. To see these switch events, navigate to the Insights page for Switches (Montior > Service Levels > Insights Tab > Select Switch). In your Switch Events section, you can see Upgrade Failed events. Click on one and now you can see why it failed and what steps to take next. Here, we can see that Cloud connectivity was lost during the upgrade, and we are asking you to re-try the upgrade once more. Another reason for a switch upgrade failure may be due to insufficient space. In those cases we will ask you to free up space on the switch before trying to upgrade again.
Switch/Gateway Topology View Improvements
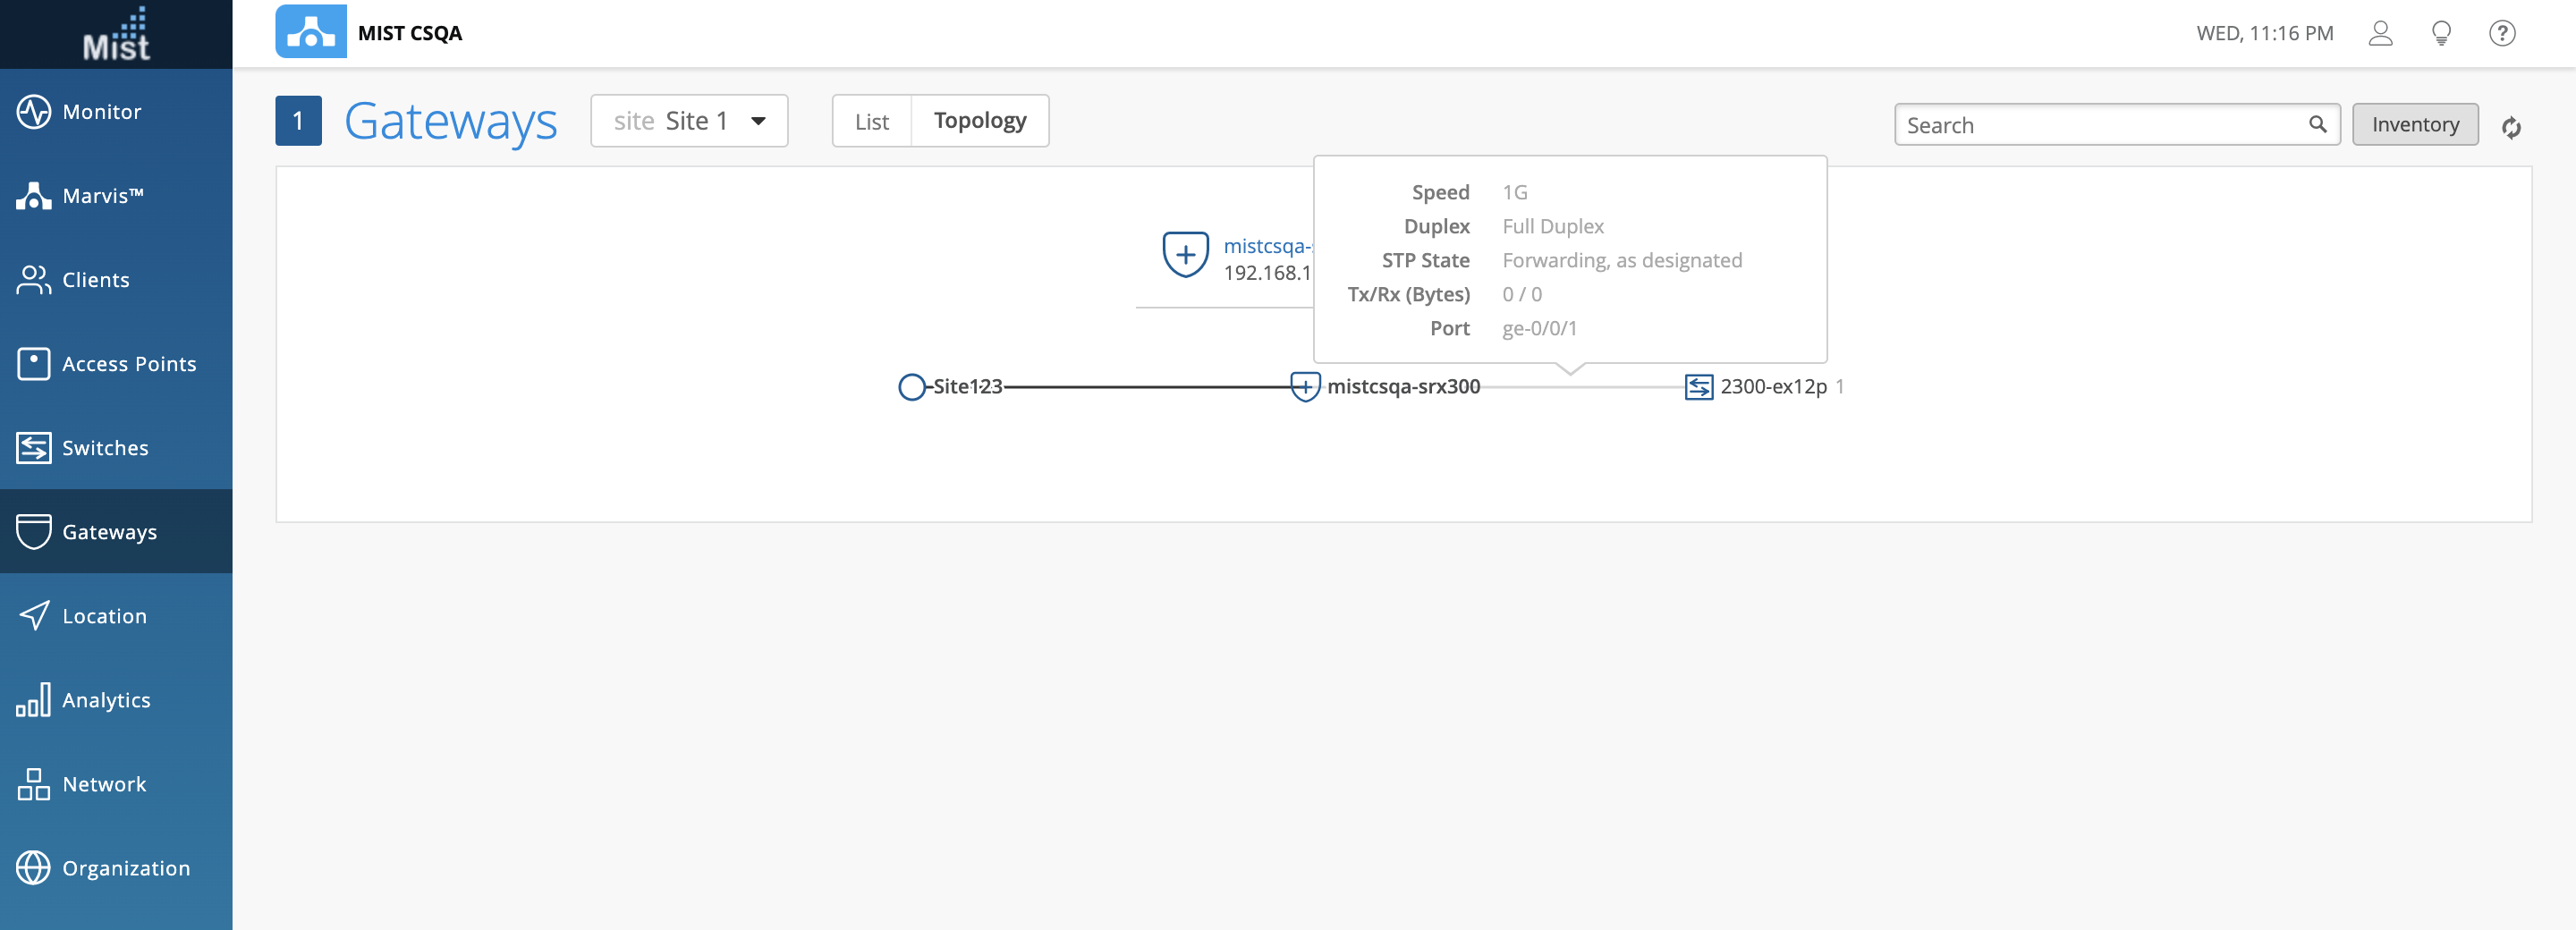
The topology view gives a clean graphical view of your list of gateways, switches, and other devices running on your site. For those that prefer to use this view over the list view, we are adding more details for you when you hover over the switch and gateway icons.
In your switch topology, you can now see Agg. Ethernet wired client connections, indicated with different colored boxes:

In the gateway topology, you can now see the STP state when hovering over the gateway:
Feature Deprecation
This is a reminder for the Feature Deprecation of Location Analytics and Reports. As mentioned in previous release notes, on 6/30 the Location Analytics and Reports APIs will be deprecated and will no longer be accessible. Please see the section What APIs are getting removed with the deprecation? on this page: https://www.mist.com/documentation/location-analytics-reports-deprecation/ for the exact list of APIs that will be deprecated and which new API you should be using instead. Please continue to migrate over to Engagement & Network Analytics under the Analytics tab to create custom reports.