Wired Assurance
Switch Configurations
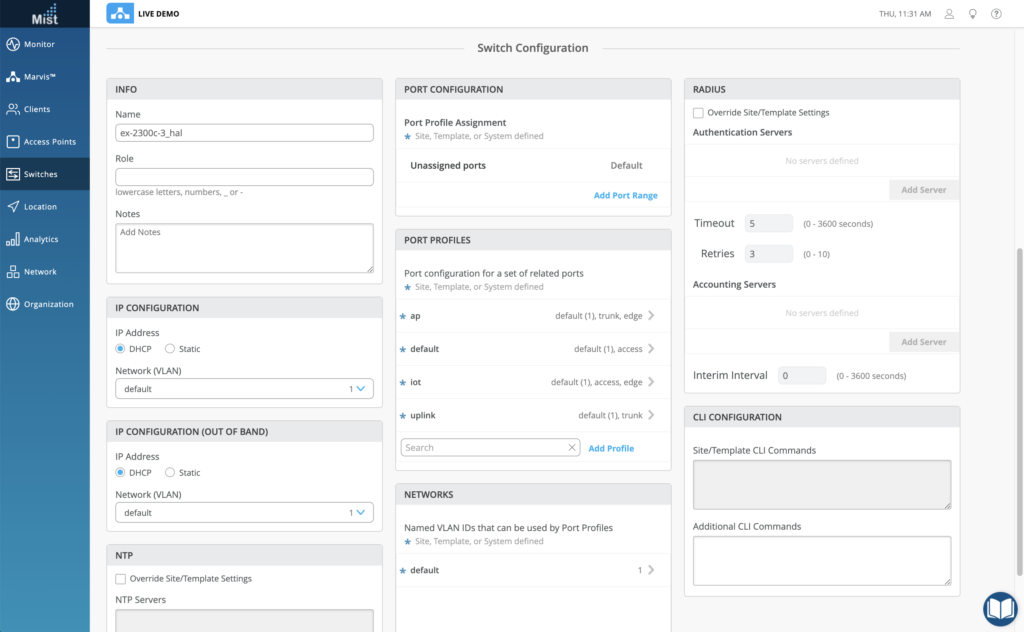
We are very excited to announce that in addition to having a monitoring solution for switches on your site, we are now rolling out the capability to make configuration changes to your switches directly from the Mist UI! Setting changes can be applied on a per-switch, per-site, and on a template basis. For supported switch models and firmware versions, you may now make certain configuration changes on our dashboard GUI without the need for any CLI commands.
Make configuration changes to areas including:
- Switch name
- IP configuration (DHCP/Static)
- Port configuration
- RADIUS
- NTP
We also include the option of entering CLI commands without the need to connect to the switch directly at all. Simply put in your command in the CLI configuration box and our cloud-ready switches will receive the changes.
Please note that this feature is available by request only and compatible with these switch models and minimum firmwares:
EX2300, EX3400: 18.2R3-S2
EX4300, EX4600, EX4650: 18.4R2-S2
Access the Switch Configuration page by navigating to Switches and selecting a Mist cloud-ready supported switch from your list.
Claiming Switches
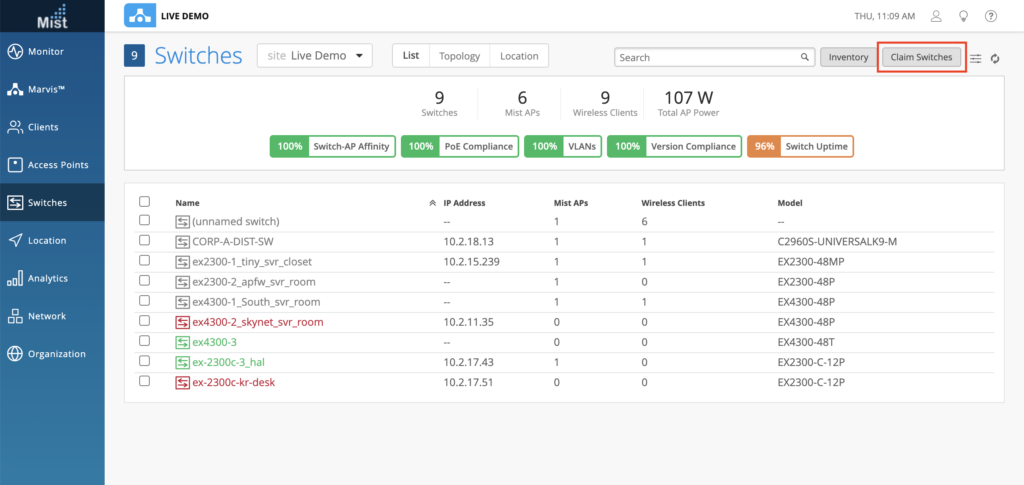
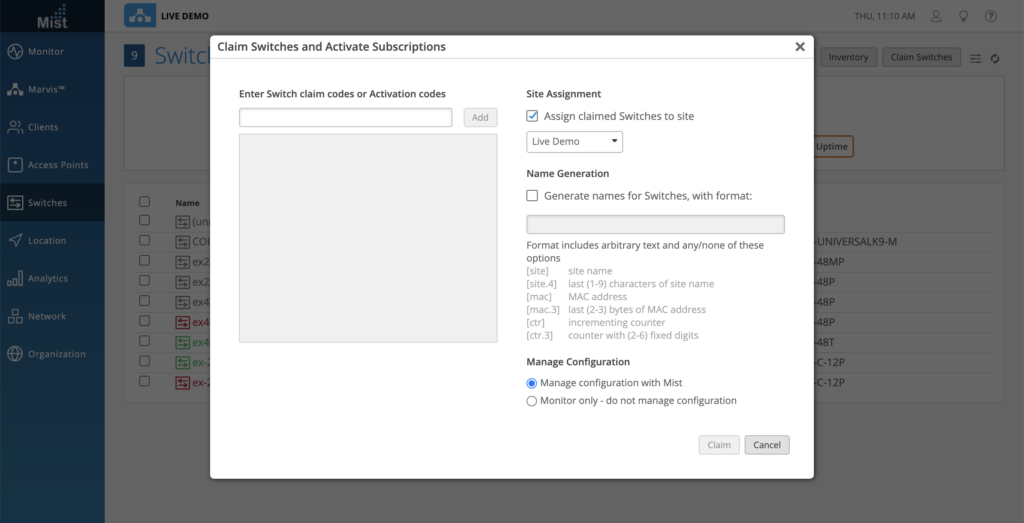
With the continuing effort to integrate switches into our Mist dashboard, we are introducing an easier way to claim cloud-ready supported switches by using claim codes and activation codes! This is similar to how you have been claiming APs onto your site by just entering the claim code directly into our UI. Simply supply the activation code or claim code, select the site to claim it on, and Claim it onto your site. You may also optionally generate names for your switches using the site name, MAC address, and counters. If you don’t want to manage the switch configuration directly on our UI, you may select the Monitor only option here.
Please note that this feature is available by request only and compatible with these switch models and minimum firmwares:
EX2300, EX3400: 18.2R3-S2
EX4300, EX4600, EX4650: 18.4R2-S2
Navigate to your Switches tab and select the Claim Switches button
This will open up a modal window for you to enter your activation and claim codes
Simplified Operations
Org, Site, and WLAN ID in the UI
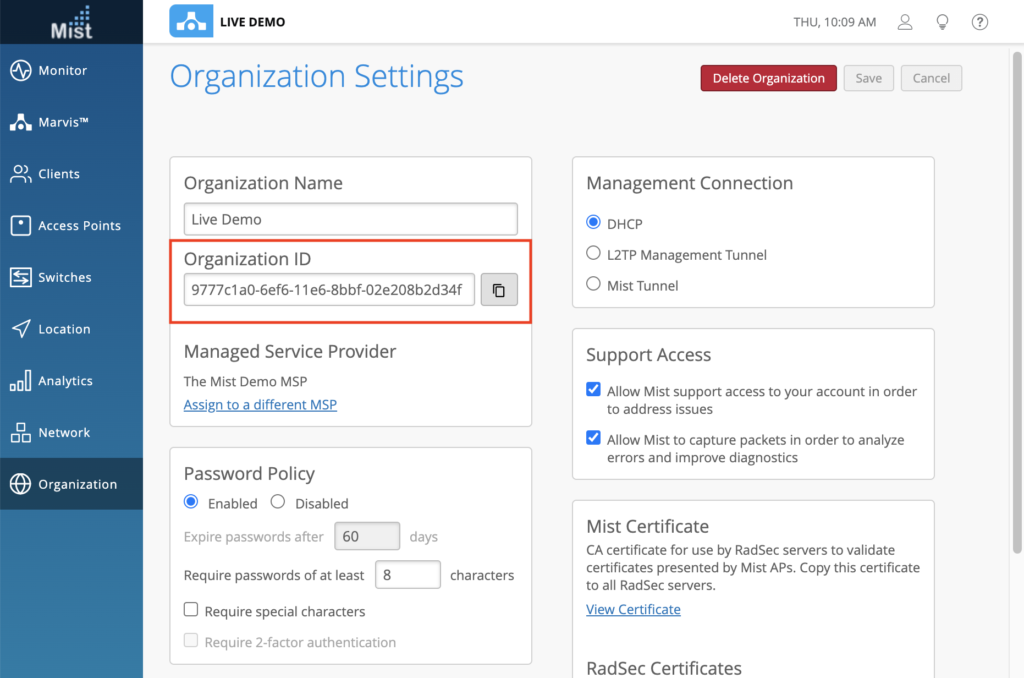
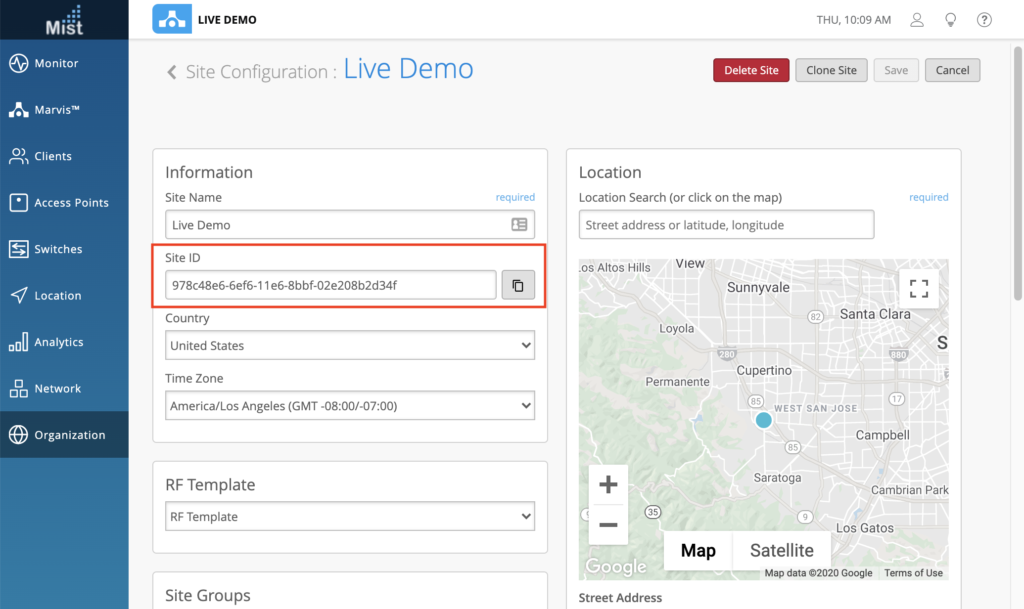
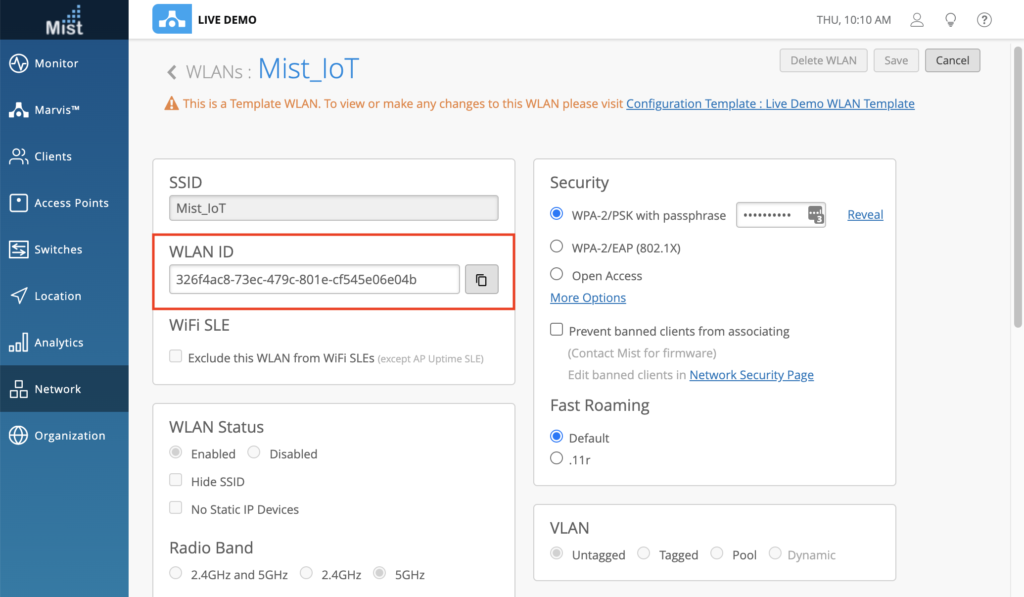
At Mist we put an emphasis on our APIs, and to make things easier for those of you using them, we are now making the Org, Site, and WLAN IDs visible directly in our UI. From each of these configurations/settings pages, the ID will be shown below the name. Select the copy button next to the ID to easily copy it onto your clipboard. You can find the IDs on these pages:
Organization > Settings
Organization > Site Configuration > Select a Site
Network > WLANs > Select a WLAN
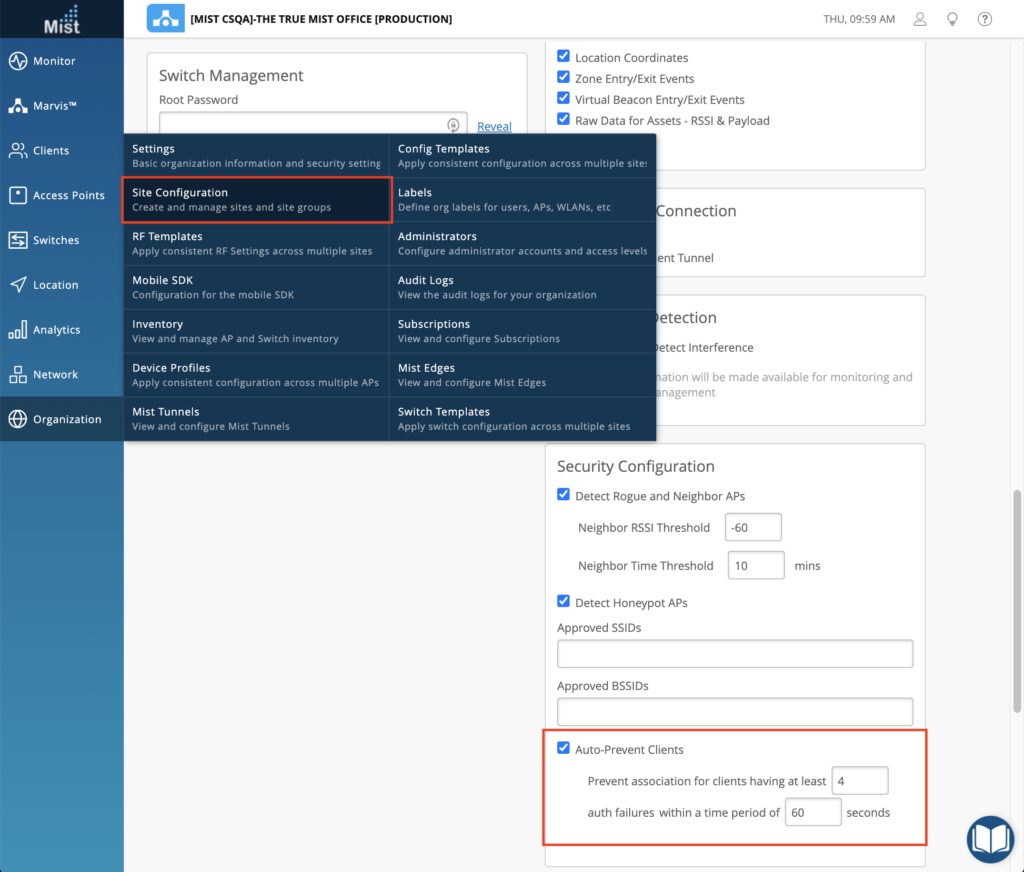
Auto-Prevent Clients
Auto-Prevent Clients is a way to dynamically ban clients with multiple authorization failures within a set duration of time. If a client exceeds a number of failed authorization attempts, they will be automatically blocked from trying to associate to WLANs on your site again. You can enable this setting in your site configurations page (Organization > Site Configurations) in the Security Configuration box. Here, we have the default values enabled on our site, which will Auto-Prevent clients from associating after 4 auth failures within a period of 60 seconds.
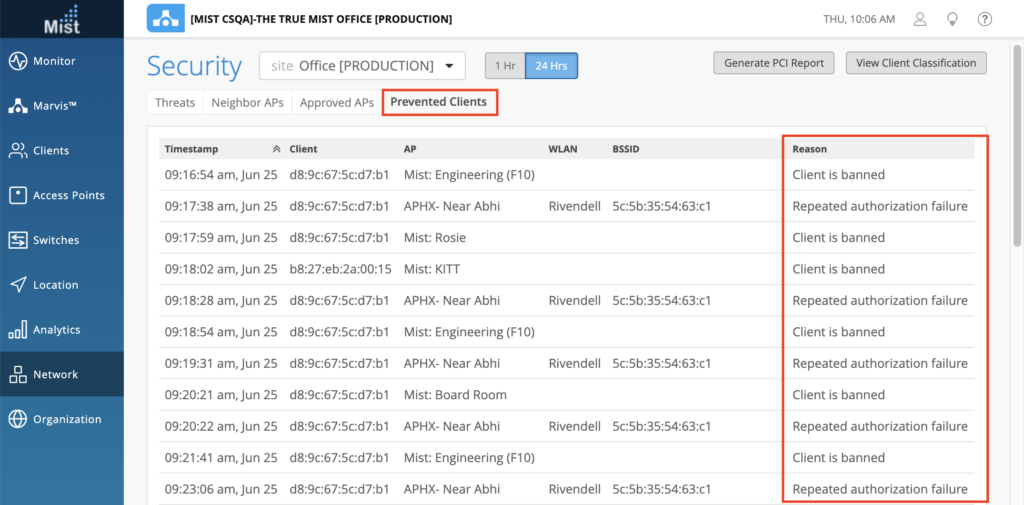
Prevented Clients is a new tab present under the Security page (Network > Security), where you can see the events generated for manual (802.11 Auth Denied) and dynamic (Blocked: Repeated Authorization Failure) client blocklisting.
Updated Sign in and Sign Up Page
We have improved our sign in page functionality to allow SSO users to initiate login directly through the Mist dashboard. Now, the initial login page prompts for just an email address. Local users (those who created an account directly through the Mist dashboard), will then be prompted to enter your password to sign in. SSO users will be redirected to their SSO URL for login before being redirected back again to the Mist dashboard.
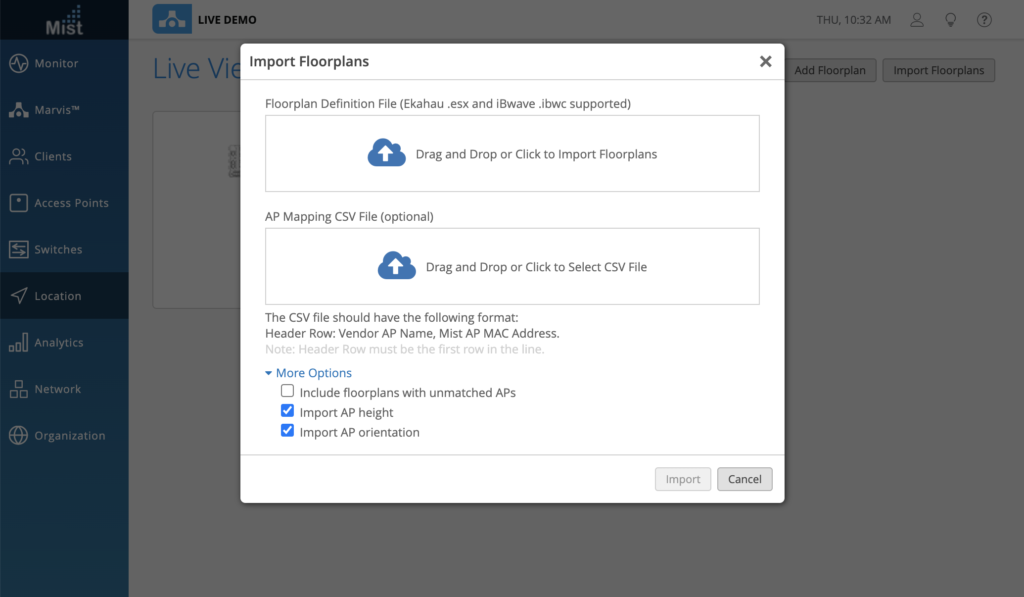
Import Maps from Ekahau and iBwave
We now support Ekahau (.esx) and iBwave (.ibwc) file formats for importing your floorplans onto Live View (Location > Live View). Either drag and drop your file, or click in the box to select the file to import. You can automatically create your floorplan, as well as place and name the APs on your site. To learn more about Location Live view and Floorplan setup, please see our Location Design section in our documentation: https://www.mist.com/documentation/category/location-design/
RSSI and AP Name in WiFi Client Disconnected Event Webhook [API]
The existing client-session webhook topic includes both client connected and client disconnected timestamps. To provide a more thorough picture of each client session, we are including two additional fields: RSSI of the client, and the AP Name where the client was connected on. To learn more about how to configure webhooks on your site, please refer to this section in our documentation: https://www.mist.com/documentation/category/webhooks/
RRM Radar Events in Webhooks [API]
RRM allows our APs to detect radar events on DFS channels and will automatically change channels to prevent any interference. To add to the transparency and tracking of these types of events we are now including them in our device-events topic which can be sent through the use of webhooks. The event will be shown as AP_RADAR_DETECTED. To learn more about how to configure webhooks on your site, please refer to this section in our documentation: https://www.mist.com/documentation/category/webhooks/
Marvis
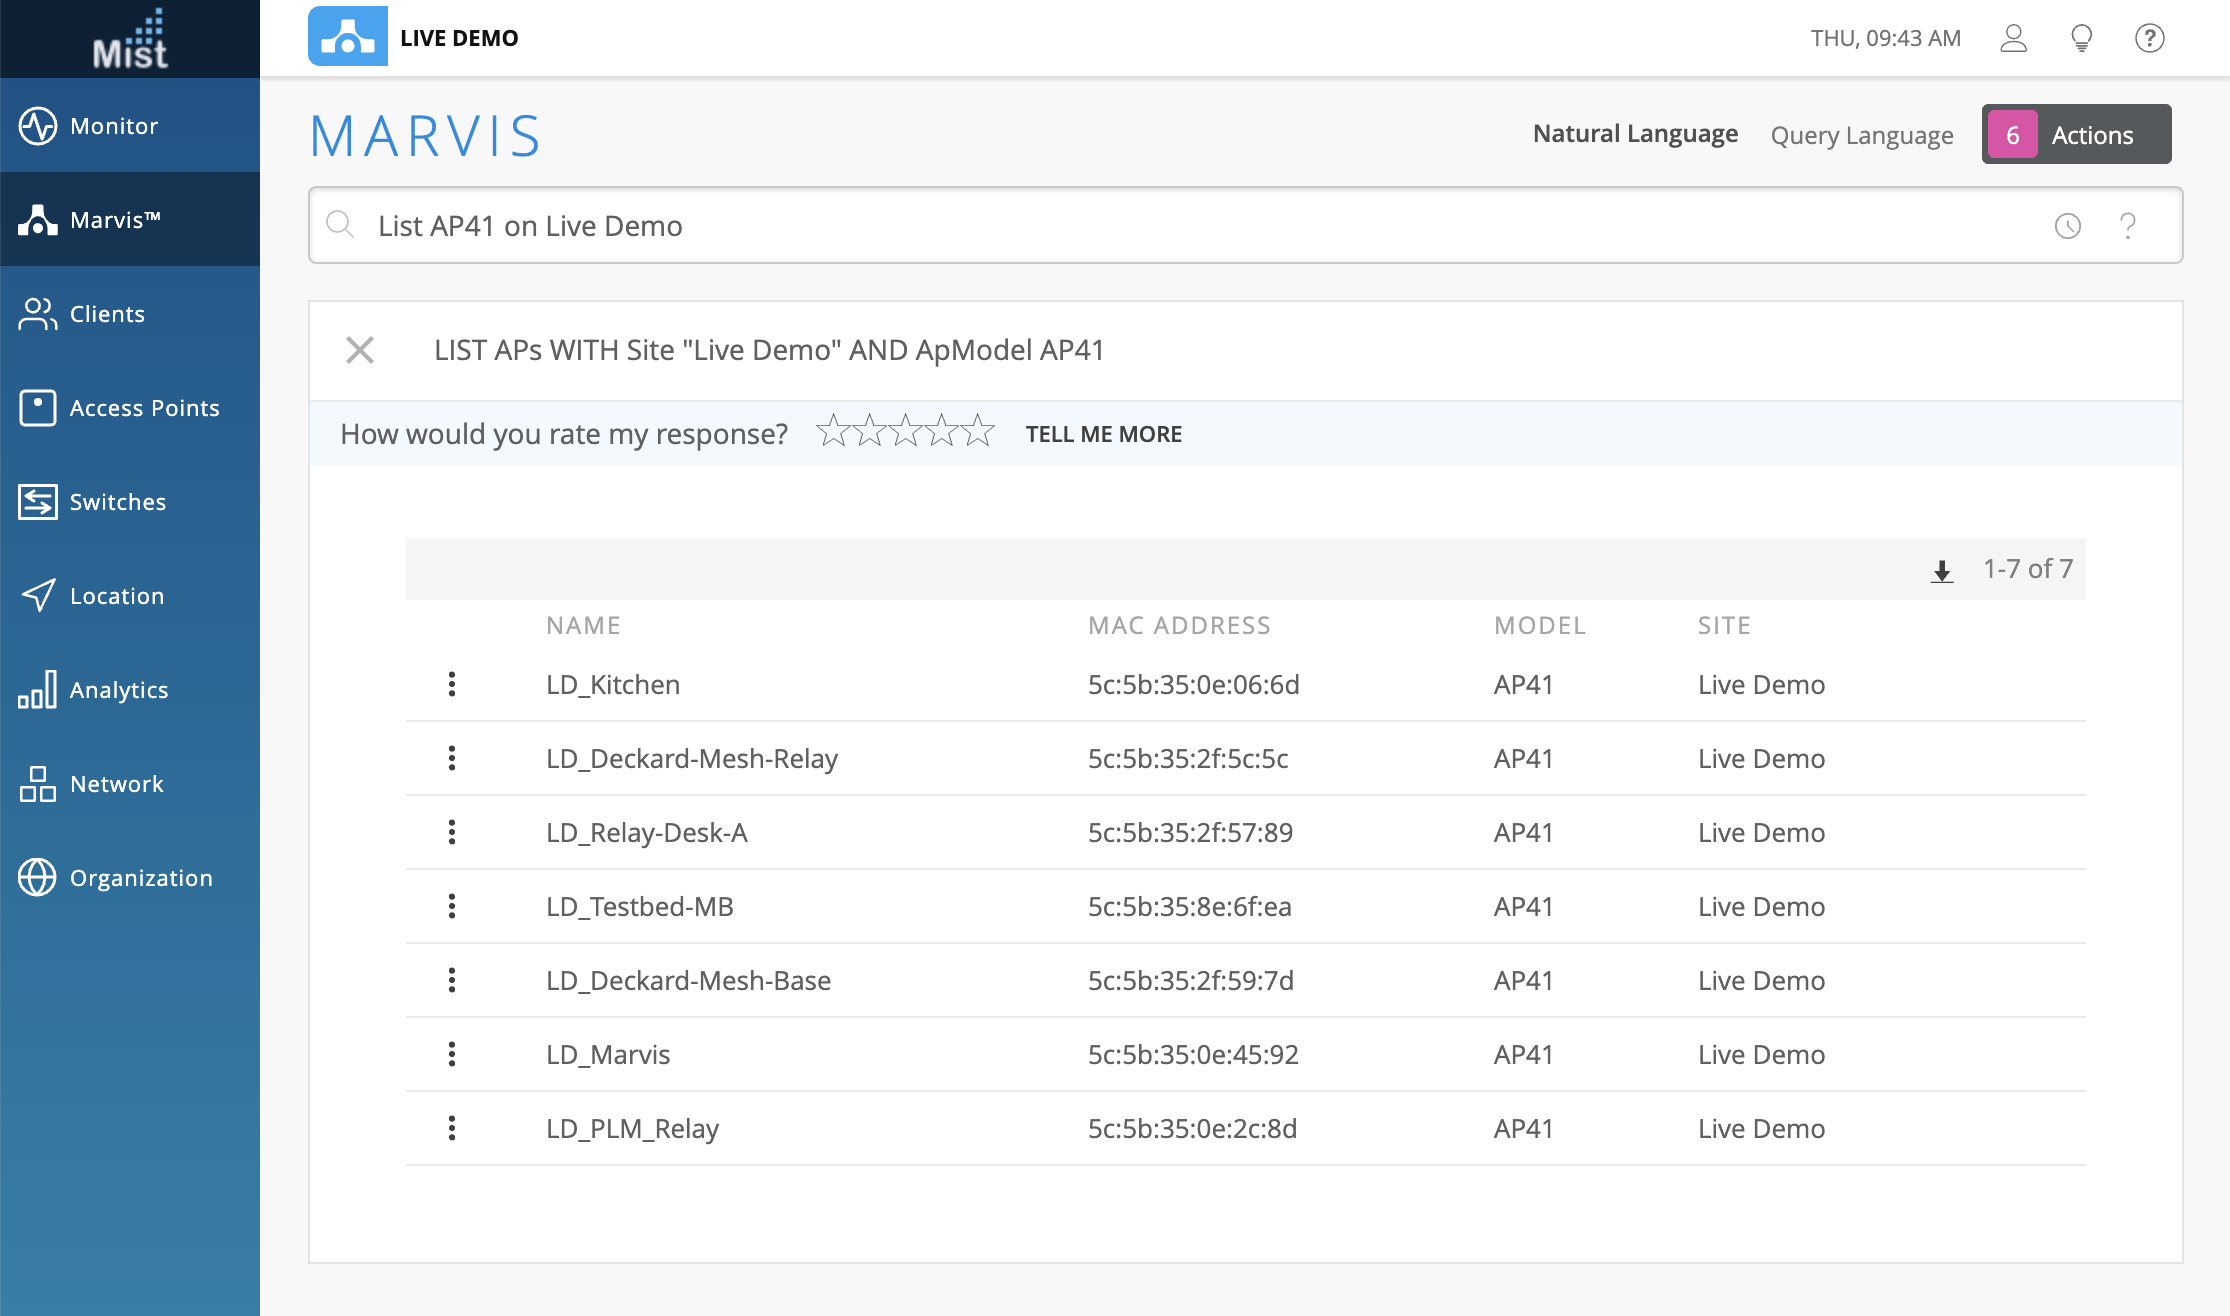
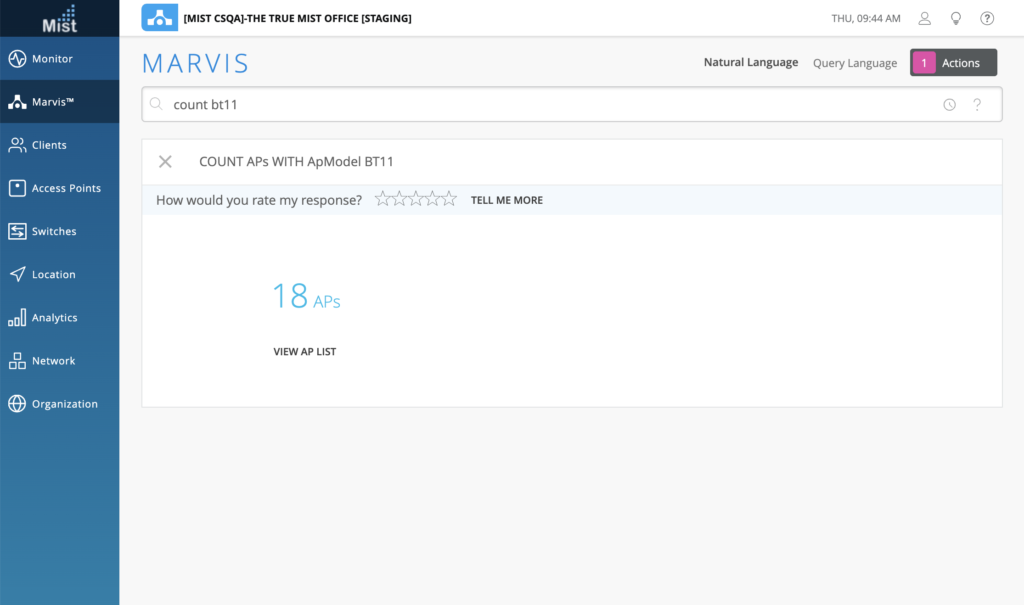
Marvis Search – List APs
This week we improved our Marvis search bar by including queries to list and count APs on your site. Use these new queries to list all APs of a specific model, or count the number of APs on a particular site in your org. Here are some example queries for you to try out:
“List AP41 on Live Demo” – This will provide the complete list of AP41’s on the Live Demo site.
“Count BT11” – This will count the total number of BT11’s on all sites of your organization.
Tunnels
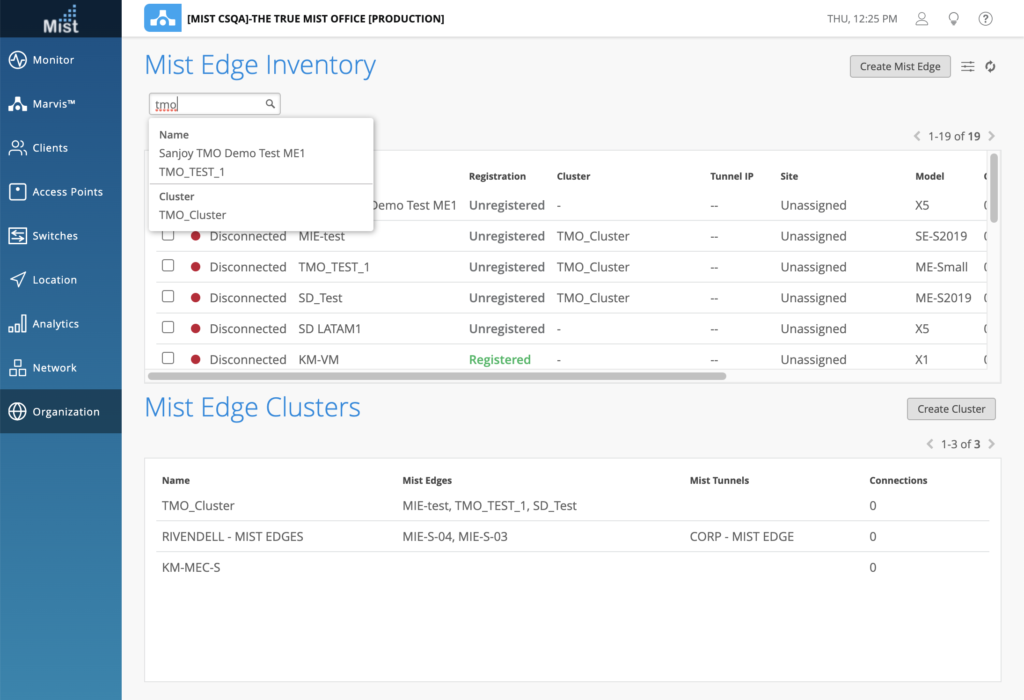
Mist Edge – Search Filter
There is now a search filter available on your Mist Edges page to easily search through your Mist Edges using any of the fields available including name, cluster, model, etc. See your Mist Edges by navigating to Organization > Mist Edges
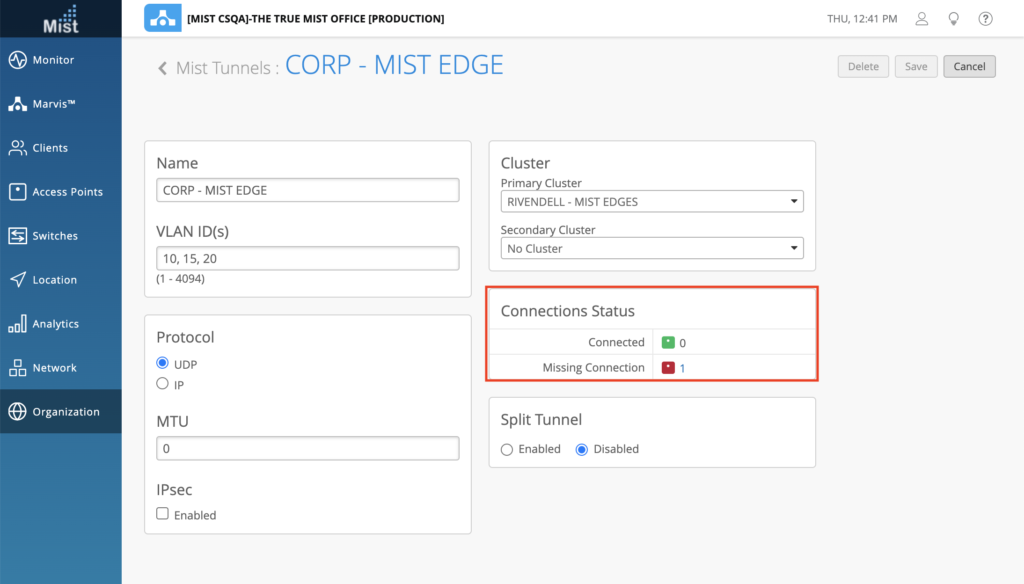
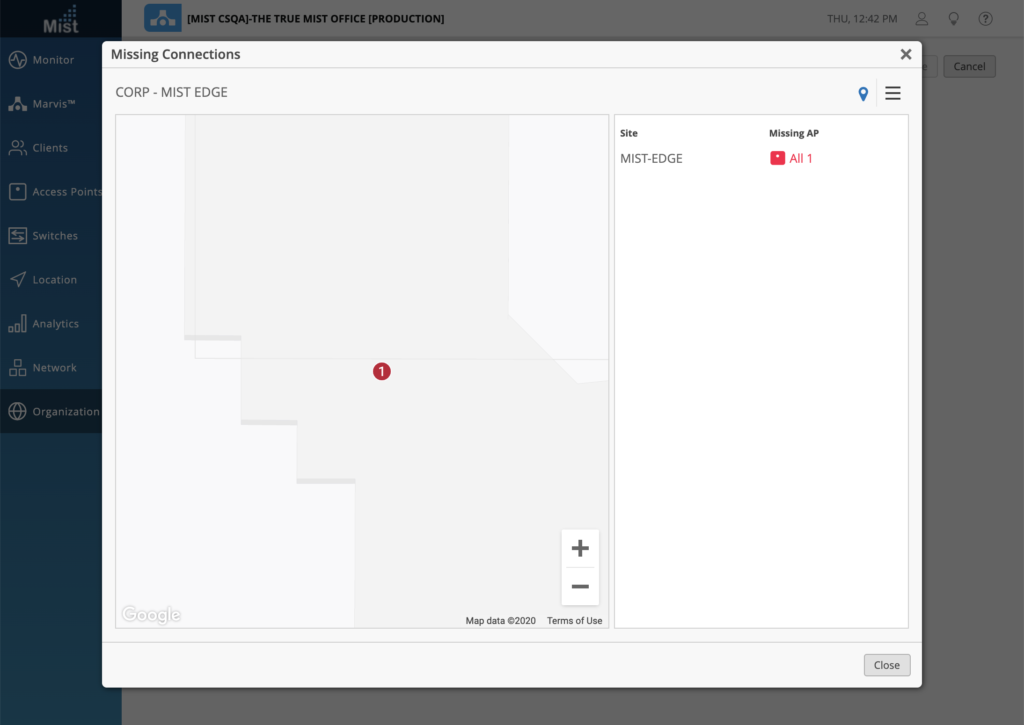
Missing Connections Visualization
For large deployments across many sites, we added visualization for missing connections to easily identify which Mist Tunnels have disconnected APs. In your Mist Tunnels page (Organization > Mist Tunnels) you can see the number of Connected APs and number of Missing Connections in the Connections Status section. Click on the red Missing Connection AP to see a visual on where these missing connection APs are on your site.
Mist Tunnel – Split Tunnels
Split tunnels are now supported as a beta feature in the tunnel configurations. Select a Mist Tunnel and select enable on the Split Tunnel section. Here, you can add DNS Servers (comma separated), Destination Subnets, and the Tunnel Gateway.
