Marvis
Actions – Scope Analysis for DHCP, ARP, DNS
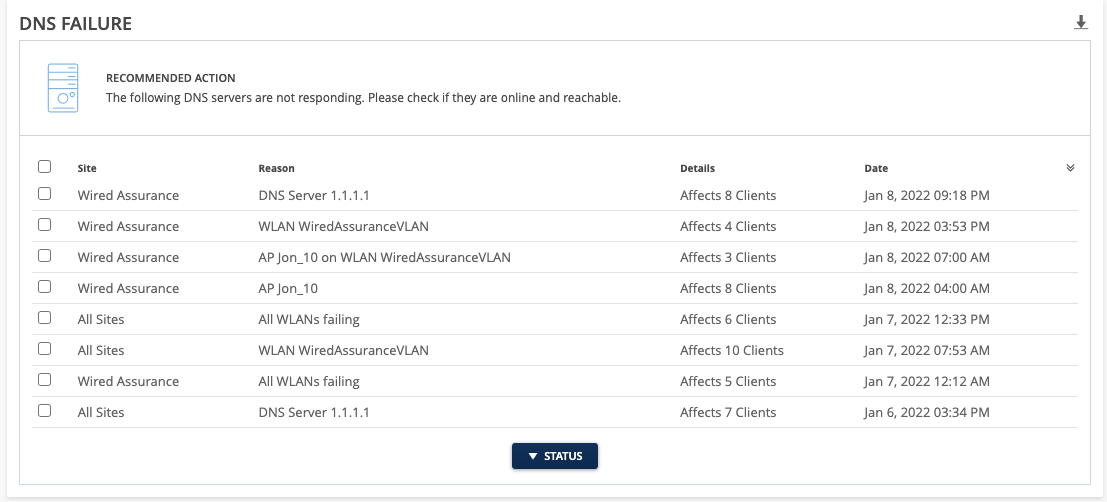
Earlier we introduced an enhancement in our Authentication Failure Actions which provided more information regarding the scope of each failure. This scope analysis allowed you to pinpoint the reason behind your failure, whether it be a server, WLAN, AP, Site, or Org. This week we are excited to bring this scope analysis to the rest of our Actions in the Connectivity section. This includes DHCP, ARP, and DNS Failure types.
The Details column for these actions tell you how many clients are affected by the failure, while the Reason column shows you the scope of the impact.
Actions – Restrictions Based on Subscription Types
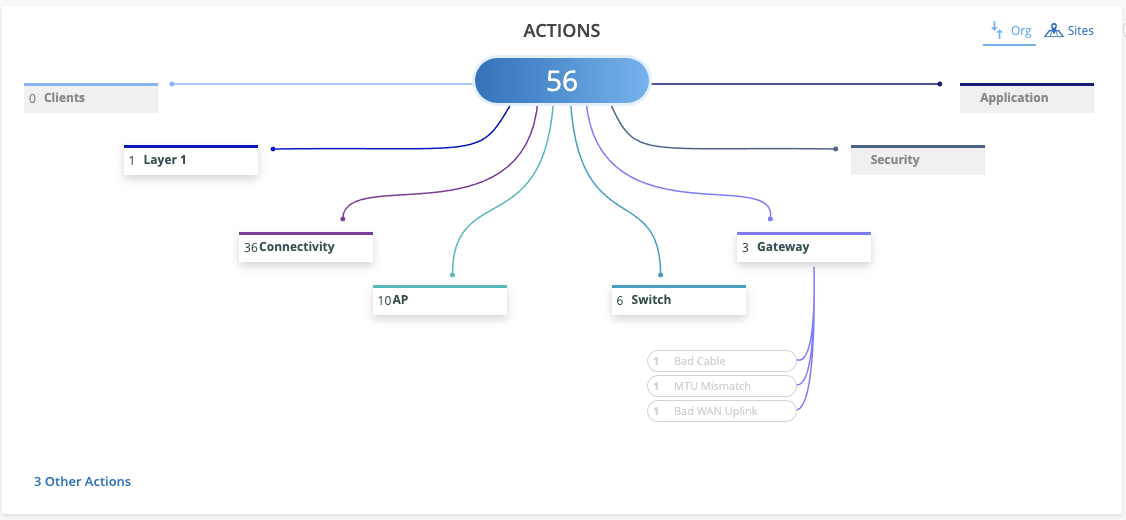
Starting this week, the Marvis Actions you see will be determined by the type of subscription you have on your organization. The three subscription types that impact the Action Dashboard availability are: Marvis for Wireless, Marvis for Wired, and Marvis for WAN. Here is a chart explaining which Actions are available under each subscription type:
| Action | Marvis for Wireless | Marvis for Wired | Marvis for WAN |
| Persistently failing clients | X | X | |
| Layer 1 – Bad cable | X | ||
| Connectivity- 802.1X failure | X | ||
| Connectivity -PSK failure | X | ||
| Connectivity – DHCP failure | X | ||
| Connectivity – ARP failure | X | ||
| Connectivity – DNS failure | X | ||
| AP – Offline | X | ||
| AP – Health check failed | X | ||
| AP – Non compliant | X | ||
| AP – Coverage hole | X | ||
| AP – Insufficient capacity | X | ||
| Switch – Missing VLAN | X | X | |
| Switch – Bad cable | X | ||
| Switch – Negotiation mismatch | X | ||
| Switch – Loop detected | X | ||
| Switch – Port flap | X | ||
| Gateway – Bad cable | X | ||
| Gateway – MTU mismatch | X | ||
| Gateway – Bad WAN link | X |
With these changes, the Marvis Actions included in the Subscriptions you do not own will not be clickable on the Action Dashboard. You will still see the count for the number of failing cases but won’t have access to more details.
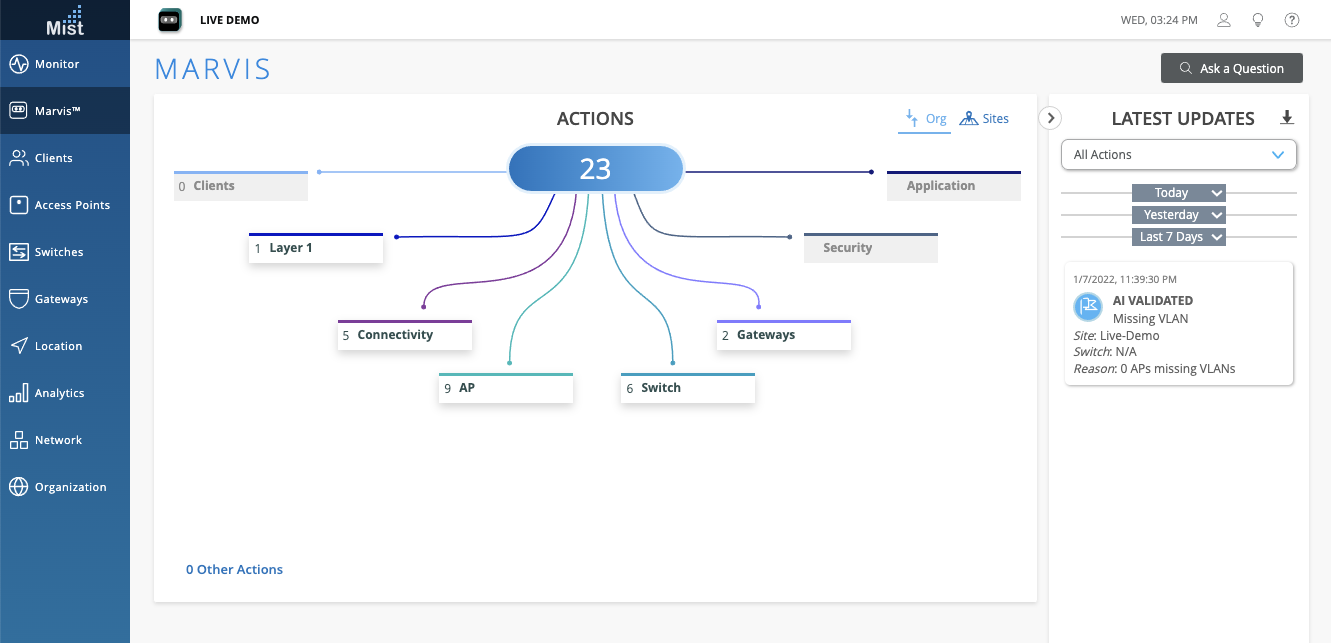
Actions – Default Landing Page
The Marvis tab on the Mist Juniper dashboard now opens directly to the Actions Dashboard page by default, to allow administrators easier access to any Marvis Actions in their network needing attention. This is part of an effort to encourage the use of the Action Dashboard as an easy first source of information regarding any network issues across your sites. You may still ask a question through the Marvis Conversational Interface by clicking on the Marvis Icon at the bottom-right of any page on our dashboard.
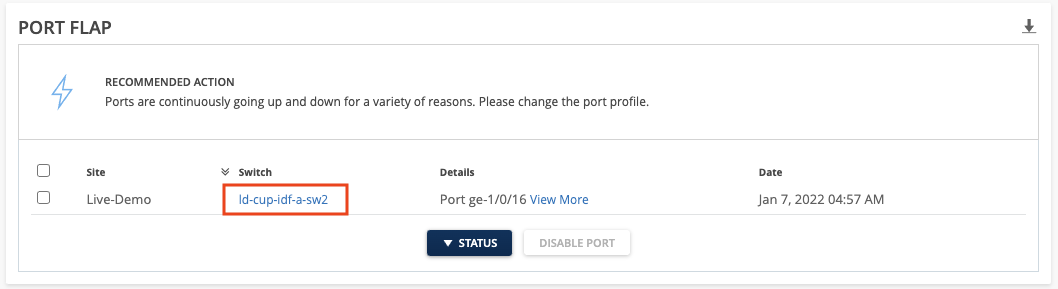
Actions – Port Flap URL Redirect
We are constantly making enhancements to the Actions Dashboard to make navigation easier. Throughout the weeks we have added redirect URLs directly in the Actions Details box for several Marvis Actions. Clicking on these will open up a new tab and load the relevant page on our Dashboard UI for you to modify your configurations. This week we added redirect URLs to the Switch – Port Flaps actions. Now, the switch names are clickable links, which opens the switch details page in a new browser tab.
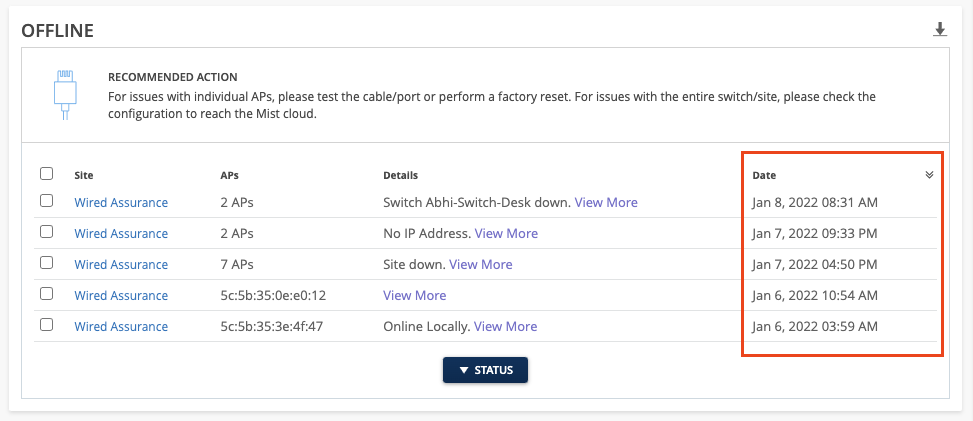
Actions – Date Column Default Sort
Marvis Actions are now default sorted by date in descending order, so the most recent actions are listed first. The sort field and order can still be changed by clicking the table headers. This allows you to prioritize the top line items as they are the most recent issues and may still be occurring.
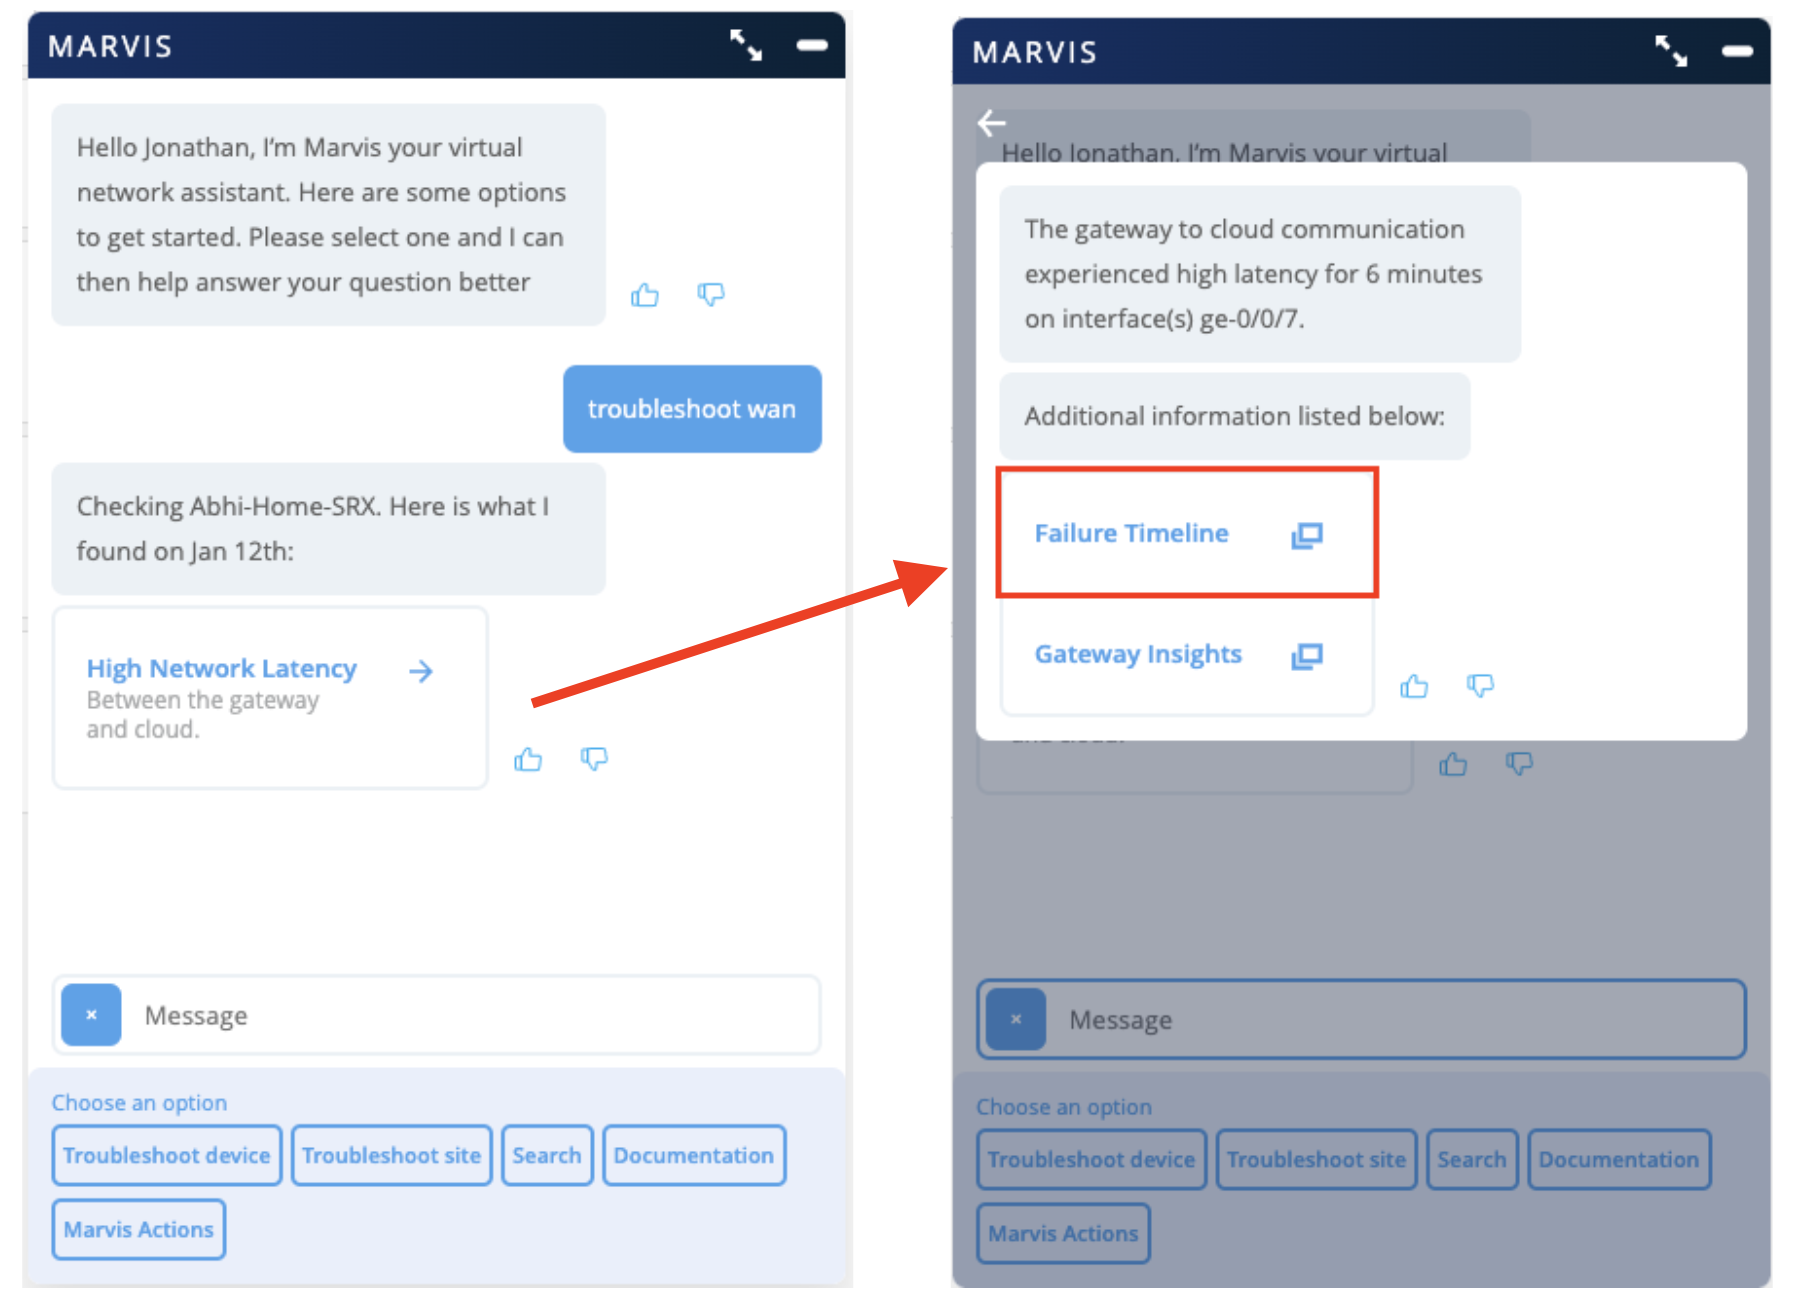
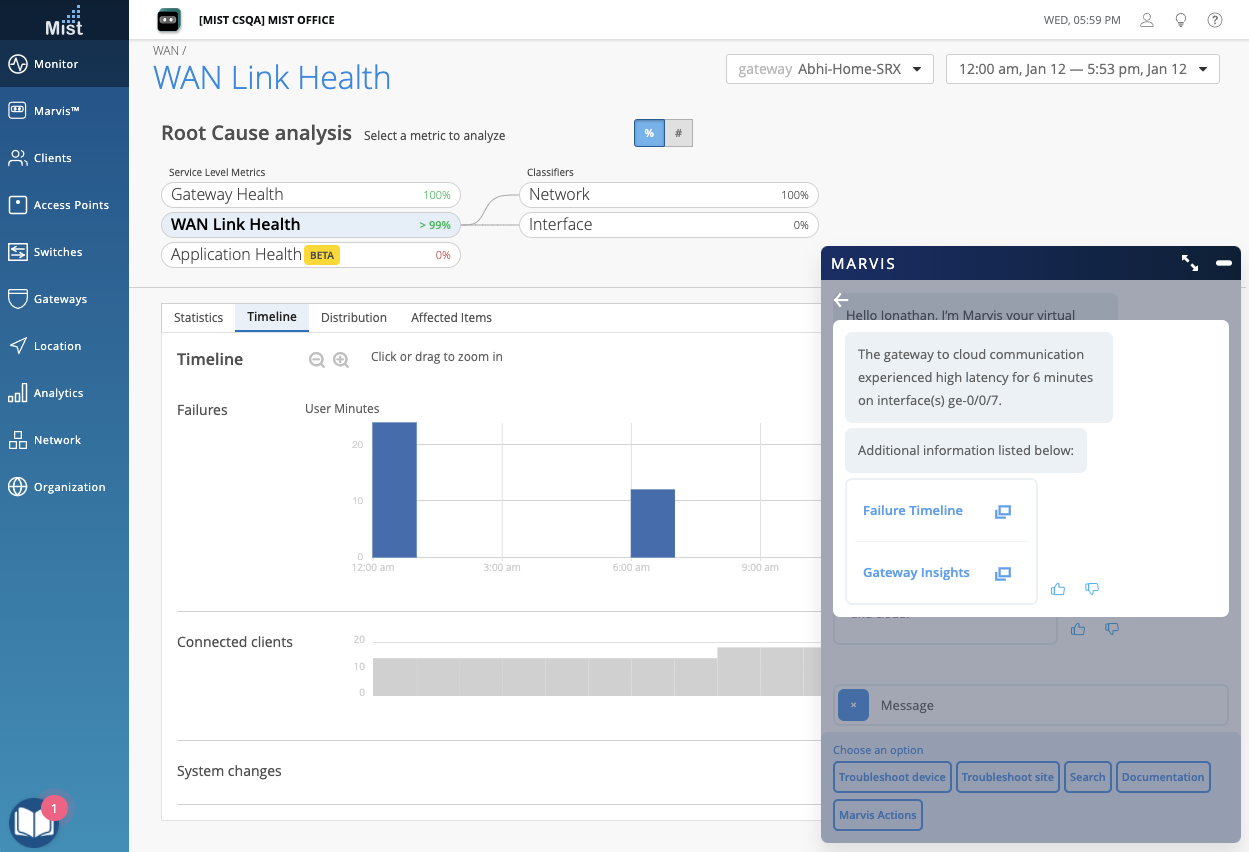
Conversational Interface – Troubleshoot WAN
We are bringing you even more questions to ask the Marvis Conversational Interface with the addition of support for “troubleshoot wan” and “troubleshoot wan network” queries. When asking to troubleshoot WAN, Marvis will identify the gateways on your sites experiencing issues. Click into the provided links to drill down and get redirected to the SLE and Insight pages to see more details about the failure.
Conversational Interface – Troubleshoot device enhancement
The Marvis Conversational Interface “Troubleshoot device” menu option has been improved to prompt for information about the device, rather than the site. Only in the cases where many matches are found will Marvis request for the site information to help streamline the search results.

Wired Assurance
Configure DHCP Snooping
Access ports on an Ethernet LAN are vulnerable to attacks such as address spoofing (forging) and Layer 2 denial of service (DoS). To protect your devices against the loss of information and productivity, Juniper recommends that you enable the DHCP Snooping, ARP Inspection, and/or IP Source Guard features available in Junos OS to help secure ports. You typically enable these features for untrusted ports in the VLAN. They are not enabled by default.
For switches managed via the Juniper Mist cloud, you can enable these security settings at the Organization level (to apply them to all devices), at the Network level (to apply them to particular subsets), and/or to individual devices.
To Enable DHCP Snooping Port Security,
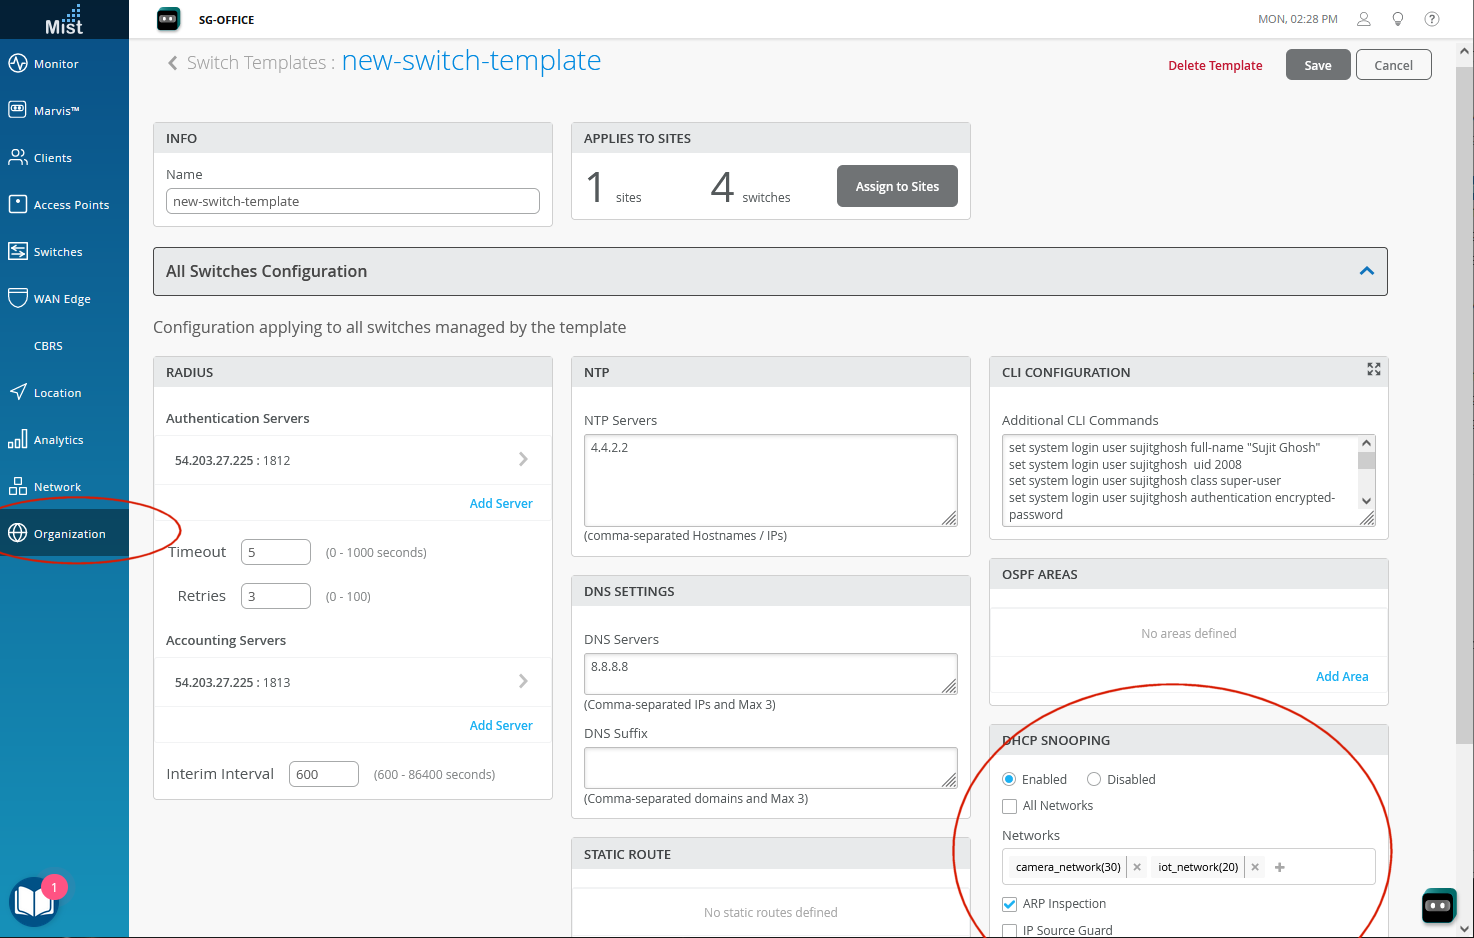
1. From the main menu in the Juniper Mist console, click Organization > Switch Template, and then scroll down the window that appears to DHCP SNOOPING.
2. Click Enable and then All Networks, or open the dropdown and select the network(s) you want the settings to apply to.
- Select ARP Inspection to verify MAC binding on ARP packets.
- Select IP Source Guard to verify source addresses.
3. Click Save to apply your changes to the selected networks.
More Information
DHCP snooping adds a layer of security to a VLAN by keeping track of valid IP addresses assigned to downstream network devices by a trusted DHCP server (which is connected to a trusted network port). Enable DHCP Snooping to have the switch monitor DHCP messages received from untrusted hosts and perform lookups in the DHCP database. Only verified hosts are allowed access on the LAN.
Dynamic ARP inspection (DAI) protects switching devices against Address Resolution Protocol (ARP) packet spoofing (also known as ARP poisoning or ARP cache poisoning). It does so by using the DHCP database to examine ARP packets received on the untrusted access port, and dropping any traffic for which a match of IP address to the MAC binding cannot be found.
IP Source Guard secures against the spoofing of source IP addresses, and source MAC addresses. It examines inbound packets received on an untrusted access interface, and verifies information such as the IP address, MAC address, and VLAN are found in the DHCP snooping database. If they are not, the packet is dropped.
Access port security is supported on the following Juniper devices: EX4300 Series, EX4400 Series, EX2300 Series, and EX3400 Series devices.
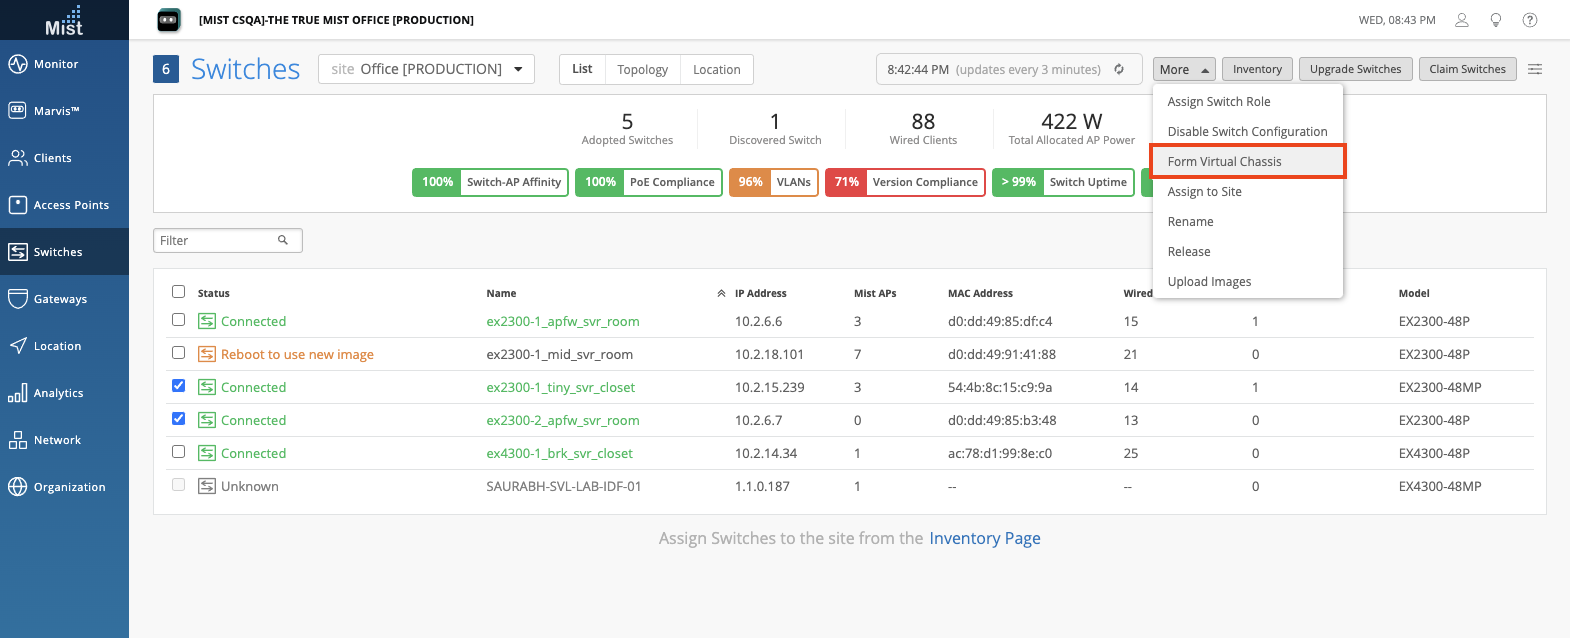
Virtual Chassis for 2300 GA
Virtual Chassis combines multiple EX Switches to act as a single device with regards to the Juniper Mist cloud. Starting this week, we are removing all ‘BETA’ labels from the UI for all pages involving VC, including the switch list page and switch details page. Learn more about what Virtual Chassis is and how to set them up on your site by visiting these pages:
https://www.mist.com/documentation/virtual-chassis-setup-with-mist/
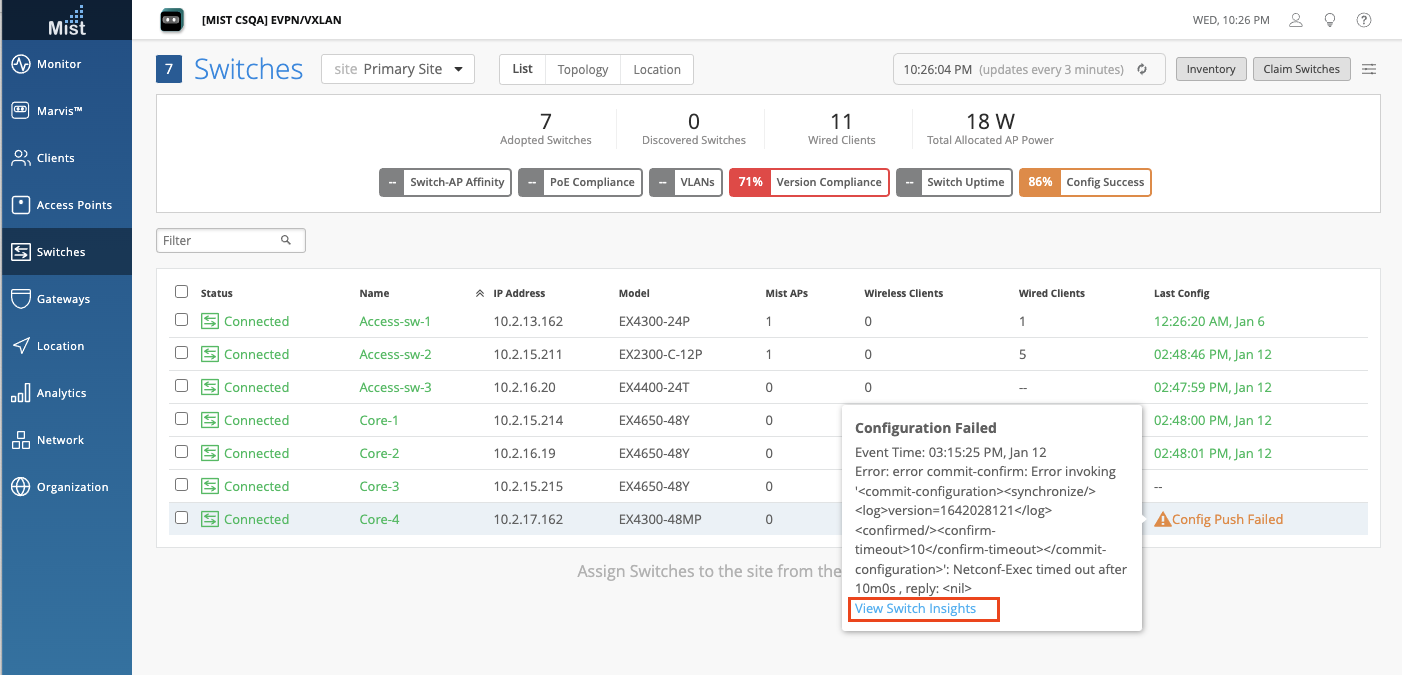
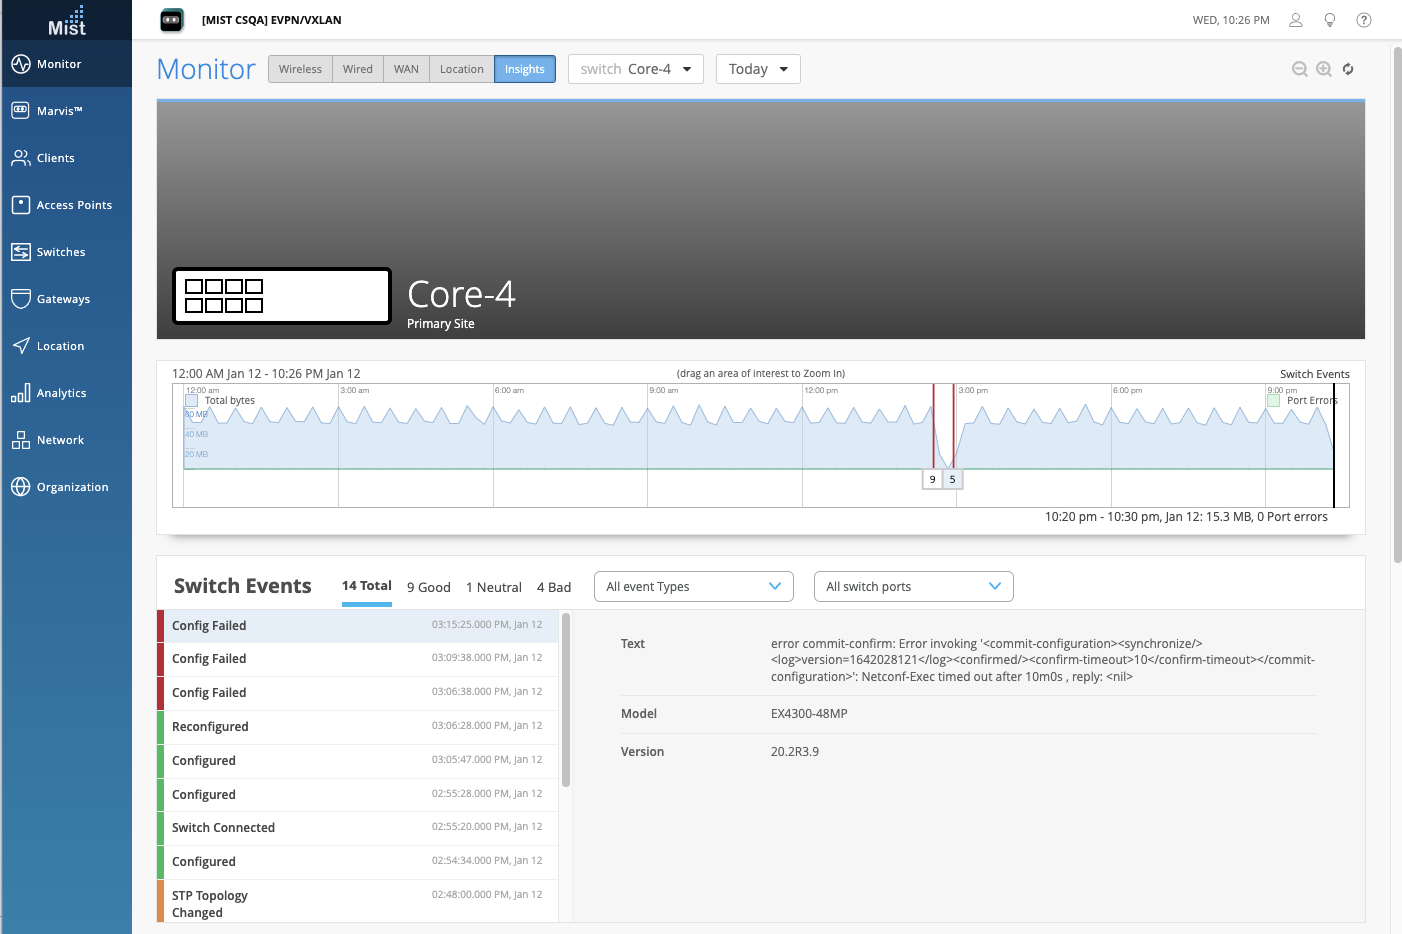
Enhanced Switch Configuration Status
We have enhanced the visibility of your EX switch configuration status by adding more details when hovering over cases indicating a Config Push Failed. This details window exposes when the config fail event took place as well as the error it encountered. You can also click on the ‘View Switch Insights’ link to get redirected to the Insights page for that switch and see more comprehensive details surrounding the event. The ‘Config Failed’ Switch Event will be highlighted.
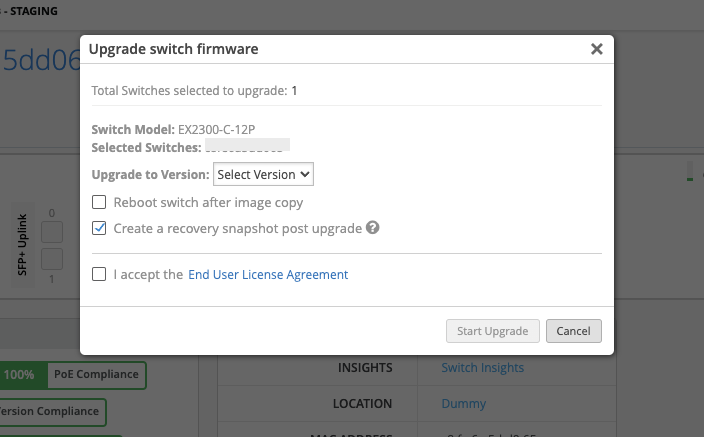
Switch Recovery Snapshot After Upgrade
When upgrading an EX switch from the Mist Juniper UI, you can now select the option to create a recovery snapshot of your switch post-upgrade. When a switch goes into a recovery mode, if there is no recent snapshot (if there is a version mismatch with the config), the device will not load correctly. Similar to the automatic switch reboot after a firmware upgrade, the recovery snapshot option is available in the Firmware Upgrade window. Access this by selecting a switch from your Switch List page and click on the Upgrade Switches button. In this window, select Create a recovery snapshot post upgrade to ensure that a recent snapshot is stored.
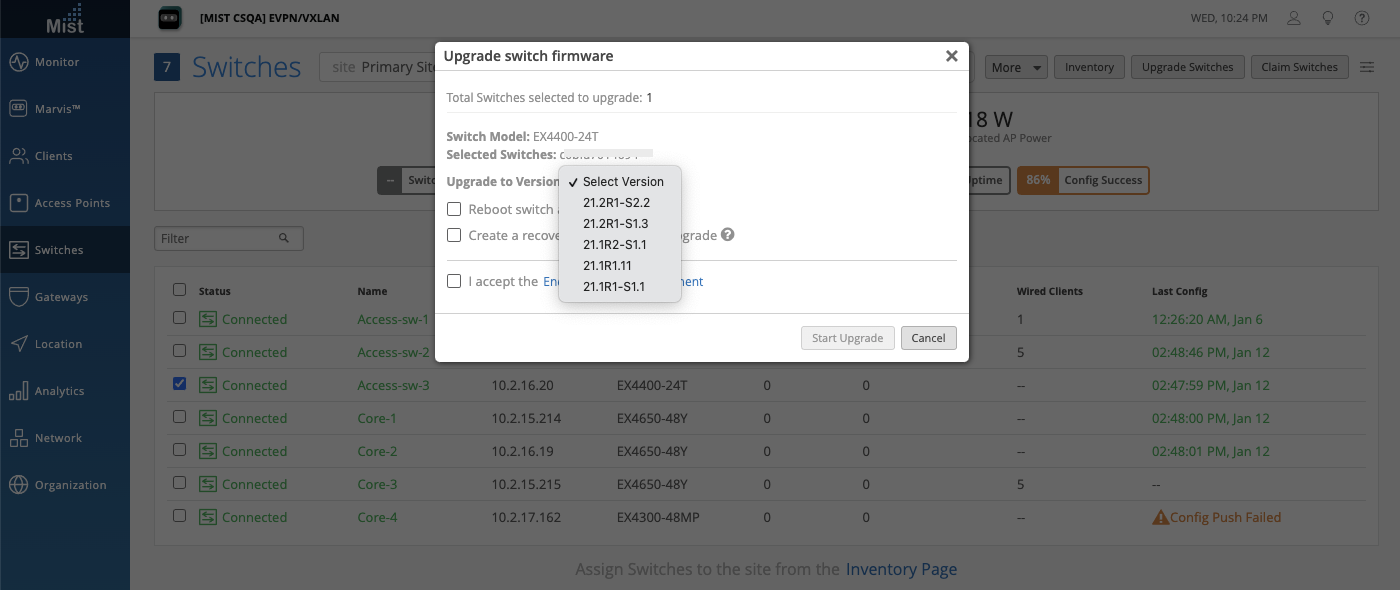
Support Switch Upgrade for EX4400 switches
We are now supporting Switch Upgrade for EX4400 model switches directly from the Mist Juniper UI. To upgrade your EX4400 switch, select it on the Switch list page and click on the Upgrade Switches button. Here, you may choose the version you want to upgrade to and select if you want the switch to reboot after the upgrade is finished.
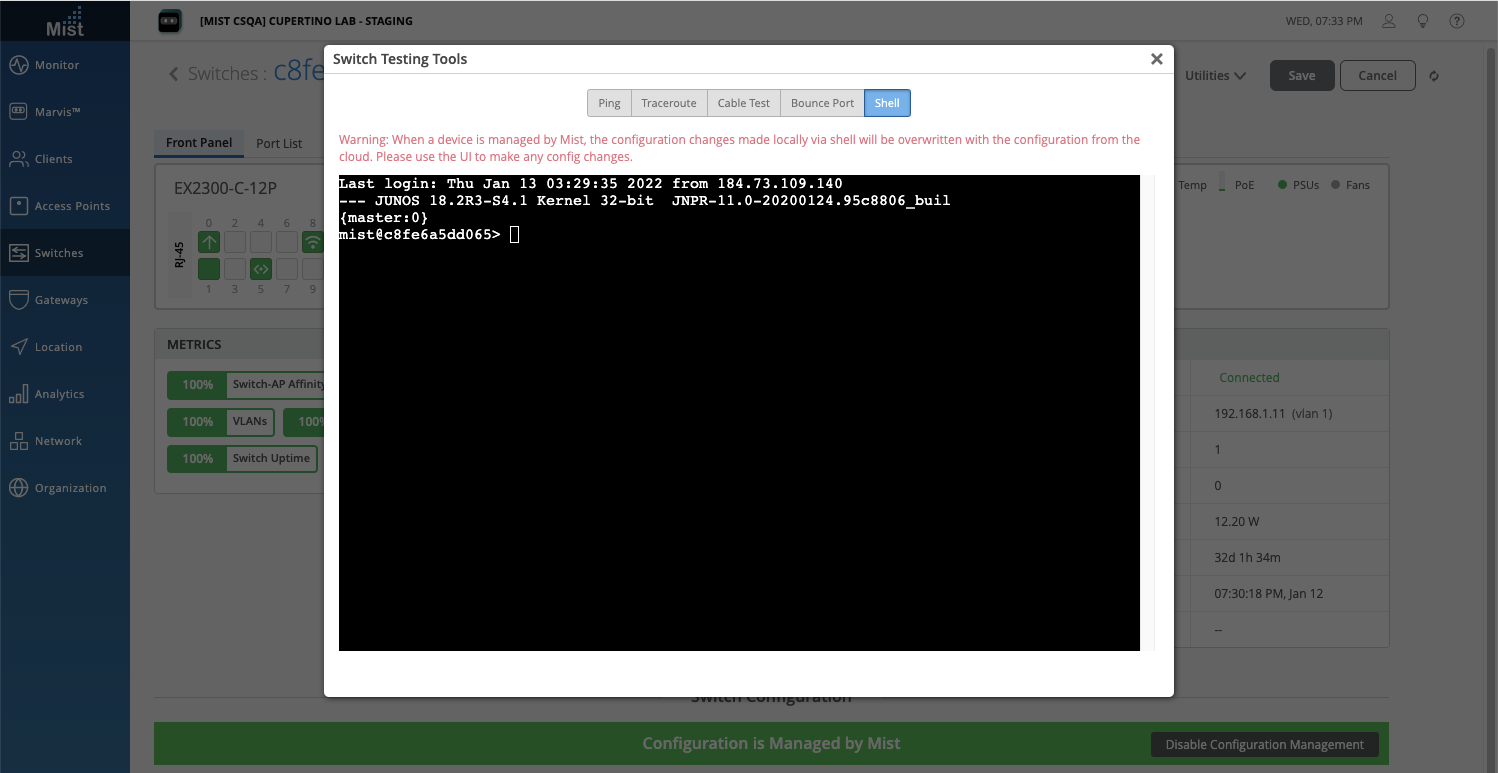
Webshell UX Improvements
We have made some improvements in the Switch Utilities Webshell to improve the experience when using the CLI directly on the Mist Juniper interface. Clicking outside of the web shell window will not close the window any longer – only clicking on the ‘X’ button will. This helps to prevent any accidental closing of the shell. Also, opening up the web shell will now auto focus on the window without requiring you to perform an extra click into the window.
To find the CLI webshell, navigate to one of your Switch pages and select the Utilities dropdown > Testing Tools.
Learn more about the CLI and other testing tools here: https://www.mist.com/documentation/switch-testing-tools/
DHCP Option 81 (API Only)
Using Option 81 to send hostname to the DHCP server allows you to manage switches via DNS and use DHCP instead of Static Addresses for things like Firewall rules. You may enable Option 81 via our API in three places:
api/v1/sites/:site_id/devices/:device_id
api/v1/sites/:site_id/setting
api/v1/orgs/:org_id/networktemplates/:network_template
Just set “dhcp_option_fqdn” to true as such:
"switch_mgmt": {

        "dhcp_option_fqdn": true

    }
Mist Edge
Multiple Mist Edge Site Tunnel Creation
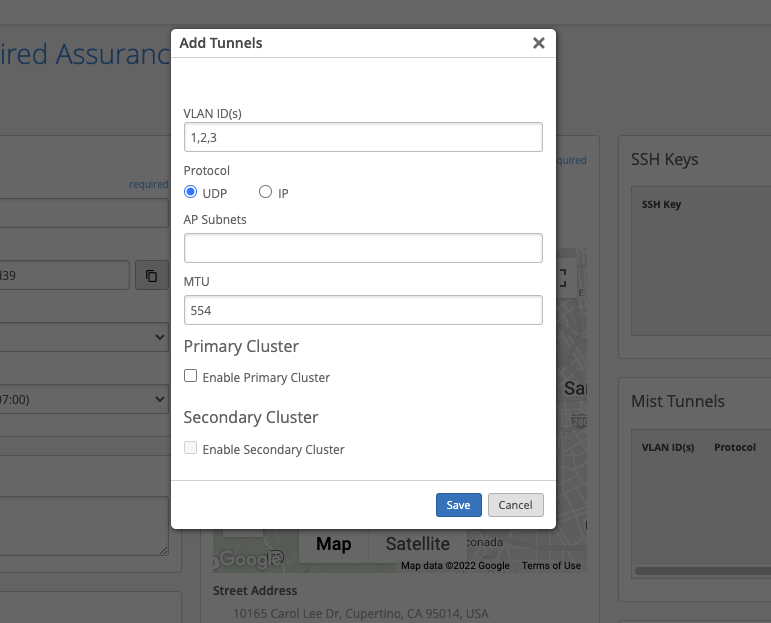
Now you can create multiple Mist Edge site tunnels directly from the Site Settings page. This applies when you have Site Mist Edge. Navigate to your site settings page (Organization > Site Configuration > Select Site), and find the Mist Tunnels section. Here, select Add Tunnel.
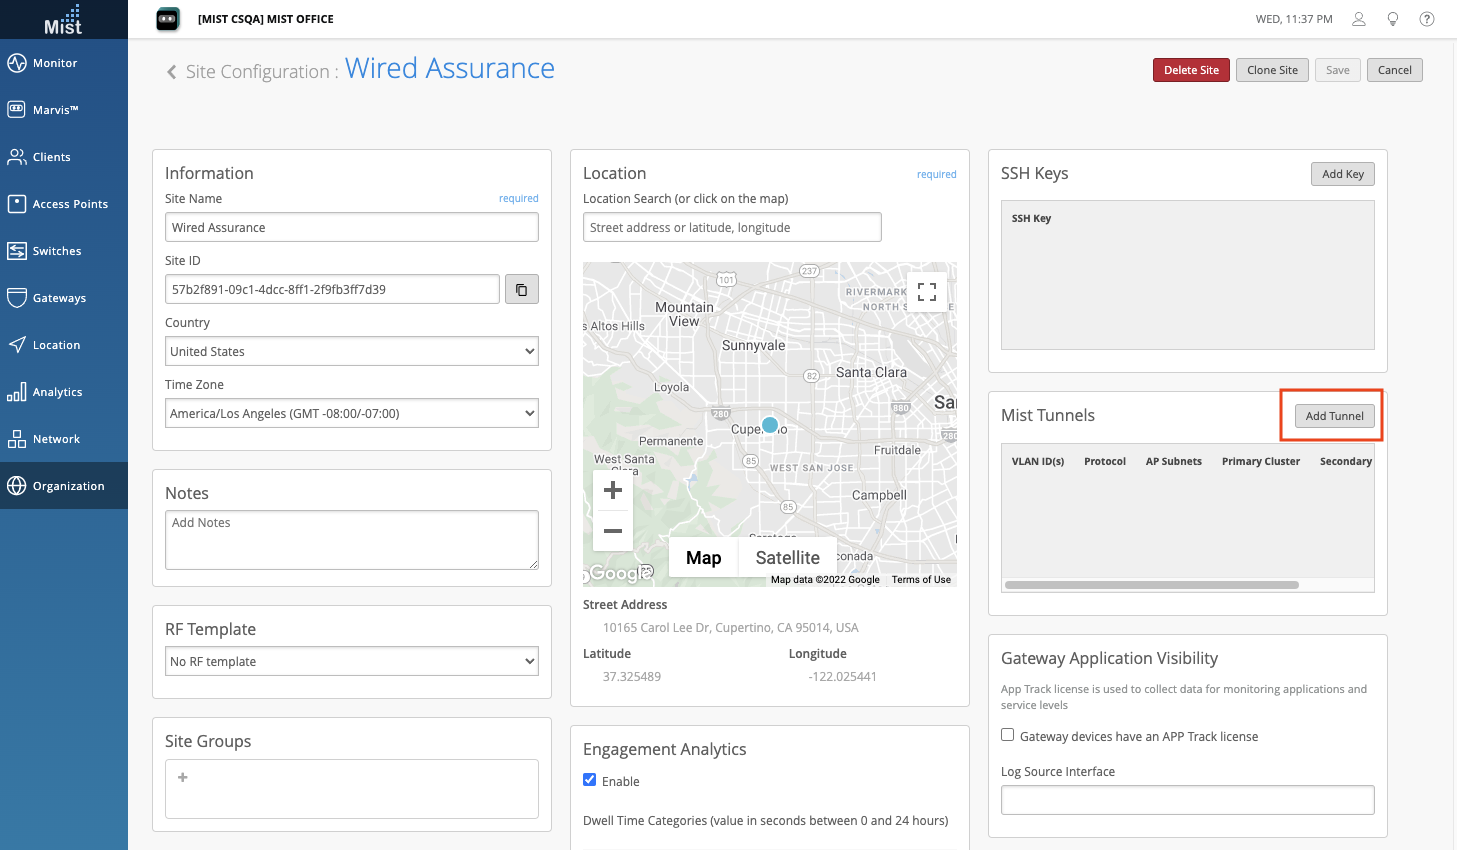
This will bring up your configurations window where you can set the VLAN IDs, Protocol and MTU settings. Select Save when finished, and repeat these steps to create multiple tunnels directly from this page.
More UI Options to Manage the Mist Edge
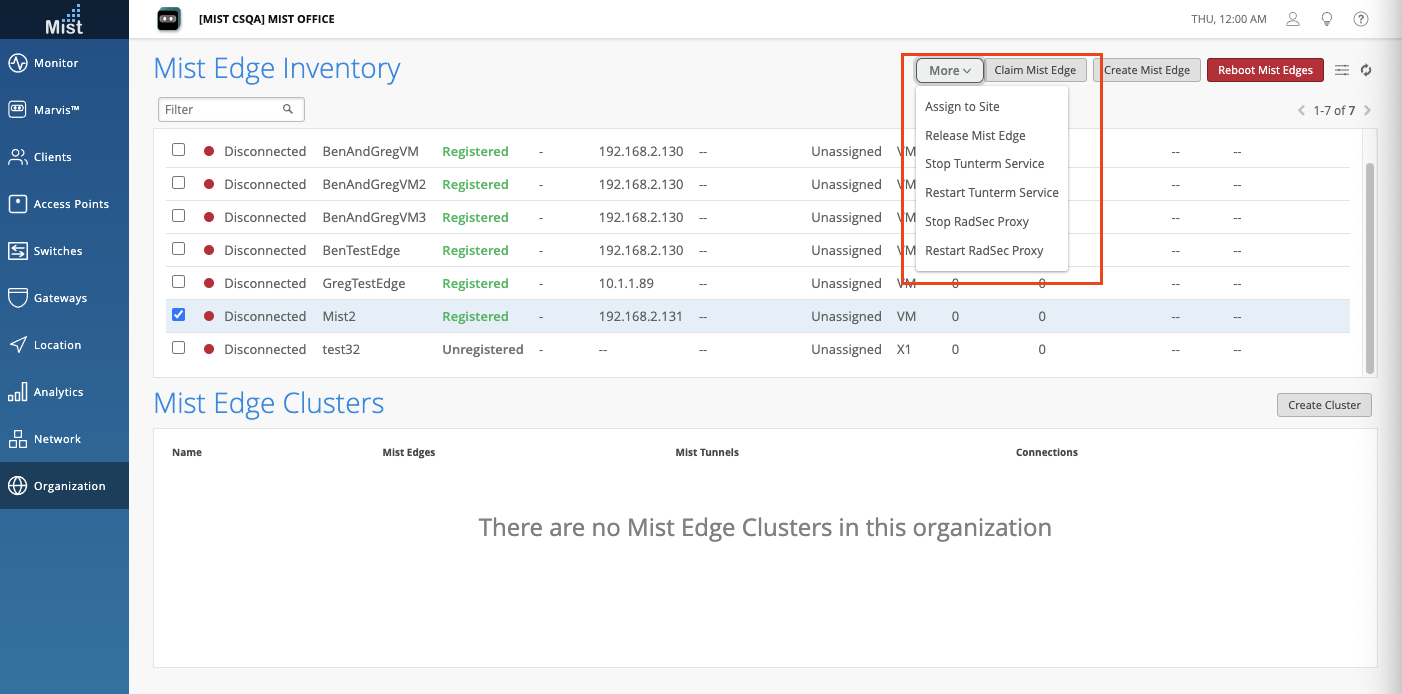
On the Mist Edge Inventory page (Organization > Mist Edges), you can now stop and restart the Tunnel Termination service and RadSec Proxy in the More dropdown menu on the top.
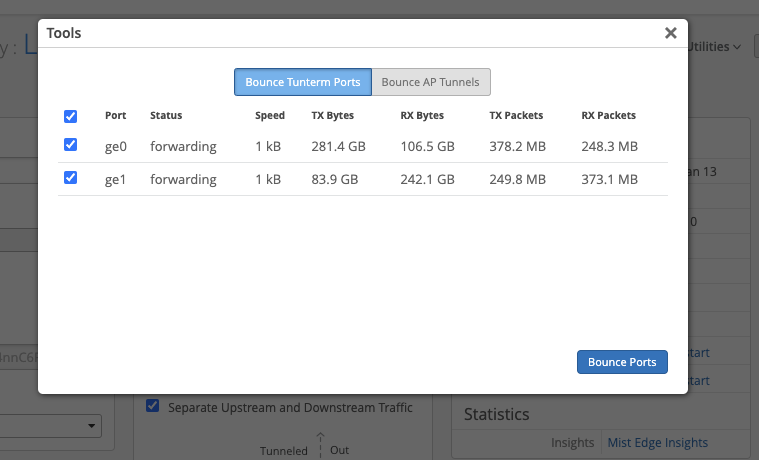
Within the Mist Edge details page, there is a new Utilities dropdown menu, where you can reboot or release the Mist Edge, and use additional Tools to bounce Tunterm Ports or AP Tunnels. Bouncing AP tunnels can be used to rebalance AP tunnels across multiple Mist Edges.
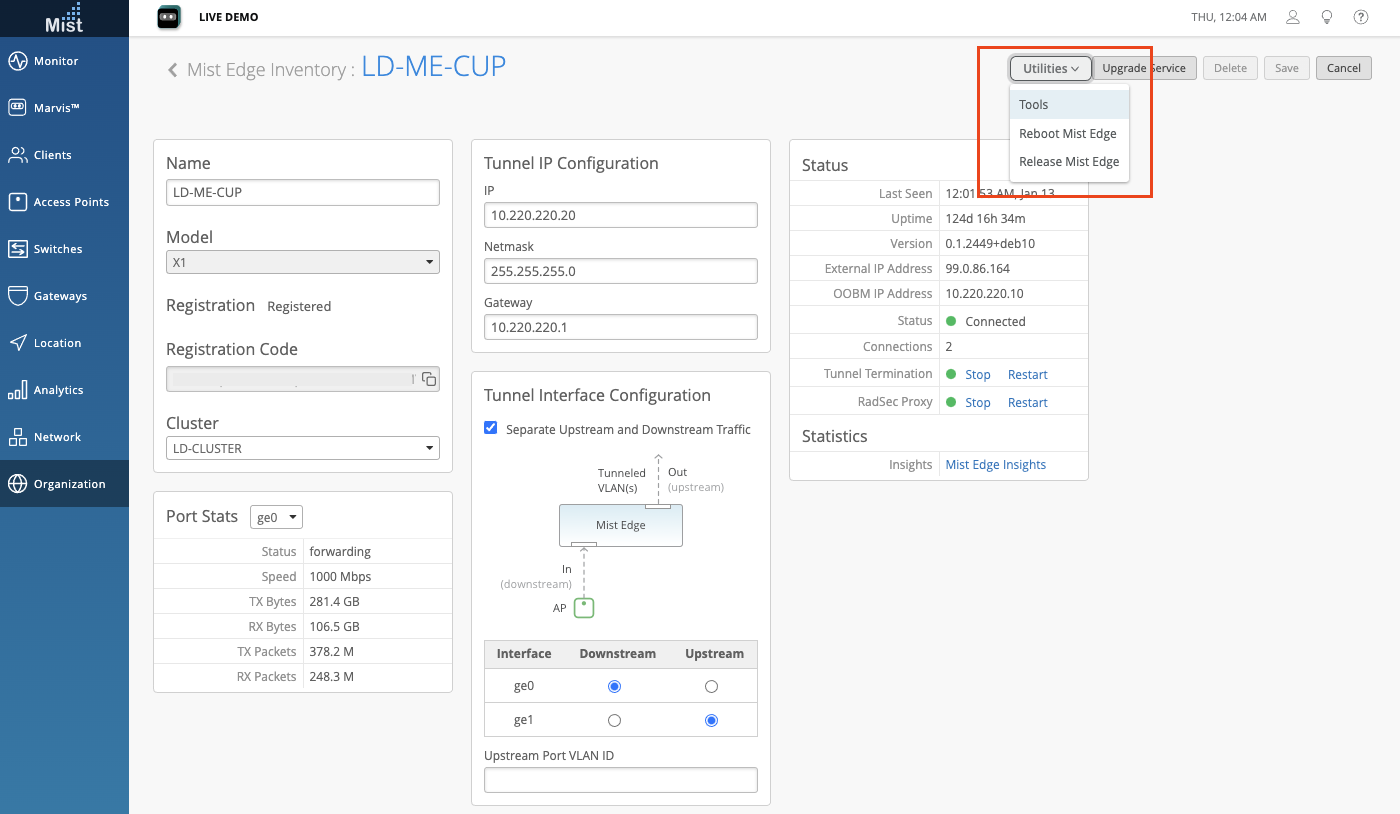
Also provide status indicators for the Tunnel Termination service and RadSec Proxy with the option to stop and restart each. In the Status section of the Mist Edge details page, there are now status indicators for the Tunnel Termination service and RadSec Proxy. Start and stop each of these with the click of a button directly from this page.
Simplified Operations
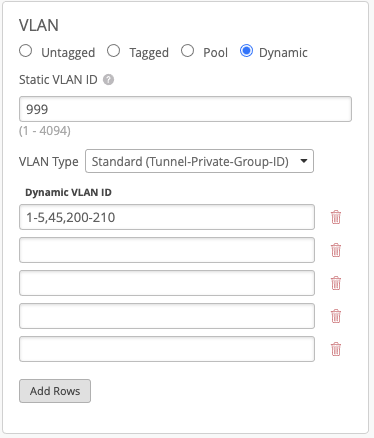
VLAN Range Configuration for Dynamic VLANs
Please note: This improvement only applies to Standard Tunnel-Private-Group-ID, but NOT Airespace-Interface-Name Dynamic VLANs.
Configuring a VLAN range when setting up dynamic VLANs has been possible using our APIs, but this week we are bringing this functionality into the UI. When configuring a Standard Dynamic VLAN, you may now input a range of VLANs into a single box instead of a separate VLAN for each line. This cuts down on the amount of effort needed to configure a WLAN with numerous Dynamic VLANs. Make sure that your RADIUS server is set up so that each VLAN in the range has a corresponding user. To learn more about setting up Dynamic VLANs, please visit this page: https://www.mist.com/documentation/vlans-static-dynamic/
You may enter multiple (comma-separated) VLAN ranges into a single line
AP Stale Configuration Indicator
Note: This requires 0.7.x firmware or newer
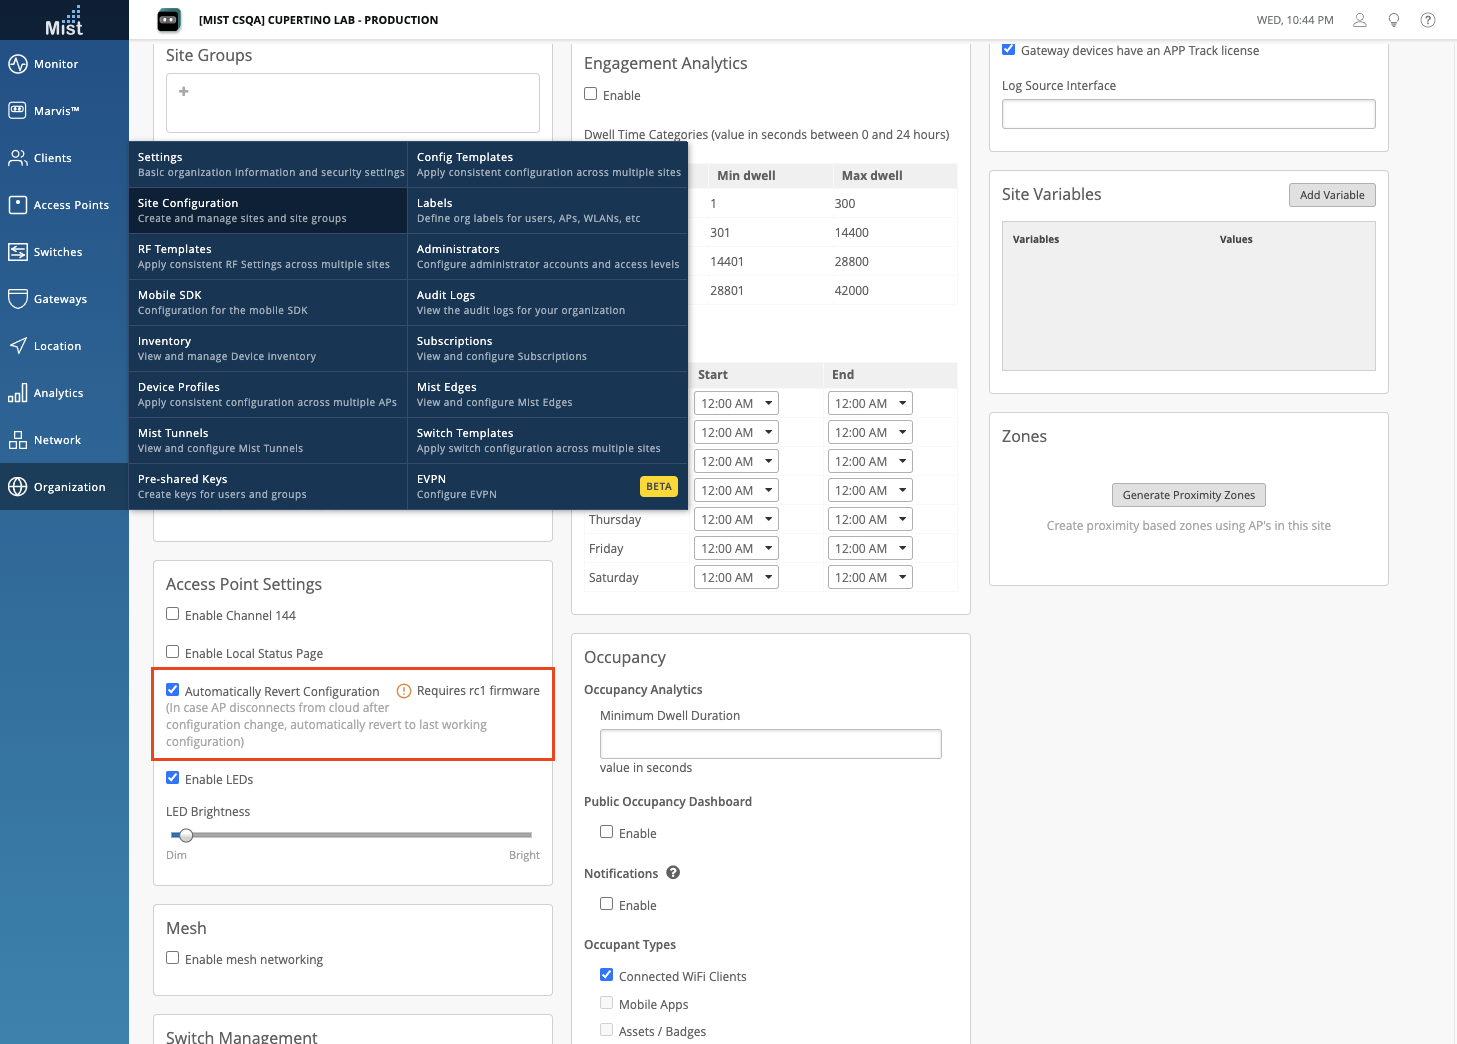
We previously introduced the ability to automatically revert your AP to its last known good configuration if it ever encounters a config that causes it to disconnect from the cloud. This feature can be set up under your site settings page (Organization > Site Configuration > Select your site) in the Access Point Settings section. Here, you can enable this feature for all APs on your site as long as they are running 0.7.x firmware or newer.
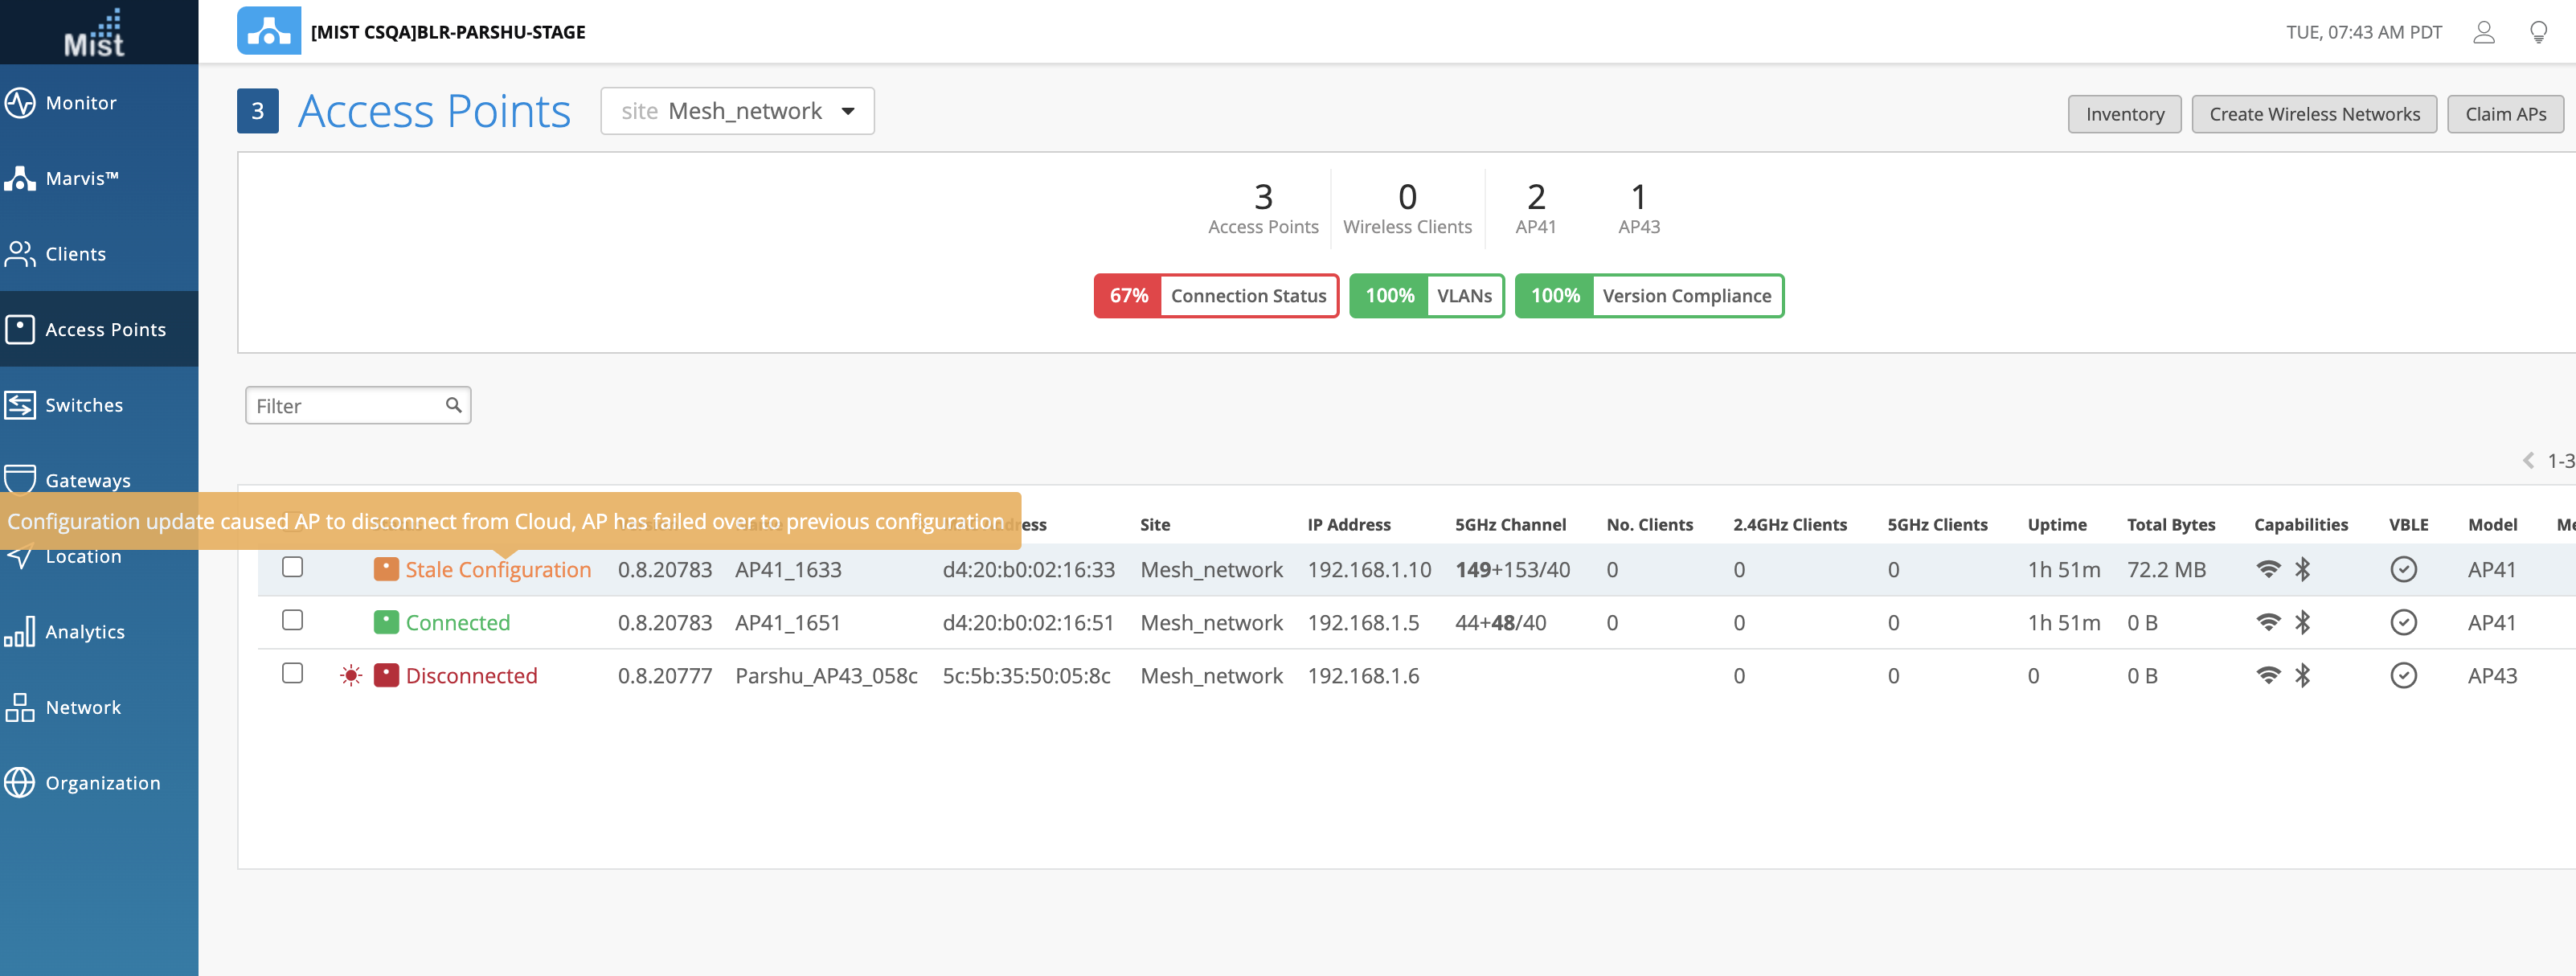
When an AP automatically reverts its configuration for this reason, it is now running an older configuration, or a Stale Configuration. You can now see which APs on your site is in a Stale state directly from your AP List page.
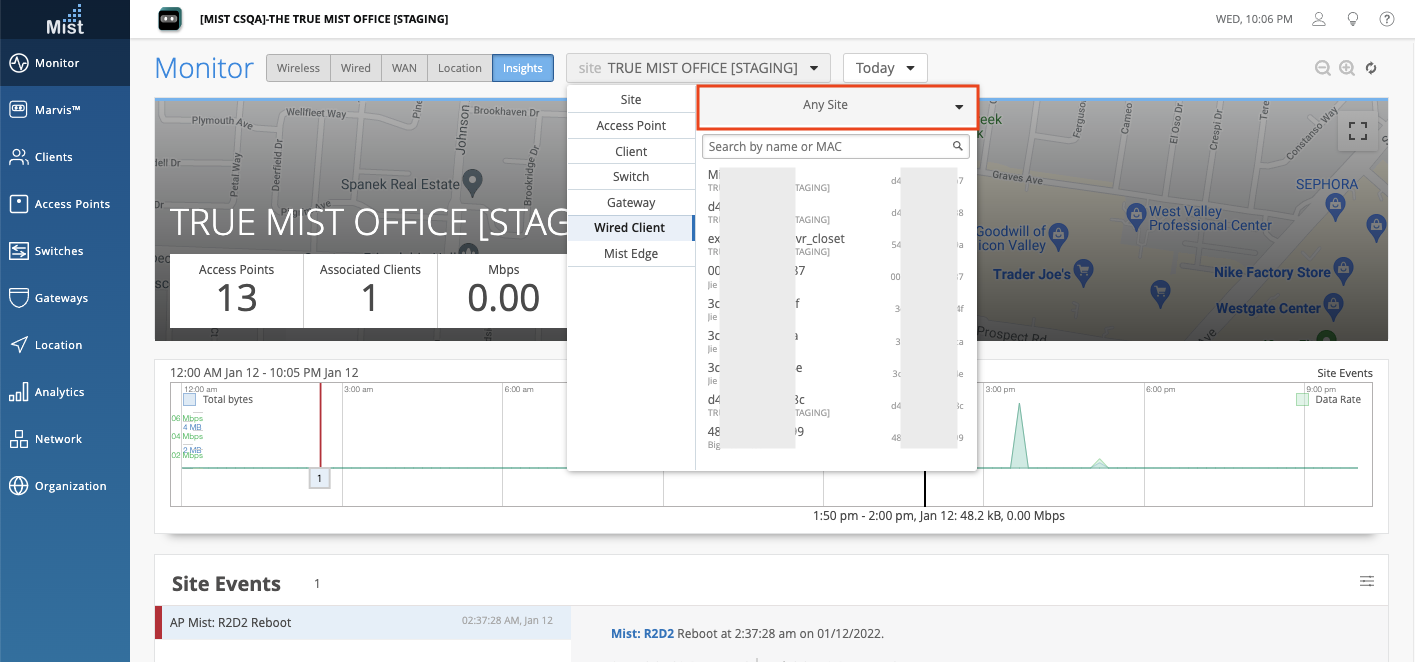
Wired Client Search Across Organization
When searching for a Wired Client on the Insights dashboard, organization-level administrators can now search across all sites in the org by selecting the “Any Site” option. This may look familiar as we are adopting the same behavior that was present on Wireless Clients already. While in an Insights page, select the dropdown to select Wired Client. Using the site dropdown on the right, select Any Site to search across all sites of your organization.
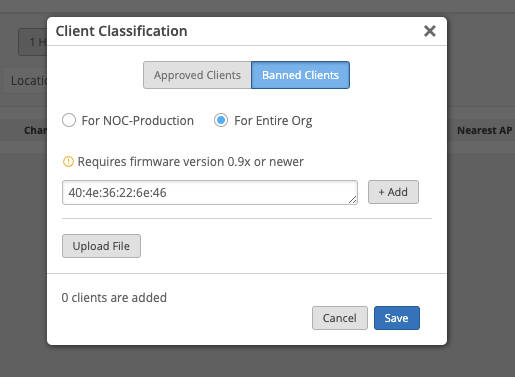
Manage Org Level Banned Clients
Note: Requires firmware version 0.9.x or newer.
WiFi clients can be blocked from authorizing by using the “Banned Clients” setting under the Network > Security page (see more here: https://www.mist.com/documentation/ban-a-client/). Choose the For Entire Org option and add the client MAC Address to prevent it from authorizing on any WLAN in any site within the organization.
When the banned client is blocked from authorizing, a corresponding Client Event will be generated for 802.11 Auth Denied, and the client will appear under the “Prevented Clients” tab of the Network > Security page.
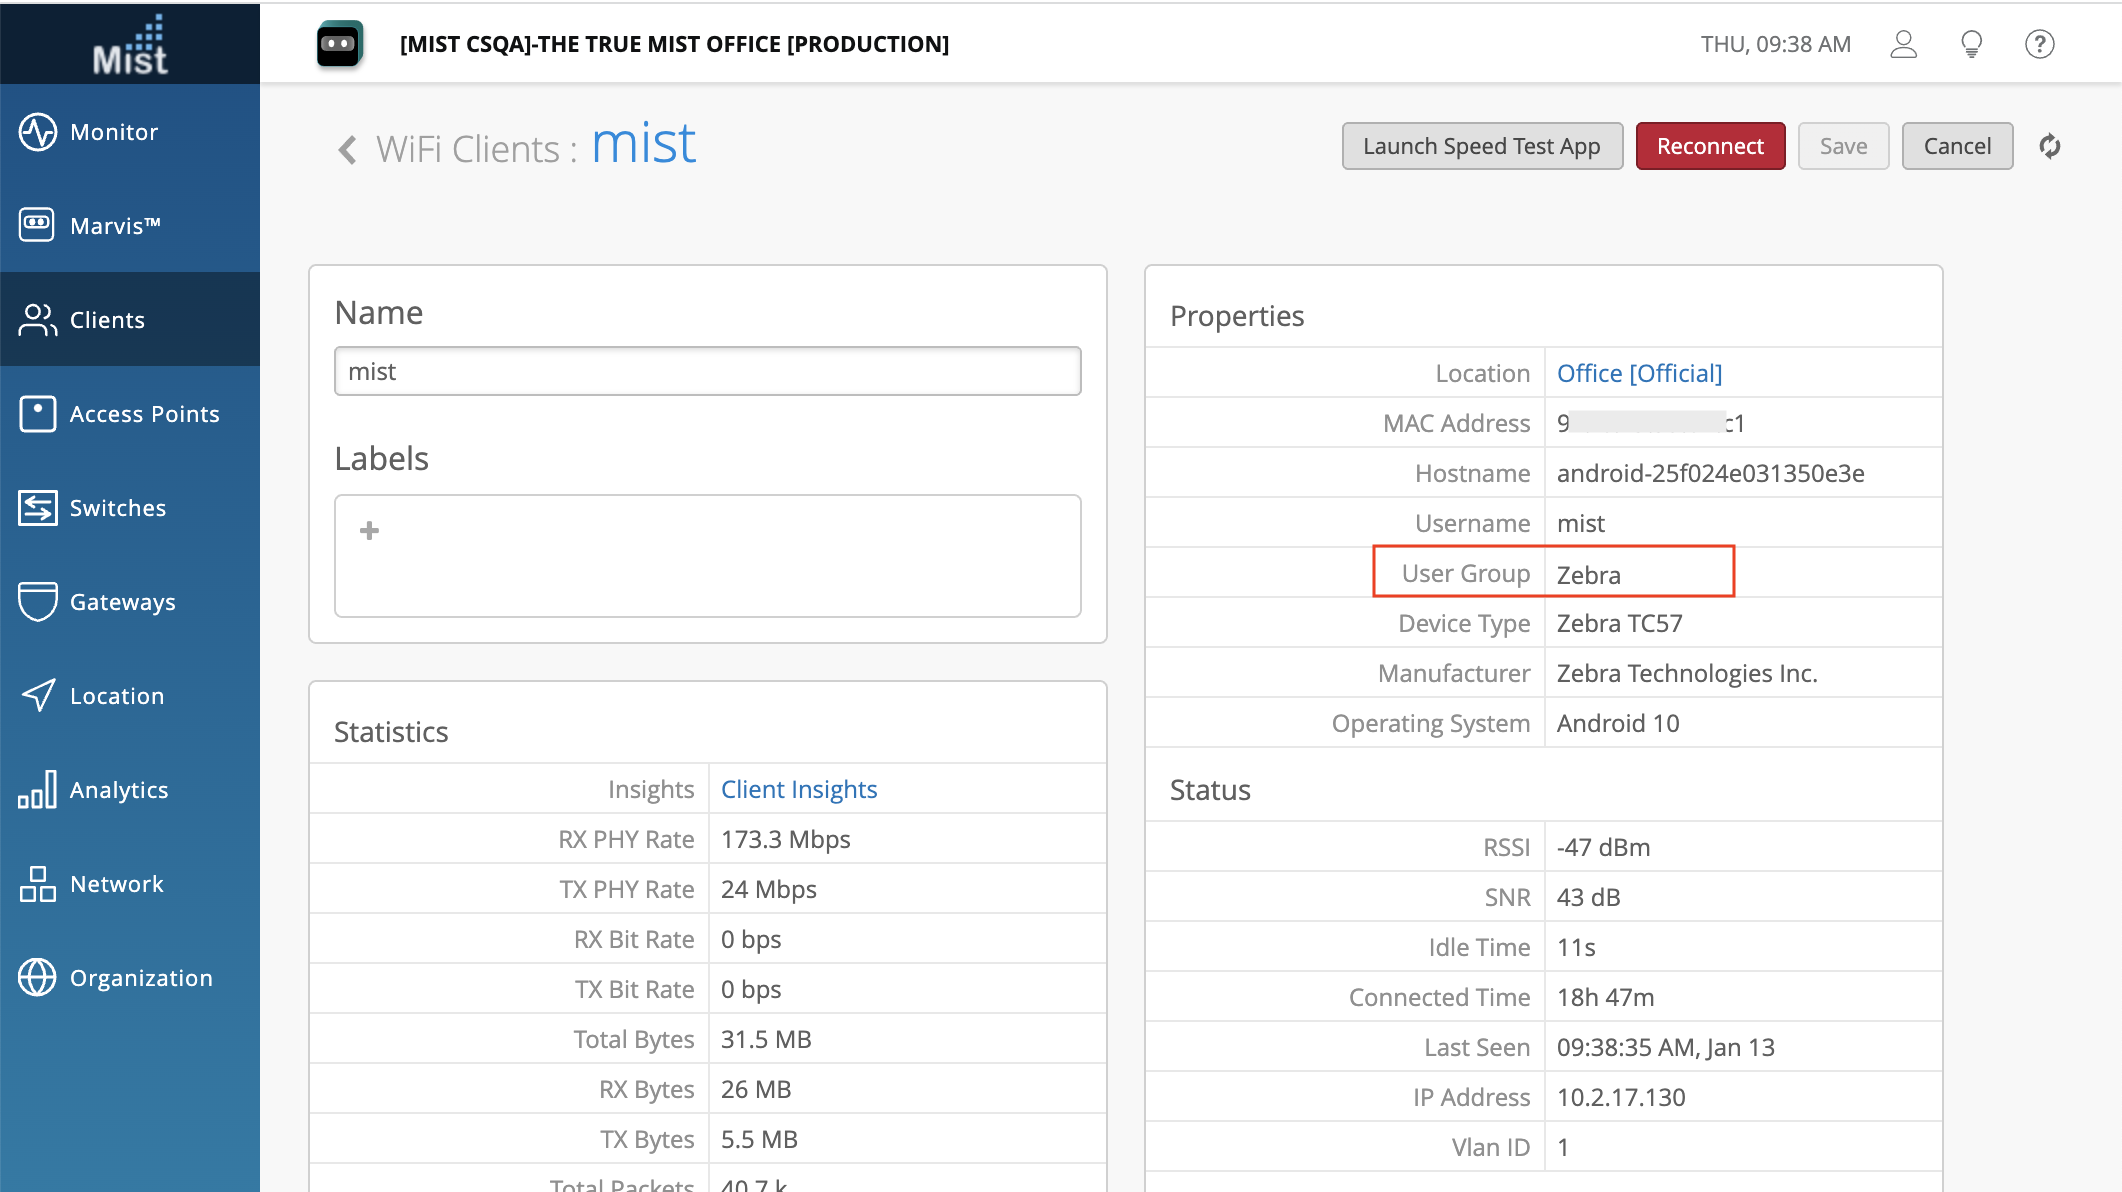
AAA Attributes in Client Details
The AAA Attributes for a connected client i.e. User Group is helpful information for admins to understand if a certain policy is applicable to the user. Previously, this was only available in the Client Insights page when selecting a Client Event. Now, you can easily find the User Group information on the Client Details page so you no longer need to search through the Events list to look for it.
Find the User Group field under the Properties section of the Client Details Page